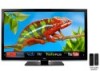

M550VSE User Manual
Page 1
USER GUIDE MOMDODEELLSS // E3D320VX // ME3D44270V0XVSE // ME3D54750V0XVSE M650VSE INSTALLING YOUR new TV CONTROLS & CONNECTIONS CONNECTING YOUR DEVICES USING THE ON-SCREEN MENU USING THE USB MEDIA PLAYER USING VIZIO INTERNET APPS TROUBLESHOOTING & SUPPORT Help, SPECs, warranty & LEGAL
USER GUIDE MOMDODEELLSS // E3D320VX // ME3D44270V0XVSE // ME3D54750V0XVSE M650VSE INSTALLING YOUR new TV CONTROLS & CONNECTIONS CONNECTING YOUR DEVICES USING THE ON-SCREEN MENU USING THE USB MEDIA PLAYER USING VIZIO INTERNET APPS TROUBLESHOOTING & SUPPORT Help, SPECs, warranty & LEGAL
M550VSE User Manual
Page 3
... reference. These plans provide additional coverage during the standard warranty period. To purchase an extended warranty service plan, visit www.VIZIO.com. Read the following instructions should be observed for the installation, use, and maintenance of the obsolete outlet. •...before using your safety. When you see this symbol, please read these instructions before connecting other apparatus (including amplifiers) that you either: • Register your VIZIO product at www.VIZIO.com • Complete and mail the enclosed registration card Extended Warranties For peace of...
... reference. These plans provide additional coverage during the standard warranty period. To purchase an extended warranty service plan, visit www.VIZIO.com. Read the following instructions should be observed for the installation, use, and maintenance of the obsolete outlet. •...before using your safety. When you see this symbol, please read these instructions before connecting other apparatus (including amplifiers) that you either: • Register your VIZIO product at www.VIZIO.com • Complete and mail the enclosed registration card Extended Warranties For peace of...
M550VSE User Manual
Page 4
.... If water penetrates into your TV. Doing so could short circuit parts causing a fire or electric shock. For more information, contact your dealer. • When connected to a power outlet, power is provided. • Never push any way, such as a radiator, heater, oven, amplifier etc. Overloading can be replaced when using different...
.... If water penetrates into your TV. Doing so could short circuit parts causing a fire or electric shock. For more information, contact your dealer. • When connected to a power outlet, power is provided. • Never push any way, such as a radiator, heater, oven, amplifier etc. Overloading can be replaced when using different...
M550VSE User Manual
Page 6
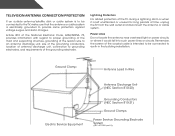
...-20) Grounding Conductors (NEC Section 810-21) Ground Clamps Power Service Grounding Electrode System (NEC ART 250, part H) Television Antenna Connection Protection If an outside antenna/satellite dish or cable system is to be connected to the TV, make sure that the antenna or cable system is intended to be... earth in wire to an antenna discharge unit, size of the grounding conductors, location of antenna discharge unit, connection to grounding electrodes, and requirements of the TV during a lightning storm or when it could fall into such power lines or circuits. Article 810 of...
...-20) Grounding Conductors (NEC Section 810-21) Ground Clamps Power Service Grounding Electrode System (NEC ART 250, part H) Television Antenna Connection Protection If an outside antenna/satellite dish or cable system is to be connected to the TV, make sure that the antenna or cable system is intended to be... earth in wire to an antenna discharge unit, size of the grounding conductors, location of antenna discharge unit, connection to grounding electrodes, and requirements of the TV during a lightning storm or when it could fall into such power lines or circuits. Article 810 of...

M550VSE User Manual
Page 7
...Picture Settings 32 Adjusting the Audio Settings 33 Adjusting the Advanced Audio Settings 34 Resetting the Audio Settings 34 Using the Network Connection Menu 35 Connecting to a Wireless Network 24 Completing the First-Time Setup 25 Using the On-Screen Menu 26 Navigating the On-Screen ... Package Contents 3 Installing the TV 3 Installing the TV Stand (M470VSE 4 Installing the TV Stand (M550VSE 7 Installing the TV Stand (M650VSE 10 Installing the TV on a Wall 14 Controls and Connections 15 Rear Panel 15 Side Panel 16 Front Panel 17 Remote Control 18 Remote Control - BacK 19 ...
...Picture Settings 32 Adjusting the Audio Settings 33 Adjusting the Advanced Audio Settings 34 Resetting the Audio Settings 34 Using the Network Connection Menu 35 Connecting to a Wireless Network 24 Completing the First-Time Setup 25 Using the On-Screen Menu 26 Navigating the On-Screen ... Package Contents 3 Installing the TV 3 Installing the TV Stand (M470VSE 4 Installing the TV Stand (M550VSE 7 Installing the TV Stand (M650VSE 10 Installing the TV on a Wall 14 Controls and Connections 15 Rear Panel 15 Side Panel 16 Front Panel 17 Remote Control 18 Remote Control - BacK 19 ...

M550VSE User Manual
Page 8
... the Names of the Inputs 42 Changing the On-Screen Menu Language 42 Setting the Time Zone 43 Adjusting the CEC Settings 43 Turning the VIZIO Logo On or Off 44 Using the Help Menu 44 Displaying System Information 45 Resetting the TV Settings 45 Restoring the TV to Factory Default... 47 Limited Warranty 60 Legal & Compliance 61 Using the USB Media Player 48 Using the USB Media Player 48 Connecting a USB Thumb Drive to the TV 48 Playing USB Media 48 Using VIZIO Internet Apps 51 Using the VIA Shortcut Buttons 51 Using the VIA Dock 51 Moving an App on the...
... the Names of the Inputs 42 Changing the On-Screen Menu Language 42 Setting the Time Zone 43 Adjusting the CEC Settings 43 Turning the VIZIO Logo On or Off 44 Using the Help Menu 44 Displaying System Information 45 Resetting the TV Settings 45 Restoring the TV to Factory Default... 47 Limited Warranty 60 Legal & Compliance 61 Using the USB Media Player 48 Using the USB Media Player 48 Connecting a USB Thumb Drive to the TV 48 Playing USB Media 48 Using VIZIO Internet Apps 51 Using the VIA Shortcut Buttons 51 Using the VIA Dock 51 Moving an App on the...

M550VSE User Manual
Page 20
To install your TV. 2. Disconnect any cables connected to your TV on a wall: 1. Use only with your mount.... for the weight/load of this TV. Remove the base by loosening and removing the screws. 4. M550VSE Wall Mount Screw Location - M650VSE Be sure the surface is capable of supporting the weight of debris that...came with a UL-listed wall mount bracket rated for your TV and wall mount to use cables with right-angle connectors. M470VSE M550VSE M650VSE Screw Size: M6 Screw Length: 12mm Screw Pitch: 1.0mm Hole Pattern: 300mm (V) x 400mm (H) M6 12mm 1.0mm 400mm...
To install your TV. 2. Disconnect any cables connected to your TV on a wall: 1. Use only with your mount.... for the weight/load of this TV. Remove the base by loosening and removing the screws. 4. M550VSE Wall Mount Screw Location - M650VSE Be sure the surface is capable of supporting the weight of debris that...came with a UL-listed wall mount bracket rated for your TV and wall mount to use cables with right-angle connectors. M470VSE M550VSE M650VSE Screw Size: M6 Screw Length: 12mm Screw Pitch: 1.0mm Hole Pattern: 300mm (V) x 400mm (H) M6 12mm 1.0mm 400mm...
M550VSE User Manual
Page 21
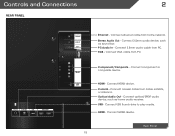
... cable from cable, satellite, or antenna. Connect optical/SPDIF audio device, such as sound bar. Stereo Audio Out - Connect component or composite device. Connect USB thumb drive to play media. HDMI - Connect coaxial cable from PC. Optical Audio Out - Component/Composite - Connect HDMI device. Connect ethernet cable from PC. Connect 3.5mm audio device, such as home audio...
... cable from cable, satellite, or antenna. Connect optical/SPDIF audio device, such as sound bar. Stereo Audio Out - Connect component or composite device. Connect USB thumb drive to play media. HDMI - Connect coaxial cable from PC. Optical Audio Out - Component/Composite - Connect HDMI device. Connect ethernet cable from PC. Connect 3.5mm audio device, such as home audio...

M550VSE User Manual
Page 27
... your device has a video port that your device off. 3. Turn the TV and your device on the TV (HDMI, Component, etc). 2. Connect the appropriate cable (not included) to component inputs: 3 Cable/Satellite Box DVD/Blu-ray Player Game Console AV CABLE GOOD • ANALOG •... STEREO AUDIO HDMI CABLE BEST • DIGITAL • HD VIDEO (1080p)* • HD AUDIO * Maximum Resolution 21 CONNECTING A DEVICE BACK OF TV Connect to the TV and the device. 4. Connecting Your Devices Connecting A Device Your TV can be used (HDMI-1, HDMI-2, etc). Set the TV's input to match the...
... your device has a video port that your device off. 3. Turn the TV and your device on the TV (HDMI, Component, etc). 2. Connect the appropriate cable (not included) to component inputs: 3 Cable/Satellite Box DVD/Blu-ray Player Game Console AV CABLE GOOD • ANALOG •... STEREO AUDIO HDMI CABLE BEST • DIGITAL • HD VIDEO (1080p)* • HD AUDIO * Maximum Resolution 21 CONNECTING A DEVICE BACK OF TV Connect to the TV and the device. 4. Connecting Your Devices Connecting A Device Your TV can be used (HDMI-1, HDMI-2, etc). Set the TV's input to match the...
M550VSE User Manual
Page 28
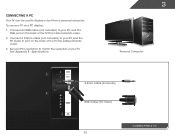
Connect an RGB cable (not included) to your PC and the PC Audio In port on the back of the TV. Set your PC's resolution to display output from a personal computer. To use your TV as a PC display: 1. Connect a 3.5mm cable (not included) to your PC and the RGB port on the back of the TV. Specifications. 3 Personal Computer 3.5mm Cable (For Audio) RGB Cable (For Video) CONNECTING A PC 22 See Appendix B - Connecting A PC Your TV can be used to match the resolution of your TV. This cable transmits audio. 3. This cable transmits video. 2.
Connect an RGB cable (not included) to your PC and the PC Audio In port on the back of the TV. Set your PC's resolution to display output from a personal computer. To use your TV as a PC display: 1. Connect a 3.5mm cable (not included) to your PC and the RGB port on the back of the TV. Specifications. 3 Personal Computer 3.5mm Cable (For Audio) RGB Cable (For Video) CONNECTING A PC 22 See Appendix B - Connecting A PC Your TV can be used to match the resolution of your TV. This cable transmits audio. 3. This cable transmits video. 2.

M550VSE User Manual
Page 29
Verify that matches an available port on . 3 Home Audio Receiver VIZIO Sound Bar GOOD 3.5mm Cable BETTER Optical/SPDIF Cable CONNECTING AUDIO DEVICE 23 Turn the TV and your device has an audio port that your audio device off. 3. Turn the TV and your device on the TV (Optical, 3.5mm, etc). 2. Connect the appropriate cable (not included) to an audio device, such as a receiver or sound bar. 1. Connecting an audio device Your TV can output sound to the TV and the device. 4.
Verify that matches an available port on . 3 Home Audio Receiver VIZIO Sound Bar GOOD 3.5mm Cable BETTER Optical/SPDIF Cable CONNECTING AUDIO DEVICE 23 Turn the TV and your device has an audio port that your audio device off. 3. Turn the TV and your device on the TV (Optical, 3.5mm, etc). 2. Connect the appropriate cable (not included) to an audio device, such as a receiver or sound bar. 1. Connecting an audio device Your TV can output sound to the TV and the device. 4.

M550VSE User Manual
Page 30
... Guided Setup on page 46. It can be connected to configure the TV. Use the Guided Network Setup to your home network with a Wired or Wireless connection. Use the Guided Network Setup to a Wireless Network 1. Ethernet Cable Router / Modem CONNECTING TO A WIRED NETWORK 24 See below. 2. ...See Using Guided Setup on page 46. Connecting to configure the TV. Ensure you have a router or...
... Guided Setup on page 46. It can be connected to configure the TV. Use the Guided Network Setup to your home network with a Wired or Wireless connection. Use the Guided Network Setup to a Wireless Network 1. Ethernet Cable Router / Modem CONNECTING TO A WIRED NETWORK 24 See below. 2. ...See Using Guided Setup on page 46. Connecting to configure the TV. Ensure you have a router or...
M550VSE User Manual
Page 31
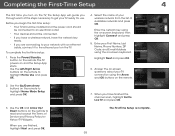
... remote. Enter the network key using the Arrow and OK buttons on the remote. 2. Answer the on-screen questions about your TV connection using the on-screen keyboard, then highlight Connect and press OK. 5. When you are finished, highlight Next and press OK. Select the name of your First Name, Last Name... time you turn on the TV, the Setup App will guide you have the network key ready. • If you are connecting to your network with an ethernet cable, connect it to the ethernet port on the TV. Use the Left/Right Arrow buttons on the remote to highlight Home Mode Setup...
... remote. Enter the network key using the Arrow and OK buttons on the remote. 2. Answer the on-screen questions about your TV connection using the on-screen keyboard, then highlight Connect and press OK. 5. When you are finished, highlight Next and press OK. Select the name of your First Name, Last Name... time you turn on the TV, the Setup App will guide you have the network key ready. • If you are connecting to your network with an ethernet cable, connect it to the ethernet port on the TV. Use the Left/Right Arrow buttons on the remote to highlight Home Mode Setup...
M550VSE User Manual
Page 33
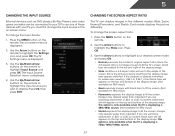
... buttons to fill the screen. The TV Settings menu is displayed. 2. To change the input device: 1. Changing the Screen Aspect Ratio The TV can be connected to your TV.To use one of these devices with black bars to fit the screen. (Not available for RBG input) • Panoramic expands the...
... buttons to fill the screen. The TV Settings menu is displayed. 2. To change the input device: 1. Changing the Screen Aspect Ratio The TV can be connected to your TV.To use one of these devices with black bars to fit the screen. (Not available for RBG input) • Panoramic expands the...

M550VSE User Manual
Page 40
... adjust, then press Left/Right Arrow to change the setting: • Digital Audio Out Changes the type of processing for the analog 3.5mm connector when connected to control the external speakers' volume from the TV's volume controls, or select Fixed to a home theater audio system. When you want to RESET Audio...' volume from your home theater system controls. 3. Press the EXIT button on the remote. 34 Sets the volume control properties for the Optical output when connected to highlight Reset Audio Mode and press OK. Highlight Yes and press OK. 5.
... adjust, then press Left/Right Arrow to change the setting: • Digital Audio Out Changes the type of processing for the analog 3.5mm connector when connected to control the external speakers' volume from the TV's volume controls, or select Fixed to a home theater audio system. When you want to RESET Audio...' volume from your home theater system controls. 3. Press the EXIT button on the remote. 34 Sets the volume control properties for the Optical output when connected to highlight Reset Audio Mode and press OK. Highlight Yes and press OK. 5.
M550VSE User Manual
Page 41
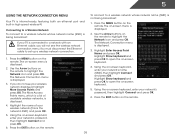
...on the remote to a network with an Ethernet cable, you do not see the wireless network connection menu. Press the EXIT button on the remote to a wireless network whose network name (SSID) is connected to highlight the Network icon and press OK. The on the remote. The More Access Points... is a list of your wireless network displayed, highlight More Access Points and press OK. Use the Arrow buttons on the remote. 35 To connect to highlight the Network icon and press OK. Highlight Enter Access Point Name and press OK. Press the EXIT button on the remote. Highlight the...
...on the remote to a network with an Ethernet cable, you do not see the wireless network connection menu. Press the EXIT button on the remote to a wireless network whose network name (SSID) is connected to highlight the Network icon and press OK. The on the remote. The More Access Points... is a list of your wireless network displayed, highlight More Access Points and press OK. Use the Arrow buttons on the remote. 35 To connect to highlight the Network icon and press OK. Highlight Enter Access Point Name and press OK. Press the EXIT button on the remote. Highlight the...

M550VSE User Manual
Page 42
...displayed at the bottom of the IP Setting menu. 4. DNS Server - Press the EXIT button on the remote. 36 From the Network Connection menu, highlight Manual Setup and press OK. The subnet mask. • Default Gateway - If you need the RJ45 (ethernet) MAC address... address to the TV. • Subnet Mask - From the Network Connection menu, highlight Test Connection and press OK. 2. Your preferred domain name server address. • Alt DNS Server - Testing Your Network Connection To test your network connection. 3. The IP Setting menu is displayed. 2. Your alternate domain name...
...displayed at the bottom of the IP Setting menu. 4. DNS Server - Press the EXIT button on the remote. 36 From the Network Connection menu, highlight Manual Setup and press OK. The subnet mask. • Default Gateway - If you need the RJ45 (ethernet) MAC address... address to the TV. • Subnet Mask - From the Network Connection menu, highlight Test Connection and press OK. 2. Your preferred domain name server address. • Alt DNS Server - Testing Your Network Connection To test your network connection. 3. The IP Setting menu is displayed. 2. Your alternate domain name...

M550VSE User Manual
Page 43
...displayed. 2. Highlight Done and press OK. 3. Press the MENU button on the remote. 37 The on-screen menu is connected to the RF input, such as an external antenna or cable TV connection, you must set the tuner mode. 1. Highlight Tuner and press OK. The auto channel scan begins. 2. 5 Changing ...; Set up parental controls • Change the on-screen menu language • Set the time • Adjust the CEC settings • Adjust the VIZIO logo settings Changing the Input Source To quickly access the Input Source menu, press the INPUT button on the remote. Use the Arrow buttons on...
...displayed. 2. Highlight Done and press OK. 3. Press the MENU button on the remote. 37 The on-screen menu is connected to the RF input, such as an external antenna or cable TV connection, you must set the tuner mode. 1. Highlight Tuner and press OK. The auto channel scan begins. 2. 5 Changing ...; Set up parental controls • Change the on-screen menu language • Set the time • Adjust the CEC settings • Adjust the VIZIO logo settings Changing the Input Source To quickly access the Input Source menu, press the INPUT button on the remote. Use the Arrow buttons on...

M550VSE User Manual
Page 48
... display "DVD Player". The on -screen keyboard by highlighting Show keyboard and press OK) 6. If you can rename the inputs. When you have a DVD player connected to the Component input, you would like to name the input yourself, highlight the field below Input Labels and press OK. 5 Changing the Names of...
... display "DVD Player". The on -screen keyboard by highlighting Show keyboard and press OK) 6. If you can rename the inputs. When you have a DVD player connected to the Component input, you would like to name the input yourself, highlight the field below Input Labels and press OK. 5 Changing the Names of...

M550VSE User Manual
Page 49
... Highlight Postal Code. Press the EXIT button on the remote. 43 To use CEC, you can control your TV enables you to control HDMI-connected devices with the included remote without any additional programming. Press the EXIT button on the remote. Press the MENU button on the remote to the... internet via an Ethernet cable or a wireless network. The on , you must be connected to highlight the Settings icon and press OK. Use the Arrow buttons on the remote. Highlight your device's user manual for details. 1. Highlight ...
... Highlight Postal Code. Press the EXIT button on the remote. 43 To use CEC, you can control your TV enables you to control HDMI-connected devices with the included remote without any additional programming. Press the EXIT button on the remote. Press the MENU button on the remote to the... internet via an Ethernet cable or a wireless network. The on , you must be connected to highlight the Settings icon and press OK. Use the Arrow buttons on the remote. Highlight your device's user manual for details. 1. Highlight ...


