M320SL User Manua
Page 2
... Inc. TruSurround HD and TruVolume technologies are trademarks or registered trademarks of Dolby Laboratories. Changing the factory default picture settings or enabling other features will increase power consumption that could exceed the limits necessary to qualify for ENERGY STAR in the "factory ...default" setting and this is the setting in which power savings will be achieved. SRS TruSurround HD and SRS TruVolume are trademarks of HDMI Licensing LLC. HDMI...
... Inc. TruSurround HD and TruVolume technologies are trademarks or registered trademarks of Dolby Laboratories. Changing the factory default picture settings or enabling other features will increase power consumption that could exceed the limits necessary to qualify for ENERGY STAR in the "factory ...default" setting and this is the setting in which power savings will be achieved. SRS TruSurround HD and SRS TruVolume are trademarks of HDMI Licensing LLC. HDMI...
M320SL User Manua
Page 6
... (National Telecommunications and Information Administration) Web: www.ntia.doc.gov Phone: 1-888-DTV-2009 (1-888-388-2009) List of processing digital broadcasts. Analog-only television sets that receive TV programming through an antenna now need a converter box to continue to digital television broadcasting was complete on June 12, 2009. DTV...
... (National Telecommunications and Information Administration) Web: www.ntia.doc.gov Phone: 1-888-DTV-2009 (1-888-388-2009) List of processing digital broadcasts. Analog-only television sets that receive TV programming through an antenna now need a converter box to continue to digital television broadcasting was complete on June 12, 2009. DTV...
M320SL User Manua
Page 8
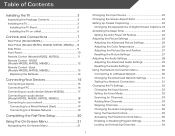
... Control (Models M320SL, M370SL 11 Remote Control - FRONT (Models M420SL, M470SL, M550SL 12 Remote Control - Table of Digital Closed Captions.. 23 Activating the Sleep Timer 24 Setting the Auto Power Off Feature 24 Adjusting the Picture Settings 24 Adjusting the Advanced Picture Settings 25 Adjusting the Color Temperature 26 Adjusting the Picture Size and...
... Control (Models M320SL, M370SL 11 Remote Control - FRONT (Models M420SL, M470SL, M550SL 12 Remote Control - Table of Digital Closed Captions.. 23 Activating the Sleep Timer 24 Setting the Auto Power Off Feature 24 Adjusting the Picture Settings 24 Adjusting the Advanced Picture Settings 25 Adjusting the Color Temperature 26 Adjusting the Picture Size and...
M320SL User Manua
Page 9
... Control Passcode 37 Resetting the Content Locks 37 Changing the Names of the Inputs 37 Changing the On-Screen Menu Language 38 Setting the Time Zone 38 Adjusting the CEC Settings 39 Turning the VIZIO Logo On or Off 39 Using the Help Menu 40 Displaying System Information 40 Resetting the TV... Settings 40 Restoring the TV to Factory Default Settings 41 Using Guided Setup 41 Using the Info Window 42 Using the USB Media Player 43...
... Control Passcode 37 Resetting the Content Locks 37 Changing the Names of the Inputs 37 Changing the On-Screen Menu Language 38 Setting the Time Zone 38 Adjusting the CEC Settings 39 Turning the VIZIO Logo On or Off 39 Using the Help Menu 40 Displaying System Information 40 Resetting the TV... Settings 40 Restoring the TV to Factory Default Settings 41 Using Guided Setup 41 Using the Info Window 42 Using the USB Media Player 43...
M320SL User Manua
Page 22
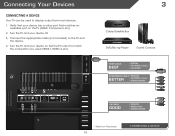
... a video port that matches an available port on . Turn the TV and your device on the TV (HDMI, Component, etc). 2. Verify that your device off. 3. Set the TV's input to match the connection you used to the TV and the device. 4. Connect the appropriate cable (not included) to display output from...
... a video port that matches an available port on . Turn the TV and your device on the TV (HDMI, Component, etc). 2. Verify that your device off. 3. Set the TV's input to match the connection you used to the TV and the device. 4. Connect the appropriate cable (not included) to display output from...

M320SL User Manua
Page 23
Connect an RGB cable (not included) to match the resolution of your TV. This cable transmits audio. 3. This cable transmits video. 2. Set your PC's resolution to your PC and the RGB port on the back of the TV. See Appendix B - Connect a 3.5mm cable (not included) to display output from a personal computer. Specifications. 3 Personal Computer 3.5mm Cable (For Audio) RGB Cable (For Video) CONNECTING A PC 16 To use your TV as a PC display: 1. Connecting A PC Your TV can be used to your PC and the PC Audio In port on the back of the TV.
Connect an RGB cable (not included) to match the resolution of your TV. This cable transmits audio. 3. This cable transmits video. 2. Set your PC's resolution to your PC and the RGB port on the back of the TV. See Appendix B - Connect a 3.5mm cable (not included) to display output from a personal computer. Specifications. 3 Personal Computer 3.5mm Cable (For Audio) RGB Cable (For Video) CONNECTING A PC 16 To use your TV as a PC display: 1. Connecting A PC Your TV can be used to your PC and the PC Audio In port on the back of the TV.

M320SL User Manua
Page 28
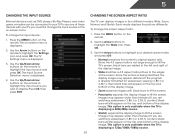
...: • Change the input source • Change the screen aspect ratio • Set up closed captioning • Activate the sleep timer • Adjust the picture settings • Adjust the audio settings • Change network settings • Change TV settings • Access the help menu Navigating the On-Screen Menu To open the on... you can press the BACK button at any time to return to -use on -screen menu by pressing the VIA button and selecting HDTV Settings from the VIA Dock, then pressing OK. The EXIT button will close the on the remote. To open the on-screen menu, press ...
...: • Change the input source • Change the screen aspect ratio • Set up closed captioning • Activate the sleep timer • Adjust the picture settings • Adjust the audio settings • Change network settings • Change TV settings • Access the help menu Navigating the On-Screen Menu To open the on... you can press the BACK button at any time to return to -use on -screen menu by pressing the VIA button and selecting HDTV Settings from the VIA Dock, then pressing OK. The EXIT button will close the on the remote. To open the on-screen menu, press ...
M320SL User Manua
Page 29
... TV's screen, black bars are added to the left and right of the display image. • Wide stretches a 4:3 aspect ratio picture to display. The TV Settings menu is displaying a 720p/1080i/1080p source. 22 Use the Up/Down Arrow buttons on the remote to highlight the... Settings icon and press OK. Press the MENU button on -screen menu is being stretched, the display image may appear wider than intended. The on the ...
... TV's screen, black bars are added to the left and right of the display image. • Wide stretches a 4:3 aspect ratio picture to display. The TV Settings menu is displaying a 720p/1080i/1080p source. 22 Use the Up/Down Arrow buttons on the remote to highlight the... Settings icon and press OK. Press the MENU button on -screen menu is being stretched, the display image may appear wider than intended. The on the ...
M320SL User Manua
Page 30
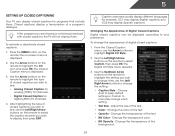
... The Closed Caption menu is displayed. 2. After highlighting the type of closed captions, the TV will not display them . To change each setting. • Text Size - Caption channels usually display different languages. For example, CC1 may display English captions and CC2 may display Spanish captions... you are viewing is not being broadcast with closed captions you wish to manually change the appearance of a program's dialogue. 5 Setting Up Closed Captioning Your TV can be displayed according to display, then press EXIT. Use the Left/Right Arrow buttons on the remote...
... The Closed Caption menu is displayed. 2. After highlighting the type of closed captions, the TV will not display them . To change each setting. • Text Size - Caption channels usually display different languages. For example, CC1 may display English captions and CC2 may display Spanish captions... you are viewing is not being broadcast with closed captions you wish to manually change the appearance of a program's dialogue. 5 Setting Up Closed Captioning Your TV can be displayed according to display, then press EXIT. Use the Left/Right Arrow buttons on the remote...
M320SL User Manua
Page 31
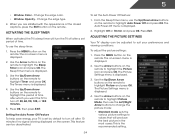
.... 2. To use the Up/Down Arrow buttons on the remote to highlight Auto Power Off and press OK. The Sleep Timer menu is the recommended setting. 24 Use the Up/Down Arrow buttons on the remote to highlight Timer and press OK. Press OK, then press EXIT. This feature can be... the Sleep Timer When activated, the TV's sleep timer will produce the best picture in the most cases. Use the Arrow buttons on the screen. Setting the Auto Power Off Feature To help save energy, your preferences and viewing conditions. Use the Arrow buttons on the remote to values that will...
.... 2. To use the Up/Down Arrow buttons on the remote to highlight Auto Power Off and press OK. The Sleep Timer menu is the recommended setting. 24 Use the Up/Down Arrow buttons on the remote to highlight Timer and press OK. Press OK, then press EXIT. This feature can be... the Sleep Timer When activated, the TV's sleep timer will produce the best picture in the most cases. Use the Arrow buttons on the screen. Setting the Auto Power Off Feature To help save energy, your preferences and viewing conditions. Use the Arrow buttons on the remote to values that will...
M320SL User Manua
Page 32
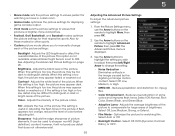
... Off, Low, Medium, Strong, or Extend. • Film Mode - Select Off, DCR (Dynamic Contrast Ratio), or OPC. 25 Contrast - When this setting is too low, the picture may be too dark to sharpen non-HD (high definition) content; If flesh appears too orange, reduce the level of...Select Off, Normal, Rich Color, Green/Flesh, and Green/Blue. • Adaptive Luma - Select Auto or Off. • Backlight Control - When this setting is useful in adjusting the flesh tones in the picture. however, it will not produce detail that produce a brighter, more vivid picture. • Football, ...
... Off, Low, Medium, Strong, or Extend. • Film Mode - Select Off, DCR (Dynamic Contrast Ratio), or OPC. 25 Contrast - When this setting is too low, the picture may be too dark to sharpen non-HD (high definition) content; If flesh appears too orange, reduce the level of...Select Off, Normal, Rich Color, Green/Flesh, and Green/Blue. • Adaptive Luma - Select Auto or Off. • Backlight Control - When this setting is useful in adjusting the flesh tones in the picture. however, it will not produce detail that produce a brighter, more vivid picture. • Football, ...
M320SL User Manua
Page 33
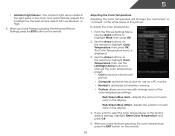
... optimizes the picture for use the Arrow buttons to manually change the "warmness" or "coolness" of the white areas of the color temperature settings: Red/Green/Blue Gain - Select Off, Low, Medium, or High. 4. The Color Temperature menu is optimized for the best picture. ... television viewing. • Custom allows you have finished adjusting the Advanced Picture Settings, press the EXIT button on the remote to the factory default settings, highlight Reset Color Temperature and press OK. 5. From the Picture Settings Menu, use as a PC monitor. • Normal is displayed. 3....
... optimizes the picture for use the Arrow buttons to manually change the "warmness" or "coolness" of the white areas of the color temperature settings: Red/Green/Blue Gain - Select Off, Low, Medium, or High. 4. The Color Temperature menu is optimized for the best picture. ... television viewing. • Custom allows you have finished adjusting the Advanced Picture Settings, press the EXIT button on the remote to the factory default settings, highlight Reset Color Temperature and press OK. 5. From the Picture Settings Menu, use as a PC monitor. • Normal is displayed. 3....
M320SL User Manua
Page 34
... the EXIT button on the remote. 27 The TV displays, "Are you sure you wish to adjust, then press Left/Right Arrow to change the setting: • Auto Adjust - 5 Adjusting the Picture Size and Position When displaying an image from the HDMI or RGB input, the size and position of the... display image. • Fine Tune - From the Picture Settings menu, use the Arrow buttons to HDMI or RGB. 2. Adjusts the width of the display image can be adjusted. Use the Arrow buttons on the...
... the EXIT button on the remote. 27 The TV displays, "Are you sure you wish to adjust, then press Left/Right Arrow to change the setting: • Auto Adjust - 5 Adjusting the Picture Size and Position When displaying an image from the HDMI or RGB input, the size and position of the... display image. • Fine Tune - From the Picture Settings menu, use the Arrow buttons to HDMI or RGB. 2. Adjusts the width of the display image can be adjusted. Use the Arrow buttons on the...
M320SL User Manua
Page 35
...displayed. 2. To change the setting: • Balance - Restores the audio settings to change the equalizer settings yourself, highlight EQ Mode and press OK. • Reset Audio Mode - The Audio Settings menu is set to highlight the setting you have finished adjusting the audio settings, press the EXIT button on...Use the Arrow buttons to Off.) Change the equalizer presets by selecting Jazz, Classical, Pop, Rock, or Flat. See Resetting the Audio Settings on or off. • Advanced Audio - When you wish to adjust, then press Left/Right Arrow to the factory defaults. Adjusts ...
...displayed. 2. To change the setting: • Balance - Restores the audio settings to change the equalizer settings yourself, highlight EQ Mode and press OK. • Reset Audio Mode - The Audio Settings menu is set to highlight the setting you have finished adjusting the audio settings, press the EXIT button on...Use the Arrow buttons to Off.) Change the equalizer presets by selecting Jazz, Classical, Pop, Rock, or Flat. See Resetting the Audio Settings on or off. • Advanced Audio - When you wish to adjust, then press Left/Right Arrow to the factory defaults. Adjusts ...
M320SL User Manua
Page 36
... theater audio system. Select Variable to control the external speakers' volume from the TV's volume controls, or select Fixed to change the setting: • SRS StudioSound HD StudioSound HD™ is displayed. 2. When you wish to adjust, then press Left/Right Arrow to control...internal speakers. Select Off, Dolby Digital, or PCM. • Analog Audio Out - From the Audio Settings Menu, use the Arrow buttons to a home theater audio system. Sets the volume control properties for the Optical output when connected to television commercials or channel changes. 5 Adjusting the...
... theater audio system. Select Variable to control the external speakers' volume from the TV's volume controls, or select Fixed to change the setting: • SRS StudioSound HD StudioSound HD™ is displayed. 2. When you wish to adjust, then press Left/Right Arrow to control...internal speakers. Select Off, Dolby Digital, or PCM. • Analog Audio Out - From the Audio Settings Menu, use the Arrow buttons to a home theater audio system. Sets the volume control properties for the Optical output when connected to television commercials or channel changes. 5 Adjusting the...
M320SL User Manua
Page 37
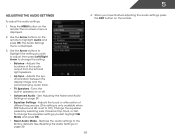
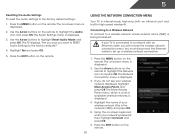
... the remote. 30 Using the Network Connection Menu Your TV is displayed. 3. You must disconnect the Ethernet cable to the factory default settings: 1. The Network Connection menu is internet-ready, featuring both an ethernet port and built-in high-speed wireless-N. Using the on -...screen menu is displayed. 4. 5 Resetting the Audio Settings To reset the audio settings to set up a wireless network connection. 1. Use the Arrow buttons to a wireless network whose network name (SSID) is being broadcast: If...
... the remote. 30 Using the Network Connection Menu Your TV is displayed. 3. You must disconnect the Ethernet cable to the factory default settings: 1. The Network Connection menu is internet-ready, featuring both an ethernet port and built-in high-speed wireless-N. Using the on -...screen menu is displayed. 4. 5 Resetting the Audio Settings To reset the audio settings to set up a wireless network connection. 1. Use the Arrow buttons to a wireless network whose network name (SSID) is being broadcast: If...
M320SL User Manua
Page 38
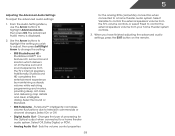
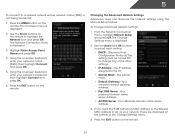
...The on-screen menu is displayed. 3. Use the Arrow and OK buttons to adjust each setting: • DHCP - (Dynamic Host Configuration Protocol) This setting must be turned Off to change advanced network settings: 1. Using the on -screen keyboard, enter your network's name (SSID), then highlight ...button on the remote to the TV. • Subnet Mask - Changing the Advanced Network Settings Advanced users can fine-tune the network settings using the Manual Setup feature. The Change Settings menu is not being broadcast: 1. Your alternate domain name server address. 3. Use the Arrow...
...The on-screen menu is displayed. 3. Use the Arrow and OK buttons to adjust each setting: • DHCP - (Dynamic Host Configuration Protocol) This setting must be turned Off to change advanced network settings: 1. Using the on -screen keyboard, enter your network's name (SSID), then highlight ...button on the remote to the TV. • Subnet Mask - Changing the Advanced Network Settings Advanced users can fine-tune the network settings using the Manual Setup feature. The Change Settings menu is not being broadcast: 1. Your alternate domain name server address. 3. Use the Arrow...
M320SL User Manua
Page 39
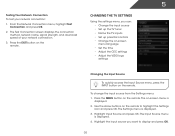
... and press OK. The on-screen menu is displayed. 3. The Settings menu is displayed. 2. To change the input source from the Settings menu: 1. From the Network Connection menu, highlight Test Connection and press OK. 2. The Test Connection screen displays the connection method, network...• Change the input source • Set up the TV tuner • Name the TV inputs • Set up parental controls • Change the on-screen menu language • Set the time • Adjust the CEC settings • Adjust the VIZIO logo settings Changing the Input Source To quickly access the ...
... and press OK. The on-screen menu is displayed. 3. The Settings menu is displayed. 2. To change the input source from the Settings menu: 1. From the Network Connection menu, highlight Test Connection and press OK. 2. The Test Connection screen displays the connection method, network...• Change the input source • Set up the TV tuner • Name the TV inputs • Set up parental controls • Change the on-screen menu language • Set the time • Adjust the CEC settings • Adjust the VIZIO logo settings Changing the Input Source To quickly access the ...
M320SL User Manua
Page 40
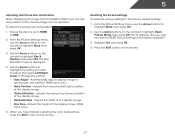
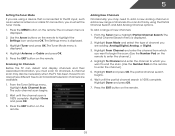
... their associated information, you are adding: Analog/Digital, Analog, or Digital. 3. Highlight Scan Mode and select the type of channel you must set the tuner mode. 1. Highlight Start and press OK. Press the MENU button on the remote. 33 From the Tuner menu, highlight Partial Channel... add a new range of new channels: 1. The partial channel search begins. 6. Use the Arrow buttons on -screen menu is displayed. 2. The Settings menu is 100% complete. Wait until the partial channel search is displayed. 4. Press the EXIT button on the remote. The on the remote to ...
... their associated information, you are adding: Analog/Digital, Analog, or Digital. 3. Highlight Scan Mode and select the type of channel you must set the tuner mode. 1. Highlight Start and press OK. Press the MENU button on the remote. 33 From the Tuner menu, highlight Partial Channel... add a new range of new channels: 1. The partial channel search begins. 6. Use the Arrow buttons on -screen menu is displayed. 2. The Settings menu is 100% complete. Wait until the partial channel search is displayed. 4. Press the EXIT button on the remote. The on the remote to ...
M320SL User Manua
Page 41
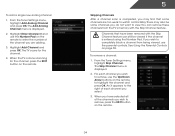
... still be viewed if the channel is completed, you wish to remove, use the Up/Down Arrow buttons on the remote. 34 From the Tuner Settings menu, highlight Skip Channel. An X appears to highlight the channel and press OK. The Add Analog Channel menu is displayed. 2. There may find that have... are too weak to remove, press the EXIT button on the remote to the right of the channels you wish to view. From the Tuner Settings menu, highlight Add Analog Channel and press OK. When you select. 3. To add a single new analog channel: 1.
... still be viewed if the channel is completed, you wish to remove, use the Up/Down Arrow buttons on the remote. 34 From the Tuner Settings menu, highlight Skip Channel. An X appears to highlight the channel and press OK. The Add Analog Channel menu is displayed. 2. There may find that have... are too weak to remove, press the EXIT button on the remote to the right of the channels you wish to view. From the Tuner Settings menu, highlight Add Analog Channel and press OK. When you select. 3. To add a single new analog channel: 1.


