
M3D650SV User Manua
Page 3
... accordance with the manufacturer's instructions. • Do not install near water. • Clean only with the cart, stand, tripod, bracket, or table specified by the manufacturer, or sold Product Registration To purchase or inquire about accessories and installation services for...before connecting other apparatus (including amplifiers) that you see this apparatus near any ventilation openings. To get the most out of your new VIZIO product, read these instructions. • Heed all warnings. • Follow all instructions. • Do not use attachments/accessories specified ...
... accordance with the manufacturer's instructions. • Do not install near water. • Clean only with the cart, stand, tripod, bracket, or table specified by the manufacturer, or sold Product Registration To purchase or inquire about accessories and installation services for...before connecting other apparatus (including amplifiers) that you see this apparatus near any ventilation openings. To get the most out of your new VIZIO product, read these instructions. • Heed all warnings. • Follow all instructions. • Do not use attachments/accessories specified ...

M3D650SV User Manua
Page 8
... Ratio 19 Setting Up Closed Captioning 19 Changing the Appearance of Contents Installing the TV 3 Inspecting the Package Contents 3 Installing the TV 3 Installing the TV Stand 3 Installing the TV on a Wall 5 Controls and Connections 6 Rear Panel 6 Using The Jag Wheel 7 Using the Quick Menu 7 Front Panel 8 Remote Control - Back 10 Replacing...
... Ratio 19 Setting Up Closed Captioning 19 Changing the Appearance of Contents Installing the TV 3 Inspecting the Package Contents 3 Installing the TV 3 Installing the TV Stand 3 Installing the TV on a Wall 5 Controls and Connections 6 Rear Panel 6 Using The Jag Wheel 7 Using the Quick Menu 7 Front Panel 8 Remote Control - Back 10 Replacing...

M3D650SV User Manua
Page 10
Your TV can be installed in two ways: • On a flat surface, using the included stand • On a wall, using a VESA-standard wall mount (not included) Installing the TV Stand Your TV includes a stand designed to support the weight of the TV and keep it from the box and inspecting the package ...contents you can still fall over . Use the images below to inspect the package contents. VIZIO 3D LED LCD HDTV 3D Glasses (4) ...
Your TV can be installed in two ways: • On a flat surface, using the included stand • On a wall, using a VESA-standard wall mount (not included) Installing the TV Stand Your TV includes a stand designed to support the weight of the TV and keep it from the box and inspecting the package ...contents you can still fall over . Use the images below to inspect the package contents. VIZIO 3D LED LCD HDTV 3D Glasses (4) ...
M3D650SV User Manua
Page 11
Place the TV screen-down on a soft surface, such as shown. 5. Push the stand neck into the bottom of the base as shown. 4. Attach the cover to the stand neck with four screws as carpet, rug, or blanket. 2. To ensure proper ventilation, leave at least 1" of space between the back of the tv... screws as shown. To prevent scratches or damage to the back of the TV and any other objects (walls, etc). 4 1 Step 3 Step 4 Attach the assembled stand to the screen, place the TV on a clean, flat surface. Insert and tighten 8 screws as shown. 3. Step 2 To install the TV...
Place the TV screen-down on a soft surface, such as shown. 5. Push the stand neck into the bottom of the base as shown. 4. Attach the cover to the stand neck with four screws as carpet, rug, or blanket. 2. To ensure proper ventilation, leave at least 1" of space between the back of the tv... screws as shown. To prevent scratches or damage to the back of the TV and any other objects (walls, etc). 4 1 Step 3 Step 4 Attach the assembled stand to the screen, place the TV on a clean, flat surface. Insert and tighten 8 screws as shown. 3. Step 2 To install the TV...

M3D650SV User Manua
Page 54
... the example below, two of the 3D effect may be lost. Eye Line Best 3D - In addition, the child on a Tilt Mount. TV on Stand In this example, the viewers have mounted the TV on the floor is not seeing the best possible picture because he/she is important that...line.They will experience good 3D picture quality. 47 Losing 3D Effects Best 3D - They are sitting at a good distance. For your TV, VIZIO recommends: Viewing Range: Optimal Distance: M3D650SV 7 - 10 feet 8 feet Illustrations in the example below , all of the viewers are not seeing the best 3D picture. The viewers in...
... the example below, two of the 3D effect may be lost. Eye Line Best 3D - In addition, the child on a Tilt Mount. TV on Stand In this example, the viewers have mounted the TV on the floor is not seeing the best possible picture because he/she is important that...line.They will experience good 3D picture quality. 47 Losing 3D Effects Best 3D - They are sitting at a good distance. For your TV, VIZIO recommends: Viewing Range: Optimal Distance: M3D650SV 7 - 10 feet 8 feet Illustrations in the example below , all of the viewers are not seeing the best 3D picture. The viewers in...

M3D650SV User Manua
Page 58
...Stand: w/o Stand: Weight w/ Stand: w/o Stand: TV Type: Refresh Rate: Maximum Resolution: Pixel Pitch: Dynamic Contrast Ratio: Response Time: Brightness: 2D Viewing Angle: Ambient Light Sensor: HDMI Inputs: Component Video Inputs: Composite Inputs: RF/Coaxial Input: USB Ports: RGB Inputs: OSD Language: Audio Outputs: Number of Speakers M3D650SV...Power Consumption: Standby Power Consumption: Ethernet Ports: Wireless (WiFi): Remote Control Model: Zero Bright Pixel Guarantee: B M3D650SV 15W SRS StudioSound, Dolby Digital Plus SRS TruVolume Energy Star CSA-US FCC Class B HDMI v1.4 100 - 240 VAC @...
...Stand: w/o Stand: Weight w/ Stand: w/o Stand: TV Type: Refresh Rate: Maximum Resolution: Pixel Pitch: Dynamic Contrast Ratio: Response Time: Brightness: 2D Viewing Angle: Ambient Light Sensor: HDMI Inputs: Component Video Inputs: Composite Inputs: RF/Coaxial Input: USB Ports: RGB Inputs: OSD Language: Audio Outputs: Number of Speakers M3D650SV...Power Consumption: Standby Power Consumption: Ethernet Ports: Wireless (WiFi): Remote Control Model: Zero Bright Pixel Guarantee: B M3D650SV 15W SRS StudioSound, Dolby Digital Plus SRS TruVolume Energy Star CSA-US FCC Class B HDMI v1.4 100 - 240 VAC @...

M3D650SV Quick Start Guide
Page 2
... moving your TV from being walked on or pinched, particularly at least three feet should be installed near water. • Clean only with the cart, stand, tripod, bracket, or table specified by qualified service personnel only. Overloading can damage the remote control or injure the operator. Opening or removing the back...
... moving your TV from being walked on or pinched, particularly at least three feet should be installed near water. • Clean only with the cart, stand, tripod, bracket, or table specified by qualified service personnel only. Overloading can damage the remote control or injure the operator. Opening or removing the back...

M3D650SV Quick Start Guide
Page 4
DOWNLOAD THE FULL USER MANUAL AT VIZIO.COM/SUPPORT PACKAGE CONTENTS INPUT CC EXIT BACK OK INFO MENU GUIDE VOL CH VOL CH 1 2 3 4 5 6 7 8 9 3D 0 INPUT CC EXIT BACK OK INFO MENU GUIDE VOL VOL 1 2 4 5 7 8 3D 0 CH CH 3 6 9 VIZIO 3D LCD LED HDTV with Stand Remote Control with Batteries Basic Theater 3D Glasses (4)* This Quick Start Guide *Appearance may vary HELP VIZIO REDUCE PAPER WASTE.
DOWNLOAD THE FULL USER MANUAL AT VIZIO.COM/SUPPORT PACKAGE CONTENTS INPUT CC EXIT BACK OK INFO MENU GUIDE VOL CH VOL CH 1 2 3 4 5 6 7 8 9 3D 0 INPUT CC EXIT BACK OK INFO MENU GUIDE VOL VOL 1 2 4 5 7 8 3D 0 CH CH 3 6 9 VIZIO 3D LCD LED HDTV with Stand Remote Control with Batteries Basic Theater 3D Glasses (4)* This Quick Start Guide *Appearance may vary HELP VIZIO REDUCE PAPER WASTE.

M3D650SV Quick Start Guide
Page 8
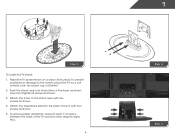
INSTALLING THE BASE 1 2 Push the stand neck into the bottom of the base as shown. Insert and tighten 8 screws as shown. Attach the cover to the stand neck with two screws as shown.
INSTALLING THE BASE 1 2 Push the stand neck into the bottom of the base as shown. Insert and tighten 8 screws as shown. Attach the cover to the stand neck with two screws as shown.

M3D650SV Quick Start Guide
Page 9
3 4 Place the TV face down on a stable, level surface. Place the TV on a soft surface like a rug or blanket. Attach the assembled stand to the back of the tv with four screws.
3 4 Place the TV face down on a stable, level surface. Place the TV on a soft surface like a rug or blanket. Attach the assembled stand to the back of the tv with four screws.

M3D650SV Quick Start Guide
Page 21
away, and the sound bar offers either a table-stand or wall-mount option. Available at www.VIZIO.com This Product Sold Separately This powerful sound system is also remarkably versatile. Its wireless subwoofer fits nearly anywhere in a new sleeker, slimmer design - a perfect complement for a 40" HDTV and larger. UPGRADE TO POWERFUL DIGITAL AUDIO The VIZIO Home Theater Sound Bar with Wireless Subwoofer delivers exceptional audio performance in your home theater up to 60 ft.
away, and the sound bar offers either a table-stand or wall-mount option. Available at www.VIZIO.com This Product Sold Separately This powerful sound system is also remarkably versatile. Its wireless subwoofer fits nearly anywhere in a new sleeker, slimmer design - a perfect complement for a 40" HDTV and larger. UPGRADE TO POWERFUL DIGITAL AUDIO The VIZIO Home Theater Sound Bar with Wireless Subwoofer delivers exceptional audio performance in your home theater up to 60 ft.


