
E472VL User Manual
Page 25
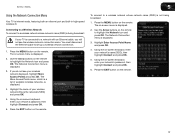
...whose network name (SSID) is the network's SSID) and press OK. 5. The Network Connection menu is displayed. 2. Use the Arrow buttons on -screen keyboard, enter your wireless network (this is being broadcast: 1. Using the on the remote to set up a wireless network connection. 1. Press the EXIT button ... the Network icon and press OK. The More Access Points menu, which is displayed. 2. Press the EXIT button on the remote. E472VL / E552VL 5 Using the Network Connection Menu Your TV is displayed. 3. Press the MENU button on the remote. The on the remote to a network ...
...whose network name (SSID) is the network's SSID) and press OK. 5. The Network Connection menu is displayed. 2. Use the Arrow buttons on -screen keyboard, enter your wireless network (this is being broadcast: 1. Using the on the remote to set up a wireless network connection. 1. Press the EXIT button ... the Network icon and press OK. The More Access Points menu, which is displayed. 2. Press the EXIT button on the remote. E472VL / E552VL 5 Using the Network Connection Menu Your TV is displayed. 3. Press the MENU button on the remote. The on the remote to a network ...
E472VL User Manual
Page 31
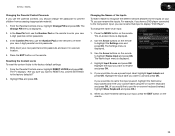
...that input to the factory defaults?" 2. When you have a DVD player connected to the Component input, you can rename the inputs. E472VL / E552VL 5 Changing the Parental Control Passcode If you use the parental controls, you should change the name of the Inputs To make it in a secure...you want to use and press OK. The Change PIN menu is displayed. 3. Write down your custom label using the on -screen keyboard instead, highlight Show Keyboard and press OK.) 6. From the Parental Controls menu, highlight Change PIN and press OK. The Name Input menu is displayed. 2. ...
...that input to the factory defaults?" 2. When you have a DVD player connected to the Component input, you can rename the inputs. E472VL / E552VL 5 Changing the Parental Control Passcode If you use the parental controls, you should change the name of the Inputs To make it in a secure...you want to use and press OK. The Change PIN menu is displayed. 3. Write down your custom label using the on -screen keyboard instead, highlight Show Keyboard and press OK.) 6. From the Parental Controls menu, highlight Change PIN and press OK. The Name Input menu is displayed. 2. ...
E472VL User Manual
Page 40
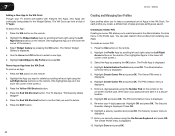
... and press OK. Use the Arrow and OK buttons to delete. 6. Highlight Create Owner Pin and press OK. Highlight Done and press OK. 32 7 E472VL / E552VL Adding a New App to the VIA Dock Though your TV arrives pre-loaded with featured VIA Apps, new Apps are saved. Press the Yellow VIA... Widget to delete by scrolling left corner of the screen.) 3. The Security Answer menu is in the lower left and right using the On-Screen Keyboard and press OK.
... and press OK. Use the Arrow and OK buttons to delete. 6. Highlight Create Owner Pin and press OK. Highlight Done and press OK. 32 7 E472VL / E552VL Adding a New App to the VIA Dock Though your TV arrives pre-loaded with featured VIA Apps, new Apps are saved. Press the Yellow VIA... Widget to delete by scrolling left corner of the screen.) 3. The Security Answer menu is in the lower left and right using the On-Screen Keyboard and press OK.
E472VL User Manual
Page 41
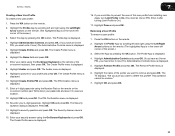
...OK. Press the VIA button on the remote. 2. If you want to On. (You need an Owner PIN. This operation cannot be undone." 7. E472VL / E552VL Creating a New User Profile To create a new user profile: 1. The Create Profile menu is displayed. 4. Enter it in the lower left and right using ...the On-Screen Keyboard and press OK. Highlight the Name field and press OK. 7. Highlight the Profile App by scrolling left corner of this new profile from installing new...
...OK. Press the VIA button on the remote. 2. If you want to On. (You need an Owner PIN. This operation cannot be undone." 7. E472VL / E552VL Creating a New User Profile To create a new user profile: 1. The Create Profile menu is displayed. 4. Enter it in the lower left and right using ...the On-Screen Keyboard and press OK. Highlight the Name field and press OK. 7. Highlight the Profile App by scrolling left corner of this new profile from installing new...


