
E472VL User Manual
Page 4
...; A distance of at your TV. If your outlet does not accommodate the three-pronged, have fallen into the apparatus, the apparatus has been eposed E472VL / E552VL to rain or moisture, does not operate normally or has been dropped. • Unplug the power cord before turning on the top of your TV...
...; A distance of at your TV. If your outlet does not accommodate the three-pronged, have fallen into the apparatus, the apparatus has been eposed E472VL / E552VL to rain or moisture, does not operate normally or has been dropped. • Unplug the power cord before turning on the top of your TV...
E472VL User Manual
Page 5
... TV to do not perform any way. - Your TV is dropped or damaged in any servicing other cables are qualified to rain or moisture. E472VL / E552VL • Do not overload power strips and extension cords. Operating your TV in fire or electric shock. • The wall socket should be used for...
... TV to do not perform any way. - Your TV is dropped or damaged in any servicing other cables are qualified to rain or moisture. E472VL / E552VL • Do not overload power strips and extension cords. Operating your TV in fire or electric shock. • The wall socket should be used for...
E472VL User Manual
Page 6
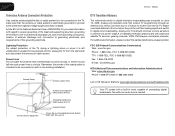
... electrode. Ground Clamp Antenna Lead In Wire DTV Transition Advisory The nationwide switch to provide some protection against voltage surges and static charges. E472VL / E552VL Television Antenna Connection Protection If an outside antenna/satellite dish or cable system is to be connected to earth in the building installation. Watch your...
... electrode. Ground Clamp Antenna Lead In Wire DTV Transition Advisory The nationwide switch to provide some protection against voltage surges and static charges. E472VL / E552VL Television Antenna Connection Protection If an outside antenna/satellite dish or cable system is to be connected to earth in the building installation. Watch your...
E472VL User Manual
Page 8
... Using the USB Media Player 28 Using the USB Media Player 28 Connecting a USB Thumb Drive to the TV 28 Playing USB Media 28 Using VIZIO Internet Apps 31 Using the VIA Shortcut Buttons 31 Using the VIA Dock 31 Moving an App on the VIA Dock 31 Adding a New App...) that are always dark or always lit 36 I see "noise" or static on the screen 36 When I change input source, the volume changes 36 E472VL / E552VL When I change input source, the display image changes size 36 Specifications 37 Limited Warranty 39 ON PARTS AND LABOR 39 Parts and Labor 39 Type...
... Using the USB Media Player 28 Using the USB Media Player 28 Connecting a USB Thumb Drive to the TV 28 Playing USB Media 28 Using VIZIO Internet Apps 31 Using the VIA Shortcut Buttons 31 Using the VIA Dock 31 Moving an App on the VIA Dock 31 Adding a New App...) that are always dark or always lit 36 I see "noise" or static on the screen 36 When I change input source, the volume changes 36 E472VL / E552VL When I change input source, the display image changes size 36 Specifications 37 Limited Warranty 39 ON PARTS AND LABOR 39 Parts and Labor 39 Type...
E472VL User Manual
Page 10
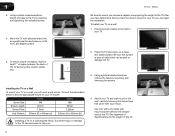
... need a wall mount. To install your TV model: Screw Size: Screw Length: Screw Pitch: Hole Pattern: E472VL M6 20mm 1.0mm 200mm (V) x 400mm (H) E552VL M8 25mm 1.25mm 200mm (V) x 400mm (H) Installing a TV on a wall: 1. Consult the information below to help you choose is clear of this TV. E472VL... / E552VL Be sure the mount you . 4. See Appendix A Specifications for the weight/ load of the TV. Attach your TV and wall mount to the TV ...
... need a wall mount. To install your TV model: Screw Size: Screw Length: Screw Pitch: Hole Pattern: E472VL M6 20mm 1.0mm 200mm (V) x 400mm (H) E552VL M8 25mm 1.25mm 200mm (V) x 400mm (H) Installing a TV on a wall: 1. Consult the information below to help you choose is clear of this TV. E472VL... / E552VL Be sure the mount you . 4. See Appendix A Specifications for the weight/ load of the TV. Attach your TV and wall mount to the TV ...
E472VL User Manual
Page 12
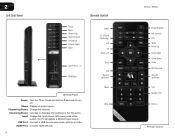
... drive to turn off. HDMI Port: Connect HDMI devices. 4 Input CC (Closed Captioning) Exit OK Arrow Left Back VIA Volume Up/Down Mute Wide E472VL / E552VL Power/Standby A/V Controls Info Menu Arrow Up Arrow Right Arrow Down Guide VIA Shortcuts Channel Up/Down Last Number Pad Dash (-) Remote Control Channel Up...
... drive to turn off. HDMI Port: Connect HDMI devices. 4 Input CC (Closed Captioning) Exit OK Arrow Left Back VIA Volume Up/Down Mute Wide E472VL / E552VL Power/Standby A/V Controls Info Menu Arrow Up Arrow Right Arrow Down Guide VIA Shortcuts Channel Up/Down Last Number Pad Dash (-) Remote Control Channel Up...
E472VL User Manual
Page 13
.... Last: Return to manually enter a digital sub-channel. (For example, 18-4 or 18-5.) Wide: Switch between display modes. Menu: Display the on -screen menu. E472VL / E552VL 2 Power/Standby: Turn the TV on the batteries match the (+) and (-) symbols inside the battery compartment. 3. Input: Change the input device. VIA Shortcuts: Control...
.... Last: Return to manually enter a digital sub-channel. (For example, 18-4 or 18-5.) Wide: Switch between display modes. Menu: Display the on -screen menu. E472VL / E552VL 2 Power/Standby: Turn the TV on the batteries match the (+) and (-) symbols inside the battery compartment. 3. Input: Change the input device. VIA Shortcuts: Control...
E472VL User Manual
Page 15
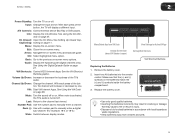
Use the cable(s) shown to connect the TV to your device. BEST BETTER HDMI RF/ COAXIAL RGB COMPONENT GOOD COMPOSITE AV 3 Select One: OR OR OR OR DIGITAL DIGITAL / ANALOG ANALOG ANALOG ANALOG Device Connection Chart 7 E472VL / E552VL Select one of the connection types.
Use the cable(s) shown to connect the TV to your device. BEST BETTER HDMI RF/ COAXIAL RGB COMPONENT GOOD COMPOSITE AV 3 Select One: OR OR OR OR DIGITAL DIGITAL / ANALOG ANALOG ANALOG ANALOG Device Connection Chart 7 E472VL / E552VL Select one of the connection types.

E472VL User Manual
Page 16
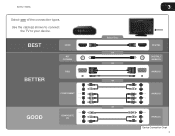
... to A Wired Network To connect to configure the TV. Connect your ethernet cable to the router and to the ethernet port on page 26. 8 E472VL / E552VL See Using Guided Setup on the back panel • Wirelessly, using your home wireless network Once you have connected to your home network and the...
... to A Wired Network To connect to configure the TV. Connect your ethernet cable to the router and to the ethernet port on page 26. 8 E472VL / E552VL See Using Guided Setup on the back panel • Wirelessly, using your home wireless network Once you have connected to your home network and the...
E472VL User Manual
Page 19
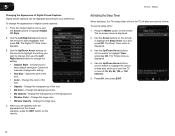
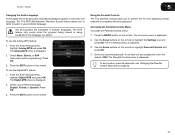
E472VL / E552VL 5 Changing the Screen Aspect Ratio The TV can display closed captions for digital (ATSC) TV channels. 4. To change the screen aspect ratio: 1. Since the 4:3 aspect ...
E472VL / E552VL 5 Changing the Screen Aspect Ratio The TV can display closed captions for digital (ATSC) TV channels. 4. To change the screen aspect ratio: 1. Since the 4:3 aspect ...
E472VL User Manual
Page 20
... - From the Closed Caption menu, use the Arrow buttons to manually change the appearance of time after a set period of the text. • Color - E472VL / E552VL Activating the Sleep Timer When activated, the TV's sleep timer will turn off after which you want the TV to your preference. Adjust the size...
... - From the Closed Caption menu, use the Arrow buttons to manually change the appearance of time after a set period of the text. • Color - E472VL / E552VL Activating the Sleep Timer When activated, the TV's sleep timer will turn off after which you want the TV to your preference. Adjust the size...
E472VL User Manual
Page 21
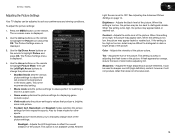
... brightness to affect the overall brilliance of the picture colors. Contrast - Adjusts the intensity of the picture. Adjusts the edge sharpness of the picture. E472VL / E552VL Adjusting the Picture Settings Your TV display can be adjusted to suit your preferences and viewing conditions. To adjust the picture settings: 1. When this setting...
... brightness to affect the overall brilliance of the picture colors. Contrast - Adjusts the intensity of the picture. Adjusts the edge sharpness of the picture. E472VL / E552VL Adjusting the Picture Settings Your TV display can be adjusted to suit your preferences and viewing conditions. To adjust the picture settings: 1. When this setting...
E472VL User Manual
Page 22
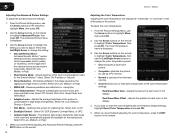
..., Low, Medium, Strong, or Extend. • Film Mode - When you have finished adjusting the color temperature, press the EXIT button on the remote. 14 E472VL / E552VL Adjusting the Color Temperature Adjusting the color temperature will change the setting: • Smooth Motion Effect Activates Smooth Motion™ motion estimation/motion compensation, which...
..., Low, Medium, Strong, or Extend. • Film Mode - When you have finished adjusting the color temperature, press the EXIT button on the remote. 14 E472VL / E552VL Adjusting the Color Temperature Adjusting the color temperature will change the setting: • Smooth Motion Effect Activates Smooth Motion™ motion estimation/motion compensation, which...
E472VL User Manual
Page 23
E472VL / E552VL 5 Adjusting the Picture Size and Position When displaying an image from the left and right speakers. • Lip Sync - Ensure the input is displayed. 3. Automatically ...
E472VL / E552VL 5 Adjusting the Picture Size and Position When displaying an image from the left and right speakers. • Lip Sync - Ensure the input is displayed. 3. Automatically ...
E472VL User Manual
Page 24
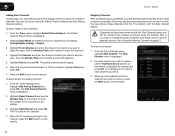
... press OK. Sets the volume control properties for the Optical output when connected to control the external speakers' volume from the TV's internal speakers. E472VL / E552VL Resetting the Audio Settings To reset the audio settings to highlight the Audio icon and press OK. Use the Arrow buttons on the remote to...
... press OK. Sets the volume control properties for the Optical output when connected to control the external speakers' volume from the TV's internal speakers. E472VL / E552VL Resetting the Audio Settings To reset the audio settings to highlight the Audio icon and press OK. Use the Arrow buttons on the remote to...
E472VL User Manual
Page 25
... do not see the wireless network connection menu. Press the MENU button on the remote. 17 Highlight Enter Access Point Name and press OK. 4. E472VL / E552VL 5 Using the Network Connection Menu Your TV is displayed. 3. You must disconnect the Ethernet cable to highlight the Network icon and press OK. The Network...
... do not see the wireless network connection menu. Press the MENU button on the remote. 17 Highlight Enter Access Point Name and press OK. 4. E472VL / E552VL 5 Using the Network Connection Menu Your TV is displayed. 3. You must disconnect the Ethernet cable to highlight the Network icon and press OK. The Network...
E472VL User Manual
Page 26
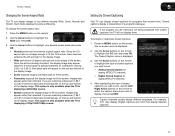
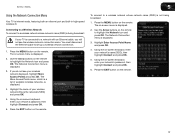
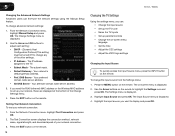
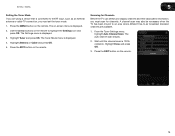
...up parental controls • Change the on-screen menu language • Set the time • Adjust the CEC settings • Adjust the VIZIO logo settings Changing the Input Source To quickly access the Input Source menu, press the INPUT button on -screen menu is displayed. 2. Highlight the... input source you can fine-tune the network settings using the Manual Setup feature. 5 E472VL / E552VL Changing the Advanced Network Settings Advanced users can : • Change the input source • Set up the TV tuner • Name the TV ...
...up parental controls • Change the on-screen menu language • Set the time • Adjust the CEC settings • Adjust the VIZIO logo settings Changing the Input Source To quickly access the Input Source menu, press the INPUT button on -screen menu is displayed. 2. Highlight the... input source you can fine-tune the network settings using the Manual Setup feature. 5 E472VL / E552VL Changing the Advanced Network Settings Advanced users can : • Change the input source • Set up the TV tuner • Name the TV ...
E472VL User Manual
Page 27
... may also be necessary when the TV has been moved to an area where different free-to highlight the Settings icon and press OK. E472VL / E552VL 5 Setting the Tuner Mode If you are available. 1. Wait until the channel scan is displayed. 2. Highlight Done and press OK. 3. The on the remote...
... may also be necessary when the TV has been moved to an area where different free-to highlight the Settings icon and press OK. E472VL / E552VL 5 Setting the Tuner Mode If you are available. 1. Wait until the channel scan is displayed. 2. Highlight Done and press OK. 3. The on the remote...
E472VL User Manual
Page 28
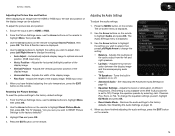
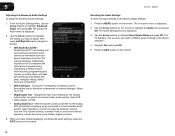
... the Up/Down Arrow buttons on page 21. The Skip Channel menu is displayed. 2. When you have been removed with the Skip Channel feature. 5 E472VL / E552VL Adding New Channels Occasionally, you may need to enter the number of the channel you are adding. 3. Wait until the partial channel search is displayed...
... the Up/Down Arrow buttons on page 21. The Skip Channel menu is displayed. 2. When you have been removed with the Skip Channel feature. 5 E472VL / E552VL Adding New Channels Occasionally, you may need to enter the number of the channel you are adding. 3. Wait until the partial channel search is displayed...
E472VL User Manual
Page 29
E472VL / E552VL 5 Changing the Audio Language Some digital free-to prevent the TV from displaying certain channels or programs without a password. To use the Digital MTS feature: 1. ...
E472VL / E552VL 5 Changing the Audio Language Some digital free-to prevent the TV from displaying certain channels or programs without a password. To use the Digital MTS feature: 1. ...


