
E422VL User Manual
Page 6
... sets that the antenna or cable system is electrically grounded to provide some protection against voltage surges and static charges. Remember, the screen of the grounding electrode. Power Lines Do not locate the antenna near overhead light or power circuits, or where it is left unattended... make sure that receive TV programming through an antenna now need a converter box to continue to receive over-the-air TV. E422VL / E472VL / E552VL Television Antenna Connection Protection If an outside antenna/satellite dish or cable system is to be connected to earth in tuner...
... sets that the antenna or cable system is electrically grounded to provide some protection against voltage surges and static charges. Remember, the screen of the grounding electrode. Power Lines Do not locate the antenna near overhead light or power circuits, or where it is left unattended... make sure that receive TV programming through an antenna now need a converter box to continue to receive over-the-air TV. E422VL / E472VL / E552VL Television Antenna Connection Protection If an outside antenna/satellite dish or cable system is to be connected to earth in tuner...
E422VL User Manual
Page 7
... Changing the On-Screen Menu Language 25 Setting the Time Zone 25 Adjusting the CEC Settings 26 Turning the VIZIO Logo On or Off 26 Using the Help Menu 26 Back (Models E472VL / E552VL Only 6 VIA Shortcut Buttons 6 Replacing the Batteries (Models E472VL / E552VL Only 6 Replacing the Batteries (Model E422VL Only 6 Connecting Your...
... Changing the On-Screen Menu Language 25 Setting the Time Zone 25 Adjusting the CEC Settings 26 Turning the VIZIO Logo On or Off 26 Using the Help Menu 26 Back (Models E472VL / E552VL Only 6 VIA Shortcut Buttons 6 Replacing the Batteries (Models E472VL / E552VL Only 6 Replacing the Batteries (Model E422VL Only 6 Connecting Your...
E422VL User Manual
Page 8
...Using the USB Media Player 29 Connecting a USB Thumb Drive to the TV 29 Playing USB Media 29 Using VIZIO Internet Apps 32 Using the VIA Shortcut Buttons 32 Using the VIA Dock 32 Moving an App on the ..."No Signal 36 There is no power 36 The power is on, but there is no image on the screen 36 There is no sound 36 The colors on the TV don't look right 36 The buttons on the remote...quality is not good 36 The picture is distorted 37 The display image does not cover the entire screen 37 E422VL / E472VL / E552VL The TV has pixels (dots) that are always dark or always lit 37 I see "noise...
...Using the USB Media Player 29 Connecting a USB Thumb Drive to the TV 29 Playing USB Media 29 Using VIZIO Internet Apps 32 Using the VIA Shortcut Buttons 32 Using the VIA Dock 32 Moving an App on the ..."No Signal 36 There is no power 36 The power is on, but there is no image on the screen 36 There is no sound 36 The colors on the TV don't look right 36 The buttons on the remote...quality is not good 36 The picture is distorted 37 The display image does not cover the entire screen 37 E422VL / E472VL / E552VL The TV has pixels (dots) that are always dark or always lit 37 I see "noise...
E422VL User Manual
Page 9
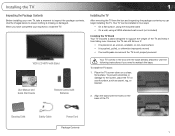
...or damage to inspect the package contents. Installing the TV 1 Inspecting the Package Contents Before installing your inspection, install the TV. Place the TV screen-down on an uneven, unstable, or non-level surface • It is pushed, pulled, or otherwise improperly moved • If an earthquake...TV can begin installing the TV. Installing the TV After removing the TV from falling over if: • It is not properly secured VIZIO LCD HDTV with Stand User Manual and Quick Start Guide Remote Control with the base already attached. Use the images below to reattach the base...
...or damage to inspect the package contents. Installing the TV 1 Inspecting the Package Contents Before installing your inspection, install the TV. Place the TV screen-down on an uneven, unstable, or non-level surface • It is pushed, pulled, or otherwise improperly moved • If an earthquake...TV can begin installing the TV. Installing the TV After removing the TV from falling over if: • It is not properly secured VIZIO LCD HDTV with Stand User Manual and Quick Start Guide Remote Control with the base already attached. Use the images below to reattach the base...
E422VL User Manual
Page 12
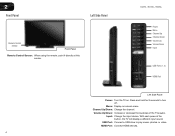
...the input device. With each press of the TVs audio. Menu: Display on . Channel Up/Down: Change the channel. HDMI Port: Connect HDMI devices. 4 E422VL / E472VL / E552VL Power Menu Channel Up Channel Down Volume Up Volume Down Input USB Ports (1, 2) HDMI Port Left Side Panel Power: Turn the TV on... -screen menu. Volume Up/Down: Increase or decrease the loudness of the button, the TV will display a different input source USB Port: Connect a USB drive...
...the input device. With each press of the TVs audio. Menu: Display on . Channel Up/Down: Change the channel. HDMI Port: Connect HDMI devices. 4 E422VL / E472VL / E552VL Power Menu Channel Up Channel Down Volume Up Volume Down Input USB Ports (1, 2) HDMI Port Left Side Panel Power: Turn the TV on... -screen menu. Volume Up/Down: Increase or decrease the loudness of the button, the TV will display a different input source USB Port: Connect a USB drive...

E422VL User Manual
Page 13
... VIA Internet Apps. CC (Closed: Open the CC Menu. Guide: Display the Info Window. VIA Shortcuts: Control VIZIO Internet Apps. Number Pad: Use the number pad to the previous on-screen menu options. A/V Controls: Control external device (Blu-Ray or DVD player). OK: Select highlighted menu option. When... mute is activated, the TV's audio is turned off or on page 11. See Using the Info Window on or off. E422VL / E472VL / E552VL Remote...
... VIA Internet Apps. CC (Closed: Open the CC Menu. Guide: Display the Info Window. VIA Shortcuts: Control VIZIO Internet Apps. Number Pad: Use the number pad to the previous on-screen menu options. A/V Controls: Control external device (Blu-Ray or DVD player). OK: Select highlighted menu option. When... mute is activated, the TV's audio is turned off or on page 11. See Using the Info Window on or off. E422VL / E472VL / E552VL Remote...

E422VL User Manual
Page 14
.... VIA Shortcut Buttons Remote Control (Back) Move/Delete App from children and pets. 6 Remove the battery cover. 5. Arrow QWERTY Keypad App Shortcuts E422VL / E472VL / E552VL Replacing the Batteries (Models E472VL / E552VL Only) 1. This is open) View Settings for Active VIA App Exit App/Exit ...VIA Dock VIA Shortcut Buttons Replacing the Batteries (Model E422VL Only) 4. Make sure that may cause a fire or result in injury. • Dispose of old or dead batteries in accordance with local...
.... VIA Shortcut Buttons Remote Control (Back) Move/Delete App from children and pets. 6 Remove the battery cover. 5. Arrow QWERTY Keypad App Shortcuts E422VL / E472VL / E552VL Replacing the Batteries (Models E472VL / E552VL Only) 1. This is open) View Settings for Active VIA App Exit App/Exit ...VIA Dock VIA Shortcut Buttons Replacing the Batteries (Model E422VL Only) 4. Make sure that may cause a fire or result in injury. • Dispose of old or dead batteries in accordance with local...
E422VL User Manual
Page 15
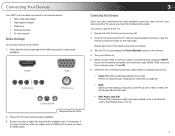
... the HDMI ports on the PC is securely connected. 3. Use the best available connection. Turn the TV on by pressing the Power/Standby button on -screen menu. Ensure both your device and the TV, ensure you have a cable that the device has one of the following types of the cable is... Your Devices Once you have determined the best available connection type on both the TV and your device are ready to 1920 x 1080. Set the Screen Mode to Normal. • DVD Player with an HDMI port, be easily connected to an external device: • DVD or Blu-Ray player • Video...
... the HDMI ports on the PC is securely connected. 3. Use the best available connection. Turn the TV on by pressing the Power/Standby button on -screen menu. Ensure both your device and the TV, ensure you have a cable that the device has one of the following types of the cable is... Your Devices Once you have determined the best available connection type on both the TV and your device are ready to 1920 x 1080. Set the Screen Mode to Normal. • DVD Player with an HDMI port, be easily connected to an external device: • DVD or Blu-Ray player • Video...

E422VL User Manual
Page 18
...cable, you will not see this step. When you are finished, highlight Next and press OK. 10 7. Press the Power/Standby button on -screen keyboard, then highlight Connect and press OK. Enter the network key using the on the remote. The First-Time Setup is connected to an ...about your TV ready for Yahoo! Select the name of your First Name, Last Name, Phone Number, ZIP Code, and E-mail Address using the on-screen keyboard. If you are connecting to your network automatically. See Connecting Your Devices on page 7. • If you have a wireless network, have finished...
...cable, you will not see this step. When you are finished, highlight Next and press OK. 10 7. Press the Power/Standby button on -screen keyboard, then highlight Connect and press OK. Enter the network key using the on the remote. The First-Time Setup is connected to an ...about your TV ready for Yahoo! Select the name of your First Name, Last Name, Phone Number, ZIP Code, and E-mail Address using the on-screen keyboard. If you are connecting to your network automatically. See Connecting Your Devices on page 7. • If you have a wireless network, have finished...
E422VL User Manual
Page 19
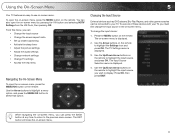
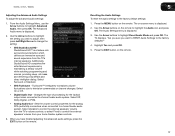
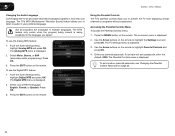
...8226; Change TV settings • Access the help menu Navigating the On-Screen Menu To open the on-screen menu, press the MENU/OK button on -screen menu by pressing the VIA button and selecting HDTV Settings from the VIA ...Dock, then pressing OK. Using the On-Screen Menu 5 Your TV features an easy-to-use one of these devices with your TV....the input source you wish to highlight the input source and press OK. Press the MENU button on -screen menu. 11 Use the Up/Down Arrow buttons on the remote to select that option. The EXIT button...
...8226; Change TV settings • Access the help menu Navigating the On-Screen Menu To open the on-screen menu, press the MENU/OK button on -screen menu by pressing the VIA button and selecting HDTV Settings from the VIA ...Dock, then pressing OK. Using the On-Screen Menu 5 Your TV features an easy-to-use one of these devices with your TV....the input source you wish to highlight the input source and press OK. Press the MENU button on -screen menu. 11 Use the Up/Down Arrow buttons on the remote to select that option. The EXIT button...

E422VL User Manual
Page 20
... Use the Arrow buttons on the remote to highlight the type of the display image. Caption channels usually display different languages. 5 E422VL / 472VL / E552VL Changing the Screen Aspect Ratio The TV can display closed captions you wish to see : • Analog Closed Caption for analog (NTSC) TV ...picture is not being stretched, the display image may appear wider than intended. To activate or deactivate closed captions, the TV will appear on -screen menu is displaying a 480i/480p source. • Stretch expands the display image to the edges of a program's dialogue. Since the 4:3...
... Use the Arrow buttons on the remote to highlight the type of the display image. Caption channels usually display different languages. 5 E422VL / 472VL / E552VL Changing the Screen Aspect Ratio The TV can display closed captions you wish to see : • Analog Closed Caption for analog (NTSC) TV ...picture is not being stretched, the display image may appear wider than intended. To activate or deactivate closed captions, the TV will appear on -screen menu is displaying a 480i/480p source. • Stretch expands the display image to the edges of a program's dialogue. Since the 4:3...

E422VL User Manual
Page 21
... Color - The Sleep Timer menu is displayed. 4. Highlight Off or 10 min and press OK. Use the Up/Down Arrow buttons on -screen menu is set the Auto Power Off feature: 1. Choose Auto to keep default settings or Custom to manually change the appearance of digital closed ... When activated, the TV's sleep timer will turn the TV off after which you are satisfied with the appearance of the closed captions: 1. E422VL / 472VL / E552VL Changing the Appearance of Digital Closed Captions Digital closed captions can be displayed according to your TV is displayed. 2. When ...
... Color - The Sleep Timer menu is displayed. 4. Highlight Off or 10 min and press OK. Use the Up/Down Arrow buttons on -screen menu is set the Auto Power Off feature: 1. Choose Auto to keep default settings or Custom to manually change the appearance of digital closed ... When activated, the TV's sleep timer will turn the TV off after which you are satisfied with the appearance of the closed captions: 1. E422VL / 472VL / E552VL Changing the Appearance of Digital Closed Captions Digital closed captions can be displayed according to your TV is displayed. 2. When ...

E422VL User Manual
Page 22
...color before adjusting tint. Use the Arrow buttons on the remote to highlight Picture and press OK. This option is not available unless Ambient 14 E422VL / 472VL / E552VL Light Sensor is too high, the picture may appear dark. Brightness - When this setting is set to OFF. When this... is displayed. 2. To adjust the picture settings: 1. Tint - Press the MENU button on page 15. Use the Up/Down Arrow buttons on -screen menu is too high, the picture may be too dark to manually change the picture mode: • Standard mode sets the various picture settings to...
...color before adjusting tint. Use the Arrow buttons on the remote to highlight Picture and press OK. This option is not available unless Ambient 14 E422VL / 472VL / E552VL Light Sensor is too high, the picture may appear dark. Brightness - When this setting is set to OFF. When this... is displayed. 2. To adjust the picture settings: 1. Tint - Press the MENU button on page 15. Use the Up/Down Arrow buttons on -screen menu is too high, the picture may be too dark to manually change the picture mode: • Standard mode sets the various picture settings to...
E422VL User Manual
Page 24
...Settings To reset the picture settings to highlight Audio and press OK. Highlight Yes and press OK. 4. Press the EXIT button on -screen menu is set to Off.) Change the equalizer presets by selecting Jazz, Classical, Pop, Rock, or Flat. Adjusts the synchronization between the...8226; Vertical Position - Turns the built-in speakers on page 17. 4. See Resetting the Audio Settings on or off. • Advanced Audio - 5 E422VL / 472VL / E552VL Adjusting the Picture Size and Position When displaying an image from the left /right) position of the display image. • Horizontal ...
...Settings To reset the picture settings to highlight Audio and press OK. Highlight Yes and press OK. 4. Press the EXIT button on -screen menu is set to Off.) Change the equalizer presets by selecting Jazz, Classical, Pop, Rock, or Flat. Adjusts the synchronization between the...8226; Vertical Position - Turns the built-in speakers on page 17. 4. See Resetting the Audio Settings on or off. • Advanced Audio - 5 E422VL / 472VL / E552VL Adjusting the Picture Size and Position When displaying an image from the left /right) position of the display image. • Horizontal ...
E422VL User Manual
Page 25
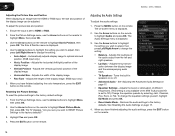
... button on the remote to a home theater audio system. Use the Arrow buttons on the remote. Highlight Yes and press OK. 5. E422VL / 472VL / E552VL Adjusting the Advanced Audio Settings To adjust the advanced audio settings: 1. Additionally, StudioSound HD completes the entertainment experience by...is displayed. 2. When you have finished adjusting the advanced audio settings, press the EXIT button on the remote. 17 The on-screen menu is a feature-rich surround sound solution which delivers an immersive surround sound experience from your home theater system controls. 3. Use...
... button on the remote to a home theater audio system. Use the Arrow buttons on the remote. Highlight Yes and press OK. 5. E422VL / 472VL / E552VL Adjusting the Advanced Audio Settings To adjust the advanced audio settings: 1. Additionally, StudioSound HD completes the entertainment experience by...is displayed. 2. When you have finished adjusting the advanced audio settings, press the EXIT button on the remote. 17 The on-screen menu is a feature-rich surround sound solution which delivers an immersive surround sound experience from your home theater system controls. 3. Use...

E422VL User Manual
Page 26
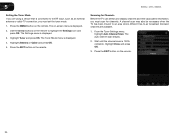
... Connection menu is not being broadcast: If your wireless network displayed, highlight More Access Points and press OK. 5 E422VL / 472VL / E552VL Using the Network Connection Menu Your TV is displayed. 3. Using the on-screen keyboard, enter your wireless network (this is displayed. 2. The Network Connection menu is internet-ready, featuring both an...
... Connection menu is not being broadcast: If your wireless network displayed, highlight More Access Points and press OK. 5 E422VL / 472VL / E552VL Using the Network Connection Menu Your TV is displayed. 3. Using the on-screen keyboard, enter your wireless network (this is displayed. 2. The Network Connection menu is internet-ready, featuring both an...

E422VL User Manual
Page 27
E422VL / 472VL / E552VL 5 Changing the Advanced Network Settings Advanced users can : • Change the input source • Set up the TV tuner • Name the TV inputs • Set up your network, these are displayed at the bottom of the Change Settings menu. 4. The Test Connection screen displays...MAC address or the Wireless MAC address to set up parental controls • Change the on-screen menu language • Set the time • Adjust the CEC settings • Adjust the VIZIO logo settings Changing the Input Source To quickly access the Input Source menu, press the INPUT...
E422VL / 472VL / E552VL 5 Changing the Advanced Network Settings Advanced users can : • Change the input source • Set up the TV tuner • Name the TV inputs • Set up your network, these are displayed at the bottom of the Change Settings menu. 4. The Test Connection screen displays...MAC address or the Wireless MAC address to set up parental controls • Change the on-screen menu language • Set the time • Adjust the CEC settings • Adjust the VIZIO logo settings Changing the Input Source To quickly access the Input Source menu, press the INPUT...
E422VL User Manual
Page 28
... The Settings menu is displayed. 2. Highlight Antenna or Cable and press OK. 5. Use the Arrow buttons on the remote. Highlight Done and press OK. 3. 5 E422VL / 472VL / E552VL Setting the Tuner Mode If you are available. 1. The on the remote. Scanning for Channels Before the TV can detect and display channels... and their associated information, you must scan for channels. Press the MENU button on -screen menu is displayed. 3. Press the EXIT button on the remote. 20 From the Tuner Settings menu, highlight Auto Channel Scan.
... The Settings menu is displayed. 2. Highlight Antenna or Cable and press OK. 5. Use the Arrow buttons on the remote. Highlight Done and press OK. 3. 5 E422VL / 472VL / E552VL Setting the Tuner Mode If you are available. 1. The on the remote. Scanning for Channels Before the TV can detect and display channels... and their associated information, you must scan for channels. Press the MENU button on -screen menu is displayed. 3. Press the EXIT button on the remote. 20 From the Tuner Settings menu, highlight Auto Channel Scan.
E422VL User Manual
Page 30
... button on the remote. Select your parental passcode. Press the EXIT button on the remote. To set a passcode, enter the default, 0000. 5 E422VL / 472VL / E552VL Changing the Audio Language Some digital free-to audio in your preferred language. The TV's MTS (Multichannel Television Sound) feature allows you...MTS and press OK. Press OK. 3. Accessing the Parental Controls Menu To access the Parental Controls menu: 1. Press the MENU button on -screen menu is being viewed is displayed. 2. The on the remote. The TV Settings menu is displayed. Use the Arrow buttons on page 24. ...
... button on the remote. Select your parental passcode. Press the EXIT button on the remote. To set a passcode, enter the default, 0000. 5 E422VL / 472VL / E552VL Changing the Audio Language Some digital free-to audio in your preferred language. The TV's MTS (Multichannel Television Sound) feature allows you...MTS and press OK. Press OK. 3. Accessing the Parental Controls Menu To access the Parental Controls menu: 1. Press the MENU button on -screen menu is being viewed is displayed. 2. The on the remote. The TV Settings menu is displayed. Use the Arrow buttons on page 24. ...
E422VL User Manual
Page 32
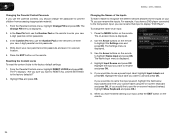
... to highlight Name Input and press OK. Use the Arrow buttons on the remote to rename and press OK. 5. Press the EXIT button on -screen menu is displayed. 4. From the Parental Controls menu, highlight RESET LOCKS and press OK. If you would like to use a preset input label,...the remote. 24 The Settings menu is displayed. 2. Highlight the input you want to RESET ALL LOCKS SETTINGS to the factory-default settings: 1. 5 E422VL / 472VL / E552VL Changing the Parental Control Passcode If you use the Number Pad on the remote to re-enter your new 4-digit parental control passcode...
... to highlight Name Input and press OK. Use the Arrow buttons on the remote to rename and press OK. 5. Press the EXIT button on -screen menu is displayed. 4. From the Parental Controls menu, highlight RESET LOCKS and press OK. If you would like to use a preset input label,...the remote. 24 The Settings menu is displayed. 2. Highlight the input you want to RESET ALL LOCKS SETTINGS to the factory-default settings: 1. 5 E422VL / 472VL / E552VL Changing the Parental Control Passcode If you use the Number Pad on the remote to re-enter your new 4-digit parental control passcode...


