
E322MV User Manual
Page 3
...please read these instructions before using your VIZIO product, visit our website at www.VIZIO.com or call toll free at www.VIZIO.com • Complete and mail the enclosed registration card Extended Warranties For peace of mind, and to this manual for safekeeping. Product Registration To purchase ... sure to inspect the package contents to the presence of your new VIZIO product, read the accompanying important warning or notice. When Reading this Manual When you attach your sales receipt to protect your new VIZIO HDTV. To get the most out of important operating instructions. These ...
...please read these instructions before using your VIZIO product, visit our website at www.VIZIO.com or call toll free at www.VIZIO.com • Complete and mail the enclosed registration card Extended Warranties For peace of mind, and to this manual for safekeeping. Product Registration To purchase ... sure to inspect the package contents to the presence of your new VIZIO product, read the accompanying important warning or notice. When Reading this Manual When you attach your sales receipt to protect your new VIZIO HDTV. To get the most out of important operating instructions. These ...

E322MV User Manual
Page 9
... TV. Place the TV screen-down on a soft surface, such as carpet, rug, or blanket. 2. To prevent scratches or damage to inspect the package contents. VIZIO LCD HDTV with the stand neck, you can be installed in two ways: • On a flat surface, using the included stand • On a wall, using... non-level surface • It is pushed, pulled, or otherwise improperly moved • If an earthquake occurs and the TV is missing or damaged. User Manual and Quick Start Guide Remote Control with the stand neck. Your TV can begin installing the TV.
... TV. Place the TV screen-down on a soft surface, such as carpet, rug, or blanket. 2. To prevent scratches or damage to inspect the package contents. VIZIO LCD HDTV with the stand neck, you can be installed in two ways: • On a flat surface, using the included stand • On a wall, using... non-level surface • It is pushed, pulled, or otherwise improperly moved • If an earthquake occurs and the TV is missing or damaged. User Manual and Quick Start Guide Remote Control with the stand neck. Your TV can begin installing the TV.

E322MV User Manual
Page 14
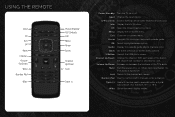
CC: Open the Closed Captioning menu. Back: Go to manually enter a channel. Channel Up/ Change the channel. Volume Up/ Increase or decrease the loudness... op- With each press of the Down: TV's audio. A/V Controls: Control external device (CEC-enabled devices only). Last: Return to manually enter a digital sub-channel. (For example, 18-4 or 18-5.) Wide: Switch between display modes. V Button: Launch the USB photo ... 6 Power/Standby A/V Controls Info Menu Arrow Guide Channel Up/Down Last Dash (-) Remote Control E322MV Power/Standby: Turn the TV on -screen menu and episode guide.
CC: Open the Closed Captioning menu. Back: Go to manually enter a channel. Channel Up/ Change the channel. Volume Up/ Increase or decrease the loudness... op- With each press of the Down: TV's audio. A/V Controls: Control external device (CEC-enabled devices only). Last: Return to manually enter a digital sub-channel. (For example, 18-4 or 18-5.) Wide: Switch between display modes. V Button: Launch the USB photo ... 6 Power/Standby A/V Controls Info Menu Arrow Guide Channel Up/Down Last Dash (-) Remote Control E322MV Power/Standby: Turn the TV on -screen menu and episode guide.

E322MV User Manual
Page 24
5 Setting the TV's Date and Time From the Date & Time menu, you cannot manually set the time zone: 1. The TV Settings menu is displayed. 3. Use the Arrow buttons to highlight the TV icon and press OK. Press EXIT. 16 E322MV Adjusting the Time for Daylight Savings This setting will automatically adjust the time...
5 Setting the TV's Date and Time From the Date & Time menu, you cannot manually set the time zone: 1. The TV Settings menu is displayed. 3. Use the Arrow buttons to highlight the TV icon and press OK. Press EXIT. 16 E322MV Adjusting the Time for Daylight Savings This setting will automatically adjust the time...

E322MV User Manual
Page 25
... • When set the TV's date and time. Press EXIT. 5 Turning the VIZIO Light On or Off This setting allows you can manually set to On, the VIZIO logo will remain off while the TV is turned on. Use the Arrow buttons to... the remote. Use the Arrow buttons to enter the current date and time. 6. To turn off the back-lit VIZIO logo on the front bezel of your TV. Use the Number Pad to highlight Time & Local Settings and press OK...is displayed. 3. The on the remote to highlight the TV icon and press OK. E322MV Setting the Date and Time Using this menu option, you to turn the...
... • When set the TV's date and time. Press EXIT. 5 Turning the VIZIO Light On or Off This setting allows you can manually set to On, the VIZIO logo will remain off while the TV is turned on. Use the Arrow buttons to... the remote. Use the Arrow buttons to enter the current date and time. 6. To turn off the back-lit VIZIO logo on the front bezel of your TV. Use the Number Pad to highlight Time & Local Settings and press OK...is displayed. 3. The on the remote to highlight the TV icon and press OK. E322MV Setting the Date and Time Using this menu option, you to turn the...

E322MV User Manual
Page 30
... the room to sharpen non-HD (high definition) content; To enable or disable the ambient light sensor: 1. Color - To change the setting to manually change the TV's backlight settings. Optimizes the picture settings for watching a movie in a dark room. • Game - Allows you to Off or...picture. Press the OK button on the remote. Use the Arrow buttons to Off. Adjusts the white level of the picture colors. 6 E322MV Adjusting the Picture Settings Using the Picture menu, you can adjust the following options, then press OK: • Standard - Use the ...
... the room to sharpen non-HD (high definition) content; To enable or disable the ambient light sensor: 1. Color - To change the setting to manually change the TV's backlight settings. Optimizes the picture settings for watching a movie in a dark room. • Game - Allows you to Off or...picture. Press the OK button on the remote. Use the Arrow buttons to Off. Adjusts the white level of the picture colors. 6 E322MV Adjusting the Picture Settings Using the Picture menu, you can adjust the following options, then press OK: • Standard - Use the ...

E322MV User Manual
Page 38
...working . • Ensure you are using cable TV, satellite, or antenna connected directly to select a different input source. see your device's user manual for Channels on the remote to the TV, scan for Channels on the TV don't look right. • Adust the Color and Tint settings... Department. Quality customer support and service are connected correctly. Phone: Fax: Email: (877) 698-4946 (949) 585-9563 techsupport@vizio.com Web: www.VIZIO.com Hours of VIZIO's commitment to a window for Channels on page 12. • Press the INPUT button on page 12. • Reset the picture ...
...working . • Ensure you are using cable TV, satellite, or antenna connected directly to select a different input source. see your device's user manual for Channels on the remote to the TV, scan for Channels on the TV don't look right. • Adust the Color and Tint settings... Department. Quality customer support and service are connected correctly. Phone: Fax: Email: (877) 698-4946 (949) 585-9563 techsupport@vizio.com Web: www.VIZIO.com Hours of VIZIO's commitment to a window for Channels on page 12. • Press the INPUT button on page 12. • Reset the picture ...

E322MV Quick Start Guide
Page 2
PACKAGE CONTENTS 1 Remote Control with Batteries VIZIO LCD HDTV with Base User Manual and Quick Start Guide
PACKAGE CONTENTS 1 Remote Control with Batteries VIZIO LCD HDTV with Base User Manual and Quick Start Guide
E322MV Quick Start Guide
Page 3
... the TV's audio. Volume Up/Down: Increase or decrease the loudness of the button, the channel will increase or decrease by one. Last: Return to manually enter a digital sub-channel. (For example, 18-4 or 18-5.) Wide: Switch between display modes. CC: Open the Closed Captioning menu. Exit: Close the on -screen...
... the TV's audio. Volume Up/Down: Increase or decrease the loudness of the button, the channel will increase or decrease by one. Last: Return to manually enter a digital sub-channel. (For example, 18-4 or 18-5.) Wide: Switch between display modes. CC: Open the Closed Captioning menu. Exit: Close the on -screen...

E322MV Quick Start Guide
Page 10
... ports. This chart shows the most common connections. CONNECTING YOUR DEVICES 1 HDMI To get the best high-resolution picture and sound on your new VIZIO TV, connect your device and the TV off. Turn your devices with an HDMI cable. If you would like to purchase online... on VIZIO TVs and feature: • 1080p and for full HD video and future Ultra-HD video • Great flexibility for thin wall mounts • Stays securely connected at sharp angles • Limited lifetime warranty Visit www.VIZIO.com to see additional connection options, see Connecting Your Devices in the user manual.
... ports. This chart shows the most common connections. CONNECTING YOUR DEVICES 1 HDMI To get the best high-resolution picture and sound on your new VIZIO TV, connect your device and the TV off. Turn your devices with an HDMI cable. If you would like to purchase online... on VIZIO TVs and feature: • 1080p and for full HD video and future Ultra-HD video • Great flexibility for thin wall mounts • Stays securely connected at sharp angles • Limited lifetime warranty Visit www.VIZIO.com to see additional connection options, see Connecting Your Devices in the user manual.

E322MV Quick Start Guide
Page 15
There are black/gray bars on the front of the TV, in the user manual. • Check all cables to which your device is on the top/bottom/ sides of your connected devices are securely attached. See Adjusting the Picture ... they are turned on. • Press the INPUT button on the TV don't look right. • Adust the Color and Tint settings in the user manual. • Reset the picture settings. I press buttons on the remote control. • Insert new batteries into the remote. • Point the remote directly at the...
There are black/gray bars on the front of the TV, in the user manual. • Check all cables to which your device is on the top/bottom/ sides of your connected devices are securely attached. See Adjusting the Picture ... they are turned on. • Press the INPUT button on the TV don't look right. • Adust the Color and Tint settings in the user manual. • Reset the picture settings. I press buttons on the remote control. • Insert new batteries into the remote. • Point the remote directly at the...

