E240AR User Manual
Page 2
...Definition Multimedia Interface are incorporated under license from SRS Labs, Inc. Changing the factory default picture settings or enabling other features will increase power consumption that could exceed the limits necessary to qualify for ENERGY STAR in the "factory default" setting and this is the setting in which... power savings will be achieved. Dolby and the double-D symbol are trademarks of SRS Labs, Inc. SRS StudioSound HD and SRS TruVolume are ...
...Definition Multimedia Interface are incorporated under license from SRS Labs, Inc. Changing the factory default picture settings or enabling other features will increase power consumption that could exceed the limits necessary to qualify for ENERGY STAR in the "factory default" setting and this is the setting in which... power savings will be achieved. Dolby and the double-D symbol are trademarks of SRS Labs, Inc. SRS StudioSound HD and SRS TruVolume are ...
E240AR User Manual
Page 3
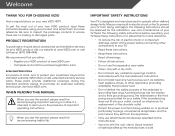
... instructions should be observed for future reference. It is designed and manufactured to protect your investment beyond the standard warranty, VIZIO offers on or pinched, particularly at plugs, convenience receptacles, and the point where they exit from being damaged, the following... your VIZIO product at www.VIZIO.com • Complete and mail the enclosed registration card Extended Warranties For peace of mind, and to operate within defined design limits. Install in a safe place for replacement of electric shock or component damage, switch off the power before...
... instructions should be observed for future reference. It is designed and manufactured to protect your investment beyond the standard warranty, VIZIO offers on or pinched, particularly at plugs, convenience receptacles, and the point where they exit from being damaged, the following... your VIZIO product at www.VIZIO.com • Complete and mail the enclosed registration card Extended Warranties For peace of mind, and to operate within defined design limits. Install in a safe place for replacement of electric shock or component damage, switch off the power before...
E240AR User Manual
Page 4
... TV from tip-over. • Unplug this apparatus during lightning. For more information, contact your dealer. • When connected to a power outlet, power is always flowing into the apparatus, the apparatus has been exposed to rain or moisture, does not operate normally or has been dropped. &#...your TV close to smoke. If you to high voltages, electric shock, and other voltage than the voltage specified. To totally disconnect power, unplug the power cord. • The lightning flash with the apparatus. This will not be sure these openings are provided for long periods of time...
... TV from tip-over. • Unplug this apparatus during lightning. For more information, contact your dealer. • When connected to a power outlet, power is always flowing into the apparatus, the apparatus has been exposed to rain or moisture, does not operate normally or has been dropped. &#...your TV close to smoke. If you to high voltages, electric shock, and other voltage than the voltage specified. To totally disconnect power, unplug the power cord. • The lightning flash with the apparatus. This will not be sure these openings are provided for long periods of time...
E240AR User Manual
Page 5
... not use your TV in an area with heavy dust or high humidity. Ensure that contained in any smoke or odor becomes apparent, unplug the power cord and contact your TV. When your TV will not be used as the disconnect device, the disconnect device shall remain readily operable. • CAUTION... expose batteries to excessive heat such as vases, shall be of sufficient magnitude to repair your dealer for an extended period of time, unplug the power cord. • To reduce risk of your TV may cause fire or electric shock. • Do not install your TV if any of electrical shock...
... not use your TV in an area with heavy dust or high humidity. Ensure that contained in any smoke or odor becomes apparent, unplug the power cord and contact your TV. When your TV will not be used as the disconnect device, the disconnect device shall remain readily operable. • CAUTION... expose batteries to excessive heat such as vases, shall be of sufficient magnitude to repair your dealer for an extended period of time, unplug the power cord. • To reduce risk of your TV may cause fire or electric shock. • Do not install your TV if any of electrical shock...
E240AR User Manual
Page 6
... parties listed below, as before to digital television broadcasting was complete on June 12, 2009. DTV Transition Advisory The nationwide switch to receive low power, Class A or translator television stations and with a built-in tuner capable of US Television Stations www.high-techproductions.com/usTVstations.htm Your TV comes with...
... parties listed below, as before to digital television broadcasting was complete on June 12, 2009. DTV Transition Advisory The nationwide switch to receive low power, Class A or translator television stations and with a built-in tuner capable of US Television Stations www.high-techproductions.com/usTVstations.htm Your TV comes with...
E240AR User Manual
Page 7
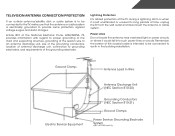
...screen of the grounding electrode. Lightning Protection For added protection of the TV during a lightning storm or when it could fall into such power lines or circuits. Ground Clamp Antenna Lead In Wire Electric Service Equipment Antenna Discharge Unit (NEC Section 810-20) Grounding Conductors (NEC Section... 810-21) Ground Clamps Power Service Grounding Electrode System (NEC ART 250, part H) Power Lines Do not locate the antenna near overhead light or power circuits, or where it is intended to be connected to the TV, make ...
...screen of the grounding electrode. Lightning Protection For added protection of the TV during a lightning storm or when it could fall into such power lines or circuits. Ground Clamp Antenna Lead In Wire Electric Service Equipment Antenna Discharge Unit (NEC Section 810-20) Grounding Conductors (NEC Section... 810-21) Ground Clamps Power Service Grounding Electrode System (NEC ART 250, part H) Power Lines Do not locate the antenna near overhead light or power circuits, or where it is intended to be connected to the TV, make ...
E240AR User Manual
Page 8
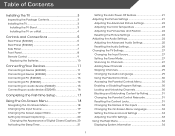
... 10 Connecting Your Devices 11 Connecting A Device (E240AR 11 Connecting A Device (E320AR 12 Connecting A PC (E240AR 13 Connecting A PC (E320AR 14 Connecting an audio device (E240AR 15 Connecting an audio device (E320AR 16 Completing the First-Time Setup 17 Using the On-Screen Menu 18 Navigating ...Setting Up Closed Captioning 20 Changing the Appearance of Digital Closed Captions.. 20 Activating the Sleep Timer 21 Setting the Auto Power Off Feature 21 Adjusting the Picture Settings 21 Adjusting the Advanced Picture Settings 22 Adjusting the Color Temperature 23 Adjusting the ...
... 10 Connecting Your Devices 11 Connecting A Device (E240AR 11 Connecting A Device (E320AR 12 Connecting A PC (E240AR 13 Connecting A PC (E320AR 14 Connecting an audio device (E240AR 15 Connecting an audio device (E320AR 16 Completing the First-Time Setup 17 Using the On-Screen Menu 18 Navigating ...Setting Up Closed Captioning 20 Changing the Appearance of Digital Closed Captions.. 20 Activating the Sleep Timer 21 Setting the Auto Power Off Feature 21 Adjusting the Picture Settings 21 Adjusting the Advanced Picture Settings 22 Adjusting the Color Temperature 23 Adjusting the ...
E240AR User Manual
Page 14
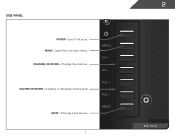
Turn TV off or on -screen menu. INPUT 7 2 Side Panel Side Panel POWER - MENU - CHANNEL UP/DOWN - MENU CH + CH - Change input source. Increase or decrease volume level INPUT - Open the on . Change the channel. VOLUME UP/DOWN -
Turn TV off or on -screen menu. INPUT 7 2 Side Panel Side Panel POWER - MENU - CHANNEL UP/DOWN - MENU CH + CH - Change input source. Increase or decrease volume level INPUT - Open the on . Change the channel. VOLUME UP/DOWN -
E240AR User Manual
Page 16
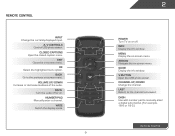
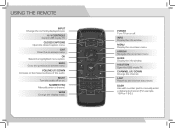
... Open the USB photo viewer. Info Display the info window. Menu Display the on or off or on -screen menu. WIDE Switch the display mode. 9 2 Power Turn TV on -screen menu. Last Return to manually enter a digital sub-channel. (For example, 18-4 or 18-5.) Remote Control
... Open the USB photo viewer. Info Display the info window. Menu Display the on or off or on -screen menu. WIDE Switch the display mode. 9 2 Power Turn TV on -screen menu. Last Return to manually enter a digital sub-channel. (For example, 18-4 or 18-5.) Remote Control
E240AR User Manual
Page 24
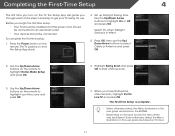
... press OK. 2. Before you begin the first-time setup: • Your TV should be installed and the power cord should be connected. Press the Power button on and the Setup App starts. 4. The TV powers on the remote. Use the Up/Down Arrow buttons on TV input. 17 The First-Time Setup is...
... press OK. 2. Before you begin the first-time setup: • Your TV should be installed and the power cord should be connected. Press the Power button on and the Setup App starts. 4. The TV powers on the remote. Use the Up/Down Arrow buttons on TV input. 17 The First-Time Setup is...

E240AR User Manual
Page 28
... 2. This is displayed. 1. The on the remote to highlight Picture Mode, then use the sleep timer: To adjust the picture settings: 1. Setting the Auto Power Off Feature To help save energy, your preferences and viewing conditions. The Picture menu is displayed. 2. Press OK, then press EXIT. and press OK. The... output. • Vivid mode sets the picture settings to values that will turn off : 30, 60, 90, 120, or 180 minutes. 5. The Auto Power Off menu is displayed. 3. Use the Up/Down Arrow buttons on the remote to highlight the period of time after a set the Auto...
... 2. This is displayed. 1. The on the remote to highlight Picture Mode, then use the sleep timer: To adjust the picture settings: 1. Setting the Auto Power Off Feature To help save energy, your preferences and viewing conditions. The Picture menu is displayed. 2. Press OK, then press EXIT. and press OK. The... output. • Vivid mode sets the picture settings to values that will turn off : 30, 60, 90, 120, or 180 minutes. 5. The Auto Power Off menu is displayed. 3. Use the Up/Down Arrow buttons on the remote to highlight the period of time after a set the Auto...

E240AR User Manual
Page 44
... be formatted as FAT32. • Files on . Select the photo, press OK, then highlight Fullscreen and press OK. 37 Press the Power/Standby button on the remote or touch the Power control on the side of the TV to the USB port on . 3. Highlight Start Slideshow and press OK to the TV...
... be formatted as FAT32. • Files on . Select the photo, press OK, then highlight Fullscreen and press OK. 37 Press the Power/Standby button on the remote or touch the Power control on the side of the TV to the USB port on . 3. Highlight Start Slideshow and press OK to the TV...
E240AR User Manual
Page 47
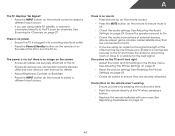
... Color and Tint settings in the Picture menu. The colors on page 24. The buttons on the remote aren't working electrical outlet. • Press the Power/Standby button on the remote or on the side of the TV to turn the TV on. See Resetting the Picture Settings on page 24...; If you are using an antenna, the signal strength of the channel may be low. See Scanning for Channels on page 27 There is no power. • Ensure the TV is no sound. • Press Volume Up on the remote control. • Press the MUTE button on the remote to ensure...
... Color and Tint settings in the Picture menu. The colors on page 24. The buttons on the remote aren't working electrical outlet. • Press the Power/Standby button on the remote or on the side of the TV to turn the TV on. See Resetting the Picture Settings on page 24...; If you are using an antenna, the signal strength of the channel may be low. See Scanning for Channels on page 27 There is no power. • Ensure the TV is no sound. • Press Volume Up on the remote control. • Press the MUTE button on the remote to ensure...
E240AR User Manual
Page 51
...and workmanship for a period of the model's product information page (www.VIZIO.com) or look for example: cosmetic damage, normal wear and tear, improper operation, improper voltage supply or power surges, signal issues, damages from warranty service or replacement, whichever is ...not responsible for transportation costs to the service center, but VIZIO will be restored to protect your personal information,VIZIO recommends that affords an equal degree ...
...and workmanship for a period of the model's product information page (www.VIZIO.com) or look for example: cosmetic damage, normal wear and tear, improper operation, improper voltage supply or power surges, signal issues, damages from warranty service or replacement, whichever is ...not responsible for transportation costs to the service center, but VIZIO will be restored to protect your personal information,VIZIO recommends that affords an equal degree ...

E240AR User Manual
Page 52
... can radiate radio frequency energy, and if not installed and used in accordance with the instructions, may cause undesired operation. Shielded interface cables and AC power cord, if any, must accept any radio or TV interference caused by turning the equipment off and on a circuit different from that may cause harmful...
... can radiate radio frequency energy, and if not installed and used in accordance with the instructions, may cause undesired operation. Shielded interface cables and AC power cord, if any, must accept any radio or TV interference caused by turning the equipment off and on a circuit different from that may cause harmful...

E320AR Quick Start Guide
Page 2
...not use caution when moving your TV. To ensure reliable operation of the polarized or grounding-type plug. To totally disconnect power, unplug the power cord. • The lightning flash with instructions. Overloading can result in the operating instructions unless you to high voltages, electric...to avoid causing fire, electric shock, or component damage. • A distance of at your TV and easily accessible. • Only power of time. Wait before connecting other components to your TV. • Read these instructions. • Keep these instructions in the literature...
...not use caution when moving your TV. To ensure reliable operation of the polarized or grounding-type plug. To totally disconnect power, unplug the power cord. • The lightning flash with instructions. Overloading can result in the operating instructions unless you to high voltages, electric...to avoid causing fire, electric shock, or component damage. • A distance of at your TV and easily accessible. • Only power of time. Wait before connecting other components to your TV. • Read these instructions. • Keep these instructions in the literature...
E320AR Quick Start Guide
Page 4
... window. Back Go to the previous on -screen menu. Number Pad Manually enter a channel. Wide Change the display mode. V Button Open the USB media TV. Power Turn TV on or off or on. Guide Display the info window. Ok Select the highlighted menu option. Channel Up/Down Change the channel. using...
... window. Back Go to the previous on -screen menu. Number Pad Manually enter a channel. Wide Change the display mode. V Button Open the USB media TV. Power Turn TV on or off or on. Guide Display the info window. Ok Select the highlighted menu option. Channel Up/Down Change the channel. using...

E320AR Quick Start Guide
Page 6
Gently slide the battery cover back into an electrical outlet. Plug the power cord into place. Insert the included batteries. first-time setup 1 2 Remove the battery cover by pressing gently on the VIZIO logo and sliding away from the remote.
Gently slide the battery cover back into an electrical outlet. Plug the power cord into place. Insert the included batteries. first-time setup 1 2 Remove the battery cover by pressing gently on the VIZIO logo and sliding away from the remote.

E320AR Quick Start Guide
Page 7
Use the Arrow buttons on the remote. The Setup App is displayed. Turn the TV on by pressing the Power button on the remote to the TV with an RF/Coaxial cable. 3 4 Back of TV Coaxial Cable If you have an external antenna or a cable connection that extends from a wall outlet, connect it to highlight Home Mode Setup and press OK.
Use the Arrow buttons on the remote. The Setup App is displayed. Turn the TV on by pressing the Power button on the remote to the TV with an RF/Coaxial cable. 3 4 Back of TV Coaxial Cable If you have an external antenna or a cable connection that extends from a wall outlet, connect it to highlight Home Mode Setup and press OK.
E320AR Quick Start Guide
Page 13
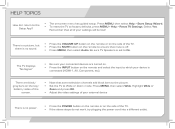
.... • If the above steps do I return to ensure that mute is connected (HDMI-1, AV, Component, etc). Be sure TV Speakers is no power. • Press the POWER button on the remote or on the remote and select the input to On. There is a picture, but there is set to which your... to the picture. • Set the TV to factory defaults, press MENU > Help > Reset TV Settings. help topics How do not work, try plugging the power cord into a different outlet. Press MENU, then select Help > Start Setup Wizard. • To reset the TV to Wide or Zoom mode.
.... • If the above steps do I return to ensure that mute is connected (HDMI-1, AV, Component, etc). Be sure TV Speakers is no power. • Press the POWER button on the remote or on the remote and select the input to On. There is a picture, but there is set to which your... to the picture. • Set the TV to factory defaults, press MENU > Help > Reset TV Settings. help topics How do not work, try plugging the power cord into a different outlet. Press MENU, then select Help > Start Setup Wizard. • To reset the TV to Wide or Zoom mode.


