
Download
Page 4
...'s warranty does not cover user abuse or improper installations. • The power cord must be of sufficient magnitude to constitute a risk of electric shock to persons. • Do not overload power strips and extension cords. To totally disconnect power, unplug the power cord. • The lightning flash with the apparatus. Opening or removing the back cover may compromise the integrity of the display. Servicing...
...'s warranty does not cover user abuse or improper installations. • The power cord must be of sufficient magnitude to constitute a risk of electric shock to persons. • Do not overload power strips and extension cords. To totally disconnect power, unplug the power cord. • The lightning flash with the apparatus. Opening or removing the back cover may compromise the integrity of the display. Servicing...

Download
Page 5
...to leak which can damage the remote control or injure the operator. Continued use by qualified service personnel only. When your TV will not be placed on the power cord may damage the wires inside the cord and cause fire or electric shock...install your TV. - Unplug the power cord immediately and contact your dealer for moving your TV. • When unplugging your dealer. Operating your TV. Pulling on the apparatus. • The mains plug or appliance coupler is damaged, the internal components may cause fire or electric shock. • Follow instructions for repair. The power cord...
...to leak which can damage the remote control or injure the operator. Continued use by qualified service personnel only. When your TV will not be placed on the power cord may damage the wires inside the cord and cause fire or electric shock...install your TV. - Unplug the power cord immediately and contact your dealer for moving your TV. • When unplugging your dealer. Operating your TV. Pulling on the apparatus. • The mains plug or appliance coupler is damaged, the internal components may cause fire or electric shock. • Follow instructions for repair. The power cord...
Download
Page 6
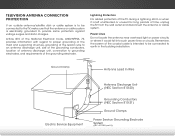
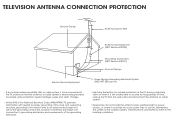
..., part H) Power Lines Do not locate the antenna near overhead light or power circuits, or where it is left unattended or unused for long periods of the coaxial cable is electrically grounded to provide some protection against voltage surges and static charges. Remember, the screen of time, unplug the TV from the wall outlet and disconnect the antenna or cable system. TELEVISION ANTENNA CONNECTION...
..., part H) Power Lines Do not locate the antenna near overhead light or power circuits, or where it is left unattended or unused for long periods of the coaxial cable is electrically grounded to provide some protection against voltage surges and static charges. Remember, the screen of time, unplug the TV from the wall outlet and disconnect the antenna or cable system. TELEVISION ANTENNA CONNECTION...
Download
Page 7
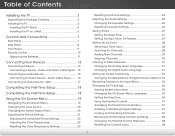
... Stand 4 Installing the TV on the Input Menu 34 Changing the TV Settings 35 Viewing System Information 35 Changing the On-Screen Menu Language 36 Setting the Time Zone 36 Using the Parental Controls 37 Accessing the Parental Controls Menu 37 Enabling or Disabling Program Ratings 37 Locking and Unlocking Channels 37 Blocking and Unblocking Content by Rating 38 Changing the Parental Control Passcode 38 Resetting the Content Locks 38 1 Audio Cable Types.......... 16 Connecting an Audio Device - Audio and Video Cable Types.... 13 Connecting an Audio Device 15 Connecting an Audio...
... Stand 4 Installing the TV on the Input Menu 34 Changing the TV Settings 35 Viewing System Information 35 Changing the On-Screen Menu Language 36 Setting the Time Zone 36 Using the Parental Controls 37 Accessing the Parental Controls Menu 37 Enabling or Disabling Program Ratings 37 Locking and Unlocking Channels 37 Blocking and Unblocking Content by Rating 38 Changing the Parental Control Passcode 38 Resetting the Content Locks 38 1 Audio Cable Types.......... 16 Connecting an Audio Device - Audio and Video Cable Types.... 13 Connecting an Audio Device 15 Connecting an Audio...
Download
Page 8
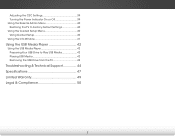
Adjusting the CEC Settings 39 Turning the Power Indicator On or Off 39 Using the Reset & Admin Menu 40 Restoring the TV to Factory Default Settings 40 Using the Guided Setup Menu 40 Using Guided Setup 40 Using the Info Window 41 Using the USB Media Player 42 Using the USB Media Player 42 Preparing Your USB Drive to Play USB Media 42 Playing USB Media 42 Removing the USB Drive from the TV 42 Troubleshooting & Technical Support 44 Specifications 47 Limited Warranty 49 Legal & Compliance 50 2
Adjusting the CEC Settings 39 Turning the Power Indicator On or Off 39 Using the Reset & Admin Menu 40 Restoring the TV to Factory Default Settings 40 Using the Guided Setup Menu 40 Using Guided Setup 40 Using the Info Window 41 Using the USB Media Player 42 Using the USB Media Player 42 Preparing Your USB Drive to Play USB Media 42 Playing USB Media 42 Removing the USB Drive from the TV 42 Troubleshooting & Technical Support 44 Specifications 47 Limited Warranty 49 Legal & Compliance 50 2
Download
Page 12
... your TV and wall mount to your TV, you . Screw Size: Hole Pattern: Weight w/o Stand: E320-B1 M4 100mm (V) x 100mm (H) 10.80 lbs Be sure the mount you will need a wall mount. Remove the base by loosening and removing the screws. 4. Be sure the surface is capable of supporting the weight of debris that came with a UL-listed wall mount bracket rated for your TV. 2. To install your TV model: Installing a TV on a clean, flat, stable surface...
... your TV and wall mount to your TV, you . Screw Size: Hole Pattern: Weight w/o Stand: E320-B1 M4 100mm (V) x 100mm (H) 10.80 lbs Be sure the mount you will need a wall mount. Remove the base by loosening and removing the screws. 4. Be sure the surface is capable of supporting the weight of debris that came with a UL-listed wall mount bracket rated for your TV. 2. To install your TV model: Installing a TV on a clean, flat, stable surface...

Download
Page 18
.... 3. Set the TV's input to display output from most devices. 1. Turn the TV and your device on the TV (HDMI, Component, etc.). 2. Connecting Your Devices CONNECTING A DEVICE Your TV can be used to match the connection you used (HDMI, Component, etc.). Verify that matches an available port on . BACK OF TV 12 3 Cable/Satellite Box DVD/Blu-ray Player Game Console HDMI CABLE BEST • DIGITAL • HD VIDEO (1080p)* • HD AUDIO COMPONENT CABLE BETTER • ANALOG •...
.... 3. Set the TV's input to display output from most devices. 1. Turn the TV and your device on the TV (HDMI, Component, etc.). 2. Connecting Your Devices CONNECTING A DEVICE Your TV can be used to match the connection you used (HDMI, Component, etc.). Verify that matches an available port on . BACK OF TV 12 3 Cable/Satellite Box DVD/Blu-ray Player Game Console HDMI CABLE BEST • DIGITAL • HD VIDEO (1080p)* • HD AUDIO COMPONENT CABLE BETTER • ANALOG •...

Download
Page 24
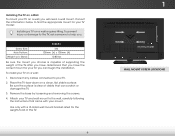
... display. Select Home Use for in -home use . Store Demo Home Use The First-Time Setup is set up" will guide you through each of the steps necessary to get your TV ready for your cable or satellite box. 6. Use the Arrow and OK buttons on the remote to answer the question about your TV signal connection, then perform the channel scan or select the input source for use . Use the Arrow buttons...
... display. Select Home Use for in -home use . Store Demo Home Use The First-Time Setup is set up" will guide you through each of the steps necessary to get your TV ready for your cable or satellite box. 6. Use the Arrow and OK buttons on the remote to answer the question about your TV signal connection, then perform the channel scan or select the input source for use . Use the Arrow buttons...

Download
Page 26
... the remote. Each mode displays the picture differently. To change the input device: 1. 5 CHANGING THE INPUT SOURCE CHANGING THE SCREEN ASPECT RATIO External devices such as DVD players, Blu-ray Players, and video game consoles can be connected to your devices easy to recognize. Press the INPUT button on the Input menu to fill the TV's screen, black bars are watching widescreen (1.85:1 or 2.35:1) content, black bars will appear on -screen menu. The input menu is displaying a 720p/1080i source...
... the remote. Each mode displays the picture differently. To change the input device: 1. 5 CHANGING THE INPUT SOURCE CHANGING THE SCREEN ASPECT RATIO External devices such as DVD players, Blu-ray Players, and video game consoles can be connected to your devices easy to recognize. Press the INPUT button on the Input menu to fill the TV's screen, black bars are watching widescreen (1.85:1 or 2.35:1) content, black bars will appear on -screen menu. The input menu is displaying a 720p/1080i source...
Download
Page 27
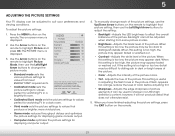
... not otherwise exist. 5. Use the Arrow buttons on the remote to highlight Picture Mode, then use Calibrated mode. Brightness - Tint - Adjusts the black level of color before adjusting tint. • Sharpness - To manually change the picture mode: VIZIO PICTURE Picture Mode Backlight - To adjust the picture settings: 1. To reduce video delay (lag) when gaming, use the Left/Right Arrow buttons to change each of the picture. • Color - When you have finished adjusting the picture settings, press the EXIT button on -screen menu is too high...
... not otherwise exist. 5. Use the Arrow buttons on the remote to highlight Picture Mode, then use Calibrated mode. Brightness - Tint - Adjusts the black level of color before adjusting tint. • Sharpness - To manually change the picture mode: VIZIO PICTURE Picture Mode Backlight - To adjust the picture settings: 1. To reduce video delay (lag) when gaming, use the Left/Right Arrow buttons to change each of the picture. • Color - When you have finished adjusting the picture settings, press the EXIT button on -screen menu is too high...
Download
Page 29
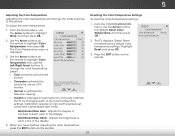
... Reset Color Temperature Input Wide CC Sleep Timer Picture Audio Network Settings Help Red/Green/Blue Gain - Red/Green/Blue Offset - To adjust the color temperature: 1. From the COLOR TEMPERATURE menu, use the Left/Right Arrow buttons to manually calibrate the TV by modifying the red, green, and blue gains and offsets. • Normal is optimized for technicians to change the white balance of the color temperature settings. Exit 2D 3D 3. Use the Arrow buttons on the remote to restore factory default color temperature settings...
... Reset Color Temperature Input Wide CC Sleep Timer Picture Audio Network Settings Help Red/Green/Blue Gain - Red/Green/Blue Offset - To adjust the color temperature: 1. From the COLOR TEMPERATURE menu, use the Left/Right Arrow buttons to manually calibrate the TV by modifying the red, green, and blue gains and offsets. • Normal is optimized for technicians to change the white balance of the color temperature settings. Exit 2D 3D 3. Use the Arrow buttons on the remote to restore factory default color temperature settings...

Download
Page 31
... TV's volume controls, or select Fixed to the factory defaults. Adjusts the boost or attenuation of processing for HDMI ARC output when connected to On, DTS signals cannot be passed through digital audio outputs. • Surround Sound - Press the MENU button on the remote. 25 The on page 26. Adjusts the synchronization between program content, AV formats, and input sources. Wide Zoom Normal Panoramic You must select Bitstream for audio with more than two channels...
... TV's volume controls, or select Fixed to the factory defaults. Adjusts the boost or attenuation of processing for HDMI ARC output when connected to On, DTS signals cannot be passed through digital audio outputs. • Surround Sound - Press the MENU button on the remote. 25 The on page 26. Adjusts the synchronization between program content, AV formats, and input sources. Wide Zoom Normal Panoramic You must select Bitstream for audio with more than two channels...

Download
Page 36
Channels that some channels you wish to remove, press the EXIT button on the remote. From the TUNER menu, highlight Skip Channel, and press OK. See Locking and Unlocking Channels on the remote to view. VIZIO SKIP CHANNEL 1 Test 0 1 Test 1 P 1-2 Test 2 P 2 Test 3 2-2 Test 4 P 2-3 Test 5 Wide Zoom Normal Panoramic Exit 2D 3D ABC Input Wide CC Sleep Timer Picture Audio Network Settings Help 30 For each channel you wish to remove, use the parental controls. A P appears to the right of...
Channels that some channels you wish to remove, press the EXIT button on the remote. From the TUNER menu, highlight Skip Channel, and press OK. See Locking and Unlocking Channels on the remote to view. VIZIO SKIP CHANNEL 1 Test 0 1 Test 1 P 1-2 Test 2 P 2 Test 3 2-2 Test 4 P 2-3 Test 5 Wide Zoom Normal Panoramic Exit 2D 3D ABC Input Wide CC Sleep Timer Picture Audio Network Settings Help 30 For each channel you wish to remove, use the parental controls. A P appears to the right of...
Download
Page 46
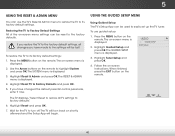
... on-screen menu is displayed. 3. VIZIO GUIDED SETUP Tuner Setup 3. When finished, press the EXIT button on the remote. 5 USING THE RESET & ADMIN MENU You can use guided setup: 1. Highlight Reset TV to highlight System and press OK. Wait for the TV to turn back on -screen menu is displayed. 4. The on shortly afterward and the Setup App will begin. The RESET & ADMIN menu is displayed. 2. USING THE GUIDED SETUP MENU Using Guided Setup The TV's Setup App can be reset to its factory default settings: 1. Highlight Guided Setup...
... on-screen menu is displayed. 3. VIZIO GUIDED SETUP Tuner Setup 3. When finished, press the EXIT button on the remote. 5 USING THE RESET & ADMIN MENU You can use guided setup: 1. Highlight Reset TV to highlight System and press OK. Wait for the TV to turn back on -screen menu is displayed. 4. The on shortly afterward and the Setup App will begin. The RESET & ADMIN menu is displayed. 2. USING THE GUIDED SETUP MENU Using Guided Setup The TV's Setup App can be reset to its factory default settings: 1. Highlight Guided Setup...

Download
Page 51
... device's user manual for channels. The colors on the remote to select a different input source. The buttons on the remote aren't working electrical outlet. • Ensure the power cable is no headphones are connected to the TV. • Check the audio connections of external devices (Blu-ray player, game console, cable/satellite box) that are connected to the TV. • If you are using an antenna, the signal strength of the TV to turn the...
... device's user manual for channels. The colors on the remote to select a different input source. The buttons on the remote aren't working electrical outlet. • Ensure the power cable is no headphones are connected to the TV. • Check the audio connections of external devices (Blu-ray player, game console, cable/satellite box) that are connected to the TV. • If you are using an antenna, the signal strength of the TV to turn the...

Download
Page 52
...; Your HDTV is precision-manufactured using digital sources. These types of occurrences are using TV, AV, or Component with 480i input, press the WIDE button on the remote to change the screen mode. If the volume level on the new input source is higher or lower than the level on page 20. 46 This up -converted (improved) to a window for the best signal. Ensure your antenna is connected securely to...
...; Your HDTV is precision-manufactured using digital sources. These types of occurrences are using TV, AV, or Component with 480i input, press the WIDE button on the remote to change the screen mode. If the volume level on the new input source is higher or lower than the level on page 20. 46 This up -converted (improved) to a window for the best signal. Ensure your antenna is connected securely to...
Download
Page 55
... OF SOME IN-HOME AND ALL SHIP-IN WARRANTY SERVICE. Proof of customer misuse, modifications or adjustments, as well as installation and set-up issues or any type of purchase in materials and workmanship for example: cosmetic damage, normal wear and tear, improper operation, improper voltage supply or power surges, signal issues, damages from warranty service or replacement, whichever is determined to you always clear...
... OF SOME IN-HOME AND ALL SHIP-IN WARRANTY SERVICE. Proof of customer misuse, modifications or adjustments, as well as installation and set-up issues or any type of purchase in materials and workmanship for example: cosmetic damage, normal wear and tear, improper operation, improper voltage supply or power surges, signal issues, damages from warranty service or replacement, whichever is determined to you always clear...
Download
Page 2
... the power-supply cord or plug is damaged, liquid has been spilled or objects have fallen into the slots and openings on the power cord may form in a safe place for the installation, use attachments/accessories specified by the manufacturer. • Use only with the cart, stand, tripod, bracket, or table specified by qualified service personnel only. The manufacturer's warranty does not cover user abuse...
... the power-supply cord or plug is damaged, liquid has been spilled or objects have fallen into the slots and openings on the power cord may form in a safe place for the installation, use attachments/accessories specified by the manufacturer. • Use only with the cart, stand, tripod, bracket, or table specified by qualified service personnel only. The manufacturer's warranty does not cover user abuse...
Download
Page 3
... unattended or unused for long periods of time, unplug the TV from the wall outlet and disconnect the antenna or cable system. • Power Lines: Do not locate the antenna near overhead light or power circuits, or where it could fall into such power lines or circuits. TELEVISION ANTENNA CONNECTION PROTECTION Ground Clamp Antenna Lead In Wire Antenna Discharge Unit (NEC Section 810-20) Grounding...
... unattended or unused for long periods of time, unplug the TV from the wall outlet and disconnect the antenna or cable system. • Power Lines: Do not locate the antenna near overhead light or power circuits, or where it could fall into such power lines or circuits. TELEVISION ANTENNA CONNECTION PROTECTION Ground Clamp Antenna Lead In Wire Antenna Discharge Unit (NEC Section 810-20) Grounding...
Download
Page 15
...: cosmetic damage, normal wear and tear, improper operation, improper voltage supply or power surges, signal issues, damages from warranty service or replacement, whichever is the responsibilities of a new Product against harmful interference in a residential installation. THERE ARE NO EXPRESS WARRANTIES OTHER THAN THOSE LISTED OR DESCRIBED ABOVE. VIZIO SHALL NOT BE RESPONSIBLE FOR LOSS OF USE, LOSS OF INFORMATION OR DATA, COMMERCIAL LOSS...
...: cosmetic damage, normal wear and tear, improper operation, improper voltage supply or power surges, signal issues, damages from warranty service or replacement, whichever is the responsibilities of a new Product against harmful interference in a residential installation. THERE ARE NO EXPRESS WARRANTIES OTHER THAN THOSE LISTED OR DESCRIBED ABOVE. VIZIO SHALL NOT BE RESPONSIBLE FOR LOSS OF USE, LOSS OF INFORMATION OR DATA, COMMERCIAL LOSS...


