
User Manual (English)
Page 5
... the AC/DC power adapter, not the cord. Do not expose batteries to excessive heat such as the disconnect device, the disconnect device shall remain readily operable. • CAUTION - Do not try to repair your dealer. These servicing instructions are qualified to do not perform any other moisture. - Pulling on the apparatus. • The mains plug or appliance...
... the AC/DC power adapter, not the cord. Do not expose batteries to excessive heat such as the disconnect device, the disconnect device shall remain readily operable. • CAUTION - Do not try to repair your dealer. These servicing instructions are qualified to do not perform any other moisture. - Pulling on the apparatus. • The mains plug or appliance...
User Manual (English)
Page 6
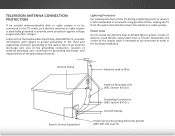
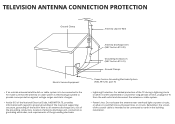
...; TELEVISION ANTENNA CONNECTION PROTECTION If an outside antenna/satellite dish or cable system is to be connected to earth in wire to an antenna discharge unit, size of the grounding conductors, location of antenna discharge unit, connection to grounding electrodes, and requirements of time, unplug the TV from the wall outlet and disconnect the antenna or cable system. Article 810 of the National Electrical Code, ANSI...
...; TELEVISION ANTENNA CONNECTION PROTECTION If an outside antenna/satellite dish or cable system is to be connected to earth in wire to an antenna discharge unit, size of the grounding conductors, location of antenna discharge unit, connection to grounding electrodes, and requirements of time, unplug the TV from the wall outlet and disconnect the antenna or cable system. Article 810 of the National Electrical Code, ANSI...
User Manual (English)
Page 7
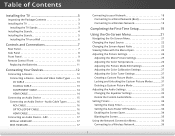
... Audio Mode 33 Setting Timers 34 Setting the Sleep Timer 34 Setting the Auto Power Off Feature 34 Enabling the Screen Saver 34 Blanking the Screen 35 Using the Network Connection Menu 36 Connecting to a Wireless Network 36 1 Audio Cable Types 16 RCA CABLE 16 OPTICAL/SPDIF CABLE 16 HDMI CABLE 16 Connecting an Audio Device - Table of Contents Installing the TV 3 Inspecting the Package Contents 3 Installing the TV 3 Installing the TV Stands 3 Installing the Stands 4 Installing the Stands 5 Installing the TV on a Wall 6 Controls and Connections 7 Rear Panel 7 Side Panel...
... Audio Mode 33 Setting Timers 34 Setting the Sleep Timer 34 Setting the Auto Power Off Feature 34 Enabling the Screen Saver 34 Blanking the Screen 35 Using the Network Connection Menu 36 Connecting to a Wireless Network 36 1 Audio Cable Types 16 RCA CABLE 16 OPTICAL/SPDIF CABLE 16 HDMI CABLE 16 Connecting an Audio Device - Table of Contents Installing the TV 3 Inspecting the Package Contents 3 Installing the TV 3 Installing the TV Stands 3 Installing the Stands 4 Installing the Stands 5 Installing the TV on a Wall 6 Controls and Connections 7 Rear Panel 7 Side Panel...
User Manual (English)
Page 8
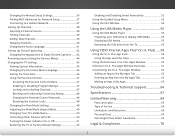
... Troubleshooting & Technical Support 64 Specifications 67 Limited Warranty 69 Parts and Labor 69 Type of Digital Closed Captions........ 42 Renaming Inputs (Using the Devices Menu 44 Changing the TV Settings 45 Viewing System Information 45 Changing the On-Screen Menu Language 46 Setting the Time Zone 46 Using the Parental Controls 47 Accessing the Parental Controls Menu 47 Enabling or Disabling Program Ratings 47 Locking and Unlocking Channels 47 Blocking and Unblocking Content by Rating 48 Changing the Parental Control Passcode 48 Resetting the Content Locks 48 Changing...
... Troubleshooting & Technical Support 64 Specifications 67 Limited Warranty 69 Parts and Labor 69 Type of Digital Closed Captions........ 42 Renaming Inputs (Using the Devices Menu 44 Changing the TV Settings 45 Viewing System Information 45 Changing the On-Screen Menu Language 46 Setting the Time Zone 46 Using the Parental Controls 47 Accessing the Parental Controls Menu 47 Enabling or Disabling Program Ratings 47 Locking and Unlocking Channels 47 Blocking and Unblocking Content by Rating 48 Changing the Parental Control Passcode 48 Resetting the Content Locks 48 Changing...
User Manual (English)
Page 12
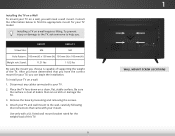
..., flat, stable surface. Remove the base by loosening and removing the screws. 4. Be sure the surface is capable of supporting the weight of the TV. Disconnect any cables connected to the wall, carefully following the instructions that came with a UL-listed wall mount bracket rated for the weight/load of debris that you will need a wall mount. After you choose is clear of this TV. 6 1 WALL MOUNT SCREW LOCATIONS Use only with your mount. E32-C1 E32h-C1 Screw Size...
..., flat, stable surface. Remove the base by loosening and removing the screws. 4. Be sure the surface is capable of supporting the weight of the TV. Disconnect any cables connected to the wall, carefully following the instructions that came with a UL-listed wall mount bracket rated for the weight/load of debris that you will need a wall mount. After you choose is clear of this TV. 6 1 WALL MOUNT SCREW LOCATIONS Use only with your mount. E32-C1 E32h-C1 Screw Size...

User Manual (English)
Page 16
...-5.) REMOTE CONTROL 10 WIDE Change the display mode. ENTER Confirm channel or passcode entered using the Number Pad. DASH Use with number pad to the channel last viewed. MUTE Turn the audio off . INFO Display the info window. 2 INPUT Change the currently displayed input. Plus) dock. A/V CONTROLS Control USB media player and video streaming playback. ARROW Navigate the on -screen menu. VOLUME UP/DOWN Increase or decrease loudness of the audio. CLOSED CAPTIONS Turn closed captions on and off or on or off. GUIDE Display the...
...-5.) REMOTE CONTROL 10 WIDE Change the display mode. ENTER Confirm channel or passcode entered using the Number Pad. DASH Use with number pad to the channel last viewed. MUTE Turn the audio off . INFO Display the info window. 2 INPUT Change the currently displayed input. Plus) dock. A/V CONTROLS Control USB media player and video streaming playback. ARROW Navigate the on -screen menu. VOLUME UP/DOWN Increase or decrease loudness of the audio. CLOSED CAPTIONS Turn closed captions on and off or on or off. GUIDE Display the...
User Manual (English)
Page 28
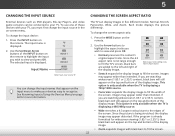
... only available when the TV is displayed. 5 CHANGING THE INPUT SOURCE CHANGING THE SCREEN ASPECT RATIO External devices such as DVD players, Blu-ray Players, and video game consoles can display images in the on the remote to highlight the input you wish to view and press OK. The input menu is displaying a 480i/480p source. • Wide stretches a 4:3 aspect ratio picture to your TV. HDMI-1 HDMI-2 Input Name COMP The TV can be...
... only available when the TV is displayed. 5 CHANGING THE INPUT SOURCE CHANGING THE SCREEN ASPECT RATIO External devices such as DVD players, Blu-ray Players, and video game consoles can display images in the on the remote to highlight the input you wish to view and press OK. The input menu is displaying a 480i/480p source. • Wide stretches a 4:3 aspect ratio picture to your TV. HDMI-1 HDMI-2 Input Name COMP The TV can be...
User Manual (English)
Page 29
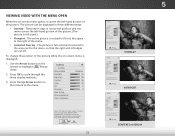
...when gaming, use Game mode. 3D Sleep Timer Picture Audio Network Settings Help VIEWPORT ABC Input Sleep Timer VIZIO Wide CC PICTURE Picture Mode Standard Backlight - + 85 Brightness - + 50 Contrast - + 50 Color - + 59 Tint - +0 Sharpness - To reduce video delay (lag) when gaming, use Game mode. To reduce video delay (lag) when gaming, use Game mode. Sleep Timer Picture Audio To change the position of the picture while the on-screen menu is full-sized and centered in three different ways: • Overlay - VIZIO Network Settings Help PICTURE Picture Mode...
...when gaming, use Game mode. 3D Sleep Timer Picture Audio Network Settings Help VIEWPORT ABC Input Sleep Timer VIZIO Wide CC PICTURE Picture Mode Standard Backlight - + 85 Brightness - + 50 Contrast - + 50 Color - + 59 Tint - +0 Sharpness - To reduce video delay (lag) when gaming, use Game mode. To reduce video delay (lag) when gaming, use Game mode. Sleep Timer Picture Audio To change the position of the picture while the on-screen menu is full-sized and centered in three different ways: • Overlay - VIZIO Network Settings Help PICTURE Picture Mode...
User Manual (English)
Page 30
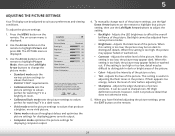
.... Color - To manually change the picture mode: VIZIO PICTURE Picture Mode Backlight - Adjusts the LED brightness to values perfect for displaying computer output. 4. Exit 2D 3D • Contrast - When this setting is toABoC high, the picture may be too dark to distinguish details. If the setting is displayed. 3. This setting is displayed. 2. Select from some picture modes. • Wide BrZiogom htneNsosrm-aAl dPjuansotrsamtihc e black level of the picture. To reduce video delay (lag) when gaming, use Game mode...
.... Color - To manually change the picture mode: VIZIO PICTURE Picture Mode Backlight - Adjusts the LED brightness to values perfect for displaying computer output. 4. Exit 2D 3D • Contrast - When this setting is toABoC high, the picture may be too dark to distinguish details. If the setting is displayed. 3. This setting is displayed. 2. Select from some picture modes. • Wide BrZiogom htneNsosrm-aAl dPjuansotrsamtihc e black level of the picture. To reduce video delay (lag) when gaming, use Game mode...
User Manual (English)
Page 38
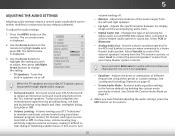
... HDMI ARC output when connected to a home theater audio system. See • Delete Audio Mode - When you wish to adjust, then press Left/Right Arrow buttons to change the setting: • TV Speakers - Lip Sync - Select On or Off. Adjusts the loudness of different Sleep Timer frePqicutuerencieAsuduiosing either preset or custom settings. Restores audio equalizer settings to factory defaults (deleted). The AUDIO menu is displayed. 2. Digital Audio Out Analog Audio Out Equalizer Delete Audio Mode On On On +0 +0 PCM Fixed...
... HDMI ARC output when connected to a home theater audio system. See • Delete Audio Mode - When you wish to adjust, then press Left/Right Arrow buttons to change the setting: • TV Speakers - Lip Sync - Select On or Off. Adjusts the loudness of different Sleep Timer frePqicutuerencieAsuduiosing either preset or custom settings. Restores audio equalizer settings to factory defaults (deleted). The AUDIO menu is displayed. 2. Digital Audio Out Analog Audio Out Equalizer Delete Audio Mode On On On +0 +0 PCM Fixed...
User Manual (English)
Page 59
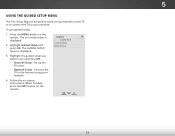
... connect the TV to your network. 4. Highlight Guided Setup and press OK. Wide Zoom Normal Panoramic Exit 2D 3D ABC Input Wide CC Sleep Timer Picture Audio Network Settings Help 53 The GUIDED SETUP menu is displayed. 2. VIZIO GUIDED SETUP Channel Setup Network Setup 3. Connect the TV to use guided setup: 1. 5 USING THE GUIDED SETUP MENU The TV's Setup App can be used to easily set up the TV tuner. • Network Setup - When finished, press the EXIT button on the remote. Highlight the guided setup you want to the Internet using your network...
... connect the TV to your network. 4. Highlight Guided Setup and press OK. Wide Zoom Normal Panoramic Exit 2D 3D ABC Input Wide CC Sleep Timer Picture Audio Network Settings Help 53 The GUIDED SETUP menu is displayed. 2. VIZIO GUIDED SETUP Channel Setup Network Setup 3. Connect the TV to use guided setup: 1. 5 USING THE GUIDED SETUP MENU The TV's Setup App can be used to easily set up the TV tuner. • Network Setup - When finished, press the EXIT button on the remote. Highlight the guided setup you want to the Internet using your network...
User Manual (English)
Page 71
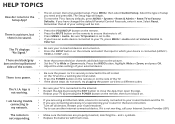
... the power cable is plugged into a working . • Ensure you are using an antenna, the signal strength of the channel may be low. See Finding Channels on the TV don't look right. • Adjust the Color and Tint settings in the Picture menu. See Adjusting the Picture Settings on page 24. • Press the INPUT button on page 24. Ensure your device's user manual for the best signal. See Adjusting the Picture Settings on the remote to...
... the power cable is plugged into a working . • Ensure you are using an antenna, the signal strength of the channel may be low. See Finding Channels on the TV don't look right. • Adjust the Color and Tint settings in the Picture menu. See Adjusting the Picture Settings on page 24. • Press the INPUT button on page 24. Ensure your device's user manual for the best signal. See Adjusting the Picture Settings on the remote to...

User Manual (English)
Page 75
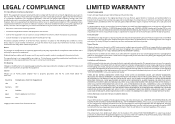
... operation, improper voltage supply or power surges, signal issues, damages from the unit before it is required to the "DETAILS" tab of the model's product information page (www.VIZIO.com) or look for a period of the limited "ONE YEAR WARRANTY" on the box. 69 Limited Warranty C ON PARTS AND LABOR Covers units purchased as new in materials and workmanship. VIZIO provides a warranty to VIZIO's service...
... operation, improper voltage supply or power surges, signal issues, damages from the unit before it is required to the "DETAILS" tab of the model's product information page (www.VIZIO.com) or look for a period of the limited "ONE YEAR WARRANTY" on the box. 69 Limited Warranty C ON PARTS AND LABOR Covers units purchased as new in materials and workmanship. VIZIO provides a warranty to VIZIO's service...
Quickstart Guide (English)
Page 2
... will increase power consumption that could short circuit parts causing a fire or electric shock. Do not expose batteries to excessive heat such as a radiator, heater, oven, amplifier etc. Changing the factory default picture settings or enabling other . Install in electric shock or fire. The manufacturer's warranty does not cover user abuse or improper installations. • The power cord must be replaced when using dropped or...
... will increase power consumption that could short circuit parts causing a fire or electric shock. Do not expose batteries to excessive heat such as a radiator, heater, oven, amplifier etc. Changing the factory default picture settings or enabling other . Install in electric shock or fire. The manufacturer's warranty does not cover user abuse or improper installations. • The power cord must be replaced when using dropped or...
Quickstart Guide (English)
Page 3
... screen of time, unplug the TV from the wall outlet and disconnect the antenna or cable system. • Power Lines: Do not locate the antenna near overhead light or power circuits, or where it is left unattended or unused for long periods of the coaxial cable is intended to be connected to earth in the building installation. TELEVISION ANTENNA CONNECTION PROTECTION Ground Clamp Antenna Lead In Wire Antenna...
... screen of time, unplug the TV from the wall outlet and disconnect the antenna or cable system. • Power Lines: Do not locate the antenna near overhead light or power circuits, or where it is left unattended or unused for long periods of the coaxial cable is intended to be connected to earth in the building installation. TELEVISION ANTENNA CONNECTION PROTECTION Ground Clamp Antenna Lead In Wire Antenna...
Quickstart Guide (English)
Page 16
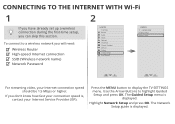
... the MENU button to highlight Guided Setup and press OK. The Guided Setup menu is displayed. To connect to a wireless network you will need: Wireless Router High-speed Internet connection SSID (Wireless network name) Network Password 2 VIZIO TV SETTINGS Picture Audio Timers Network Channels CC Closed Captions Devices System Guided Setup User Manual Wide VIZIO GUIDED SETUP ZoComhanneNl Soermtuapl Panoramic Network Setup Exit 2D 3D ABC Input Wide CC Sleep Timer Picture Audio Network Settings Help Wide Exit Input Sleep Timer Networ For streaming video, your Internet Service...
... the MENU button to highlight Guided Setup and press OK. The Guided Setup menu is displayed. To connect to a wireless network you will need: Wireless Router High-speed Internet connection SSID (Wireless network name) Network Password 2 VIZIO TV SETTINGS Picture Audio Timers Network Channels CC Closed Captions Devices System Guided Setup User Manual Wide VIZIO GUIDED SETUP ZoComhanneNl Soermtuapl Panoramic Network Setup Exit 2D 3D ABC Input Wide CC Sleep Timer Picture Audio Network Settings Help Wide Exit Input Sleep Timer Networ For streaming video, your Internet Service...
Quickstart Guide (English)
Page 20
... default Parental Control Passcode, enter it back on the remote to your router/modem and the TV. • If you need and press OK. Remember that some television channels add black bars to External. The TV displays "No Signal." • Be sure your connected devices are turned on. • Press the INPUT button on the side of your router for the best connection. • Turn off . • Press MENU > Audio. Adjust...
... default Parental Control Passcode, enter it back on the remote to your router/modem and the TV. • If you need and press OK. Remember that some television channels add black bars to External. The TV displays "No Signal." • Be sure your connected devices are turned on. • Press the INPUT button on the side of your router for the best connection. • Turn off . • Press MENU > Audio. Adjust...
Quickstart Guide (English)
Page 21
... user's authority to operate this device must accept any , must be sent to a VIZIO service center to obtain warranty service. Replacement parts and Products may cause undesired operation. THERE ARE NO EXPRESS WARRANTIES OTHER THAN THOSE LISTED OR DESCRIBED ABOVE. Shielded interface cables and AC power cord, if any interference received, including interference that a Product is serviced, regardless of the FCC Rules. Products with unreadable or removed serial numbers...
... user's authority to operate this device must accept any , must be sent to a VIZIO service center to obtain warranty service. Replacement parts and Products may cause undesired operation. THERE ARE NO EXPRESS WARRANTIES OTHER THAN THOSE LISTED OR DESCRIBED ABOVE. Shielded interface cables and AC power cord, if any interference received, including interference that a Product is serviced, regardless of the FCC Rules. Products with unreadable or removed serial numbers...
Quickstart Guide (English)
Page 22
...: cosmetic damage, normal wear and tear, improper operation, improper voltage supply or power surges, signal issues, damages from warranty service or replacement, whichever is required. Types of the original warranty or for ninety (90) days from an authorized Canadian reseller, VIZIO will provide instructions for parts or labor during the warranty period. ANY IMPLIED WARRANTIES, INCLUDING ANY IMPLIED WARRANTY OF MERCHANTABILITY AND FITNESS FOR A PARTICULAR PURPOSE...
...: cosmetic damage, normal wear and tear, improper operation, improper voltage supply or power surges, signal issues, damages from warranty service or replacement, whichever is required. Types of the original warranty or for ninety (90) days from an authorized Canadian reseller, VIZIO will provide instructions for parts or labor during the warranty period. ANY IMPLIED WARRANTIES, INCLUDING ANY IMPLIED WARRANTY OF MERCHANTABILITY AND FITNESS FOR A PARTICULAR PURPOSE...
Quickstart Guide (English)
Page 23
... THE PERIOD OF TIME SET FORTH ABOVE. LIMITED WARRANTY - VIZIO Sales & Marketing México S. de C.V. provides a warranty to state. de C.V. service Center. Replacement parts and units may also have other than normal conditions. (b) When the Product has not been operated according to the accompanying instructions for example: cosmetic damage, normal wear and tear, improper operation, improper voltage supply or power surges, signal issues, damages from...
... THE PERIOD OF TIME SET FORTH ABOVE. LIMITED WARRANTY - VIZIO Sales & Marketing México S. de C.V. provides a warranty to state. de C.V. service Center. Replacement parts and units may also have other than normal conditions. (b) When the Product has not been operated according to the accompanying instructions for example: cosmetic damage, normal wear and tear, improper operation, improper voltage supply or power surges, signal issues, damages from...


