Download
Page 6
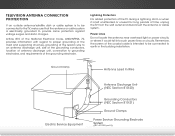
... left unattended or unused for long periods of time, unplug the TV from the wall outlet and disconnect the antenna or cable system. Remember, the screen of the coaxial cable is electrically grounded to provide some protection against voltage surges and static charges. Article 810 of the National Electrical Code, ANSI...
... left unattended or unused for long periods of time, unplug the TV from the wall outlet and disconnect the antenna or cable system. Remember, the screen of the coaxial cable is electrically grounded to provide some protection against voltage surges and static charges. Article 810 of the National Electrical Code, ANSI...

Download
Page 7
... 18 Without HDMI ARC 18 With HDMI ARC 18 Completing the First-Time Setup 19 Using the On-Screen Menu 21 Navigating the On-Screen Menu 21 Changing the Input Source 22 Changing the Screen Aspect Ratio 22 Viewing Video with the Menu Open 23 Adjusting the Picture Settings 24 Adjusting the Advanced...
... 18 Without HDMI ARC 18 With HDMI ARC 18 Completing the First-Time Setup 19 Using the On-Screen Menu 21 Navigating the On-Screen Menu 21 Changing the Input Source 22 Changing the Screen Aspect Ratio 22 Viewing Video with the Menu Open 23 Adjusting the Picture Settings 24 Adjusting the Advanced...

Download
Page 8
... and Unlocking Channels 45 Blocking and Unblocking Content by Rating 46 Changing the Parental Control Passcode 46 Resetting the Content Locks 46 Changing the On-Screen Menu Language 47 Setting the Time & Local Settings 47 Adjusting the CEC Settings 48 Turning the Power Indicator On or Off 48 Using the Reset... 51 Using the USB Media Player 51 Preparing Your USB Drive to the My Apps Tab 58 Deleting an App from the TV 51 Using VIZIO Internet Apps Plus® (V.I.A.
... and Unlocking Channels 45 Blocking and Unblocking Content by Rating 46 Changing the Parental Control Passcode 46 Resetting the Content Locks 46 Changing the On-Screen Menu Language 47 Setting the Time & Local Settings 47 Adjusting the CEC Settings 48 Turning the Power Indicator On or Off 48 Using the Reset... 51 Using the USB Media Player 51 Preparing Your USB Drive to the My Apps Tab 58 Deleting an App from the TV 51 Using VIZIO Internet Apps Plus® (V.I.A.

Download
Page 10
Align the stand and hook it into the bottom of the TV as a blanket. 2. Place the TV screen-down on a soft surface, such as shown. 4 To prevent scratches or damage to the screen, place the TV on a clean, flat surface. 1 To install the base: 1.
Align the stand and hook it into the bottom of the TV as a blanket. 2. Place the TV screen-down on a soft surface, such as shown. 4 To prevent scratches or damage to the screen, place the TV on a clean, flat surface. 1 To install the base: 1.

Download
Page 16
...Remote Control 10 Back Go to the previous on and off. Number Pad Manually enter a channel. Power Turn TV on -screen menu. Info Display the info window. V Button Open the VIZIO Internet Apps Plus® dock. Ok Select the highlighted menu option. Menu Display the on or off or on... -screen menu. Arrow Navigate the on . Channel Up/Down Change the channel. 2 Remote Control Input Change the currently-displayed input. ...
...Remote Control 10 Back Go to the previous on and off. Number Pad Manually enter a channel. Power Turn TV on -screen menu. Info Display the info window. V Button Open the VIZIO Internet Apps Plus® dock. Ok Select the highlighted menu option. Menu Display the on or off or on... -screen menu. Arrow Navigate the on . Channel Up/Down Change the channel. 2 Remote Control Input Change the currently-displayed input. ...

Download
Page 25
... remote to read and accept the Terms and Conditions and the Privacy Policy. Use the Arrow buttons on -screen keyboard, then highlight Connect and press OK. 2. Enter the wireless password using the on the remote. SeSleeclet...oHneom"HeoUmseeU"speo"rpMoroMdooddoedCe aCsaasao o"S"StotorereDDeemmoo"" ppoorr DDeemmoosstrtaraccióiónndedeTiTeniednad. Press the Power/Standby button on -screen keyboard. ChoisCishsoeiszis"sHeozm"HeoUmseeU" speo"uproMuroMdeodDeoDmoimciilceileouou"S"StotorereDDeemmoo"" ppoouurr DDéémmoonnsstrtaratiotionnenenMMagaagsains.in the list of the ...
... remote to read and accept the Terms and Conditions and the Privacy Policy. Use the Arrow buttons on -screen keyboard, then highlight Connect and press OK. 2. Enter the wireless password using the on the remote. SeSleeclet...oHneom"HeoUmseeU"speo"rpMoroMdooddoedCe aCsaasao o"S"StotorereDDeemmoo"" ppoorr DDeemmoosstrtaraccióiónndedeTiTeniednad. Press the Power/Standby button on -screen keyboard. ChoisCishsoeiszis"sHeozm"HeoUmseeU" speo"uproMuroMdeodDeoDmoimciilceileouou"S"StotorereDDeemmoo"" ppoouurr DDéémmoonnsstrtaratiotionnenenMMagaagsains.in the list of the ...

Download
Page 26
If the TV Signal screen appears, the TV will need to highlight Begin Scan and press OK. 10. Use the arrow buttons on the remote to scan for channels, which takes several minutes. Completing the First-Time Setup 4 8. If you have cable TV, select whether you have a cable box or if you connect the TV directly to select the input your TV source and press OK. The First-Time Setup is connected to. Use the Arrow buttons on the remote to a cable from the wall. 9. Use the Arrow and OK buttons on the remote to highlight your TV source is complete. 20
If the TV Signal screen appears, the TV will need to highlight Begin Scan and press OK. 10. Use the arrow buttons on the remote to scan for channels, which takes several minutes. Completing the First-Time Setup 4 8. If you have cable TV, select whether you have a cable box or if you connect the TV directly to select the input your TV source and press OK. The First-Time Setup is connected to. Use the Arrow buttons on the remote to a cable from the wall. 9. Use the Arrow and OK buttons on the remote to highlight your TV source is complete. 20

Download
Page 27
...Access the Guided Setup • Access the User Manual VIZIO TV Settings Picture Audio Timers Network Tuner CC Closed Captions Devices System Guided Setup User Manual Navigating the On-Screen Menu To open the on-screen menu, press the MENU button on -screen menu. Wide Zoom Normal Panoramic While navigating the on the..., you can press Exit 2Dthe BA3DCK button at any time to return to the previous menu screen. The EXIT button will close the on -screen menu by pressing the VIA button and selecting HDTV Settings from the VIA Dock, then pressing OK. Input Wide CC Sleep Timer ...
...Access the Guided Setup • Access the User Manual VIZIO TV Settings Picture Audio Timers Network Tuner CC Closed Captions Devices System Guided Setup User Manual Navigating the On-Screen Menu To open the on-screen menu, press the MENU button on -screen menu. Wide Zoom Normal Panoramic While navigating the on the..., you can press Exit 2Dthe BA3DCK button at any time to return to the previous menu screen. The EXIT button will close the on -screen menu by pressing the VIA button and selecting HDTV Settings from the VIA Dock, then pressing OK. Input Wide CC Sleep Timer ...

Download
Page 28
..., the display image may appear wider than intended. Use the Arrow buttons to highlight the aspect ratio you wish to fill the screen. Images may appear distorted. Each mode displays the picture differently. Normal Panoramic Normal Stretch • Normal preserves the content's original ...to the left and right of the display image. • Zoom expands images with your TV. 5 Changing the Input Source Changing the Screen Aspect Ratio External devices such as DVD players, Blu-ray Players, and video game consoles can display images in five different modes: Normal,...
..., the display image may appear wider than intended. Use the Arrow buttons to highlight the aspect ratio you wish to fill the screen. Images may appear distorted. Each mode displays the picture differently. Normal Panoramic Normal Stretch • Normal preserves the content's original ...to the left and right of the display image. • Zoom expands images with your TV. 5 Changing the Input Source Changing the Screen Aspect Ratio External devices such as DVD players, Blu-ray Players, and video game consoles can display images in five different modes: Normal,...

Download
Page 29
...Input Wide CC Sleep Timer Picture Audio Network Settings Help Full-sized and aligned to right of the picture. VIZIO Wide Zoom Normal Panoramic Viewing Video with the Menu Open When the on-screen menu opens, it covers the left -hand ABC portion of the picture covered by the menu. •... Resized to fit - The left -hand portion of menu 23 5 Press OK to cycle through the three display methods. 3. VIZIO Network Settings Help Picture Picture Mode...
...Input Wide CC Sleep Timer Picture Audio Network Settings Help Full-sized and aligned to right of the picture. VIZIO Wide Zoom Normal Panoramic Viewing Video with the Menu Open When the on-screen menu opens, it covers the left -hand ABC portion of the picture covered by the menu. •... Resized to fit - The left -hand portion of menu 23 5 Press OK to cycle through the three display methods. 3. VIZIO Network Settings Help Picture Picture Mode...

Download
Page 30
Standard picture mode meets ENERGY STAR® requirements. To manually change the picture mode: VIZIO Picture Picture Mode Backlight - Backlight cannot be too dark to distinguish details. When this setting is selected are given generic names, beginning with "Custom... brilliance of the picture. When you have finished adjusting the picture settings, press the EXIT button on the remote. Use the Arrow buttons on -screen menu is too low, the picture may appear faded or washed out. • Exit Co2nDtrast -3AD djusts the white level of the picture settings...
Standard picture mode meets ENERGY STAR® requirements. To manually change the picture mode: VIZIO Picture Picture Mode Backlight - Backlight cannot be too dark to distinguish details. When this setting is selected are given generic names, beginning with "Custom... brilliance of the picture. When you have finished adjusting the picture settings, press the EXIT button on the remote. Use the Arrow buttons on -screen menu is too low, the picture may appear faded or washed out. • Exit Co2nDtrast -3AD djusts the white level of the picture settings...

Download
Page 31
...finished. • Film Mode - STliWm eeehpr enPyicotuurehavAeudfiionished adjusting the Advanced Picture Settings, press the EXIT button on the screen. Select Cool, Normal, or Computer. • Cool produces a blue-hued picture. • Computer optimizes the...adjust the vertical size of the displayed picture. Use the Arrow buttons to change the setting: VIZIO AAddvvaanncceedd PPiiccttuurree CCoolloorr TTeemmppeerraattuurree BBllaacckk DDeettaaiill BBaacckklliigghhtt CCoonnttrrooll RReedduuccee SSiiggnnaall NNooiissee RReedduuccee BBlloocckk NNooiissee PPiiccttuurree SPiozesition ...
...finished. • Film Mode - STliWm eeehpr enPyicotuurehavAeudfiionished adjusting the Advanced Picture Settings, press the EXIT button on the screen. Select Cool, Normal, or Computer. • Cool produces a blue-hued picture. • Computer optimizes the...adjust the vertical size of the displayed picture. Use the Arrow buttons to change the setting: VIZIO AAddvvaanncceedd PPiiccttuurree CCoolloorr TTeemmppeerraattuurree BBllaacckk DDeettaaiill BBaacckklliigghhtt CCoonnttrrooll RReedduuccee SSiiggnnaall NNooiissee RReedduuccee BBlloocckk NNooiissee PPiiccttuurree SPiozesition ...

Download
Page 35
... for your custom picture mode using the on the remote to highlight Off. 3. A custom picture mode only applies to exit the menu screens. 29 To create a custom picture mode manually: 1. Selecting a color immediately shows that color ramp. -or- When you to the picture settings.... 5. VIZIO Create PICTURE MODE Custom1_ abc def ghi j k l mn o p q r s t u v wx y z 0 123456789 .@# .com Space Done 4. Use the Left/Right Arrow buttons to eight custom ...
... for your custom picture mode using the on the remote to highlight Off. 3. A custom picture mode only applies to exit the menu screens. 29 To create a custom picture mode manually: 1. Selecting a color immediately shows that color ramp. -or- When you to the picture settings.... 5. VIZIO Create PICTURE MODE Custom1_ abc def ghi j k l mn o p q r s t u v wx y z 0 123456789 .@# .com Space Done 4. Use the Left/Right Arrow buttons to eight custom ...

Download
Page 36
...the Picture Mode to prevent changes. ThSeettiUngns loHceklp PICTURE MODE menu is displayed. The RENAME PICTURE MODE menu is displayed. VIZIO LOCK PICTURE MODE Enter the Picture Control PIN to an existing custom setting. To rename a custom picture mode: 1. Create ... ss thWiedeEXIT CbCutton to exit the menu screens. Use the Number Pad on page 24. 2. STliFm eereopr m tPhiceturPe ROAFuEdSioSIONAL PICTURE menu, use the Arrow buttons to enter a custom name using the number keys on your 4-digit passcode. 3. VIZIO RENAME PICTURE MODE Custom 1_ abc def ghi j k l mn o p ...
...the Picture Mode to prevent changes. ThSeettiUngns loHceklp PICTURE MODE menu is displayed. The RENAME PICTURE MODE menu is displayed. VIZIO LOCK PICTURE MODE Enter the Picture Control PIN to an existing custom setting. To rename a custom picture mode: 1. Create ... ss thWiedeEXIT CbCutton to exit the menu screens. Use the Number Pad on page 24. 2. STliFm eereopr m tPhiceturPe ROAFuEdSioSIONAL PICTURE menu, use the Arrow buttons to enter a custom name using the number keys on your 4-digit passcode. 3. VIZIO RENAME PICTURE MODE Custom 1_ abc def ghi j k l mn o p ...

Download
Page 37
... and press OK. 3. Press the EXIT button to the Calibrated picture mode. Inputs assigned to a deleted custom picture mode become assigned to exit the menu screens. 31 5 Deleting a Custom Picture Mode Custom picture modes that are no longer needed can be deleted.
... and press OK. 3. Press the EXIT button to the Calibrated picture mode. Inputs assigned to a deleted custom picture mode become assigned to exit the menu screens. 31 5 Deleting a Custom Picture Mode Custom picture modes that are no longer needed can be deleted.

Download
Page 38
... and press OK. Network Settings Help • Delete Audio Mode - Press the MENU button on page 33. 4. See Changing the Equalizer Settings on -screen menu is displayed. 3. VIZIO Audio TV Speakers Surround Sound Volume Leveling Balance - Sets the volume control properties for example). Adjusts the boost or attenuation of the audio output...
... and press OK. Network Settings Help • Delete Audio Mode - Press the MENU button on page 33. 4. See Changing the Equalizer Settings on -screen menu is displayed. 3. VIZIO Audio TV Speakers Surround Sound Volume Leveling Balance - Sets the volume control properties for example). Adjusts the boost or attenuation of the audio output...

Download
Page 39
... to adjust the boost (up) and attenuation (down) for the frequency. 7. The Audio menu is displayed. 3. The Audio Mode and equalizer settings screen appears. 4. Use the Left and Right Arrow buttons to highlight Audio and press OK. The equalizer bars change to highlight Equalizer Settings and press OK... the mode. 5. The TV displays, "To delete the user created custom audio mode, select the Delete button." 4. Press the MENU button on -screen menu is displayed. 2. Press the EXIT button on the remote. Press the MENU button on the remote. The Audio menu is displayed. 3. The on...
... to adjust the boost (up) and attenuation (down) for the frequency. 7. The Audio menu is displayed. 3. The Audio Mode and equalizer settings screen appears. 4. Use the Left and Right Arrow buttons to highlight Audio and press OK. The equalizer bars change to highlight Equalizer Settings and press OK... the mode. 5. The TV displays, "To delete the user created custom audio mode, select the Delete button." 4. Press the MENU button on -screen menu is displayed. 2. Press the EXIT button on the remote. Press the MENU button on the remote. The Audio menu is displayed. 3. The on...

Download
Page 40
...time after 10 minutes without a video or audio signal. From the Timers menu, use the Up/Down Arrow buttons on -screen menu is displayed. The on the remote to highlight Timers and press OK. The Timers menu is displayed. 2. When ...EXIT button on the remote to highlight Auto Power Off. 2. If you have finished setting the auto power off the screen when the TV is no signal, change the setting to Off. Use the Arrow buttons on the remote. When ...set by default to turn off time, press the EXIT button on the remote. VIZIO Timers Sleep Timer Auto Power Off Off 10 minutes 3.
...time after 10 minutes without a video or audio signal. From the Timers menu, use the Up/Down Arrow buttons on -screen menu is displayed. The on the remote to highlight Timers and press OK. The Timers menu is displayed. 2. When ...EXIT button on the remote to highlight Auto Power Off. 2. If you have finished setting the auto power off the screen when the TV is no signal, change the setting to Off. Use the Arrow buttons on the remote. When ...set by default to turn off time, press the EXIT button on the remote. VIZIO Timers Sleep Timer Auto Power Off Off 10 minutes 3.

Download
Page 41
... Settings Advanced users can fine-tune the network settings using the Manual Setup feature. To change the settings manually, use the Arrow buttons on -screen keyboard, enter your wireless network (this is the network's SSID) and press OK. 5. Your alternate domain name server 4. The More Access ... on the remote to Off. 3. To change the setting to highlight Network and press OK. From the Network menu, highlight Manual Setup and VIZIO press OK. DHCP Off 2. The IP address assigned to highlight Save and press OK. DNS Server Alt. The subnet Exit ma2sDk. 3D &#...
... Settings Advanced users can fine-tune the network settings using the Manual Setup feature. To change the settings manually, use the Arrow buttons on -screen keyboard, enter your wireless network (this is the network's SSID) and press OK. 5. Your alternate domain name server 4. The More Access ... on the remote to Off. 3. To change the setting to highlight Network and press OK. From the Network menu, highlight Manual Setup and VIZIO press OK. DHCP Off 2. The IP address assigned to highlight Save and press OK. DNS Server Alt. The subnet Exit ma2sDk. 3D &#...

Download
Page 42
... your network's name (SSID), then highlight Connect and press OK. 3. From the Network menu, highlight Hidden Network and press OK. The Enter Access Point Name screen is displayed. 2. abc def ghi j k l mn o p q r s t u v wx y z 0 123456789 .@# .com Space Connect Testing Your Network Connection To test your access point name. ... hidden SSID. Using the on the remote. Find the MAC address for the connections in the router's settings. Press the EXIT button on -screen keyboard, enter your network connection. 3. VIZIO Enter Access Point Name Enter your network connection: 1.
... your network's name (SSID), then highlight Connect and press OK. 3. From the Network menu, highlight Hidden Network and press OK. The Enter Access Point Name screen is displayed. 2. abc def ghi j k l mn o p q r s t u v wx y z 0 123456789 .@# .com Space Connect Testing Your Network Connection To test your access point name. ... hidden SSID. Using the on the remote. Find the MAC address for the connections in the router's settings. Press the EXIT button on -screen keyboard, enter your network connection. 3. VIZIO Enter Access Point Name Enter your network connection: 1.

