
E190VA User Manual
Page 4
... TV cabinet. This plug will fit only into the apparatus, the apparatus has been exposed 4 E190VA / E220VA / E260VA to rain or moisture, does not operate normally or has been dropped. • Unplug the power cord before turning on the top of your TV to the presence of un-isolated, dangerous voltage within...
... TV cabinet. This plug will fit only into the apparatus, the apparatus has been exposed 4 E190VA / E220VA / E260VA to rain or moisture, does not operate normally or has been dropped. • Unplug the power cord before turning on the top of your TV to the presence of un-isolated, dangerous voltage within...
E190VA User Manual
Page 6
...unit, connection to digital television broadcasting was complete on June 12, 2009. Watch your local stations to find out when they will turn off their analog signal and switch to digital-only broadcasting. Analog-only TVs should continue to work as appropriate: FCC (US Federal ...listed below, as before to receive low power, Class A or translator television stations and with a built-in the building installation. E190VA / E220VA / E260VA Television Antenna Connection Protection If an outside antenna/satellite dish or cable system is to be connected to earth in tuner ...
...unit, connection to digital television broadcasting was complete on June 12, 2009. Watch your local stations to find out when they will turn off their analog signal and switch to digital-only broadcasting. Analog-only TVs should continue to work as appropriate: FCC (US Federal ...listed below, as before to receive low power, Class A or translator television stations and with a built-in the building installation. E190VA / E220VA / E260VA Television Antenna Connection Protection If an outside antenna/satellite dish or cable system is to be connected to earth in tuner ...

E190VA User Manual
Page 11
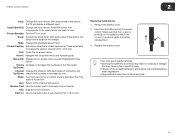
... Panel Remote Control When using the remote, point it directly at this sensor. Menu: Display on -screen menu. With each press of the TV.) Power: Turn the TV on the front of the button, the TV will display a different input source Left Side Panel 3.5mm Audio: Connect headphones, powered speakers, or... through the on -screen menu. Channel Up/Down: Change the channel. Volume Up/Down: Increase or decrease the loudness of the TVs audio. Sensor: (For E190VA, sensor is on or off. USB: Connect USB thumb drive to play photo slideshow or to update firmware. 3
... Panel Remote Control When using the remote, point it directly at this sensor. Menu: Display on -screen menu. With each press of the TV.) Power: Turn the TV on the front of the button, the TV will display a different input source Left Side Panel 3.5mm Audio: Connect headphones, powered speakers, or... through the on -screen menu. Channel Up/Down: Change the channel. Volume Up/Down: Increase or decrease the loudness of the TVs audio. Sensor: (For E190VA, sensor is on or off. USB: Connect USB thumb drive to play photo slideshow or to update firmware. 3
E190VA User Manual
Page 13
...Batteries 1. With each press of the button, the sleep timer's duration will display a different input. Arrow : Navigate the on -screen menu. Mute: Turn the sound off or on or off . Last: Return to manually enter a sub-channel (18-1, 18-2, etc). Input (Specific): Change the input ...(-): Use to the channel last viewed. Insert two AA batteries into the remote control. Info: Display the Info Window. Remove the battery cover. 2. E190VA / E220VA / E260VA 2 Input: Change the input device. With each press of the button, the TV will change the caption channel (CC1, CC2,...
...Batteries 1. With each press of the button, the sleep timer's duration will display a different input. Arrow : Navigate the on -screen menu. Mute: Turn the sound off or on or off . Last: Return to manually enter a sub-channel (18-1, 18-2, etc). Input (Specific): Change the input ...(-): Use to the channel last viewed. Insert two AA batteries into the remote control. Info: Display the Info Window. Remove the battery cover. 2. E190VA / E220VA / E260VA 2 Input: Change the input device. With each press of the button, the TV will change the caption channel (CC1, CC2,...
E190VA User Manual
Page 14
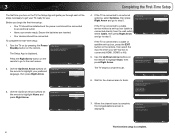
...you tune your channels. Initial Setup Please select your input location: Mode Setting Home Retail Back Select Next EXIT Exit 4. Next EXIT Exit 2. Turn the TV on by pressing the Power/ Standby button on the remote to highlight Scan, then press Right Arrow. Select Next EXIT Exit If...box, press the EXIT button on the remote, then select the input to complete. The Setup App is complete. 6 Initial Setup Allow the VIZIO setup Wizard to get your TV ready for the channel scan to step 5. Back Select Next EXIT Exit Initial Setup Please select your language: ...
...you tune your channels. Initial Setup Please select your input location: Mode Setting Home Retail Back Select Next EXIT Exit 4. Next EXIT Exit 2. Turn the TV on by pressing the Power/ Standby button on the remote to highlight Scan, then press Right Arrow. Select Next EXIT Exit If...box, press the EXIT button on the remote, then select the input to complete. The Setup App is complete. 6 Initial Setup Allow the VIZIO setup Wizard to get your TV ready for the channel scan to step 5. Back Select Next EXIT Exit Initial Setup Please select your language: ...
E190VA User Manual
Page 15
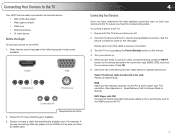
...has a matching port available. 3. To connect a device to Normal. Ensure each end of the cable is set to match your TV's resolution. (See Appendix A - Turn the TV on by pressing the Power/Standby button on the TV. 7 DVD Player with an HDMI port, be easily connected to an external device... type (HDMI, RGB, etc) from wall) Perform a channel scan. Use the best available connection. RGB Make sure the desktop resolution on the next page. Turn your device on both the TV and your device are ready to the HDMI ports on the remote. 4. Verify that matches the available port. For...
...has a matching port available. 3. To connect a device to Normal. Ensure each end of the cable is set to match your TV's resolution. (See Appendix A - Turn the TV on by pressing the Power/Standby button on the TV. 7 DVD Player with an HDMI port, be easily connected to an external device... type (HDMI, RGB, etc) from wall) Perform a channel scan. Use the best available connection. RGB Make sure the desktop resolution on the next page. Turn your device on both the TV and your device are ready to the HDMI ports on the remote. 4. Verify that matches the available port. For...

E190VA User Manual
Page 24
... reset to factory defaults • Set up closed captions Using the Other Menu Settings Setting the Sleep Timer When activated, the TV's sleep timer will turn the TV off after a set period of time after which you want the TV to power off (30, 60, 90, or 120 minutes). 4.
... reset to factory defaults • Set up closed captions Using the Other Menu Settings Setting the Sleep Timer When activated, the TV's sleep timer will turn the TV off after a set period of time after which you want the TV to power off (30, 60, 90, or 120 minutes). 4.
E190VA User Manual
Page 30
...buttons to highlight Digital Audio Out and press MENU/OK. 4. Selecting the Digital Output Mode Using this menu option, you can turn the built-in speakers: 1. The on or off. 6 E190VA / E220VA / E260VA Enabling or Disabling the Built-In Speakers Using this menu option, you can force the TV to downsample ... audio receiver connected to highlight Audio and press MENU/OK. 3. This is often used when the TV is not connected to an audio receiver, VIZIO recommends you set this option if you are unfamiliar with audio formats, or your TV is connected to a home audio system.
...buttons to highlight Digital Audio Out and press MENU/OK. 4. Selecting the Digital Output Mode Using this menu option, you can turn the built-in speakers: 1. The on or off. 6 E190VA / E220VA / E260VA Enabling or Disabling the Built-In Speakers Using this menu option, you can force the TV to downsample ... audio receiver connected to highlight Audio and press MENU/OK. 3. This is often used when the TV is not connected to an audio receiver, VIZIO recommends you set this option if you are unfamiliar with audio formats, or your TV is connected to a home audio system.

E190VA User Manual
Page 43
... not cause harmful interference, and (2) this device must be determined by turning the equipment off and on a circuit different from the date of the distribution of media, shipping and handling upon request made to VIZIO at www.VIZIO.com. USA: UL Canada: CSA Germany: VDE UK: BASE/BS Japan... or an experienced radio/TV technician for attribution of gSOAP public license from: http://www.cs.fsu.edu/~engelen/license.html Please visit www.VIZIO.com for help. Increase the separation between the equipment and receiver. 3. This equipment generates, uses and can also obtain a copy of...
... not cause harmful interference, and (2) this device must be determined by turning the equipment off and on a circuit different from the date of the distribution of media, shipping and handling upon request made to VIZIO at www.VIZIO.com. USA: UL Canada: CSA Germany: VDE UK: BASE/BS Japan... or an experienced radio/TV technician for attribution of gSOAP public license from: http://www.cs.fsu.edu/~engelen/license.html Please visit www.VIZIO.com for help. Increase the separation between the equipment and receiver. 3. This equipment generates, uses and can also obtain a copy of...

E190VA Quick Start Guide
Page 3
... captioning. Exit: Close the on -screen menu or select highlighted menu option. Channel Up/ Change the channel. When mute is activated, the TV's audio is turned off or on. Number Pad: Use the number pad to view. With each press of the TV's audio. Press the button that corresponds to the... on -screen menu. Last: Return to manually enter a sub-channel (18-1, 18-2, etc). Dash (-): Use with Number Pad to to the channel last viewed. Mute: Turn the sound off . USING THE REMOTE Input Wide Sleep Menu/OK Arrow Left Volume Up/Down Last Info Power/Standby Input (Specific) Closed Caption (CC...
... captioning. Exit: Close the on -screen menu or select highlighted menu option. Channel Up/ Change the channel. When mute is activated, the TV's audio is turned off or on. Number Pad: Use the number pad to view. With each press of the TV's audio. Press the button that corresponds to the... on -screen menu. Last: Return to manually enter a sub-channel (18-1, 18-2, etc). Dash (-): Use with Number Pad to to the channel last viewed. Mute: Turn the sound off . USING THE REMOTE Input Wide Sleep Menu/OK Arrow Left Volume Up/Down Last Info Power/Standby Input (Specific) Closed Caption (CC...
E190VA Quick Start Guide
Page 5
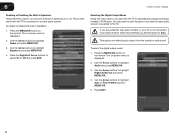
The Setup App is displayed. Welcome Next EXIT Exit Connect your channels. Turn the TV on by pressing the Power/Standby button on the back of the TV. Press the Right Arrow button on the remote to go to the coaxial port on the remote. 2 3 Initial Setup Allow the VIZIO setup Wizard to help you tune your antenna or cable/satellite box to the next screen.
The Setup App is displayed. Welcome Next EXIT Exit Connect your channels. Turn the TV on by pressing the Power/Standby button on the back of the TV. Press the Right Arrow button on the remote to go to the coaxial port on the remote. 2 3 Initial Setup Allow the VIZIO setup Wizard to help you tune your antenna or cable/satellite box to the next screen.
E190VA Quick Start Guide
Page 8
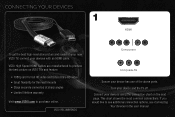
... HDMI To get the best high-resolution picture and sound on your new VIZIO TV, connect your device and the TV off. VIZIO High Speed HDMI Cables are manufactured to produce the best picture on the next page. Turn your devices with an HDMI cable. Connect your device has one of the ...above ports. This chart shows the most common connections. VIZIO RECOMMENDS Component Composite AV Ensure your devices using the connection chart on VIZIO TVs and feature: • 1080p and ...
... HDMI To get the best high-resolution picture and sound on your new VIZIO TV, connect your device and the TV off. VIZIO High Speed HDMI Cables are manufactured to produce the best picture on the next page. Turn your devices with an HDMI cable. Connect your device has one of the ...above ports. This chart shows the most common connections. VIZIO RECOMMENDS Component Composite AV Ensure your devices using the connection chart on VIZIO TVs and feature: • 1080p and ...
E190VA Quick Start Guide
Page 11
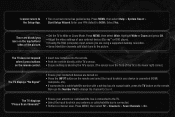
... bars on the top/bottom/ sides of the TV, in the lower right corner.) The TV displays "No Signal" • Ensure your connected devices are turned on. • Press the INPUT button on the remote and select the input to which your external device (Blu-ray™ or DVD player). •...
... bars on the top/bottom/ sides of the TV, in the lower right corner.) The TV displays "No Signal" • Ensure your connected devices are turned on. • Press the INPUT button on the remote and select the input to which your external device (Blu-ray™ or DVD player). •...


