User Manual English
Page 2
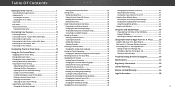
... Screen Saver 33 Blanking the Screen 33 Restoring the TV to Factory Default Settings 47 Enabling and Disabling Smart Interactivity 47 Rear Panel 11 Remote Control Front 12 Using the Network Connection Menu 34 Connecting to Play USB Media 49 Playing USB Media 49 Removing the USB Drive from... the TV 49 Using VIZIO Internet Apps Plus® (V.I .A. Audio & Video Cable Types 14 Connecting an Audio Device 15 Connecting An Audio Device - ARC 17 Connecting to ...
... Screen Saver 33 Blanking the Screen 33 Restoring the TV to Factory Default Settings 47 Enabling and Disabling Smart Interactivity 47 Rear Panel 11 Remote Control Front 12 Using the Network Connection Menu 34 Connecting to Play USB Media 49 Playing USB Media 49 Removing the USB Drive from... the TV 49 Using VIZIO Internet Apps Plus® (V.I .A. Audio & Video Cable Types 14 Connecting an Audio Device 15 Connecting An Audio Device - ARC 17 Connecting to ...

User Manual English
Page 4
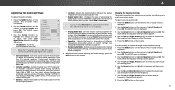
...vases, shall be used for children younger than the specified voltage may compromise the integrity of electric shock to loud sounds can damage the remote control or injure the operator. If your TV. Ensure that may be of sufficient magnitude to constitute a risk of the display. ...use your TV yourself. • Avoid using different voltage than that may be exposed to hang onto the product. • Store the accessories (remote, batteries, etc.) in a location safely out of the reach of children. • The American Academy of Pediatrics discourages television viewing for an...
...vases, shall be used for children younger than the specified voltage may compromise the integrity of electric shock to loud sounds can damage the remote control or injure the operator. If your TV. Ensure that may be of sufficient magnitude to constitute a risk of the display. ...use your TV yourself. • Avoid using different voltage than that may be exposed to hang onto the product. • Store the accessories (remote, batteries, etc.) in a location safely out of the reach of children. • The American Academy of Pediatrics discourages television viewing for an...
User Manual English
Page 7
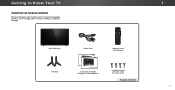
Use the images below to inspect the package contents. Getting to Know Your TV 1 INSPECTING THE PACKAGE CONTENTS Before installing your new TV, take a moment to ensure nothing is missing or damaged. VIZIO LED HDTV Power Cord Remote Control with Batteries TV Stands 2 x Quick Start Guides (1 English, 1 French-Spanish) 4 x Phillips Screws 32mm Screws for D40 28mm Screws for D50 PACKAGE CONTENTS 7
Use the images below to inspect the package contents. Getting to Know Your TV 1 INSPECTING THE PACKAGE CONTENTS Before installing your new TV, take a moment to ensure nothing is missing or damaged. VIZIO LED HDTV Power Cord Remote Control with Batteries TV Stands 2 x Quick Start Guides (1 English, 1 French-Spanish) 4 x Phillips Screws 32mm Screws for D40 28mm Screws for D50 PACKAGE CONTENTS 7
User Manual English
Page 10
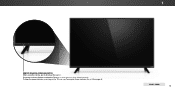
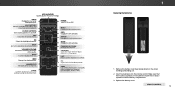
1 REMOTE SENSOR & POWER INDICATOR When using the remote, aim it directly at this sensor. FRONT PANEL 10 The power indicator flashes on when the TV turns on page 46. To keep the power indicator on as long as the TV is on, see Turning the Power Indicator On or Off on , then goes out after several seconds.
1 REMOTE SENSOR & POWER INDICATOR When using the remote, aim it directly at this sensor. FRONT PANEL 10 The power indicator flashes on when the TV turns on page 46. To keep the power indicator on as long as the TV is on, see Turning the Power Indicator On or Off on , then goes out after several seconds.
User Manual English
Page 12
... and (-) symbols inside the battery compartment. 3. MUTE Turn the audio Off or On. CHANNEL UP/DOWN Change the channel. V BUTTON Open the VIZIO Internet Apps Plus® (V.I.A. Make sure that the (+) and (-) symbols on -screen menu. ENTER Confirm channel or passcode entered using the Number ...by pressing down on -screen menu. APP LAUNCHER Quickly launch the pictured App. GUIDE Display the info window. Insert two batteries into the remote control. MENU Display the on the arrow markings and sliding out. 2. WIDE Change the display mode. OK Select the highlighted option. ...
... and (-) symbols inside the battery compartment. 3. MUTE Turn the audio Off or On. CHANNEL UP/DOWN Change the channel. V BUTTON Open the VIZIO Internet Apps Plus® (V.I.A. Make sure that the (+) and (-) symbols on -screen menu. ENTER Confirm channel or passcode entered using the Number ...by pressing down on -screen menu. APP LAUNCHER Quickly launch the pictured App. GUIDE Display the info window. Insert two batteries into the remote control. MENU Display the on the arrow markings and sliding out. 2. WIDE Change the display mode. OK Select the highlighted option. ...
User Manual English
Page 19
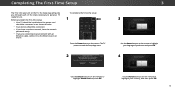
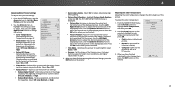
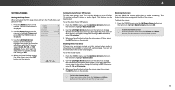
Select Store Demo for in -home use . Store Demo Home Use Use the Arrow buttons on the remote to highlight Home Use and press OK. 3 3 Use the Arrow buttons on the remote to highlight your language of the steps necessary to highlight your country, and then press OK. 19 Seleccione "Home Use" ...ón en la Tienda. Choisissez "Home Use" pour le Mode Domicile ou "Store Demo" pour la Démo en Magasin. The TV powers on the remote. Select Home Use for use . To complete the first-time setup: 1 Press the Power button on and the Setup App starts. 2 Choose your mode. ...
Select Store Demo for in -home use . Store Demo Home Use Use the Arrow buttons on the remote to highlight Home Use and press OK. 3 3 Use the Arrow buttons on the remote to highlight your language of the steps necessary to highlight your country, and then press OK. 19 Seleccione "Home Use" ...ón en la Tienda. Choisissez "Home Use" pour le Mode Domicile ou "Store Demo" pour la Démo en Magasin. The TV powers on the remote. Select Home Use for use . To complete the first-time setup: 1 Press the Power button on and the Setup App starts. 2 Choose your mode. ...
User Manual English
Page 20
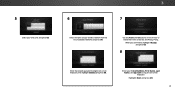
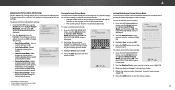
Use the Arrow and OK buttons on -screen keyboard. Highlight Next and press OK. 20 5 Select your time zone and press OK. 3 6 7 Select the name of your E-mail Address, First Name, Last Name, and Zip Code using the on-screen keyboard, then highlight Connect and press OK. Enter your wireless network from the list of available networks and press OK. When you are finished, highlight I Accept and press OK. 8 Enter the network password using the on the remote to review the Terms Of Service and Privacy Policy.
Use the Arrow and OK buttons on -screen keyboard. Highlight Next and press OK. 20 5 Select your time zone and press OK. 3 6 7 Select the name of your E-mail Address, First Name, Last Name, and Zip Code using the on-screen keyboard, then highlight Connect and press OK. Enter your wireless network from the list of available networks and press OK. When you are finished, highlight I Accept and press OK. 8 Enter the network password using the on the remote to review the Terms Of Service and Privacy Policy.
User Manual English
Page 21
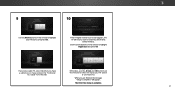
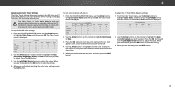
Otherwise, use the Arrow and OK buttons on the remote to select the input your TV source and press OK. Note: Number of ports may differ by TV. If you have cable TV, select whether ... Scan and press OK. The First-Time Setup is complete. 3 21 9 10 Use the Arrow buttons on the remote to highlight your TV source is complete." Use the arrow buttons on the remote to a cable from the wall. will need to scan for channels, which takes several minutes. If the TV Signal...
Otherwise, use the Arrow and OK buttons on the remote to select the input your TV source and press OK. Note: Number of ports may differ by TV. If you have cable TV, select whether ... Scan and press OK. The First-Time Setup is complete. 3 21 9 10 Use the Arrow buttons on the remote to highlight your TV source is complete." Use the arrow buttons on the remote to a cable from the wall. will need to scan for channels, which takes several minutes. If the TV Signal...
User Manual English
Page 22
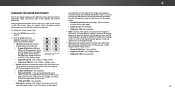
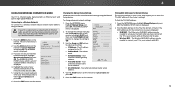
...Wide CC Sleep Timer Picture Audio While navigating the on -screen menu by TV. To use on -screen menu. Press the INPUT button on the remote to highlight the input you can : • Adjust the Picture settings • Adjust the Audio settings • Setting the Sleep Timers •...• Set up Closed Captioning • Name Inputs • Adjust TV settings • Access the Guided Setup • View the User Manual VIZIO TV SETTINGS Picture Audio Timers Network Channels CC Closed Captions Devices System Guided Setup User Manual NAVIGATING THE ON-SCREEN MENU To open the on...
...Wide CC Sleep Timer Picture Audio While navigating the on -screen menu by TV. To use on -screen menu. Press the INPUT button on the remote to highlight the input you can : • Adjust the Picture settings • Adjust the Audio settings • Setting the Sleep Timers •...• Set up Closed Captioning • Name Inputs • Adjust TV settings • Access the Guided Setup • View the User Manual VIZIO TV SETTINGS Picture Audio Timers Network Channels CC Closed Captions Devices System Guided Setup User Manual NAVIGATING THE ON-SCREEN MENU To open the on...
User Manual English
Page 23
... and 480p) - Press the WIDE button on the top or sides of the screen. • 1080p and 1080i - Some programs have black bars on the remote. 2. Not available. • Panoramic stretches a 4:3 aspect ratio picture to view and press OK. • Normal preserves the content's original aspect ratio and size. • Standard...
... and 480p) - Press the WIDE button on the top or sides of the screen. • 1080p and 1080i - Some programs have black bars on the remote. 2. Not available. • Panoramic stretches a 4:3 aspect ratio picture to view and press OK. • Normal preserves the content's original aspect ratio and size. • Standard...
User Manual English
Page 24
... Color - Color - Brightness - Sharpness - Press the Up Arrow button on the remote to the menu. The entire picture is full-sized) Input Wide CC VIZIO PICTURE Picture Mode Standard Auto Brightness Control Backlight - Tint - Sleep Timer Picture Audio...the picture. (The picture is resized to fitEixnit to th2eD space3D to cycle through the three display methods. 3. VIZIO Network Settings PICTURE Help Picture Mode Standard Auto Brightness Control Backlight - The picture is displayed: 1. Contrast - ZoomSharpness Norm- ...
... Color - Color - Brightness - Sharpness - Press the Up Arrow button on the remote to the menu. The entire picture is full-sized) Input Wide CC VIZIO PICTURE Picture Mode Standard Auto Brightness Control Backlight - Tint - Sleep Timer Picture Audio...the picture. (The picture is resized to fitEixnit to th2eD space3D to cycle through the three display methods. 3. VIZIO Network Settings PICTURE Help Picture Mode Standard Auto Brightness Control Backlight - The picture is displayed: 1. Contrast - ZoomSharpness Norm- ...
User Manual English
Page 25
VIZIO PICTURE Picture Mode Auto Brightness Control Backlight - Tint - More Picture Picture Mode Edit Color Calibration Standard Medium + ... appears after its name (see Saving a Custom Picture Mode on page 27). Use the Arrow buttons on the remote to highlight Picture Mode, then use the Left/Right Arrow buttons to change each of the picture settings, use ...8226; Color - The PICTURE menu is too high, the picture may appear dark. Use the Arrow buttons on the remote to values ideal for watching TV in a brightly-lit room. • Calibrated Dark mode sets the picture settings to...
VIZIO PICTURE Picture Mode Auto Brightness Control Backlight - Tint - More Picture Picture Mode Edit Color Calibration Standard Medium + ... appears after its name (see Saving a Custom Picture Mode on page 27). Use the Arrow buttons on the remote to highlight Picture Mode, then use the Left/Right Arrow buttons to change each of the picture settings, use ...8226; Color - The PICTURE menu is too high, the picture may appear dark. Use the Arrow buttons on the remote to values ideal for watching TV in a brightly-lit room. • Calibrated Dark mode sets the picture settings to...
User Manual English
Page 26
.... To adjust the color temperature: 1. When you have finished adjusting More Picture Settings, press the EXIT button on the remote. VIZIO MORE PICTURE 2. Reduces pixelation and distortion for watching film. The PICTURE SIZE & POSITION menu is controlled by adjusting the ... Adjusting More Picture Settings To adjust more picture settings: 1. Opens a sub-menu with fast action. Use the Arrow buttons on the remote to reduce video delay (lag) when gaming. • Picture Size & Position - Press ST•lim eeepr FilmtPhicetMuOreoKdebAuu-dtOitoopntimwhizeens you are ...
.... To adjust the color temperature: 1. When you have finished adjusting More Picture Settings, press the EXIT button on the remote. VIZIO MORE PICTURE 2. Reduces pixelation and distortion for watching film. The PICTURE SIZE & POSITION menu is controlled by adjusting the ... Adjusting More Picture Settings To adjust more picture settings: 1. Opens a sub-menu with fast action. Use the Arrow buttons on the remote to reduce video delay (lag) when gaming. • Picture Size & Position - Press ST•lim eeepr FilmtPhicetMuOreoKdebAuu-dtOitoopntimwhizeens you are ...
User Manual English
Page 27
...and then press OK. 4 Adjusting the Picture Mode Edit Settings Picture Mode Edit Settings allow you to save a group of custom settings for your remote to enter a unique 4-digit PIN. 3. Use the Arrow buttons to highlight the setting you wish to adjust, then press OK to custom picture ...create a new 4-digit PIN. 5. Inputs assigned to all custom picture modes: 1. VIZIO LOCK PICTURE MODE Create a picture control PIN to prevent changes to that custom picture mode will add an asterisk on your remote to exit the menu screens. From the PICTURE MODE EDIT menu, use the Arrow ...
...and then press OK. 4 Adjusting the Picture Mode Edit Settings Picture Mode Edit Settings allow you to save a group of custom settings for your remote to enter a unique 4-digit PIN. 3. Use the Arrow buttons to highlight the setting you wish to adjust, then press OK to custom picture ...create a new 4-digit PIN. 5. Inputs assigned to all custom picture modes: 1. VIZIO LOCK PICTURE MODE Create a picture control PIN to prevent changes to that custom picture mode will add an asterisk on your remote to exit the menu screens. From the PICTURE MODE EDIT menu, use the Arrow ...
User Manual English
Page 29
... COLOR CALIBRATION menu, use the Arrow buttons to highlight Red, Green, or Blue. 3. Press the OK button to turn off or on the remote to highlight the Gain and Color values you are finished, press the OK button to save the setting. 3. When you are finished adjusting the ...0 Offset 0 0 0 Gain 0 0 0 2. Use the Arrow buttons on . Use the Arrow buttons to highlight another color channel to turn the color channel off or on the remote to highlight Color Tuner, and then press OK. Press the OK button and use the Arrow buttons to adjust. Press the OK button. 3. To turn...
... COLOR CALIBRATION menu, use the Arrow buttons to highlight Red, Green, or Blue. 3. Press the OK button to turn off or on the remote to highlight the Gain and Color values you are finished, press the OK button to save the setting. 3. When you are finished adjusting the ...0 Offset 0 0 0 Gain 0 0 0 2. Use the Arrow buttons on . Use the Arrow buttons to highlight another color channel to turn the color channel off or on the remote to highlight Color Tuner, and then press OK. Press the OK button and use the Arrow buttons to adjust. Press the OK button. 3. To turn...
User Manual English
Page 30
...for the ramp test pattern. Color Bar Test Pattern Off To show or hide the Ramp Test Pattern: 1. Use the Arrow buttons on the remote to highlight Off. Use the Left/Right Arrow buttons to highlight Color Tuner, and then press the Left/Right Arrow buttons until the Color Bar.... -or- From the Color Tuner menu, use the Arrow buttons to select the color for the flat test pattern. Use the Arrow buttons on the remote to highlight Off. Selecting a percentage immediately shows the flat pattern at that color ramp. -or- 4 To show the SMPTE Pattern. -or- Ramp Test Pattern...
...for the ramp test pattern. Color Bar Test Pattern Off To show or hide the Ramp Test Pattern: 1. Use the Arrow buttons on the remote to highlight Off. Use the Left/Right Arrow buttons to highlight Color Tuner, and then press the Left/Right Arrow buttons until the Color Bar.... -or- From the Color Tuner menu, use the Arrow buttons to select the color for the flat test pattern. Use the Arrow buttons on the remote to highlight Off. Selecting a percentage immediately shows the flat pattern at that color ramp. -or- 4 To show the SMPTE Pattern. -or- Ramp Test Pattern...
User Manual English
Page 31
...When you to a home theater audio system. The Audio Mode and equalizer settings screen appears. 4. Use the Arrow buttons on the remote. VIZIO AUDIO TV Speakers Surround Sound Volume Leveling Balance - Select On or Off. Input Wide CC • Equalizer - Use the Arrow ...and equalizer settings screen appears. 4. 4 ADJUSTING THE AUDIO SETTINGS To adjust the audio settings: 1. Press the MENU button on the remote. 31 Use the Arrow buttons to reflect the mode. 5. TruSurround completes the entertainment experience by providing deep, rich bass and by...
...When you to a home theater audio system. The Audio Mode and equalizer settings screen appears. 4. Use the Arrow buttons on the remote. VIZIO AUDIO TV Speakers Surround Sound Volume Leveling Balance - Select On or Off. Input Wide CC • Equalizer - Use the Arrow ...and equalizer settings screen appears. 4. 4 ADJUSTING THE AUDIO SETTINGS To adjust the audio settings: 1. Press the MENU button on the remote. 31 Use the Arrow buttons to reflect the mode. 5. TruSurround completes the entertainment experience by providing deep, rich bass and by...
User Manual English
Page 32
The on the remote to highlight Delete Audio Mode and press OK. The TV displays, "To delete the user created custom audio mode, select the Delete button." 4. Use the Arrow buttons on -screen menu is displayed. 3. Use the Arrow buttons to highlight Audio and press OK. Press the EXIT button on the remote. The AUDIO menu is displayed. 2. Press the MENU button on the remote. 4 32 Highlight Delete and press OK. 5. Deleting the Custom Audio Mode To delete the custom audio mode that has been created: 1.
The on the remote to highlight Delete Audio Mode and press OK. The TV displays, "To delete the user created custom audio mode, select the Delete button." 4. Use the Arrow buttons on -screen menu is displayed. 3. Use the Arrow buttons to highlight Audio and press OK. Press the EXIT button on the remote. The AUDIO menu is displayed. 2. Press the MENU button on the remote. 4 32 Highlight Delete and press OK. 5. Deleting the Custom Audio Mode To delete the custom audio mode that has been created: 1.
User Manual English
Page 33
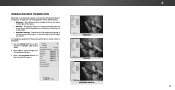
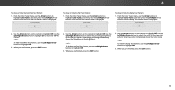
Press the MENU button on the remote to sleep: 30, 60, 90, 120, or 180 minutes. VIZIO TIMERS Sleep Timer Auto Power Off Screen Saver Blank ...Screen Off 10 minutes Off 3. This feature can set the time before the screen saver begins. From the TIMERS menu, use the Up/Down Arrow buttons on the remote...TV to go to highlight Blank Screen and press OK. WUidsee thZoeom Left/NRorimgahl t PAarnroroawmicbuttons on the remote to change the setting to exit the blank screen. If you have finished setting the auto power off ...
Press the MENU button on the remote to sleep: 30, 60, 90, 120, or 180 minutes. VIZIO TIMERS Sleep Timer Auto Power Off Screen Saver Blank ...Screen Off 10 minutes Off 3. This feature can set the time before the screen saver begins. From the TIMERS menu, use the Up/Down Arrow buttons on the remote...TV to go to highlight Blank Screen and press OK. WUidsee thZoeom Left/NRorimgahl t PAarnroroawmicbuttons on the remote to change the setting to exit the blank screen. If you have finished setting the auto power off ...
User Manual English
Page 34
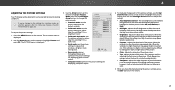
... TV is displayed. 3. Use the Arrow buttons on the remote to set up a wireless network connection. 1. Highlight the name of your wireless network displayed, highlight More Access Points and press OK. VIZIO NETWORK Wired Connection Disconnected Wireless Access Points More Access Points WPS... connected to enter the TV's MAC address in high-speed Wireless-N. Using the on the remote. To change advanced network settings: 1. From the NETWORK menu, highlight Manual Setup and VIZIO press OK. Your alternate domain name server 4. Press the MENU button on -screeen keyboard,...
... TV is displayed. 3. Use the Arrow buttons on the remote to set up a wireless network connection. 1. Highlight the name of your wireless network displayed, highlight More Access Points and press OK. VIZIO NETWORK Wired Connection Disconnected Wireless Access Points More Access Points WPS... connected to enter the TV's MAC address in high-speed Wireless-N. Using the on the remote. To change advanced network settings: 1. From the NETWORK menu, highlight Manual Setup and VIZIO press OK. Your alternate domain name server 4. Press the MENU button on -screeen keyboard,...


