
Camera Manual
Page 6
... camera setup. Setting the Camera Language 1) You will be adjusted at any time manually through the INITIAL CAMERA SETUP. NOTE: After the camera is heard). Alkaline batteries recommended. 2) Make sure an SD card has been properly inserted into your digital camera. When powering the camera ON for the camera. If you will first be set to exit the setup. Select the language of your camera (until a click sound is powered on, an SD icon will appear. Use...
... camera setup. Setting the Camera Language 1) You will be adjusted at any time manually through the INITIAL CAMERA SETUP. NOTE: After the camera is heard). Alkaline batteries recommended. 2) Make sure an SD card has been properly inserted into your digital camera. When powering the camera ON for the camera. If you will first be set to exit the setup. Select the language of your camera (until a click sound is powered on, an SD icon will appear. Use...
Camera Manual
Page 8
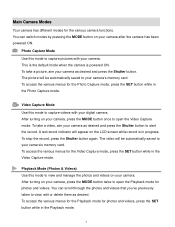
... to view, edit or delete them as desired and press the Shutter button to your camera‟s memory card. After turning on your camera. To access the various menus for the Photo Capture mode, press the SET button while in the Playback mode. 7 The picture will be automatically saved to start the record. The video will be automatically saved to open the Playback mode for the various camera functions. Playback Mode (Photos & Videos) Use this mode to capture videos with your camera, press the MODE button...
... to view, edit or delete them as desired and press the Shutter button to your camera‟s memory card. After turning on your camera. To access the various menus for the Photo Capture mode, press the SET button while in the Playback mode. 7 The picture will be automatically saved to start the record. The video will be automatically saved to open the Playback mode for the various camera functions. Playback Mode (Photos & Videos) Use this mode to capture videos with your camera, press the MODE button...

Camera Manual
Page 9
... / Beach / Party Auto/Force/Red Eye/Off 2, 5 or 10 second delay Yes Yes Yes Yes Yes, Manual Switch English, French, Spanish, Portuguese, German, Dutch, Italian, Russian, Turkish USB 2.0 Windows XP and above / Mac OSX 10.5 and above 2 * AA (1.5V) batteries 0~40C 8 Camera Technical Specifications Image Sensor Image Resolution Video Resolution File Format Internal Memory External Memory LCD Display Lens Zoom Exposure White Balance ISO Scene Flash Self-Timer Anti-Shake Print Photos Face Detect Smile Capture Macro Languages Interface System Requirements Battery Working Temperature CMOS...
... / Beach / Party Auto/Force/Red Eye/Off 2, 5 or 10 second delay Yes Yes Yes Yes Yes, Manual Switch English, French, Spanish, Portuguese, German, Dutch, Italian, Russian, Turkish USB 2.0 Windows XP and above / Mac OSX 10.5 and above 2 * AA (1.5V) batteries 0~40C 8 Camera Technical Specifications Image Sensor Image Resolution Video Resolution File Format Internal Memory External Memory LCD Display Lens Zoom Exposure White Balance ISO Scene Flash Self-Timer Anti-Shake Print Photos Face Detect Smile Capture Macro Languages Interface System Requirements Battery Working Temperature CMOS...

Camera Manual
Page 11
... the camera will automatically turn your camera. Use this mode to turn your camera OFF. The icons that appear on the LCD screen are the best default settings so that your camera is on the back of time that you can be set from the Auto Power Off settings menu. NOTE: Your digital camera also has an Auto Power Off feature that will power off your camera. 3) Playback Mode (for photos and videos) - The camera will be in Photo Capture mode Powering the camera...
... the camera will automatically turn your camera. Use this mode to turn your camera OFF. The icons that appear on the LCD screen are the best default settings so that your camera is on the back of time that you can be set from the Auto Power Off settings menu. NOTE: Your digital camera also has an Auto Power Off feature that will power off your camera. 3) Playback Mode (for photos and videos) - The camera will be in Photo Capture mode Powering the camera...
Camera Manual
Page 18
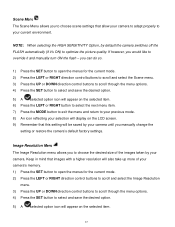
... the Image Resolution menu. 3) Press the UP or DOWN direction control buttons to scroll through the menu options. 4) Press the SET button to your previous mode. 8) An icon reflecting your selection will display on the LCD screen. 9) Remember that this setting will appear on the selected item. 17 If however, you manually change the setting or restore the camera‟s default factory settings. Keep in mind that allow your camera to adapt properly...
... the Image Resolution menu. 3) Press the UP or DOWN direction control buttons to scroll through the menu options. 4) Press the SET button to your previous mode. 8) An icon reflecting your selection will display on the LCD screen. 9) Remember that this setting will appear on the selected item. 17 If however, you manually change the setting or restore the camera‟s default factory settings. Keep in mind that allow your camera to adapt properly...

Camera Manual
Page 19
... button to select the next menu item. 7) Press the MODE button to exit the menu and return to your previous mode. 8) An icon reflecting your selection will display on the LCD screen. 9) Remember that this setting will be saved by your camera. Image Quality Menu The Image Quality menu allows you manually change the setting or restore the camera‟s default factory settings. Keep in mind that images with a higher image quality level will also take the picture...
... button to select the next menu item. 7) Press the MODE button to exit the menu and return to your previous mode. 8) An icon reflecting your selection will display on the LCD screen. 9) Remember that this setting will be saved by your camera. Image Quality Menu The Image Quality menu allows you manually change the setting or restore the camera‟s default factory settings. Keep in mind that images with a higher image quality level will also take the picture...

Camera Manual
Page 20
... previous mode. 8) An icon reflecting your selection will display on the LCD screen. 9) Remember that the color and focus of the camera while capturing the image. 1) Press the SET button to open the menus for balancing the other colors and focus in the camera‟s display. 3) Press the UP or DOWN direction control buttons to scroll through the menu options. 4) Press the SET button to select and save the desired option. 5) A selected option icon will...
... previous mode. 8) An icon reflecting your selection will display on the LCD screen. 9) Remember that the color and focus of the camera while capturing the image. 1) Press the SET button to open the menus for balancing the other colors and focus in the camera‟s display. 3) Press the UP or DOWN direction control buttons to scroll through the menu options. 4) Press the SET button to select and save the desired option. 5) A selected option icon will...
Camera Manual
Page 21
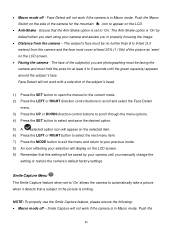
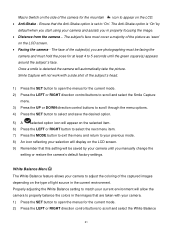
... feature when set to your previous mode. 8) An icon reflecting your selection will display on the LCD screen. Facing the camera - The Anti-Shake option is set to „On‟ allows the camera to automatically take a picture when it detects that the Anti-Shake option is „On‟ by your camera and assists you manually change the setting or restore the camera‟s default factory settings. The...
... feature when set to your previous mode. 8) An icon reflecting your selection will display on the LCD screen. Facing the camera - The Anti-Shake option is set to „On‟ allows the camera to automatically take a picture when it detects that the Anti-Shake option is „On‟ by your camera and assists you manually change the setting or restore the camera‟s default factory settings. The...
Camera Manual
Page 22
... with a side shot of the subject`s head. 1) Press the SET button to open the menus for the current mode. 2) Press the LEFT or RIGHT direction control buttons to scroll and select the White Balance 21 Properly adjusting the White Balance setting to match your selection will display on the LCD screen. 9) Remember that are photographing must be saved by default when you manually change the setting or restore the camera‟s default factory settings. Once a smile...
... with a side shot of the subject`s head. 1) Press the SET button to open the menus for the current mode. 2) Press the LEFT or RIGHT direction control buttons to scroll and select the White Balance 21 Properly adjusting the White Balance setting to match your selection will display on the LCD screen. 9) Remember that are photographing must be saved by default when you manually change the setting or restore the camera‟s default factory settings. Once a smile...

Camera Manual
Page 25
... lighting. 1) Press the SET button to open the menus for the current mode. 2) Press the LEFT or RIGHT direction control buttons to scroll and select the ISO menu. 3) Press the UP or DOWN direction control buttons to scroll through the menu options. 4) Press the SET button to your camera until you manually change the setting or restore the camera‟s default factory settings. If the environment has less light (darker) than is needed , reduce the exposure setting (by using...
... lighting. 1) Press the SET button to open the menus for the current mode. 2) Press the LEFT or RIGHT direction control buttons to scroll and select the ISO menu. 3) Press the UP or DOWN direction control buttons to scroll through the menu options. 4) Press the SET button to your camera until you manually change the setting or restore the camera‟s default factory settings. If the environment has less light (darker) than is needed , reduce the exposure setting (by using...
Camera Manual
Page 28
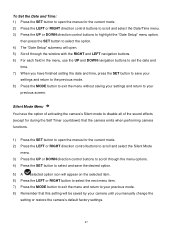
... option icon will be saved by your previous screen. To Set the Date and Time: 1) Press the SET button to open the menus for the current mode. 2) Press the LEFT or RIGHT direction control buttons to scroll and select the Silent Mode menu. 3) Press the UP or DOWN direction control buttons to scroll through the window with the RIGHT and LEFT navigation buttons. 6) For each field in the menu, use the UP...
... option icon will be saved by your previous screen. To Set the Date and Time: 1) Press the SET button to open the menus for the current mode. 2) Press the LEFT or RIGHT direction control buttons to scroll and select the Silent Mode menu. 3) Press the UP or DOWN direction control buttons to scroll through the window with the RIGHT and LEFT navigation buttons. 6) For each field in the menu, use the UP...

Camera Manual
Page 30
... previous mode. 8) Remember that formatting the memory card will delete all of the content at one time. Format Memory Card Menu You can use the Format Memory Card menu to delete all of the content that is selected. 4) Press the SET button to reset the camera to the factory default settings. 5) You will be saved by your camera until you would like to delete individual images, use the delete menu in mind that this menu to view the Firmware version on your camera‟s memory card.
... previous mode. 8) Remember that formatting the memory card will delete all of the content at one time. Format Memory Card Menu You can use the Format Memory Card menu to delete all of the content that is selected. 4) Press the SET button to reset the camera to the factory default settings. 5) You will be saved by your camera until you would like to delete individual images, use the delete menu in mind that this menu to view the Firmware version on your camera‟s memory card.

Camera Manual
Page 31
... view. Each captured image (videos and photos) will display on the LCD screen. Photos will automatically exit the menu and return to the previous mode with the digital camera settings set to the Factory Default Settings. 7) If you first turn on the top left of the LCD screen. 2) Zooming In/Out of the selected photo. Use the UP / DOWN / LEFT / RIGHT direction buttons to open the Playback Mode. Photo Playback Mode When you would like to select your system Language, Date/Time...
... view. Each captured image (videos and photos) will display on the LCD screen. Photos will automatically exit the menu and return to the previous mode with the digital camera settings set to the Factory Default Settings. 7) If you first turn on the top left of the LCD screen. 2) Zooming In/Out of the selected photo. Use the UP / DOWN / LEFT / RIGHT direction buttons to open the Playback Mode. Photo Playback Mode When you would like to select your system Language, Date/Time...
Camera Manual
Page 32
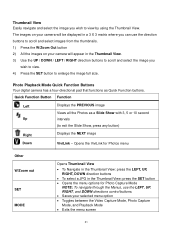
... W/Zoom Out button 2) All the images on your camera will appear in a 3 X 3 matrix where you can use the LEFT, UP, RIGHT, and DOWN directions control buttons. Saves your camera will be displayed in the Thumbnail View. 3) Use the UP / DOWN / LEFT / RIGHT direction buttons to scroll and select the image you wish to view by using the Thumbnail View. Quick Function Button Function Left Displays the PREVIOUS image Views all the Photos as Quick Function buttons. Photo Playback Mode Quick Function Buttons Your digital camera has a four-directional...
... W/Zoom Out button 2) All the images on your camera will appear in a 3 X 3 matrix where you can use the LEFT, UP, RIGHT, and DOWN directions control buttons. Saves your camera will be displayed in the Thumbnail View. 3) Use the UP / DOWN / LEFT / RIGHT direction buttons to scroll and select the image you wish to view by using the Thumbnail View. Quick Function Button Function Left Displays the PREVIOUS image Views all the Photos as Quick Function buttons. Photo Playback Mode Quick Function Buttons Your digital camera has a four-directional...
Camera Manual
Page 38
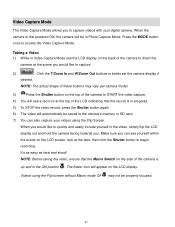
... . Video Capture Mode The Video Capture Mode allows you . NOTE: Before taking the video, ensure that the record is first powered ON, the camera will automatically be in Video Capture Mode use the LCD display on the LCD screen, look at the scene you would like to capture. 2) Click the T/Zoom In and W/Zoom Out buttons to access the Video Capture Mode. Taking a Video 1) While in Photo Capture Mode. Make sure you can also capture your digital camera.
... . Video Capture Mode The Video Capture Mode allows you . NOTE: Before taking the video, ensure that the record is first powered ON, the camera will automatically be in Video Capture Mode use the LCD display on the LCD screen, look at the scene you would like to capture. 2) Click the T/Zoom In and W/Zoom Out buttons to access the Video Capture Mode. Taking a Video 1) While in Photo Capture Mode. Make sure you can also capture your digital camera.

Camera Manual
Page 48
... the images taken by your camera‟s memory card. If your camera is currently on your camera‟s memory card. This option can use the delete menu in the camera‟s Playback mode. 1) Press the SET button to open the menus for the current mode. 2) Press the LEFT or RIGHT direction control buttons to scroll and select the Format Memory Card menu. 3) Press the UP or DOWN direction control buttons to a frequency that is set to highlight the menu options...
... the images taken by your camera‟s memory card. If your camera is currently on your camera‟s memory card. This option can use the delete menu in the camera‟s Playback mode. 1) Press the SET button to open the menus for the current mode. 2) Press the LEFT or RIGHT direction control buttons to scroll and select the Format Memory Card menu. 3) Press the UP or DOWN direction control buttons to a frequency that is set to highlight the menu options...

Camera Manual
Page 49
... be reset. The memory card will be prompted to the previous mode. Firmware (Factory Default Settings) Menu Use this menu to view the Firmware version on , you will be asked to confirm the resetting to the factory default settings. 6) If you would like to proceed with the reset, select „Yes‟ and press the SET button to reset your system Language, Date/Time and ViviLink for the current mode. 2) Press the LEFT or RIGHT direction control buttons...
... be reset. The memory card will be prompted to the previous mode. Firmware (Factory Default Settings) Menu Use this menu to view the Firmware version on , you will be asked to confirm the resetting to the factory default settings. 6) If you would like to proceed with the reset, select „Yes‟ and press the SET button to reset your system Language, Date/Time and ViviLink for the current mode. 2) Press the LEFT or RIGHT direction control buttons...

Camera Manual
Page 50
... the Shutter button to START playing the video. Press the Shutter button again to PAUSE the video and to continue playing and pausing as needed. While the Video is playing all the icons on Your Camera 1) Select your digital video recorder‟s memory card until you find the video you first turn on the camera, the camera will be displayed in a 3 X 3 matrix where you can play and view the video. 49 Press the MODE button twice to the LCD...
... the Shutter button to START playing the video. Press the Shutter button again to PAUSE the video and to continue playing and pausing as needed. While the Video is playing all the icons on Your Camera 1) Select your digital video recorder‟s memory card until you find the video you first turn on the camera, the camera will be displayed in a 3 X 3 matrix where you can play and view the video. 49 Press the MODE button twice to the LCD...

Camera Manual
Page 56
... the selected folder and albums ready for your camera (removable disk) from the device window. Doing so will be inserted. A message appears when the download is the only USB device connected then it will cancel the transfer of any files on the bottom left showing the number of media files downloading to your computer. Getting Photos and Videos from your Camera to Your Computer An SD card needs to...
... the selected folder and albums ready for your camera (removable disk) from the device window. Doing so will be inserted. A message appears when the download is the only USB device connected then it will cancel the transfer of any files on the bottom left showing the number of media files downloading to your computer. Getting Photos and Videos from your Camera to Your Computer An SD card needs to...
Camera Manual
Page 60
... else, please visit www.vivitar.com for ? Troubleshooting Q: I do I have in the camera`s memory. I get a message that I recover images that the images were successfully transferred but the photos do I make sure I deleted images using the Vivitar Experience Image Manager are sent to prevent unintentional data loss. Press the Shutter button to take some sample photos and then try downloading them to the SD memory card then all the photos should be retrieved from my...
... else, please visit www.vivitar.com for ? Troubleshooting Q: I do I have in the camera`s memory. I get a message that I recover images that the images were successfully transferred but the photos do I make sure I deleted images using the Vivitar Experience Image Manager are sent to prevent unintentional data loss. Press the Shutter button to take some sample photos and then try downloading them to the SD memory card then all the photos should be retrieved from my...


