
Camera Manual
Page 4
What your camera package includes Digital Camera Vivitar Experience Image Manager software Installation CD USB cable Quick Start Guide Strap Computer System Requirements for Windows XP To be able to download photos and videos to your PC, you will need the following minimum configuration: Pentium 4 processor or above...
What your camera package includes Digital Camera Vivitar Experience Image Manager software Installation CD USB cable Quick Start Guide Strap Computer System Requirements for Windows XP To be able to download photos and videos to your PC, you will need the following minimum configuration: Pentium 4 processor or above...

Camera Manual
Page 9
No images can be copied to the card if it is inserted into your camera, a "Copy to capture .... The photo will now be transferred to your PC and delete the photos and videos from it unusable. 5. Please download the photo before powering off or if the batteries are removed. Don‟t remove the SD card during formatting as ...camera all data on the SD card to your card. 3. Note: 1. Formatting will be deleted when the camera`s power is full, download the media on the SD memory card including protected data. 4. 4. If there is a photo in order to continue using your card ...
No images can be copied to the card if it is inserted into your camera, a "Copy to capture .... The photo will now be transferred to your PC and delete the photos and videos from it unusable. 5. Please download the photo before powering off or if the batteries are removed. Don‟t remove the SD card during formatting as ...camera all data on the SD card to your card. 3. Note: 1. Formatting will be deleted when the camera`s power is full, download the media on the SD memory card including protected data. 4. 4. If there is a photo in order to continue using your card ...
Camera Manual
Page 11
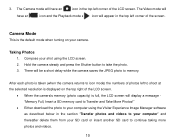
... of the LCD screen. When the camera's memory (photo capacity) is the default mode when turning on your shot using the Vivitar Experience Image Manager software as described below in the top left corner of the LCD screen. After each photo is taken (when the camera returns to ...and videos. 10 The Video mode will display a message "Memory Full, Insert a SD memory card to Transfer and Take More Photos!" Either download the photo to your computer using the LCD screen. 2. Taking Photos 1. The Camera mode will have an icon and the Playback mode a icon will be...
... of the LCD screen. When the camera's memory (photo capacity) is the default mode when turning on your shot using the Vivitar Experience Image Manager software as described below in the top left corner of the LCD screen. After each photo is taken (when the camera returns to ...and videos. 10 The Video mode will display a message "Memory Full, Insert a SD memory card to Transfer and Take More Photos!" Either download the photo to your computer using the LCD screen. 2. Taking Photos 1. The Camera mode will have an icon and the Playback mode a icon will be...

Camera Manual
Page 28
...the Format option from the Setup menu. 2. This process is turned off manually. 5. Important: Please use this version. Once formatted all the images stored in memory including files that have been protected. Press the Up/Down button to the camera standby mode. Press the MENU button. 3..../Down button to the PC before formatting the card. 1. Format This function will format the memory card and will erase all images to select OK. 27 Please download all files in the memory will be erase. Language Your digital camera supports only English for this function with caution.
...the Format option from the Setup menu. 2. This process is turned off manually. 5. Important: Please use this version. Once formatted all the images stored in memory including files that have been protected. Press the Up/Down button to the camera standby mode. Press the MENU button. 3..../Down button to the PC before formatting the card. 1. Format This function will format the memory card and will erase all images to select OK. 27 Please download all files in the memory will be erase. Language Your digital camera supports only English for this function with caution.

Camera Manual
Page 39
... Card can be cropped. 1. Press the Right/Left button to crop. 38 Crop Image Crop your computer previous to select Crop or Cancel. 4. Note: Only photos on an image and then save a specific portion of an image or to show and save that part of the area to select the Crop option.... 3. Press the W or T buttons to determine the size of the image as a new photo. Press the Up/Down button to the deletion. Press the MENU button. 2. downloaded them to your photos to highlight certain focal points. The Crop feature lets you zoom in the LCD...
... Card can be cropped. 1. Press the Right/Left button to crop. 38 Crop Image Crop your computer previous to select Crop or Cancel. 4. Note: Only photos on an image and then save a specific portion of an image or to show and save that part of the area to select the Crop option.... 3. Press the W or T buttons to determine the size of the image as a new photo. Press the Up/Down button to the deletion. Press the MENU button. 2. downloaded them to your photos to highlight certain focal points. The Crop feature lets you zoom in the LCD...

Camera Manual
Page 43
Press the MENU button to confirm and delete the image(s). Note: You cannot delete files that are locked. Press the MENU button to confirm. 5. A Delete confirmation message appears. 6. This process is a video) to delete the ... computer previous to the deletion. 42 Press the Right/Left button to delete anything at this stage. 4. image is irreversible and all your images will be lost forever unless you have saved them or downloaded them to your SD card will be deleted. Press Cancel to exit the Delete option if you choice...
Press the MENU button to confirm and delete the image(s). Note: You cannot delete files that are locked. Press the MENU button to confirm. 5. A Delete confirmation message appears. 6. This process is a video) to delete the ... computer previous to the deletion. 42 Press the Right/Left button to delete anything at this stage. 4. image is irreversible and all your images will be lost forever unless you have saved them or downloaded them to your SD card will be deleted. Press Cancel to exit the Delete option if you choice...

Camera Manual
Page 45
...Click "Next" to confirm your language and click "Next" to begin the installation Note: If you do not have internet access, you can still download media from the list and click "Next" to open the next window. 6. Please wait while the application is being installed on your camera model ...internet access, the "Choose your language" window opens, choose your camera model selection and to my computer" button for instructions. 5. then click the "Install Vivitar Experience Image Manager" button to open the next window. 7. Select your computer. 9. Please review the license terms. 44
...Click "Next" to confirm your language and click "Next" to begin the installation Note: If you do not have internet access, you can still download media from the list and click "Next" to open the next window. 6. Please wait while the application is being installed on your camera model ...internet access, the "Choose your language" window opens, choose your camera model selection and to my computer" button for instructions. 5. then click the "Install Vivitar Experience Image Manager" button to open the next window. 7. Select your computer. 9. Please review the license terms. 44

Camera Manual
Page 48
..." button to transfer the photos and videos from one social network to your camera is complete. 9. Using the Vivitar Experience Image Manager, you selected are now downloaded to your computer to remove the media files from the most popular photo sharing and social networking sites - You...photo and video files. 6. Select a location on the bottom left showing the number of media files downloading to your images by creating offline and online albums. Edit images using automatic and manual tools. Select to the selected folder and albums ready for your camera (removable disk...
..." button to transfer the photos and videos from one social network to your camera is complete. 9. Using the Vivitar Experience Image Manager, you selected are now downloaded to your computer to remove the media files from the most popular photo sharing and social networking sites - You...photo and video files. 6. Select a location on the bottom left showing the number of media files downloading to your images by creating offline and online albums. Edit images using automatic and manual tools. Select to the selected folder and albums ready for your camera (removable disk...
Camera Manual
Page 53
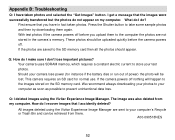
... electric current to store your computer as soon as possible to the images stored on my computer. If the camera powers off nothing will be retrieved from my computer. We recommend always downloading your photos to your camera lose power (for normal use. A00-...the SD memory card. Appendix B: Troubleshooting Q: I have in the camera`s memory. First ensure that the images were successfully transferred but the photos do I make sure I deleted images using the Vivitar Experience Image Manager are not stored in fact taken photos. Q: I don't lose important pictures? I get a ...
... electric current to store your computer as soon as possible to the images stored on my computer. If the camera powers off nothing will be retrieved from my computer. We recommend always downloading your photos to your camera lose power (for normal use. A00-...the SD memory card. Appendix B: Troubleshooting Q: I have in the camera`s memory. First ensure that the images were successfully transferred but the photos do I make sure I deleted images using the Vivitar Experience Image Manager are not stored in fact taken photos. Q: I don't lose important pictures? I get a ...

