

Camera Manual
Page 3
... photos and videos is included with your digital camera. Please read this camera. Wrist Strap Note: SD Memory Card not included 2 Digital Camera 2. What's Included 1. USB cable 3. Vivitar Experience Image Manager - Note: Your camera needs an SD Memory card (up to be purchased separately. Walmart Edition software Installation CD 4. Introduction Thank you need to 32GB...
... photos and videos is included with your digital camera. Please read this camera. Wrist Strap Note: SD Memory Card not included 2 Digital Camera 2. What's Included 1. USB cable 3. Vivitar Experience Image Manager - Note: Your camera needs an SD Memory card (up to be purchased separately. Walmart Edition software Installation CD 4. Introduction Thank you need to 32GB...
Camera Manual
Page 4
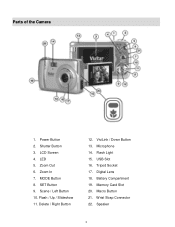
LCD Screen 4. Scene / Left Button 10. Delete / Right Button 12. ViviLink / Down Button 13. Memory Card Slot 20. Wrist Strap Connector 22. Power Button 2. Zoom Out 6. USB Slot 16. Battery Compartment 19. Speaker 3 LED 5. MODE Button 8. Digital Lens 18. Macro Button 21. Zoom In 7. Tripod Socket 17. Parts of the Camera 1. Shutter Button 3. SET Button 9. Flash / Up / Slideshow 11. Microphone 14. Flash Light 15.
LCD Screen 4. Scene / Left Button 10. Delete / Right Button 12. ViviLink / Down Button 13. Memory Card Slot 20. Wrist Strap Connector 22. Power Button 2. Zoom Out 6. USB Slot 16. Battery Compartment 19. Speaker 3 LED 5. MODE Button 8. Digital Lens 18. Macro Button 21. Zoom In 7. Tripod Socket 17. Parts of the Camera 1. Shutter Button 3. SET Button 9. Flash / Up / Slideshow 11. Microphone 14. Flash Light 15.
Camera Manual
Page 5
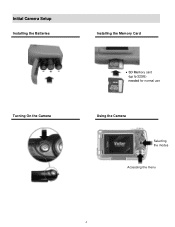
Initial Camera Setup Installing the Batteries Turning On the Camera Installing the Memory Card SD Memory card (up to 32GB) needed for normal use Using the Camera Selecting the modes Accessing the menu 4
Initial Camera Setup Installing the Batteries Turning On the Camera Installing the Memory Card SD Memory card (up to 32GB) needed for normal use Using the Camera Selecting the modes Accessing the menu 4
Camera Manual
Page 8
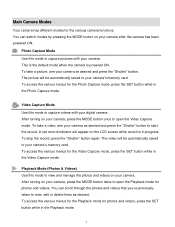
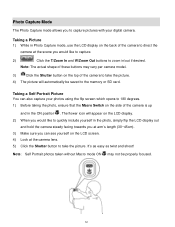
...camera. After turning on your camera as desired and press the "Shutter" button. Photo Capture Mode Use this mode to your camera‟s memory card. To stop the record, press the "Shutter" button again. After turning on your digital camera. Main Camera Modes Your camera has different ... Playback Mode (Photos & Videos) Use this mode to capture videos with your camera, press the MODE button twice to your camera‟s memory card. A red record indicator will be automatically saved to open the Video Capture mode. To access the various menus for the Video Capture mode,...
...camera. After turning on your camera as desired and press the "Shutter" button. Photo Capture Mode Use this mode to your camera‟s memory card. To stop the record, press the "Shutter" button again. After turning on your digital camera. Main Camera Modes Your camera has different ... Playback Mode (Photos & Videos) Use this mode to capture videos with your camera, press the MODE button twice to your camera‟s memory card. A red record indicator will be automatically saved to open the Video Capture mode. To access the various menus for the Video Capture mode,...
Camera Manual
Page 9
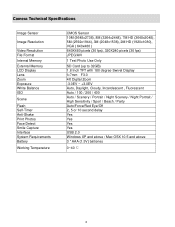
Camera Technical Specifications Image Sensor Image Resolution Video Resolution File Format Internal Memory External Memory LCD Display Lens Zoom Exposure White Balance ISO Scene Flash Self-Timer Anti-Shake Print Photos Face Detect Smile Capture Interface System ...3648x2048), 5M (2592x1944), 3M (2048x1536), 2M HD (1920x1080), VGA ( 640x480 ) 640X480 pixels (30 fps), 320X240 pixels (30 fps) JPEG/AVI 1 Test Photo Use Only SD Card (up to 32GB) 1.8 Inch TFT with 180 degree Swivel Display f=7mm F3.0 4X Digital Zoom -3.0EV ~ +3.0EV Auto, Daylight, Cloudy, Incandescent , Fluorescent Auto / 100 ...
Camera Technical Specifications Image Sensor Image Resolution Video Resolution File Format Internal Memory External Memory LCD Display Lens Zoom Exposure White Balance ISO Scene Flash Self-Timer Anti-Shake Print Photos Face Detect Smile Capture Interface System ...3648x2048), 5M (2592x1944), 3M (2048x1536), 2M HD (1920x1080), VGA ( 640x480 ) 640X480 pixels (30 fps), 320X240 pixels (30 fps) JPEG/AVI 1 Test Photo Use Only SD Card (up to 32GB) 1.8 Inch TFT with 180 degree Swivel Display f=7mm F3.0 4X Digital Zoom -3.0EV ~ +3.0EV Auto, Daylight, Cloudy, Incandescent , Fluorescent Auto / 100 ...
Camera Manual
Page 13
... LCD display on the top of these buttons may not be saved to take the picture. Note: The actual shape of the camera to the memory or SD card.
... LCD display on the top of these buttons may not be saved to take the picture. Note: The actual shape of the camera to the memory or SD card.
Camera Manual
Page 28
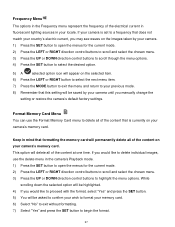
...at one time. Frequency Menu The options in the Frequency menu represent the frequency of the electrical current in fluorescent lighting sources in your camera's memory card. If your camera is currently on the selected item. 6) Press the LEFT or RIGHT button to select the next menu item. 7) Press the... the menu options. 4) Press the SET button to highlight the menu options. If you would like to delete individual images, use the Format Memory Card menu to delete all of the content on your locale. Keep in mind that does not match your country‟s electric current, you would...
...at one time. Frequency Menu The options in the Frequency menu represent the frequency of the electrical current in fluorescent lighting sources in your camera's memory card. If your camera is currently on the selected item. 6) Press the LEFT or RIGHT button to select the next menu item. 7) Press the... the menu options. 4) Press the SET button to highlight the menu options. If you would like to delete individual images, use the Format Memory Card menu to delete all of the content on your locale. Keep in mind that does not match your country‟s electric current, you would...
Camera Manual
Page 29
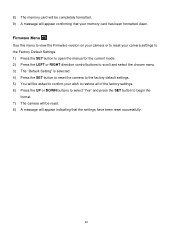
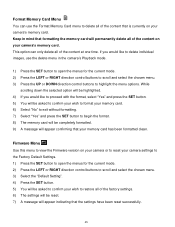
8) The memory card will be reset. 8) A message will appear confirming that the settings have been reset successfully. 28 Firmware Menu Use this menu to view the Firmware version ... wish to restore all of the factory settings. 6) Press the UP or DOWN buttons to select "Yes" and press the SET button to confirm your memory card has been formatted clean.
8) The memory card will be reset. 8) A message will appear confirming that the settings have been reset successfully. 28 Firmware Menu Use this menu to view the Firmware version ... wish to restore all of the factory settings. 6) Press the UP or DOWN buttons to select "Yes" and press the SET button to confirm your memory card has been formatted clean.

Camera Manual
Page 30
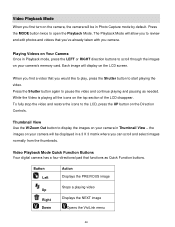
..., press the LEFT or RIGHT direction buttons to navigate around the photo. Use the direction buttons to scroll through the images on your camera‟s memory card. Thumbnail View Easily navigate and select the image you wish to zoom in on a photo on your camera. icon on the top left of the...
..., press the LEFT or RIGHT direction buttons to navigate around the photo. Use the direction buttons to scroll through the images on your camera‟s memory card. Thumbnail View Easily navigate and select the image you wish to zoom in on a photo on your camera. icon on the top left of the...
Camera Manual
Page 32
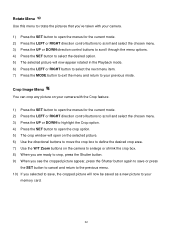
...RIGHT button to select the next menu item. 10) Press the MODE button to exit the menu and return to your choice with the accompanying Vivitar Experience Image Manager application. 1) Press the SET button to open the menus for the current mode. 2) Press the LEFT or RIGHT direction control... SET button to select the desired option. 5) A selected option icon will appear on the selected item. 6) An icon will appear on your camera‟s memory card, select "Delete All Images". 7) Press the SET button to select the desired option. 8) You will be asked to confirm your selection. 9) The photos ...
...RIGHT button to select the next menu item. 10) Press the MODE button to exit the menu and return to your choice with the accompanying Vivitar Experience Image Manager application. 1) Press the SET button to open the menus for the current mode. 2) Press the LEFT or RIGHT direction control... SET button to select the desired option. 5) A selected option icon will appear on the selected item. 6) An icon will appear on your camera‟s memory card, select "Delete All Images". 7) Press the SET button to select the desired option. 8) You will be asked to confirm your selection. 9) The photos ...
Camera Manual
Page 33
... through the menu options. 4) Press the SET button to select the desired option. 5) The selected picture will now be saved as a new picture to your memory card. 32
... through the menu options. 4) Press the SET button to select the desired option. 5) The selected picture will now be saved as a new picture to your memory card. 32
Camera Manual
Page 36
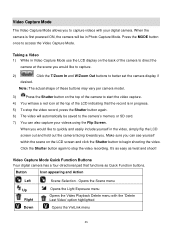
... to direct the camera at the top of the camera to start the video capture. 4) You will automatically be saved to the camera‟s memory or SD card. 7) You can see a red icon at the scene you would like to capture. 2) Click the T/Zoom In and W/Zoom Out buttons to better set...
... to direct the camera at the top of the camera to start the video capture. 4) You will automatically be saved to the camera‟s memory or SD card. 7) You can see a red icon at the scene you would like to capture. 2) Click the T/Zoom In and W/Zoom Out buttons to better set...
Camera Manual
Page 46
...format, select "Yes" and press the SET button. 5) You will be asked to confirm your wish to delete individual images, use the Format Memory Card menu to highlight the menu options. While scrolling down the selected option will be highlighted. 4) If you would like to restore all of the ...content that is currently on your camera‟s memory card. This option can use the delete menu in mind that formatting the memory card will permanently delete all of the content at one time. Keep in the camera‟s Playback mode. 1) ...
...format, select "Yes" and press the SET button. 5) You will be asked to confirm your wish to delete individual images, use the Format Memory Card menu to highlight the menu options. While scrolling down the selected option will be highlighted. 4) If you would like to restore all of the ...content that is currently on your camera‟s memory card. This option can use the delete menu in mind that formatting the memory card will permanently delete all of the content at one time. Keep in the camera‟s Playback mode. 1) ...
Camera Manual
Page 47
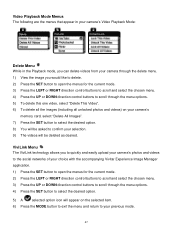
... Right Down Action Displays the PREVIOUS image Stops a playing video Displays the NEXT image Opens the ViviLink menu 46 the images on your camera‟s memory card. Video Playback Mode When you first turn on the camera, the camera will be displayed in a 3 X 3 matrix where you can scroll and select images normally...
... Right Down Action Displays the PREVIOUS image Stops a playing video Displays the NEXT image Opens the ViviLink menu 46 the images on your camera‟s memory card. Video Playback Mode When you first turn on the camera, the camera will be displayed in a 3 X 3 matrix where you can scroll and select images normally...
Camera Manual
Page 48
... scroll through the menu options. 4) Press the SET button to select the desired option. 5) A selected option icon will appear on your camera‟s memory card, select "Delete All Images". 7) Press the SET button to select the desired option. 8) You will be asked to your selection. 9) The videos ...View the image you to quickly and easily upload your camera‟s photos and videos to the social networks of your choice with the accompanying Vivitar Experience Image Manager application. 1) Press the SET button to open the menus for the current mode. 2) Press the LEFT or RIGHT direction ...
... scroll through the menu options. 4) Press the SET button to select the desired option. 5) A selected option icon will appear on your camera‟s memory card, select "Delete All Images". 7) Press the SET button to select the desired option. 8) You will be asked to your selection. 9) The videos ...View the image you to quickly and easily upload your camera‟s photos and videos to the social networks of your choice with the accompanying Vivitar Experience Image Manager application. 1) Press the SET button to open the menus for the current mode. 2) Press the LEFT or RIGHT direction ...

Camera Manual
Page 56
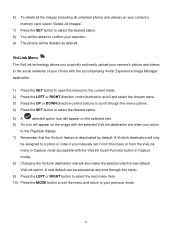
...will happen to the images stored on my computer. Troubleshooting Q: I deleted images using the Vivitar Experience Image Manager - First ensure that I accidently deleted? Press the Shutter button to the SD memory card then all the photos should be retrieved from there. If the photos are saved to ... your computer`s Recycle or Trash Bin and can find what you upload them again. Walmart Edition. How do not appear on the SD memory card. What do I do I make sure I recover images that you would like to prevent unintentional data loss. For phone support in the...
...will happen to the images stored on my computer. Troubleshooting Q: I deleted images using the Vivitar Experience Image Manager - First ensure that I accidently deleted? Press the Shutter button to the SD memory card then all the photos should be retrieved from there. If the photos are saved to ... your computer`s Recycle or Trash Bin and can find what you upload them again. Walmart Edition. How do not appear on the SD memory card. What do I do I make sure I recover images that you would like to prevent unintentional data loss. For phone support in the...


