
Camera Manual
Page 4
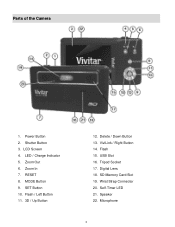
RESET 8. Flash 15. Tripod Socket 17. Wrist Strap Connector 20. Speaker 22. Power Button 2. Flash / Left Button 11. 3D / Up Button 12. Delete / Down Button 13. LED / Charge Indicator 5. ViviLink / Right Button 14. SD Memory Card Slot 19. MODE Button 9. Parts of the Camera 1. Shutter Button 3. LCD Screen 4. Zoom Out 6. Zoom In 7. SET Button 10. USB Slot 16. Digital Lens 18. Self-Timer LED 21. Microphone 3
RESET 8. Flash 15. Tripod Socket 17. Wrist Strap Connector 20. Speaker 22. Power Button 2. Flash / Left Button 11. 3D / Up Button 12. Delete / Down Button 13. LED / Charge Indicator 5. ViviLink / Right Button 14. SD Memory Card Slot 19. MODE Button 9. Parts of the Camera 1. Shutter Button 3. LCD Screen 4. Zoom Out 6. Zoom In 7. SET Button 10. USB Slot 16. Digital Lens 18. Self-Timer LED 21. Microphone 3

Camera Manual
Page 9
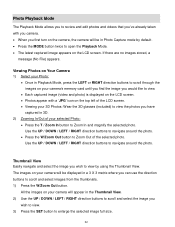
.... To take a picture, aim your camera after the camera has been powered ON. You can switch modes by pressing the MODE button on the LCD screen while record is powered ON. To access the various menus for photos and videos, press the SET button while in the Photo Capture mode. To...
.... To take a picture, aim your camera after the camera has been powered ON. You can switch modes by pressing the MODE button on the LCD screen while record is powered ON. To access the various menus for photos and videos, press the SET button while in the Photo Capture mode. To...

Camera Manual
Page 11
...) 512 MB of RAM, with 250 MB of free hard disk space 16-bit Color monitor, 1024 X 768 recommended screen resolution CD-ROM Drive QuickTime® 6 or higher Microsoft® Internet Explorer 7 or higher ... DirectX 9 or higher Internet connection required MACINTOSH OS To be able to download photos and videos to your Macintosh using the Vivitar Experience Image Manager Software, you will need the following minimum configuration: Intel processor running Mac OS X v10.5.x or later 256...
...) 512 MB of RAM, with 250 MB of free hard disk space 16-bit Color monitor, 1024 X 768 recommended screen resolution CD-ROM Drive QuickTime® 6 or higher Microsoft® Internet Explorer 7 or higher ... DirectX 9 or higher Internet connection required MACINTOSH OS To be able to download photos and videos to your Macintosh using the Vivitar Experience Image Manager Software, you will need the following minimum configuration: Intel processor running Mac OS X v10.5.x or later 256...

Camera Manual
Page 12
... inserted properly into your camera ON. After powering on, the camera emits a sound and the LED light turns on briefly. The LCD screen turns on , you can be set from the Auto Power Off settings menu (in Photo Capture mode to start. The Auto Power Off settings can...Capture Mode). 11 Powering the camera ON Press the Power button to turn your camera. (SD card up to turn your camera OFF. A "Goodbye" screen appears and then the camera will automatically turn off your camera after a specific period of time that will power off completely. Powering the camera OFF...
... inserted properly into your camera ON. After powering on, the camera emits a sound and the LED light turns on briefly. The LCD screen turns on , you can be set from the Auto Power Off settings menu (in Photo Capture mode to start. The Auto Power Off settings can...Capture Mode). 11 Powering the camera ON Press the Power button to turn your camera. (SD card up to turn your camera OFF. A "Goodbye" screen appears and then the camera will automatically turn off your camera after a specific period of time that will power off completely. Powering the camera OFF...

Camera Manual
Page 13
... MODE button. To change the active camera mode, make sure the camera is first powered ON, the Photo Capture Mode will display on the LCD screen are the best default settings so that appear on the top-left corner of the LCD display When in Video Capture Mode, this icon will...
... MODE button. To change the active camera mode, make sure the camera is first powered ON, the Photo Capture Mode will display on the LCD screen are the best default settings so that appear on the top-left corner of the LCD display When in Video Capture Mode, this icon will...

Camera Manual
Page 14
... button to exit the menus and return to the right of the selected menu option. Changes made to these options will appear to the previous screen. 13
... button to exit the menus and return to the right of the selected menu option. Changes made to these options will appear to the previous screen. 13

Camera Manual
Page 15
... the 3D/UP button. Taking a Picture 1) While in /out if desired. Note: The actual shape of the LCD screen. The following Digital Zoom Indicator appears on the right side of the LCD screen: 3) Click the Shutter button to take your photos in Photo Capture Mode by default. This indicates that the 3D... Photo Capture Mode is first powered ON, the camera will appear on the LCD screen in 3D as you to 4 times using the digital zoom. Put on your 3D glasses (included) in order to view the scene on the top...
... the 3D/UP button. Taking a Picture 1) While in /out if desired. Note: The actual shape of the LCD screen. The following Digital Zoom Indicator appears on the right side of the LCD screen: 3) Click the Shutter button to take your photos in Photo Capture Mode by default. This indicates that the 3D... Photo Capture Mode is first powered ON, the camera will appear on the LCD screen in 3D as you to 4 times using the digital zoom. Put on your 3D glasses (included) in order to view the scene on the top...
Camera Manual
Page 16
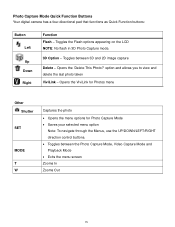
Toggles between the Photo Capture Mode, Video Capture Mode and Playback Mode Exits the menu screen Zooms In Zooms Out 15 Toggles the Flash options appearing on the LCD NOTE: No flash in 3D Photo Capture mode. 3D Option - Opens the ...
Toggles between the Photo Capture Mode, Video Capture Mode and Playback Mode Exits the menu screen Zooms In Zooms Out 15 Toggles the Flash options appearing on the LCD NOTE: No flash in 3D Photo Capture mode. 3D Option - Opens the ...
Camera Manual
Page 17
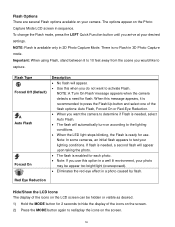
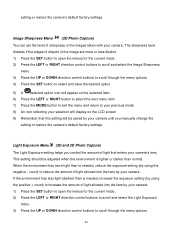
... do not want the camera to determine if Flash is needed , a second flash will automatically turn on your desired settings. The options appear on the screen. 16 Important: When using Flash, stand between 8 to 10 feet away from the scene you use . Note: In some cameras, an initial flash appears ...to capture. Red Eye Reduction Hide/Show the LCD Icons The display of the icons on the LCD screen can be appear too bright/light (overexposed). Eliminates the red-eye effect in a photo caused by flash. To change the Flash mode, press...
... do not want the camera to determine if Flash is needed , a second flash will automatically turn on your desired settings. The options appear on the screen. 16 Important: When using Flash, stand between 8 to 10 feet away from the scene you use . Note: In some cameras, an initial flash appears ...to capture. Red Eye Reduction Hide/Show the LCD Icons The display of the icons on the LCD screen can be appear too bright/light (overexposed). Eliminates the red-eye effect in a photo caused by flash. To change the Flash mode, press...

Camera Manual
Page 19
...) Press the MODE button to exit the menu and return to your previous mode. 15) An icon reflecting your selection will display on the LCD screen. 16) Remember that this setting will be saved by your camera until you manually change the setting or restore the camera‟s default factory settings...
...) Press the MODE button to exit the menu and return to your previous mode. 15) An icon reflecting your selection will display on the LCD screen. 16) Remember that this setting will be saved by your camera until you manually change the setting or restore the camera‟s default factory settings...
Camera Manual
Page 20
... buttons to scroll through the menu options. 4) Press the SET button to your previous mode. 8) An icon reflecting your selection will display on the LCD screen. 9) Remember that images with a higher image quality level will be saved by your camera‟s memory. 1) Press the SET button to open the menus for...
... buttons to scroll through the menu options. 4) Press the SET button to your previous mode. 8) An icon reflecting your selection will display on the LCD screen. 9) Remember that images with a higher image quality level will be saved by your camera‟s memory. 1) Press the SET button to open the menus for...
Camera Manual
Page 21
...Press the MODE button to exit the menu and return to your previous mode. 8) An icon reflecting your selection will display on the LCD screen. 9) Remember that this setting will be saved by your camera until you manually change the setting or restore the camera‟s default factory settings... Press the MODE button to exit the menu and return to your previous mode. 8) An icon reflecting your selection will display on the LCD screen. 9) Remember that this setting will be saved by your camera until you manually change the setting or restore the camera‟s default factory settings...
...Press the MODE button to exit the menu and return to your previous mode. 8) An icon reflecting your selection will display on the LCD screen. 9) Remember that this setting will be saved by your camera until you manually change the setting or restore the camera‟s default factory settings... Press the MODE button to exit the menu and return to your previous mode. 8) An icon reflecting your selection will display on the LCD screen. 9) Remember that this setting will be saved by your camera until you manually change the setting or restore the camera‟s default factory settings...
Camera Manual
Page 22
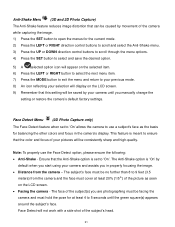
... item. 7) Press the MODE button to exit the menu and return to your previous mode. 8) An icon reflecting your selection will display on the LCD screen. Facing the camera - Note: To properly use a subject‟s face as the basis for balancing the other colors and focus in properly focusing the.... Distance from the camera and the face must hold the pose for at least 20% (1/5th) of the picture as seen on the LCD screen. 9) Remember that the color and focus of your pictures will be consistently sharp and high-quality. The subject‟s face must be no further than...
... item. 7) Press the MODE button to exit the menu and return to your previous mode. 8) An icon reflecting your selection will display on the LCD screen. Facing the camera - Note: To properly use a subject‟s face as the basis for balancing the other colors and focus in properly focusing the.... Distance from the camera and the face must hold the pose for at least 20% (1/5th) of the picture as seen on the LCD screen. 9) Remember that the color and focus of your pictures will be consistently sharp and high-quality. The subject‟s face must be no further than...

Camera Manual
Page 23
.... 7) Press the MODE button to exit the menu and return to your previous mode. 8) An icon reflecting your selection will display on the LCD screen. 9) Remember that this setting will display on the type of light source in the images that are taken with your camera. 1) Press the SET... mode. 8) An icon reflecting your selection will be saved by your camera to adjust the coloring of the captured images depending on the LCD screen 9) Remember that this setting will be saved by your camera until you manually change the setting or restore the camera‟s default factory settings....
.... 7) Press the MODE button to exit the menu and return to your previous mode. 8) An icon reflecting your selection will display on the LCD screen. 9) Remember that this setting will display on the type of light source in the images that are taken with your camera. 1) Press the SET... mode. 8) An icon reflecting your selection will be saved by your camera to adjust the coloring of the captured images depending on the LCD screen 9) Remember that this setting will be saved by your camera until you manually change the setting or restore the camera‟s default factory settings....

Camera Manual
Page 24
... to scroll through the menu options. 4) Press the SET button to select and save the desired option. 5) A selected option icon will appear on the LCD screen 9) Remember that this setting will be saved by your camera until you manually change the setting or restore the camera‟s default factory settings. This...
... to scroll through the menu options. 4) Press the SET button to select and save the desired option. 5) A selected option icon will appear on the LCD screen 9) Remember that this setting will be saved by your camera until you manually change the setting or restore the camera‟s default factory settings. This...
Camera Manual
Page 25
... to scroll through the menu options. 4) Press the SET button to select and save the desired option. 5) A selected option icon will display on the LCD screen 9) Remember that enters your camera. The sharpness level dictates if the edges of light allowed into the lens by your camera. 1) Press the SET button...
... to scroll through the menu options. 4) Press the SET button to select and save the desired option. 5) A selected option icon will display on the LCD screen 9) Remember that enters your camera. The sharpness level dictates if the edges of light allowed into the lens by your camera. 1) Press the SET button...

Camera Manual
Page 26
...7) Press the MODE button to exit the menu and return to your previous mode. 8) An icon reflecting your selection will display on the LCD screen 9) Remember that this setting will be saved by your camera until you manually change the setting or restore the camera‟s default factory settings....Press the MODE button to exit the menu and return to your previous mode. 8) An icon reflecting your selection will display on the LCD screen 9) Remember that this setting will be saved by your camera until you manually change the setting or restore the camera‟s default factory settings.
...7) Press the MODE button to exit the menu and return to your previous mode. 8) An icon reflecting your selection will display on the LCD screen 9) Remember that this setting will be saved by your camera until you manually change the setting or restore the camera‟s default factory settings....Press the MODE button to exit the menu and return to your previous mode. 8) An icon reflecting your selection will display on the LCD screen 9) Remember that this setting will be saved by your camera until you manually change the setting or restore the camera‟s default factory settings.
Camera Manual
Page 27
... the SET button to the subject in the center Multi - Depending on your selection, the camera will be more sensitive to focusing on the LCD screen. 9) Remember that this setting will affect how your camera‟s language setting by your camera until you manually change the setting or restore the camera...
... the SET button to the subject in the center Multi - Depending on your selection, the camera will be more sensitive to focusing on the LCD screen. 9) Remember that this setting will affect how your camera‟s language setting by your camera until you manually change the setting or restore the camera...

Camera Manual
Page 29
... button to exit the menu without saving your settings and return to your camera will automatically power off. The designated time represents when your previous screen. then press the SET button to select the option. 4) The "Date Setup" submenu will open the menus for beeps heard during the Self-Timer countdown...
... button to exit the menu without saving your settings and return to your camera will automatically power off. The designated time represents when your previous screen. then press the SET button to select the option. 4) The "Date Setup" submenu will open the menus for beeps heard during the Self-Timer countdown...
Camera Manual
Page 33
...‟s memory card until you find the image you would like to view. Each captured image (video and photo) is displayed on the LCD screen. Photos appear with you camera. When you first turn on the camera, the camera will be displayed in a 3 X 3 matrix where you can use... to review and edit photos and videos that you‟ve already taken with a „JPG‟ icon on the top left of the LCD screen. Viewing your 3D Photos: Wear the 3D glasses (included) to view the photos you have captured in 3D. 2) Zooming In/Out of the selected...
...‟s memory card until you find the image you would like to view. Each captured image (video and photo) is displayed on the LCD screen. Photos appear with you camera. When you first turn on the camera, the camera will be displayed in a 3 X 3 matrix where you can use... to review and edit photos and videos that you‟ve already taken with a „JPG‟ icon on the top left of the LCD screen. Viewing your 3D Photos: Wear the 3D glasses (included) to view the photos you have captured in 3D. 2) Zooming In/Out of the selected...


