User Manual
Page 3
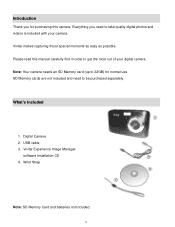
Everything you for normal use. Please read this camera. What's Included 1. Vivitar Experience Image Manager software Installation CD 4. Note: Your camera needs an SD Memory card (up to be purchased separately. Introduction Thank you need to 32GB) ...for purchasing this manual carefully first in order to get the most out of your camera. USB cable 3. Vivitar makes capturing those special moments as easy as possible. SD Memory cards are not included and need to take quality digital photos and videos is...
Everything you for normal use. Please read this camera. What's Included 1. Vivitar Experience Image Manager software Installation CD 4. Note: Your camera needs an SD Memory card (up to be purchased separately. Introduction Thank you need to 32GB) ...for purchasing this manual carefully first in order to get the most out of your camera. USB cable 3. Vivitar makes capturing those special moments as easy as possible. SD Memory cards are not included and need to take quality digital photos and videos is...
User Manual
Page 4
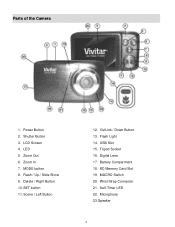
Zoom Out 6. Delete / Right Button 10. Power Button 2. Shutter Button 3. LCD Screen 4. ViviLink / Down Button 13. Flash Light 14. USB Slot 15. MACRO Switch 20. Speaker 3 MODE button 8. Digital Lens 17. Microphone 23. LED 5. Zoom In 7. Scene / Left Button 12. SD Memory Card Slot 19. Wrist Strap Connector 21. SET button 11. Battery Compartment 18. Self-Timer LED 22. Parts of the Camera 1. Flash / Up / Slide Show 9. Tripod Socket 16.
Zoom Out 6. Delete / Right Button 10. Power Button 2. Shutter Button 3. LCD Screen 4. ViviLink / Down Button 13. Flash Light 14. USB Slot 15. MACRO Switch 20. Speaker 3 MODE button 8. Digital Lens 17. Microphone 23. LED 5. Zoom In 7. Scene / Left Button 12. SD Memory Card Slot 19. Wrist Strap Connector 21. SET button 11. Battery Compartment 18. Self-Timer LED 22. Parts of the Camera 1. Flash / Up / Slide Show 9. Tripod Socket 16.
User Manual
Page 5
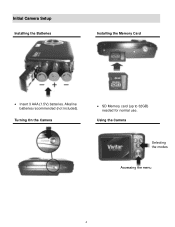
Alkaline batteries recommended (not included). Using the Camera Selecting the modes Accessing the menu 4 Turning On the Camera SD Memory card (up to 32GB) needed for normal use. Initial Camera Setup Installing the Batteries Installing the Memory Card Insert 3 AAA (1.5V) batteries.
Alkaline batteries recommended (not included). Using the Camera Selecting the modes Accessing the menu 4 Turning On the Camera SD Memory card (up to 32GB) needed for normal use. Initial Camera Setup Installing the Batteries Installing the Memory Card Insert 3 AAA (1.5V) batteries.

User Manual
Page 6
...card until you through the INITIAL CAMERA SETUP. Alkaline batteries are recommended. (Batteries not included.) Note: Remove the batteries from the camera when not in the direction shown on LCD as shown below: Full battery power Medium battery power Low battery power 2) SD Card Make sure an SD card ...an extended period. Do not mix alkaline and non-alkaline batteries. Some features, such as Flash, will not work if the battery power level is low. When the battery power is low the battery icon turns red and the camera will take you hear a slight clicking...
...card until you through the INITIAL CAMERA SETUP. Alkaline batteries are recommended. (Batteries not included.) Note: Remove the batteries from the camera when not in the direction shown on LCD as shown below: Full battery power Medium battery power Low battery power 2) SD Card Make sure an SD card ...an extended period. Do not mix alkaline and non-alkaline batteries. Some features, such as Flash, will not work if the battery power level is low. When the battery power is low the battery icon turns red and the camera will take you hear a slight clicking...

User Manual
Page 10
... External Memory LCD Display Lens Zoom Exposure White Balance ISO Scene Flash Self-Timer Anti-Shake Face Detect Print Photos Microphone Macro Interface System Requirements Battery Working Temperature 9 Mega Pixel CMOS Sensor 4416 x 3312 (14M) / 4000 x 3000 (12M) / 3456 x 2592 (9M) / 3264 x 2448 (8M) / 3648 x 2048 (7M HD) / 2592 x1944 (5M... 2, 5 or 10 second delay Yes Yes Yes Yes Yes, Manual Switch USB 2.0 Windows XP (SP 3), Vista (SP1) and 7 ; Mac OSX v10.5.x and above 3 * AAA (1.5V) batteries 0~40C 9
... External Memory LCD Display Lens Zoom Exposure White Balance ISO Scene Flash Self-Timer Anti-Shake Face Detect Print Photos Microphone Macro Interface System Requirements Battery Working Temperature 9 Mega Pixel CMOS Sensor 4416 x 3312 (14M) / 4000 x 3000 (12M) / 3456 x 2592 (9M) / 3264 x 2448 (8M) / 3648 x 2048 (7M HD) / 2592 x1944 (5M... 2, 5 or 10 second delay Yes Yes Yes Yes Yes, Manual Switch USB 2.0 Windows XP (SP 3), Vista (SP1) and 7 ; Mac OSX v10.5.x and above 3 * AAA (1.5V) batteries 0~40C 9
User Manual
Page 12
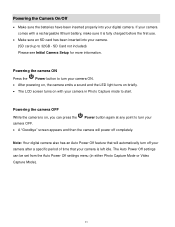
..." screen appears and then the camera will power off your camera after a specific period of time that your camera is on with a rechargeable lithium battery, make sure it is fully charged before the first use. Make sure an SD card has been inserted into your camera in either Photo... point to turn off completely. Powering the camera OFF While the camera is left idle. Powering the Camera On/Off Make sure the batteries have been inserted properly into your camera. (SD card up to 32GB - SD Card not included) Please see Initial Camera Setup for more information...
..." screen appears and then the camera will power off your camera after a specific period of time that your camera is on with a rechargeable lithium battery, make sure it is fully charged before the first use. Make sure an SD card has been inserted into your camera in either Photo... point to turn off completely. Powering the camera OFF While the camera is left idle. Powering the Camera On/Off Make sure the batteries have been inserted properly into your camera. (SD card up to 32GB - SD Card not included) Please see Initial Camera Setup for more information...
User Manual
Page 31
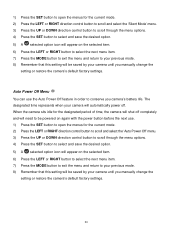
... to be powered on again with the power button before the next use the Auto Power Off feature in order to conserve you camera‟s battery life. When the camera sits idle for the designated period of time, the camera will shut off . 1) Press the SET button to open the menus...
... to be powered on again with the power button before the next use the Auto Power Off feature in order to conserve you camera‟s battery life. When the camera sits idle for the designated period of time, the camera will shut off . 1) Press the SET button to open the menus...
User Manual
Page 50
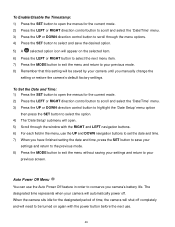
... to the previous mode. 8) Press the MODE button to exit the menu without saving your settings and return to your camera until you camera‟s battery life. The designated time represents when your camera will open. 5) Scroll through the menu options. 4) Press the SET button to select and save the desired...
... to the previous mode. 8) Press the MODE button to exit the menu without saving your settings and return to your camera until you camera‟s battery life. The designated time represents when your camera will open. 5) Scroll through the menu options. 4) Press the SET button to select and save the desired...


