v2 Camera Manual
Page 3
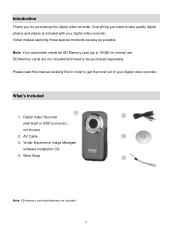
... Note: SD memory card and batteries not included. 2 Please read this digital video recorder. AV Cable 3. Digital Video Recorder (with your digital video recorder. SD Memory cards are not included and need to 16GB) for purchasing this manual carefully first in USB Connector, not shown) 2. Vivitar Experience Image Manager software Installation CD...-in order to be purchased separately. Everything you for normal use. Introduction Thank you need to get the most out of your digital video recorder. Vivitar makes capturing those special moments as easy as possible.
... Note: SD memory card and batteries not included. 2 Please read this digital video recorder. AV Cable 3. Digital Video Recorder (with your digital video recorder. SD Memory cards are not included and need to 16GB) for purchasing this manual carefully first in USB Connector, not shown) 2. Vivitar Experience Image Manager software Installation CD...-in order to be purchased separately. Everything you for normal use. Introduction Thank you need to get the most out of your digital video recorder. Vivitar makes capturing those special moments as easy as possible.
v2 Camera Manual
Page 4
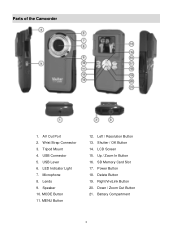
USB Connector 5. USB Lever 6. Lends 9. MODE Button 11. LCD Screen 15. Power Button 18. Microphone 8. Battery Compartment 3 Tripod Mount 4. Delete Button 19. Speaker 10. MENU Button 12. Down / Zoom Out Button 21. Shutter / OK Button 14. Up / Zoom In Button 16. Parts of the Camcorder 1. AV Out Port 2. LED Indicator Light 7. Wrist Strap Connector 3. Left / Resolution Button 13. Right/ViviLink Button 20. SD Memory Card Slot 17.
USB Connector 5. USB Lever 6. Lends 9. MODE Button 11. LCD Screen 15. Power Button 18. Microphone 8. Battery Compartment 3 Tripod Mount 4. Delete Button 19. Speaker 10. MENU Button 12. Down / Zoom Out Button 21. Shutter / OK Button 14. Up / Zoom In Button 16. Parts of the Camcorder 1. AV Out Port 2. LED Indicator Light 7. Wrist Strap Connector 3. Left / Resolution Button 13. Right/ViviLink Button 20. SD Memory Card Slot 17.
v2 Camera Manual
Page 5
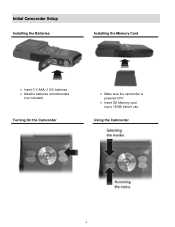
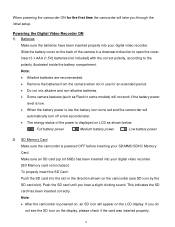
Initial Camcorder Setup Installing the Batteries Installing the Memory Card Insert 3 X AAA (1.5V) batteries. Alkaline batteries recommended (not included). Using the Camcorder 4 Turning On the Camcorder Make sure the camcorder is powered OFF. Insert SD Memory card (up to 16GB) before use.
Initial Camcorder Setup Installing the Batteries Installing the Memory Card Insert 3 X AAA (1.5V) batteries. Alkaline batteries recommended (not included). Using the Camcorder 4 Turning On the Camcorder Make sure the camcorder is powered OFF. Insert SD Memory card (up to 16GB) before use.
v2 Camera Manual
Page 6
... SD card until you do not see SD icon by the SD card slot). Slide the battery cover on the back of the power is displayed on LCD as shown below: Full battery power Medium battery power Low battery power 2) SD Memory Card Make sure the camcorder is powered on, an SD icon will... SD Card: Push the SD card into your SD/MMC/SDHC Memory Card. If you hear a slight clicking sound. Note: Alkaline batteries are recommended. Remove the batteries from the camera when not in use for the first time the camcorder will appear on the LCD display. Powering the Digital Video...
... SD card until you do not see SD icon by the SD card slot). Slide the battery cover on the back of the power is displayed on LCD as shown below: Full battery power Medium battery power Low battery power 2) SD Memory Card Make sure the camcorder is powered on, an SD icon will... SD Card: Push the SD card into your SD/MMC/SDHC Memory Card. If you hear a slight clicking sound. Note: Alkaline batteries are recommended. Remove the batteries from the camera when not in use for the first time the camcorder will appear on the LCD display. Powering the Digital Video...
v2 Camera Manual
Page 9
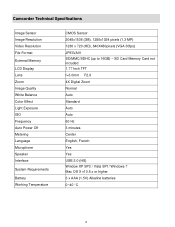
...Yes Yes USB 2.0 (HS) Window XP SP3 / Vista SP1/ Windows 7 Mac OS X v10.5.x or higher 3 x AAA (1.5V) Alkaline batteries 0~40 C 8 Camcorder Technical Specifications Image Sensor Image Resolution Video Resolution File Format External Memory LCD Display Lens Zoom Image Quality White Balance Color ...Effect Light Exposure ISO Frequency Auto Power Off Metering Language Microphone Speaker Interface System Requirements Battery Working Temperature CMOS Sensor 2048x1536 (3M), 1280x1024 pixels (1.3 MP) 1280 x 720 (HD), 640X480pixels (VGA 30fps) JPEG/AVI SD...
...Yes Yes USB 2.0 (HS) Window XP SP3 / Vista SP1/ Windows 7 Mac OS X v10.5.x or higher 3 x AAA (1.5V) Alkaline batteries 0~40 C 8 Camcorder Technical Specifications Image Sensor Image Resolution Video Resolution File Format External Memory LCD Display Lens Zoom Image Quality White Balance Color ...Effect Light Exposure ISO Frequency Auto Power Off Metering Language Microphone Speaker Interface System Requirements Battery Working Temperature CMOS Sensor 2048x1536 (3M), 1280x1024 pixels (1.3 MP) 1280 x 720 (HD), 640X480pixels (VGA 30fps) JPEG/AVI SD...
v2 Camera Manual
Page 11
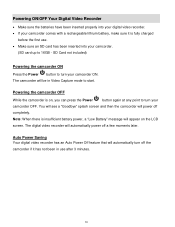
... Make sure an SD card has been inserted into your digital video recorder. If your camcorder comes with a rechargeable lithium battery, make sure it is on the LCD screen. Auto Power Saving Your digital video recorder has an Auto Power Off feature that will automatically ...Powering the camcorder OFF While the camcorder is fully charged before the first use after 3 minutes. 10 Note: When there is insufficient battery power, a "Low Battery" message will automatically power off the camcorder if it has not been in Video Capture mode to start. SD Card not included)...
... Make sure an SD card has been inserted into your digital video recorder. If your camcorder comes with a rechargeable lithium battery, make sure it is on the LCD screen. Auto Power Saving Your digital video recorder has an Auto Power Off feature that will automatically ...Powering the camcorder OFF While the camcorder is fully charged before the first use after 3 minutes. 10 Note: When there is insufficient battery power, a "Low Battery" message will automatically power off the camcorder if it has not been in Video Capture mode to start. SD Card not included)...
v2 Camera Manual
Page 35
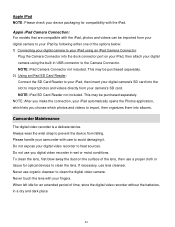
.... Do not expose your digital camera's SD card into the dock connector port on the surface of time, store the digital video recorder without the batteries, in a dry and dark place. 34 When left idle for optical devices to the Camera Connector. Please handle your iPad automatically opens the Photos application...
.... Do not expose your digital camera's SD card into the dock connector port on the surface of time, store the digital video recorder without the batteries, in a dry and dark place. 34 When left idle for optical devices to the Camera Connector. Please handle your iPad automatically opens the Photos application...


