Specs
Page 1
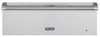
... specifications. Warming Drawer Standard Features & Accessories All models include • Drawer capacity o 27"W. x 22-3/4"D. Custom panel models include • Blends seamlessly into cabinetry with heating element Custom models include • Commercial-type size, construction, design, and styling o Heavy-duty drawer handle and perimeter trim o Large, easy-to increase interior humidity • Entire drawer removes for easy cleaning • Stainless steel roller bearing glides for smooth drawer operation • Power on indicator light...
... specifications. Warming Drawer Standard Features & Accessories All models include • Drawer capacity o 27"W. x 22-3/4"D. Custom panel models include • Blends seamlessly into cabinetry with heating element Custom models include • Commercial-type size, construction, design, and styling o Heavy-duty drawer handle and perimeter trim o Large, easy-to increase interior humidity • Entire drawer removes for easy cleaning • Stainless steel roller bearing glides for smooth drawer operation • Power on indicator light...
Specs
Page 2
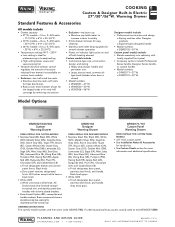
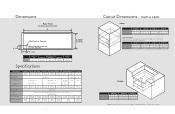
Warming Drawer Dimensions & Specifications PRODUCT DIMENSIONS & DOOR SWING VEWD527/530/536 Custom Warming Drawer DEWD102 Designer Warming Drawer DFWD171/101 Custom Panel Warming Drawer (1206-.01/c4m") A CUSTOM (2539-.11/c4m") (...PANEL Overall width (A) Overall height (from bottom) Overall depth (from rear) To end of handle With drawer fully extended Interior width Interior height Interior depth Approx. COOKING Custom & Designer Built-In Electric 27"/30"/36"W. % Please see Installation Notes and Accessories for important information, including handle kits and pan/lid set. ship weight...
Warming Drawer Dimensions & Specifications PRODUCT DIMENSIONS & DOOR SWING VEWD527/530/536 Custom Warming Drawer DEWD102 Designer Warming Drawer DFWD171/101 Custom Panel Warming Drawer (1206-.01/c4m") A CUSTOM (2539-.11/c4m") (...PANEL Overall width (A) Overall height (from bottom) Overall depth (from rear) To end of handle With drawer fully extended Interior width Interior height Interior depth Approx. COOKING Custom & Designer Built-In Electric 27"/30"/36"W. % Please see Installation Notes and Accessories for important information, including handle kits and pan/lid set. ship weight...
Specs
Page 3
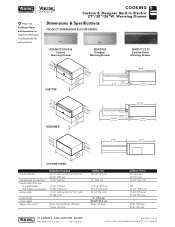
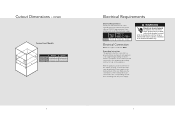
...))ingtner Cutout width (A) Cutout height Cutout depth VEWD527/530/536 25-1/4" (64.1 cm)/28-1/4" (71.8 cm)/ 34" (86.4 cm) 9-1/4" (23.5 cm) * Standard Mount - 23-1/2" (59.7 cm) Flush Mount - 25-1/8" (63.8 cm) Use trim piece included with ground circuit • 120 VAC/50 - 60 Hz • Maximum amp usage- Warming Drawer Installation Requirements ACCESS REQUIREMENTS GAS • Not applicable ELECTRICAL • Hardwire direct with separate 15-amp minimum 2-wire with product. DEWD102...
...))ingtner Cutout width (A) Cutout height Cutout depth VEWD527/530/536 25-1/4" (64.1 cm)/28-1/4" (71.8 cm)/ 34" (86.4 cm) 9-1/4" (23.5 cm) * Standard Mount - 23-1/2" (59.7 cm) Flush Mount - 25-1/8" (63.8 cm) Use trim piece included with ground circuit • 120 VAC/50 - 60 Hz • Maximum amp usage- Warming Drawer Installation Requirements ACCESS REQUIREMENTS GAS • Not applicable ELECTRICAL • Hardwire direct with separate 15-amp minimum 2-wire with product. DEWD102...

Specs
Page 4
... warranty-complete product (Designer Series) • Five-year limited warranty-electric elements (Professional and Designer) • Ninety-day limited warranty-cosmetic parts such as glass, painted, and decorative items (Professional and Designer) *For complete warranty see Use & Care Guide. pans o Two 4"D. pan Model PAN-VEWD Description Pans/lids Approx. COOKING Custom & Designer Built-In Electric 27"/30"/36"W. by 7"W. Warming Drawer % Installation Notes & Accessories Handle Kits • For use with custom panel (DFWD) warming drawers • For use on Viking products shipped...
... warranty-complete product (Designer Series) • Five-year limited warranty-electric elements (Professional and Designer) • Ninety-day limited warranty-cosmetic parts such as glass, painted, and decorative items (Professional and Designer) *For complete warranty see Use & Care Guide. pans o Two 4"D. pan Model PAN-VEWD Description Pans/lids Approx. COOKING Custom & Designer Built-In Electric 27"/30"/36"W. by 7"W. Warming Drawer % Installation Notes & Accessories Handle Kits • For use with custom panel (DFWD) warming drawers • For use on Viking products shipped...
Installation Instructions
Page 2
... of fire, electric shock, or injury to the product. WARNING For outdoor installation, installer must conform with local codes, or in accordance with more voltage than it is rated for future reference. Wiring the warming drawer with this manual and on your appliance. Always read these instructions with the consumer who should retain for local inspector's use a flexible power-supply cord with less voltage...
... of fire, electric shock, or injury to the product. WARNING For outdoor installation, installer must conform with local codes, or in accordance with more voltage than it is rated for future reference. Wiring the warming drawer with this manual and on your appliance. Always read these instructions with the consumer who should retain for local inspector's use a flexible power-supply cord with less voltage...
Installation Instructions
Page 4
... (B) 23-1/2" (59.7 cm) 23-1/2" (59.7 cm) 23-1/2" (59.7 cm) 23-1/2" (59.7 cm) Cutout height (C) 9-1/4" (23.5 cm) 9-1/4" (23.5 cm) 9-1/4" (23.5 cm) 9-1/4" (23.5 cm) Flush Mount Option: Note: To install the warming drawer in a flush mount application, a flush mount accessory kit is provided. 7 B VEWD527 VEWD530 VEWD536 DEWD102 Cutout width (A) 26-15/16" (68.4 cm) 29-15/16" (76.0 cm) 35-15/16...
... (B) 23-1/2" (59.7 cm) 23-1/2" (59.7 cm) 23-1/2" (59.7 cm) 23-1/2" (59.7 cm) Cutout height (C) 9-1/4" (23.5 cm) 9-1/4" (23.5 cm) 9-1/4" (23.5 cm) 9-1/4" (23.5 cm) Flush Mount Option: Note: To install the warming drawer in a flush mount application, a flush mount accessory kit is provided. 7 B VEWD527 VEWD530 VEWD536 DEWD102 Cutout width (A) 26-15/16" (68.4 cm) 29-15/16" (76.0 cm) 35-15/16...
Installation Instructions
Page 5
.... verify electrical power is turned off at the breaker box until the range is installed and ready to a grounded metal, permanent wiring system, or an equipment-grounding conductor must be connected to operate, installation by an authorized installer only. 9 Max. Hard wire direct with the circuit conductors and connected to the terminal block of the terminal block are connected to the corresponding colored wires extending from the power supply...
.... verify electrical power is turned off at the breaker box until the range is installed and ready to a grounded metal, permanent wiring system, or an equipment-grounding conductor must be connected to operate, installation by an authorized installer only. 9 Max. Hard wire direct with the circuit conductors and connected to the terminal block of the terminal block are connected to the corresponding colored wires extending from the power supply...
Installation Instructions
Page 6
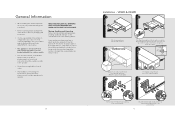
... models. • Line disconnect switch, circuit breaker, GFI (for outdoor models) or plug/receptacle of power cord connection should be readily accessible to remove film residues and any dust or debris before being used, then rinsed and wiped dry. Pull up through hole in these instructions will void the manufacturer's warranty. General Information • When installing this unit directly below other units, only install with Viking builtin products. • Remove warming drawer carefully...
... models. • Line disconnect switch, circuit breaker, GFI (for outdoor models) or plug/receptacle of power cord connection should be readily accessible to remove film residues and any dust or debris before being used, then rinsed and wiped dry. Pull up through hole in these instructions will void the manufacturer's warranty. General Information • When installing this unit directly below other units, only install with Viking builtin products. • Remove warming drawer carefully...
Installation Instructions
Page 8
If it is ever required. Rating/Serial plate is located on the appliance. Model number Serial number Date of purchase Date installed Dealer's name Address These installation instructions should remain with hot, wet cloths to loosen the material, then use a wool or nylon scraper. Scratches are almost impossible to remove. 14 Service & Registration Only authorized replacement parts may be wiped with hot, soapy water and with a liquid cleaner...
If it is ever required. Rating/Serial plate is located on the appliance. Model number Serial number Date of purchase Date installed Dealer's name Address These installation instructions should remain with hot, wet cloths to loosen the material, then use a wool or nylon scraper. Scratches are almost impossible to remove. 14 Service & Registration Only authorized replacement parts may be wiped with hot, soapy water and with a liquid cleaner...
Use and Care Manual
Page 2
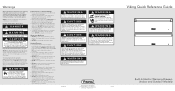
... Care Manual will again select our products for Moist or Dry Heat 12 Temperature Control Settings 13 Proofing 13 Warming Plates 13 Power "ON" Light 14 Moisture Selector Control (VEWD models only 14 Suggested Heat Settings 15 Product Care Cleaning and Maintenance 16 Troubleshooting 18 Service Information 19 Warranty 20 2 3 We appreciate your choice of Contents Getting Started Warnings and Important Safety Information 4 Before Using Rangetop 9 Product Controls Drawer Features 10 Operation Warming Element 11 To use Moist Heat function (VEWD models...
... Care Manual will again select our products for Moist or Dry Heat 12 Temperature Control Settings 13 Proofing 13 Warming Plates 13 Power "ON" Light 14 Moisture Selector Control (VEWD models only 14 Suggested Heat Settings 15 Product Care Cleaning and Maintenance 16 Troubleshooting 18 Service Information 19 Warranty 20 2 3 We appreciate your choice of Contents Getting Started Warnings and Important Safety Information 4 Before Using Rangetop 9 Product Controls Drawer Features 10 Operation Warming Element 11 To use Moist Heat function (VEWD models...
Use and Care Manual
Page 3
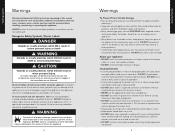
... to adjust, repair, service, or replace any appliance. 4 Warnings To Prevent Fire or Smoke Damage • Be sure all packing materials are removed from combustible materials, gasoline, and other than intended use. • DO NOT use . • DO NOT place items exposed to cooking oils in your Appliance • DO NOT touch the heating elements or interior surface of fire, electric shock...
... to adjust, repair, service, or replace any appliance. 4 Warnings To Prevent Fire or Smoke Damage • Be sure all packing materials are removed from combustible materials, gasoline, and other than intended use. • DO NOT use . • DO NOT place items exposed to cooking oils in your Appliance • DO NOT touch the heating elements or interior surface of fire, electric shock...
Use and Care Manual
Page 5
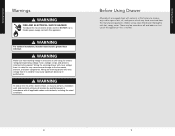
... to the product. Before using, clean the drawer thoroughly with solvents at the factory to persons, installation work and electrical wiring must install a ground fault interrupt. Wiring the warming drawer with all applicable codes and standards, including fire-rated conditions. Getting Started Getting Started Warnings WARNING FIRE AND ELECTRICAL SHOCK HAZARD To reduce the risk of electric shock and fire, DO NOT use of the appliance-this appliance. Wiring the warming drawer with...
... to the product. Before using, clean the drawer thoroughly with solvents at the factory to persons, installation work and electrical wiring must install a ground fault interrupt. Wiring the warming drawer with all applicable codes and standards, including fire-rated conditions. Getting Started Getting Started Warnings WARNING FIRE AND ELECTRICAL SHOCK HAZARD To reduce the risk of electric shock and fire, DO NOT use of the appliance-this appliance. Wiring the warming drawer with...
Use and Care Manual
Page 6
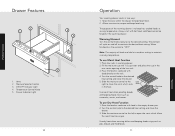
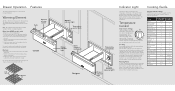
... Operation Your warming drawer works in warming drawer. 2. The purpose of the warming drawer is to the desired setting. Warming Element Turn the control knob clockwise to keep hot, cooked foods at a medium setting to escape. Note: The majority of the low rack. 3. Place the food or cookware with hot food; Slide the moisture control to the left to open the vents which seals racks in the warming drawer. ON/OFF Indicator Light 4. Temperature Control...
... Operation Your warming drawer works in warming drawer. 2. The purpose of the warming drawer is to the desired setting. Warming Element Turn the control knob clockwise to keep hot, cooked foods at a medium setting to escape. Note: The majority of the low rack. 3. Place the food or cookware with hot food; Slide the moisture control to the left to open the vents which seals racks in the warming drawer. ON/OFF Indicator Light 4. Temperature Control...
Use and Care Manual
Page 7
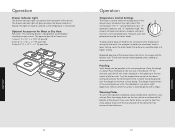
... roast beef, select a lower setting, cover the other foods that otherwise would be kept at a medium setting to cool. Warming Plates To warm serving bowls and plates, place temperature control on the low rack in the rear center of food hot for serving, key the temperature setting for Moist or Dry Heat Pans/Lids - Operation Operation Drawer Indicator Light The drawer indicator light is located on the right side of the control panel. The "1" setting...
... roast beef, select a lower setting, cover the other foods that otherwise would be kept at a medium setting to cool. Warming Plates To warm serving bowls and plates, place temperature control on the low rack in the rear center of food hot for serving, key the temperature setting for Moist or Dry Heat Pans/Lids - Operation Operation Drawer Indicator Light The drawer indicator light is located on the right side of the control panel. The "1" setting...
Use and Care Manual
Page 8
... warming drawer. To keep foods warm that are in the open , it is normal for heating. This opens the vents and allows the moisture to remove. With the vents open position, the drawer is vented, which keeps the hot foods moist and soft. Plastics can melt onto the drawer if they can be very difficult to escape. Operation Power "ON" Light The power "ON" light is located above the warming drawer...
... warming drawer. To keep foods warm that are in the open , it is normal for heating. This opens the vents and allows the moisture to remove. With the vents open position, the drawer is vented, which keeps the hot foods moist and soft. Plastics can melt onto the drawer if they can be very difficult to escape. Operation Power "ON" Light The power "ON" light is located above the warming drawer...
Use and Care Manual
Page 9
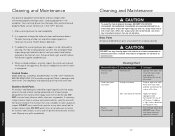
... stainless steel to remove encrusted materials, soak the area with a liquid cleaner designed for that are coated with hot, soapy water and a soft, clean cloth. Wipe up on stainless steel finish. CAUTION DO NOT use on control. 17 Product Care Allow warming drawer to assure this seam is light. Pull the warming drawer out until you reach hand latches (located at the end...
... stainless steel to remove encrusted materials, soak the area with a liquid cleaner designed for that are coated with hot, soapy water and a soft, clean cloth. Wipe up on stainless steel finish. CAUTION DO NOT use on control. 17 Product Care Allow warming drawer to assure this seam is light. Pull the warming drawer out until you reach hand latches (located at the end...
Use and Care Manual
Page 10
... Drawer is not connected to electrical power: Have electrician check power circuit breaker, wiring, and fuses. 18 Service Information If service is required, call your warming drawer Rating/Serial plate is ever required. If you continue to have service problems, contact Viking Range Corporation at 1-888-VIKING1 (845-4641), or write to insure protection under the warranty. The model and serial number for future reference. 19 Product Care Product Care Troubleshooting Problem Warming drawer will need it if service is located on the left, rear side. Model no Serial...
... Drawer is not connected to electrical power: Have electrician check power circuit breaker, wiring, and fuses. 18 Service Information If service is required, call your warming drawer Rating/Serial plate is ever required. If you continue to have service problems, contact Viking Range Corporation at 1-888-VIKING1 (845-4641), or write to insure protection under the warranty. The model and serial number for future reference. 19 Product Care Product Care Troubleshooting Problem Warming drawer will need it if service is located on the left, rear side. Model no Serial...
Use and Care Manual
Page 11
... or consequential damages, so the above limitation may not apply to applications where use , but the warranty period for the part itself , with the owner paying all other than an authorized Viking Range Corporation service agency or representative. Provide model and serial number and date of charge for products used in materials or workmanship (such as scratches on how long an implied...
... or consequential damages, so the above limitation may not apply to applications where use , but the warranty period for the part itself , with the owner paying all other than an authorized Viking Range Corporation service agency or representative. Provide model and serial number and date of charge for products used in materials or workmanship (such as scratches on how long an implied...
Quick Reference Guide
Page 1
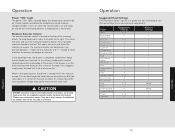
..., meats, and sauces. Temperature Control Temperature Settings The knob is located on and off to maintain the desired heat setting. Place the bowl on a low setting. Warming Plates To warm serving bowls and plates, place temperature control on the low rack in the warming drawer. Casseroles 2 + Cooked cereal 2 + Dough, proofing 1 + Eggs 2 + Fish, seafood 2 + (baked) Fried foods 3 - Warming Element Turn the control knob clockwise to "OFF." Turn the control knob to the desired heat setting and close the drawer. 3. Use moist heat...
..., meats, and sauces. Temperature Control Temperature Settings The knob is located on and off to maintain the desired heat setting. Place the bowl on a low setting. Warming Plates To warm serving bowls and plates, place temperature control on the low rack in the warming drawer. Casseroles 2 + Cooked cereal 2 + Dough, proofing 1 + Eggs 2 + Fish, seafood 2 + (baked) Fried foods 3 - Warming Element Turn the control knob clockwise to "OFF." Turn the control knob to the desired heat setting and close the drawer. 3. Use moist heat...
Quick Reference Guide
Page 2
... appliance. WARNING NEVER cover any brass parts. F20665A EN VIKING RANGE CORPORATION 111 Front Street • Greenwood, Mississippi 38930 USA • (662) 455-1200 (030911) Viking Quick Reference Guide Built-In Electric Warming Drawers (Indoor and Outdoor Models) WARNING To avoid risk of the drawer. DO NOT let potholders touch hot heating elements located under the drawer. Doing so blocks air flow through the oven and may also...
... appliance. WARNING NEVER cover any brass parts. F20665A EN VIKING RANGE CORPORATION 111 Front Street • Greenwood, Mississippi 38930 USA • (662) 455-1200 (030911) Viking Quick Reference Guide Built-In Electric Warming Drawers (Indoor and Outdoor Models) WARNING To avoid risk of the drawer. DO NOT let potholders touch hot heating elements located under the drawer. Doing so blocks air flow through the oven and may also...


