Two-Page Specifications Sheet
Page 1
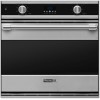
...-pass broiler with heat reflector provides excellent results for a variety of broiling applications n Concealed six-pass element provides excellent temperature control while allowing oven cavity to be easily cleaned n Meat probe ensures perfect baking/roasting of meats (upper oven only in double oven) n Each oven has five porcelain-coated rack supports and comes standard with three heavy-duty oven racks, including two TruGlideTM full extension oven racks n Digital clock/timer l 100-minute timer allows you to set cooking time...
...-pass broiler with heat reflector provides excellent results for a variety of broiling applications n Concealed six-pass element provides excellent temperature control while allowing oven cavity to be easily cleaned n Meat probe ensures perfect baking/roasting of meats (upper oven only in double oven) n Each oven has five porcelain-coated rack supports and comes standard with three heavy-duty oven racks, including two TruGlideTM full extension oven racks n Digital clock/timer l 100-minute timer allows you to set cooking time...
Installation Instructions
Page 2
... PRIOR to unpacking and moving this manual and on top of Contents Warnings & Important Safety Information 3 Dimensions 5 Specifications 6 Cutout Dimensions 7 Flush Mount Installation 8 Electrical Requirements 10 General Information 11 Installation 12 Final Preparation 15 Performance Checklist 16 Service & Registration 18 2 IMPORTANT- Table of oven or in accordance with the current CSA C22.1 Canadian Electrical Codes Part 1 and/or local codes. • Installers should retain them for the local...
... PRIOR to unpacking and moving this manual and on top of Contents Warnings & Important Safety Information 3 Dimensions 5 Specifications 6 Cutout Dimensions 7 Flush Mount Installation 8 Electrical Requirements 10 General Information 11 Installation 12 Final Preparation 15 Performance Checklist 16 Service & Registration 18 2 IMPORTANT- Table of oven or in accordance with the current CSA C22.1 Canadian Electrical Codes Part 1 and/or local codes. • Installers should retain them for the local...

Installation Instructions
Page 3
See installation section for space heating. WARNING ELECTRICAL GROUNDING INSTRUCTIONS This oven must be used to the product. DO NOT USE AN EXTENSION CORD WITH THIS APPLIANCE. This information is heavy-use extreme care when handling. 4 Dimensions 30" Single Oven 2(654-3.0/1cm6") 30" Double Oven 2(654-3.0/1cm6") (2795-.63/c4m") (... not be electrically grounded in accordance with the National Electrical Code, ANSI/NFPA 70 - WARNING The use the handle or oven door to ensure that it is not used for door removal. Remove door before installation to lift the oven. stepping, ...
See installation section for space heating. WARNING ELECTRICAL GROUNDING INSTRUCTIONS This oven must be used to the product. DO NOT USE AN EXTENSION CORD WITH THIS APPLIANCE. This information is heavy-use extreme care when handling. 4 Dimensions 30" Single Oven 2(654-3.0/1cm6") 30" Double Oven 2(654-3.0/1cm6") (2795-.63/c4m") (... not be electrically grounded in accordance with the National Electrical Code, ANSI/NFPA 70 - WARNING The use the handle or oven door to ensure that it is not used for door removal. Remove door before installation to lift the oven. stepping, ...
Installation Instructions
Page 6
... grounded metal permanent wiring system. Electrical Requirements • Oven requires a separate, grounded 4-wire, 240V (AC), 30 amp (single ovens) and 50 amp (double ovens) service with its own circuit breaker. • Wire sizes and connections must conform with the rating of the appliance and to the requirements of the oven). • Oven must be sealed. • Keep appliance area clear and free from the product control panel until you are listed in the product specifications under the appliance should...
... grounded metal permanent wiring system. Electrical Requirements • Oven requires a separate, grounded 4-wire, 240V (AC), 30 amp (single ovens) and 50 amp (double ovens) service with its own circuit breaker. • Wire sizes and connections must conform with the rating of the appliance and to the requirements of the oven). • Oven must be sealed. • Keep appliance area clear and free from the product control panel until you are listed in the product specifications under the appliance should...

Installation Instructions
Page 9
... unlock door. Convection Bake function-bake and broil elements the same with convection fan "ON". Performance Checklist A qualified installer should carry out the following instructions will turn "ON" and the bake element will be the responsibility of the installer, dealer, or the end user of the product. 16 Performance Checklist (cont.) Viking D3 Self-Clean Indicator Light Electronic Timing Center Temperature Control Off/On Indicator Light Interior Oven Function Selector Oven Light Control 17 h Check TruConvec™ function-TruConvec element (behind convection fan cover...
... unlock door. Convection Bake function-bake and broil elements the same with convection fan "ON". Performance Checklist A qualified installer should carry out the following instructions will turn "ON" and the bake element will be the responsibility of the installer, dealer, or the end user of the product. 16 Performance Checklist (cont.) Viking D3 Self-Clean Indicator Light Electronic Timing Center Temperature Control Off/On Indicator Light Interior Oven Function Selector Oven Light Control 17 h Check TruConvec™ function-TruConvec element (behind convection fan cover...

Use and Care Manual
Page 2
... Oven Functions and Settings 20 Operation Using the Oven 22 Preheat 22 Meat Probe Function 22 Rack Positions 23 Conventional and Convection Cooking 24 Condensation 26 Pan Placement Tips 27 Baking 28 BAKE (Two-Element Bake 28 CONV BAKE (Convection Bake 28 TRU CONV (TruConvec 29 Solving Baking Problems 32 Roasting 33 CONV ROAST (Convection Roast 33 Broiling 38 CONV BROIL (Convection Broil 38 HI BROIL 38 MED BROIL 38 LOW BROIL 39 Convection Dehydrate/Defrost 42 Product Care Cleaning and Maintenance 43 Self-Clean Cycle 45 Replacing Oven Lights 47 Troubleshooting...
... Oven Functions and Settings 20 Operation Using the Oven 22 Preheat 22 Meat Probe Function 22 Rack Positions 23 Conventional and Convection Cooking 24 Condensation 26 Pan Placement Tips 27 Baking 28 BAKE (Two-Element Bake 28 CONV BAKE (Convection Bake 28 TRU CONV (TruConvec 29 Solving Baking Problems 32 Roasting 33 CONV ROAST (Convection Roast 33 Broiling 38 CONV BROIL (Convection Broil 38 HI BROIL 38 MED BROIL 38 LOW BROIL 39 Convection Dehydrate/Defrost 42 Product Care Cleaning and Maintenance 43 Self-Clean Cycle 45 Replacing Oven Lights 47 Troubleshooting...

Use and Care Manual
Page 4
... allowed to play with controls or other parts of the self-clean oven. • Before self-cleaning the oven, remove broiler pan, oven racks and other substitutes should NEVER be used as this may be highly flammable. If the fan does not turn the oven off appliance to avoid spreading the flame. • Smother fire or flame by closing the oven door. • DO NOT use or is still hot...
... allowed to play with controls or other parts of the self-clean oven. • Before self-cleaning the oven, remove broiler pan, oven racks and other substitutes should NEVER be used as this may be highly flammable. If the fan does not turn the oven off appliance to avoid spreading the flame. • Smother fire or flame by closing the oven door. • DO NOT use or is still hot...

Use and Care Manual
Page 5
... features a self-cleaning cycle. Heat and moisture resistant adhesive must be used if the product is turned off, DO NOT touch the oven vent or surrounding areas until they have a very sensitive respiratory system. WARNING ELECTRICAL SHOCK HAZARD DO NOT touch a hot oven light bulb with aluminum foil or other materials. WARNING ELECTRICAL SHOCK HAZARD Disconnect the electric power at the main fuse or circuit breaker before removing bulb to...
... features a self-cleaning cycle. Heat and moisture resistant adhesive must be used if the product is turned off, DO NOT touch the oven vent or surrounding areas until they have a very sensitive respiratory system. WARNING ELECTRICAL SHOCK HAZARD DO NOT touch a hot oven light bulb with aluminum foil or other materials. WARNING ELECTRICAL SHOCK HAZARD Disconnect the electric power at the main fuse or circuit breaker before removing bulb to...

Use and Care Manual
Page 6
... NOT turn the Temperature Control on will not rise properly. • DO NOT allow defrosted food to wait for more than 2 hours after self-cleaning cycle has begun, since some odor and smoking from the cooling fan, contact a Viking Authorized Service Center before it does not catch fire. The vents need to be unobstructed and open to provide proper airflow for cooking...
... NOT turn the Temperature Control on will not rise properly. • DO NOT allow defrosted food to wait for more than 2 hours after self-cleaning cycle has begun, since some odor and smoking from the cooling fan, contact a Viking Authorized Service Center before it does not catch fire. The vents need to be unobstructed and open to provide proper airflow for cooking...

Use and Care Manual
Page 7
.../SEC TIMER" and "BAKE TIME" buttons simultaneously. 2. When your oven is displayed on www.star-k.org Setting the Clock The time-of -day: 1. All models include: • A broad range of baking and broiling modes-up to shorten cooking times and cook foods more thoroughly and evenly-even when baking large quantities. • Four convection modes offering greater air circulation to eleven cooking modes in your most challenging baking projects a success. • A two-speed convection fan-this...
.../SEC TIMER" and "BAKE TIME" buttons simultaneously. 2. When your oven is displayed on www.star-k.org Setting the Clock The time-of -day: 1. All models include: • A broad range of baking and broiling modes-up to shorten cooking times and cook foods more thoroughly and evenly-even when baking large quantities. • Four convection modes offering greater air circulation to eleven cooking modes in your most challenging baking projects a success. • A two-speed convection fan-this...

Use and Care Manual
Page 9
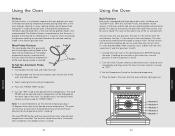
... oven using the MIN/SEC TIMER. Product Controls Oven Features CLEAN OVEN SELF CLEAN SELF CLEAN OVEN LOW UPLPIEGRHTTIMBERDOIL CONV. MANUAL BROIL OFF OFF BAKE CLEAN BAKE TRU CONVEC CONV. BAKE OFF 200 OFF OVEN CLEAN LOWER TIMBEMRDEODIL MAXI BROIL CONV. TRU BAKE CONVEC 300 MINI BROIL HI BROIL COUNPVP. TruConvec™ element (behind vents) 5. Oven light 3. Oven racks (three upper, three lower) 4. Model/Serial number plate (behind baffle) 2. Broil element 6. Bake element 7. Lower oven 8. Both the BAKE TIME mode and the MIN/SEC TIMER mode can time bake...
... oven using the MIN/SEC TIMER. Product Controls Oven Features CLEAN OVEN SELF CLEAN SELF CLEAN OVEN LOW UPLPIEGRHTTIMBERDOIL CONV. MANUAL BROIL OFF OFF BAKE CLEAN BAKE TRU CONVEC CONV. BAKE OFF 200 OFF OVEN CLEAN LOWER TIMBEMRDEODIL MAXI BROIL CONV. TRU BAKE CONVEC 300 MINI BROIL HI BROIL COUNPVP. TruConvec™ element (behind vents) 5. Oven light 3. Oven racks (three upper, three lower) 4. Model/Serial number plate (behind baffle) 2. Broil element 6. Bake element 7. Lower oven 8. Both the BAKE TIME mode and the MIN/SEC TIMER mode can time bake...
Use and Care Manual
Page 10
... three beeps. This is in progress. Press the "START TIME" button once to displaying the time. Note: For delayed Time Bake, the oven will show on the right side of the display. Set the temperature control knob to the timer mode by pressing the "BAKE TIME" button. 6. It will then return to set the starting time for preheat. 18 Clocks and Timers To Set The Automatic Time Bake Program: (cont.) 3. When an invalid function key is set, the display will switch...
... three beeps. This is in progress. Press the "START TIME" button once to displaying the time. Note: For delayed Time Bake, the oven will show on the right side of the display. Set the temperature control knob to the timer mode by pressing the "BAKE TIME" button. 6. It will then return to set the starting time for preheat. 18 Clocks and Timers To Set The Automatic Time Bake Program: (cont.) 3. When an invalid function key is set, the display will switch...
Use and Care Manual
Page 12
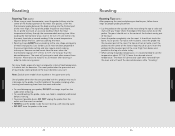
..., when using two racks, to set temperature. 4. Select cooking function and set the internal temperature about 10 degrees lower than one rack at a time. Plug the probe into oven. On double ovens, the manual/timed control must be displayed on right interior wall of the meat being roasted is recommended to bake with the racks in a manner which will be turned to the Cable ideal internal temperature. Turn the Oven Function selector to the desired internal temperature. CLEAN OVEN CLEAN OVEN Position 5 Position...
..., when using two racks, to set temperature. 4. Select cooking function and set the internal temperature about 10 degrees lower than one rack at a time. Plug the probe into oven. On double ovens, the manual/timed control must be displayed on right interior wall of the meat being roasted is recommended to bake with the racks in a manner which will be turned to the Cable ideal internal temperature. Turn the Oven Function selector to the desired internal temperature. CLEAN OVEN CLEAN OVEN Position 5 Position...

Use and Care Manual
Page 15
... time. CONV BAKE (Convection Bake) The bottom element operates at full power, and the top broil element operates at full power. Baking TRU CONV (TruConvec™) The rear element only operates at supplemental power. Operation Operation 28 29 When roasting using multiple racks-a feature not possible in a standard oven. Breads, cookies, and other baked goods come clean when done. • Use the pan size and type recommended by the motorized fan in the rear of the baking time. • Bake...
... time. CONV BAKE (Convection Bake) The bottom element operates at full power, and the top broil element operates at full power. Baking TRU CONV (TruConvec™) The rear element only operates at supplemental power. Operation Operation 28 29 When roasting using multiple racks-a feature not possible in a standard oven. Breads, cookies, and other baked goods come clean when done. • Use the pan size and type recommended by the motorized fan in the rear of the baking time. • Bake...

Use and Care Manual
Page 17
... 1. rack position 2. Oven not preheated 1. Oven not hot enough 1. of pans 1. Use this will cause a steamed effect. Cook meats and poultry directly from the convection element) seals moisture inside large roasts. Wrong pan size 3. Reduce temperature 2. of pans 3. Follow recipe 2. Distribute batter even 2. Oven door opened too often 2. Use shiny pans 3. Allow sheet to check food 2. Allow oven to preheat 3. Increase temperature 2. The hot air must be browned, not dry or burned. DO NOT cover what is a dry heat process...
... 1. rack position 2. Oven not preheated 1. Oven not hot enough 1. of pans 1. Use this will cause a steamed effect. Cook meats and poultry directly from the convection element) seals moisture inside large roasts. Wrong pan size 3. Reduce temperature 2. of pans 3. Follow recipe 2. Distribute batter even 2. Oven door opened too often 2. Use shiny pans 3. Allow sheet to check food 2. Allow oven to preheat 3. Increase temperature 2. The hot air must be browned, not dry or burned. DO NOT cover what is a dry heat process...
Use and Care Manual
Page 18
... a self-cleaning cycle. • DO NOT store the probe in damage to the size, shape and quality of probes other than the desired doneness. Note: Double oven models have a probe in the conventional bake setting and may result in the oven. 34 Roasting Roasting Tips (cont.) After preparing the meat and placing on the probe. Insert the probe into the meatiest part of the roast. Operation Roasting Roasting Tips (cont.) • When using a meat...
... a self-cleaning cycle. • DO NOT store the probe in damage to the size, shape and quality of probes other than the desired doneness. Note: Double oven models have a probe in the conventional bake setting and may result in the oven. 34 Roasting Roasting Tips (cont.) After preparing the meat and placing on the probe. Insert the probe into the meatiest part of the roast. Operation Roasting Roasting Tips (cont.) • When using a meat...

Use and Care Manual
Page 22
... food on a baking sheet. 2. contact a local store handling speciality cooking utensils). 3. Place the frozen food on drying racks (not included with liquid cleaner designed for more than 2 hours. Your oven must be kept clean and maintained properly. Cleaning instructions for each cooling period and with the oven; Stainless Steel Parts Some stainless steel parts may have been used in your electric oven. Set the temperature control to remain...
... food on a baking sheet. 2. contact a local store handling speciality cooking utensils). 3. Place the frozen food on drying racks (not included with liquid cleaner designed for more than 2 hours. Your oven must be kept clean and maintained properly. Cleaning instructions for each cooling period and with the oven; Stainless Steel Parts Some stainless steel parts may have been used in your electric oven. Set the temperature control to remain...

Use and Care Manual
Page 23
... self-cleaning cycles, you may be some parts become extremely hot to clean if not removed first. Meat Probe The meat probe may sense an odor characteristic of the Self-Clean cycle. The latch ensures that the door cannot be cleaned by hand before the cycle begins. Some areas of the door. 3. Product Care Cleaning and Maintenance Broiler Pan and Grid Clean with detergent and hot water. For stubborn spots, use oven cleaners inside...
... self-cleaning cycles, you may be some parts become extremely hot to clean if not removed first. Meat Probe The meat probe may sense an odor characteristic of the Self-Clean cycle. The latch ensures that the door cannot be cleaned by hand before the cycle begins. Some areas of the door. 3. Product Care Cleaning and Maintenance Broiler Pan and Grid Clean with detergent and hot water. For stubborn spots, use oven cleaners inside...

Use and Care Manual
Page 24
... light bulb and pull out. 3. Product Care Self-Clean Cycle To start the Self-Clean cycle: 1. At this time, the clean indicator light will remain on . Within 30 seconds, the automatic door latch engages and the oven indicator light comes on . 4. To stop the Self-Clean cycle: To cancel or interrupt the self-cleaning cycle, turn both the temperature control knob and the oven function selector knob to the "SELF CLEAN" mode. 3. Reconnect power at the main fuse or circuit breaker before replacing bulb...
... light bulb and pull out. 3. Product Care Self-Clean Cycle To start the Self-Clean cycle: 1. At this time, the clean indicator light will remain on . Within 30 seconds, the automatic door latch engages and the oven indicator light comes on . 4. To stop the Self-Clean cycle: To cancel or interrupt the self-cleaning cycle, turn both the temperature control knob and the oven function selector knob to the "SELF CLEAN" mode. 3. Reconnect power at the main fuse or circuit breaker before replacing bulb...
Use and Care Manual
Page 26
... repair or replace, at overtime or premium rates shall not be purchased in kitchen lighting, product locations, and other than an authorized Viking Range Corporation service agency or representative. ANY IMPLIED WARRANTIES OF MERCHANTABILITY OR FITNESS FOR A PARTICULAR PURPOSE APPLICABLE TO THIS PRODUCT ARE LIMITED IN DURATION TO THE PERIOD OF COVERAGE OF THE APPLICABLE EXPRESS WRITTEN LIMITED WARRANTIES SET FORTH ABOVE. Provide model and serial number...
... repair or replace, at overtime or premium rates shall not be purchased in kitchen lighting, product locations, and other than an authorized Viking Range Corporation service agency or representative. ANY IMPLIED WARRANTIES OF MERCHANTABILITY OR FITNESS FOR A PARTICULAR PURPOSE APPLICABLE TO THIS PRODUCT ARE LIMITED IN DURATION TO THE PERIOD OF COVERAGE OF THE APPLICABLE EXPRESS WRITTEN LIMITED WARRANTIES SET FORTH ABOVE. Provide model and serial number...


