User Guide
Page 3
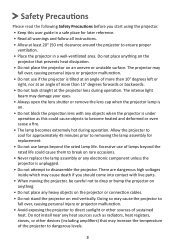
...than 15° degrees forwards or backwards. • Do not look straight at least 20" (50 cm) clearance around the projector to ensure proper ventilation. • Place the projector in a safe place for replacement. • Do not use of sustained heat. Excessive use lamps beyond the rated life could cause...even cause a fire. • The lamp becomes extremely hot during operation. The intense light beam may cause death if you start using the projector. • Keep this could cause them to break on . • Do not block the projection lens with live parts. • When moving ...
...than 15° degrees forwards or backwards. • Do not look straight at least 20" (50 cm) clearance around the projector to ensure proper ventilation. • Place the projector in a safe place for replacement. • Do not use of sustained heat. Excessive use lamps beyond the rated life could cause...even cause a fire. • The lamp becomes extremely hot during operation. The intense light beam may cause death if you start using the projector. • Keep this could cause them to break on . • Do not block the projection lens with live parts. • When moving ...

User Guide
Page 4
...8226; When the projector is under operation, you connect your outlet, obtain an adapter and do not stare into the beam, RG2 IEC 62471-5:2015. 4 The wide and third blade are NEVER REMOVED. • Protect the power cord from being used for your dealer or ViewSonic®. In areas... where voltage may fluctuate or cut out, it is recommended that you may cause it to continue using the projector. • Use only attachments/accessories specified by the manufacturer. • Disconnect...
...8226; When the projector is under operation, you connect your outlet, obtain an adapter and do not stare into the beam, RG2 IEC 62471-5:2015. 4 The wide and third blade are NEVER REMOVED. • Protect the power cord from being used for your dealer or ViewSonic®. In areas... where voltage may fluctuate or cut out, it is recommended that you may cause it to continue using the projector. • Use only attachments/accessories specified by the manufacturer. • Disconnect...

User Guide
Page 5
... mount kit, there is securely and safely installed. Ceiling Mounting Please read the following Safety Precautions before you purchased your projector. 5 If you intend to an improper attachment through the use of the wrong gauge or length screws. Safety Precautions - If you ensure it is strongly ...
... mount kit, there is securely and safely installed. Ceiling Mounting Please read the following Safety Precautions before you purchased your projector. 5 If you intend to an improper attachment through the use of the wrong gauge or length screws. Safety Precautions - If you ensure it is strongly ...
User Guide
Page 6
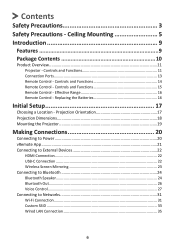
...Remote Control - Replacing the Batteries 16 Initial Setup 17 Choosing a Location - Projection Orientation 17 Projection Dimensions 18 Mounting the Projector 19 Making Connections 20 Connecting to Power 20 vRemote App...21 Connecting to External Devices 22 HDMI Connection 22 USB-C Connection 22...and Functions 11 Connection Ports...13 Remote Control - Ceiling Mounting 5 Introduction 9 Features 9 Package Contents 10 Product Overview 11 Projector - Effective Range 16 Remote Control - Controls and Functions 14 Remote Control - Contents Safety Precautions 3 Safety Precautions -
...Remote Control - Replacing the Batteries 16 Initial Setup 17 Choosing a Location - Projection Orientation 17 Projection Dimensions 18 Mounting the Projector 19 Making Connections 20 Connecting to Power 20 vRemote App...21 Connecting to External Devices 22 HDMI Connection 22 USB-C Connection 22...and Functions 11 Connection Ports...13 Remote Control - Ceiling Mounting 5 Introduction 9 Features 9 Package Contents 10 Product Overview 11 Projector - Effective Range 16 Remote Control - Controls and Functions 14 Remote Control - Contents Safety Precautions 3 Safety Precautions -

User Guide
Page 7
... (OSD) Menu Tree 57 Menu Operations 61 Aptoide...61 Apps Center...63 File Management 65 Setting...69 Appendix 87 Specifications...87 Projector Dimensions 89 Timing Chart...89 HDMI/USB-C Video Timing 89 IR Control Table...91 Glossary...92 Troubleshooting...94 LED Indicators...95 Maintenance... 96 Cleaning the Lens 96 Cleaning the Case 96 Storing the Projector 96 7 On-Screen Display (OSD) Tree 43 Operating the Projector 56 Home Screen 56 Home Screen - Using the Projector 36 Starting Up the Projector 36 First Time Activation 36 Preferred Language 36 Projection Orientation 37 ...
... (OSD) Menu Tree 57 Menu Operations 61 Aptoide...61 Apps Center...63 File Management 65 Setting...69 Appendix 87 Specifications...87 Projector Dimensions 89 Timing Chart...89 HDMI/USB-C Video Timing 89 IR Control Table...91 Glossary...92 Troubleshooting...94 LED Indicators...95 Maintenance... 96 Cleaning the Lens 96 Cleaning the Case 96 Storing the Projector 96 7 On-Screen Display (OSD) Tree 43 Operating the Projector 56 Home Screen 56 Home Screen - Using the Projector 36 Starting Up the Projector 36 First Time Activation 36 Preferred Language 36 Projection Orientation 37 ...

User Guide
Page 9
...connectivity, allows users to stream content from their favorite providers. With a lightweight design, easy carry handle, and short throw lens, the X10-4K can be conveniently moved from only 1.77 meters away. • Auto V. keystone to the light source (50 cm or 100 cm... protection feature in any room. It features 2,400 LED lumens of brightness, and with smart streaming functionality and a portable design, the ViewSonic® X10-4K projector delivers a theater-like experience in the event objects get too close to correct a distorted image automatically. • Bluetooth speaker, Auto ...
...connectivity, allows users to stream content from their favorite providers. With a lightweight design, easy carry handle, and short throw lens, the X10-4K can be conveniently moved from only 1.77 meters away. • Auto V. keystone to the light source (50 cm or 100 cm... protection feature in any room. It features 2,400 LED lumens of brightness, and with smart streaming functionality and a portable design, the ViewSonic® X10-4K projector delivers a theater-like experience in the event objects get too close to correct a distorted image automatically. • Bluetooth speaker, Auto ...

User Guide
Page 10
Please contact your country. Package Contents Item [1] [2] [3] [4] [5] [6] [7] [8] Description X10-4K Projector Remote Control Quick Start Guide Power Cord USB-C Cable HDMI Cable Wi-Fi Dongle Batteries NOTE: The power cord and video cables included in your package may vary depending on your local reseller for more information. 10
Please contact your country. Package Contents Item [1] [2] [3] [4] [5] [6] [7] [8] Description X10-4K Projector Remote Control Quick Start Guide Power Cord USB-C Cable HDMI Cable Wi-Fi Dongle Batteries NOTE: The power cord and video cables included in your package may vary depending on your local reseller for more information. 10
User Guide
Page 11
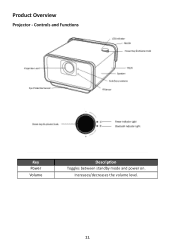
Controls and Functions Key Power Volume Description Toggles between standby mode and power on. Increases/decreases the volume level. 11 Product Overview Projector -
Controls and Functions Key Power Volume Description Toggles between standby mode and power on. Increases/decreases the volume level. 11 Product Overview Projector -
User Guide
Page 13
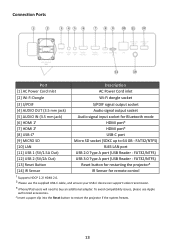
... 2.2/ HDMI 2.0. ² Please use Apple authorized accessories. ⁴ Insert a paper clip into the Reset button to restart the projector if the system freezes. 13 FAT32/NTFS) [13] Reset Button Reset button for restarting the projector⁴ [14] IR Sensor IR Sensor for Bluetooth mode [6] HDMI 1¹ HDMI port³ [7] HDMI 2¹ HDMI...
... 2.2/ HDMI 2.0. ² Please use Apple authorized accessories. ⁴ Insert a paper clip into the Reset button to restart the projector if the system freezes. 13 FAT32/NTFS) [13] Reset Button Reset button for restarting the projector⁴ [14] IR Sensor IR Sensor for Bluetooth mode [6] HDMI 1¹ HDMI port³ [7] HDMI 2¹ HDMI...
User Guide
Page 14
.../Down/Left/Right [7] OK [8] Return [9] Home [10] Volume Down [11] Mute [12] Volume Up [13] Network Setting [14] Audio Mode [15] Bluetooth Description Turns the projector On or Off Displays the input source selection bar. Increase the volume level. Displays the Application menu.
.../Down/Left/Right [7] OK [8] Return [9] Home [10] Volume Down [11] Mute [12] Volume Up [13] Network Setting [14] Audio Mode [15] Bluetooth Description Turns the projector On or Off Displays the input source selection bar. Increase the volume level. Displays the Application menu.

User Guide
Page 15
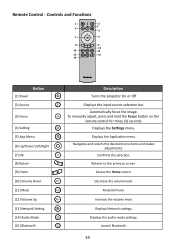
... [1] Power [2] Source [3] Focus [4] Setting [5] Audio Mode [6] Bluetooth [7] Up/Down/Left/Right [7] Shuttle Wheel Left/ Right [8] OK [9] Return [10] Home [11] Volume Control Description Turns the projector On or Off Displays the input source selection bar. View Bluetooth options. To manually adjust, press and hold the Focus button on your country 15...
... [1] Power [2] Source [3] Focus [4] Setting [5] Audio Mode [6] Bluetooth [7] Up/Down/Left/Right [7] Shuttle Wheel Left/ Right [8] OK [9] Return [10] Home [11] Volume Control Description Turns the projector On or Off Displays the input source selection bar. View Bluetooth options. To manually adjust, press and hold the Focus button on your country 15...

User Guide
Page 16
... ensure proper function of the used batteries according to the illustration for an extended period of time, remove the batteries to avoid damage to the projector's IR remote control sensor(s). 2. The remote control must be using the remote control for the location of the remote control by the battery manufacturer. •...
... ensure proper function of the used batteries according to the illustration for an extended period of time, remove the batteries to avoid damage to the projector's IR remote control sensor(s). 2. The remote control must be using the remote control for the location of the remote control by the battery manufacturer. •...

User Guide
Page 17
...screen. ¹ A rear projection screen is placed near the floor in front of the screen. Rear Ceiling¹ The projector is suspended upside-down from the ceiling behind the screen. Projection Orientation Personal preference and room layout will decide the installation location.... Consider the following locations: Location Front Table The projector is suspended upside-down from the ceiling in front of the screen. Initial Setup This section provides detailed instructions for the...
...screen. ¹ A rear projection screen is placed near the floor in front of the screen. Rear Ceiling¹ The projector is suspended upside-down from the ceiling behind the screen. Projection Orientation Personal preference and room layout will decide the installation location.... Consider the following locations: Location Front Table The projector is suspended upside-down from the ceiling in front of the screen. Initial Setup This section provides detailed instructions for the...
User Guide
Page 18
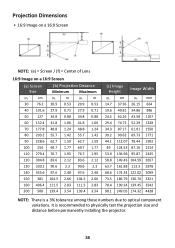
... is recommended to optical component variations. It is a 3% tolerance among these numbers due to physically test the projection size and distance before permanently installing the projector. 18 cm in . cm in . m in . m 30 76.2 20.9 0.53 20.9 0.53 40 101.6 27.9 0.71 27.9 0.71 50 127 34.8 0.88 34.8 0.88 60...
... is recommended to optical component variations. It is a 3% tolerance among these numbers due to physically test the projection size and distance before permanently installing the projector. 18 cm in . cm in . m in . m 30 76.2 20.9 0.53 20.9 0.53 40 101.6 27.9 0.71 27.9 0.71 50 127 34.8 0.88 34.8 0.88 60...

User Guide
Page 19
To ensure the most secure installation, please use the correct screw size. Ensure the screws used to attach the mount to the projector meet the following specifications: • Screw type: M4 x 8 • Maximum Screw Length: 8 mm CAUTION: • Avoid installing the projector near a heat source. • Keep at least a 10 cm (3.9 in.) gap between the ceiling and the bottom of the mounting plate. 1. Mounting the Projector NOTE: If you buy a third party mount, please use a ViewSonic® wall or ceiling mount. 2. Screw size can vary depending on the thickness of the projector. 19
To ensure the most secure installation, please use the correct screw size. Ensure the screws used to attach the mount to the projector meet the following specifications: • Screw type: M4 x 8 • Maximum Screw Length: 8 mm CAUTION: • Avoid installing the projector near a heat source. • Keep at least a 10 cm (3.9 in.) gap between the ceiling and the bottom of the mounting plate. 1. Mounting the Projector NOTE: If you buy a third party mount, please use a ViewSonic® wall or ceiling mount. 2. Screw size can vary depending on the thickness of the projector. 19
User Guide
Page 20
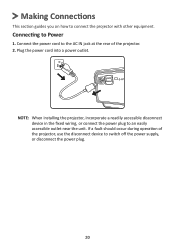
Making Connections This section guides you on how to Power 1. Connecting to connect the projector with other equipment. If a fault should occur during operation of the projector. 2. Connect the power cord to the AC IN jack at the rear of the projector, use the disconnect device to an easily accessible outlet near the unit. NOTE: When installing the projector, incorporate a readily accessible disconnect device in the fixed wiring, or connect the power plug to switch off the power supply, or disconnect the power plug. 20 Plug the power cord into a power outlet.
Making Connections This section guides you on how to Power 1. Connecting to connect the projector with other equipment. If a fault should occur during operation of the projector. 2. Connect the power cord to the AC IN jack at the rear of the projector, use the disconnect device to an easily accessible outlet near the unit. NOTE: When installing the projector, incorporate a readily accessible disconnect device in the fixed wiring, or connect the power plug to switch off the power supply, or disconnect the power plug. 20 Plug the power cord into a power outlet.
User Guide
Page 21
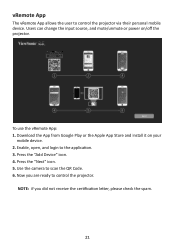
Download the App from Google Play or the Apple App Store and install it on /off the projector. Press the "Add Device" icon. 4. Users can change the input source, and mute/unmute or power on your mobile device. 2. Use the camera to the ...application. 3. Now you did not receive the certification letter, please check the spam. 21 NOTE: if you are ready to control the projector via their personal mobile device. Enable, open, and login to scan the QR Code. 6. To use the vRemote App: 1. vRemote App The vRemote App allows...
Download the App from Google Play or the Apple App Store and install it on /off the projector. Press the "Add Device" icon. 4. Users can change the input source, and mute/unmute or power on your mobile device. 2. Use the camera to the ...application. 3. Now you did not receive the certification letter, please check the spam. 21 NOTE: if you are ready to control the projector via their personal mobile device. Enable, open, and login to scan the QR Code. 6. To use the vRemote App: 1. vRemote App The vRemote App allows...
User Guide
Page 22
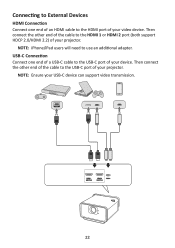
Then connect the other end of the cable to the USB-C port of your projector. USB-C Connection Connect one end of an HDMI cable to the HDMI port of your video device. Connecting to External Devices HDMI Connection Connect one end of a USB-C cable to the USB-C port of your device. NOTE: iPhone/iPad users will need to the HDMI 1 or HDMI 2 port (both support HDCP 2.0/HDMI 2.2) of your USB-C device can support video transmission. 22 Then connect the other end of the cable to use an additional adapter. NOTE: Ensure your projector.
Then connect the other end of the cable to the USB-C port of your projector. USB-C Connection Connect one end of an HDMI cable to the HDMI port of your video device. Connecting to External Devices HDMI Connection Connect one end of a USB-C cable to the USB-C port of your device. NOTE: iPhone/iPad users will need to the HDMI 1 or HDMI 2 port (both support HDCP 2.0/HDMI 2.2) of your USB-C device can support video transmission. 22 Then connect the other end of the cable to use an additional adapter. NOTE: Ensure your projector.

User Guide
Page 23
...seconds. 3. Access the drop down control menu. 2. Pull-to-refresh the app and wait for users to mirror the screen on their personal device. "ViewSonic PJ-XXXX" will now be visible, select it . 2. You can also scan the FAQ QR code and follow the steps to directly cast your device... does, go to the same network as the projector. NOTE: Ensure your device is connected to the Casting feature and choose "ViewSonic PJ-XXX" from the list of available devices. Select the "Screen Mirroring" icon. 3.
...seconds. 3. Access the drop down control menu. 2. Pull-to-refresh the app and wait for users to mirror the screen on their personal device. "ViewSonic PJ-XXXX" will now be visible, select it . 2. You can also scan the FAQ QR code and follow the steps to directly cast your device... does, go to the same network as the projector. NOTE: Ensure your device is connected to the Casting feature and choose "ViewSonic PJ-XXX" from the list of available devices. Select the "Screen Mirroring" icon. 3.

User Guide
Page 24
Go to connect their device wirelessly for audio playback. 13:00 Apps Center Bluetooth Seƫng Screen Mirroring File Management HDMI Add App Add App Add App To connect and pair your device: 1. Then press OK on the remote control to select Bluetooth Speaker or Bluetooth Pairing. Connecting to Bluetooth Bluetooth Speaker The projector is equipped with Bluetooth that allows the user to : Home > Bluetooth. 2. Use the Left and Right directional buttons on the remote control. 24
Go to connect their device wirelessly for audio playback. 13:00 Apps Center Bluetooth Seƫng Screen Mirroring File Management HDMI Add App Add App Add App To connect and pair your device: 1. Then press OK on the remote control to select Bluetooth Speaker or Bluetooth Pairing. Connecting to Bluetooth Bluetooth Speaker The projector is equipped with Bluetooth that allows the user to : Home > Bluetooth. 2. Use the Left and Right directional buttons on the remote control. 24


