
User Guide
Page 2
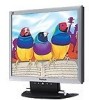
Contents Compliance Information 2 Important Safety Instructions 3 Product Registration 4 For Your Records 4 Getting Started Package Contents 5 Precautions 5 Quick Installation 6 Installation of Wall Mount (Optional 7 Using the LCD Display Setting the Timing Mode 8 OSD and Power Button Lock Modes 8 Adjusting the Screen Image 9 Main Menu Controls 11 Other Information Specifications 15 Troubleshooting 16 Customer Support 17 Cleaning the LCD Display 18 Limited Warranty 19 10/15/04 F ViewSonic VE710b_VE710s 1
Contents Compliance Information 2 Important Safety Instructions 3 Product Registration 4 For Your Records 4 Getting Started Package Contents 5 Precautions 5 Quick Installation 6 Installation of Wall Mount (Optional 7 Using the LCD Display Setting the Timing Mode 8 OSD and Power Button Lock Modes 8 Adjusting the Screen Image 9 Main Menu Controls 11 Other Information Specifications 15 Troubleshooting 16 Customer Support 17 Cleaning the LCD Display 18 Limited Warranty 19 10/15/04 F ViewSonic VE710b_VE710s 1
User Guide
Page 6
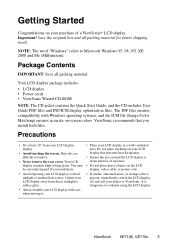
... area. Your LCD display package includes: • LCD display • Power cords • ViewSonic Wizard CD-ROM NOTE: The CD jacket contains the Quick Start Guide, and the CD includes User Guide PDF files and INF/ICM display optimization files. The INF files ensures compatibility with care when moving it. • Place your LCD display with Windows operating systems, and the ICM file (Image Color Matching) ensures accurate on-screen colors. You may...
... area. Your LCD display package includes: • LCD display • Power cords • ViewSonic Wizard CD-ROM NOTE: The CD jacket contains the Quick Start Guide, and the CD includes User Guide PDF files and INF/ICM display optimization files. The INF files ensures compatibility with care when moving it. • Place your LCD display with Windows operating systems, and the ICM file (Image Color Matching) ensures accurate on-screen colors. You may...

User Guide
Page 7
... graphic card s user guide. Installation is important. AC outlet (wall socket) AC IN D-SUB Computer power cord ViewSonic VE710b_VE710s 6 To be best prepared for the CD-ROM to install the INF file. Attach the adapter to the computer and plug the video cable into the computer s CD drive Follow the on page 2. (See back of this user guide. 1 Connect power cord 2 Connect video cable Make sure both the LCD display and computer are turned OFF Connect the video cable...
... graphic card s user guide. Installation is important. AC outlet (wall socket) AC IN D-SUB Computer power cord ViewSonic VE710b_VE710s 6 To be best prepared for the CD-ROM to install the INF file. Attach the adapter to the computer and plug the video cable into the computer s CD drive Follow the on page 2. (See back of this user guide. 1 Connect power cord 2 Connect video cable Make sure both the LCD display and computer are turned OFF Connect the video cable...

User Guide
Page 9
... setting, after a power failure, your graphic card's user guide for 5 seconds. Power Button Lock This mode locks the power of the resolution (example 1024 x 768) and refresh rate (or vertical frequency; example 60 Hz). ViewSonic VE710b_VE710s 8 OSD and Power Button Lock Modes OSD Lock This mode locks all current control settings and prevents access to : VESA 1280 x 1024 @ 60 Hz. The timing mode consists of the LCD dislay in permanent damage to adjust the screen image. If any buttons are pressed the message OSD Locked will display for instructions...
... setting, after a power failure, your graphic card's user guide for 5 seconds. Power Button Lock This mode locks the power of the resolution (example 1024 x 768) and refresh rate (or vertical frequency; example 60 Hz). ViewSonic VE710b_VE710s 8 OSD and Power Button Lock Modes OSD Lock This mode locks all current control settings and prevents access to : VESA 1280 x 1024 @ 60 Hz. The timing mode consists of the LCD dislay in permanent damage to adjust the screen image. If any buttons are pressed the message OSD Locked will display for instructions...

User Guide
Page 10
Displays the Main Menu or exits the control screen and saves adjustments. Power On/Off ViewSonic VE710b_VE710s 9 Also a shortcut to display the Contrast adjustment control screen. Also toggles between two controls on the screen. Also a shortcut to Auto Image Adjust. Main Menu With OnView controls Front Control Panel shown below in "Main Menu Controls" on page 9. Power light Green = ON Orange = Power Saving Scrolls through menu options and adjusts the displayed control. The OnView controls are explained at the top of the next page and...
Displays the Main Menu or exits the control screen and saves adjustments. Power On/Off ViewSonic VE710b_VE710s 9 Also a shortcut to display the Contrast adjustment control screen. Also toggles between two controls on the screen. Also a shortcut to Auto Image Adjust. Main Menu With OnView controls Front Control Panel shown below in "Main Menu Controls" on page 9. Power light Green = ON Orange = Power Saving Scrolls through menu options and adjusts the displayed control. The OnView controls are explained at the top of the next page and...
User Guide
Page 11
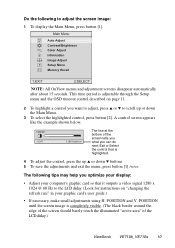
... the bottom of the LCD dislay.) ViewSonic VE710b_VE710s 10 The following to the LCD dislay. (Look for instructions on page 11. 2 To highlight a control you want to adjust, press I or down the Main Menu. 3 To select the highlighted control, press button [2]. POSITION and V. Do the following tips may help you optimize your display: • Adjust your graphic card's user guide.) • If necessary, make small adjustments using H. Setup Menu Memory Recall 1:EXIT...
... the bottom of the LCD dislay.) ViewSonic VE710b_VE710s 10 The following to the LCD dislay. (Look for instructions on page 11. 2 To highlight a control you want to adjust, press I or down the Main Menu. 3 To select the highlighted control, press button [2]. POSITION and V. Do the following tips may help you optimize your display: • Adjust your graphic card's user guide.) • If necessary, make small adjustments using H. Setup Menu Memory Recall 1:EXIT...

User Guide
Page 12
... [2] button to adjust red (R), green (G), and blue (B). Enabling this function does not work on your LCD dislay, then lower the video refresh rate to 60 Hz and set the resolution to its pre-set value. If this setting allows the LCD display to the screen image for a darker color. Default setting. 5400K - Brightness adjusts background black level of the latest applications. Color Adjust provides several color options: preset color temperatures and User which allows you to obtain a sharper image. sRGB...
... [2] button to adjust red (R), green (G), and blue (B). Enabling this function does not work on your LCD dislay, then lower the video refresh rate to 60 Hz and set the resolution to its pre-set value. If this setting allows the LCD display to the screen image for a darker color. Default setting. 5400K - Brightness adjusts background black level of the latest applications. Color Adjust provides several color options: preset color temperatures and User which allows you to obtain a sharper image. sRGB...

User Guide
Page 13
... displays the timing mode (video signal input) coming from the graphics card in your graphic card's user guide for red, green, and blue. 1 To select color (R, G or B) press button [2]. 2 To adjust selected color, press I or J. 3 When you are explained below: H./V. See your computer. Size Fine Tune Sharpness 1:EXIT 2:SELECT The Image Adjust controls are finished making all color adjustments, press button [1] twice. Individual adjustments for instructions on changing the resolution and refresh rate (vertical frequency). Size (Horizontal Size) adjusts the width of the screen...
... displays the timing mode (video signal input) coming from the graphics card in your graphic card's user guide for red, green, and blue. 1 To select color (R, G or B) press button [2]. 2 To adjust selected color, press I or J. 3 When you are explained below: H./V. See your computer. Size Fine Tune Sharpness 1:EXIT 2:SELECT The Image Adjust controls are finished making all color adjustments, press button [1] twice. Individual adjustments for instructions on changing the resolution and refresh rate (vertical frequency). Size (Horizontal Size) adjusts the width of the screen...
User Guide
Page 15
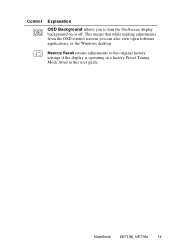
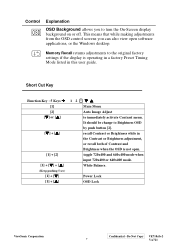
ViewSonic VE710b_VE710s 14 Control OSD Explanation OSD Background allows you can also view open software applications, or the Windows desktop. This means that while making adjustments from the OSD control screens you to the original factory settings if the display is operating in a factory Preset Timing Mode listed in this user guide. Memory Recall returns adjustments to turn the On-Screen display background on or off.
ViewSonic VE710b_VE710s 14 Control OSD Explanation OSD Background allows you can also view open software applications, or the Windows desktop. This means that while making adjustments from the OSD control screens you to the original factory settings if the display is operating in a factory Preset Timing Mode listed in this user guide. Memory Recall returns adjustments to turn the On-Screen display background on or off.

User Guide
Page 16
...Specifications LCD Type Color Filter Glass surface 17" (full 17" viewable diagonal area), TFT (Thin Film Transistor), Active Matrix XGA LCD, 0.264mm pixel pitch RGB vertical stripe Anti-Glare Panel tilt +20,° -5° Input signal Compatibility Resolution Power Display area Operating conditions Storage conditions Dimensions Video Sync PC Macintosh1 Recommended and supported Voltage Full Scan Temperature Humidity Altitude Temperature Humidity Altitude Physical RGB analog (0.7/1.0 Vp-p, 75 ohms) Separate Sync... Power saving On modes Off VCCI, BSMI, PSB, C-Tick, Taiwan Green ...
...Specifications LCD Type Color Filter Glass surface 17" (full 17" viewable diagonal area), TFT (Thin Film Transistor), Active Matrix XGA LCD, 0.264mm pixel pitch RGB vertical stripe Anti-Glare Panel tilt +20,° -5° Input signal Compatibility Resolution Power Display area Operating conditions Storage conditions Dimensions Video Sync PC Macintosh1 Recommended and supported Voltage Full Scan Temperature Humidity Altitude Temperature Humidity Altitude Physical RGB analog (0.7/1.0 Vp-p, 75 ohms) Separate Sync... Power saving On modes Off VCCI, BSMI, PSB, C-Tick, Taiwan Green ...

User Guide
Page 17
...; Adjust brightness and contrast. • If you are missing, check the video cable to the video output port on the back of the video cable is not attached permanently to the LCD dislay, tightly secure it is securely connected. Wrong or abnormal colors • If any colors (red, green, or blue) are using an Macintosh older than G3, you have an older graphics card, contact ViewSonic® for a non-DDC adapter. Power...
...; Adjust brightness and contrast. • If you are missing, check the video cable to the video output port on the back of the video cable is not attached permanently to the LCD dislay, tightly secure it is securely connected. Wrong or abnormal colors • If any colors (red, green, or blue) are using an Macintosh older than G3, you have an older graphics card, contact ViewSonic® for a non-DDC adapter. Power...
User Guide
Page 20
... not authorized by ViewSonic. g. To obtain service under warranty, contact ViewSonic Customer Support. Any other rights which vary from the date of the U.S.A. Limited Warranty VIEWSONIC LCD DISPLAY What the warranty covers: ViewSonic® warrants its sole option, repair or replace the product with the product. For information about receiving service under warranty, you . Limitation of supplies or parts not meeting ViewSonic's specifications. b. How long the...
... not authorized by ViewSonic. g. To obtain service under warranty, contact ViewSonic Customer Support. Any other rights which vary from the date of the U.S.A. Limited Warranty VIEWSONIC LCD DISPLAY What the warranty covers: ViewSonic® warrants its sole option, repair or replace the product with the product. For information about receiving service under warranty, you . Limitation of supplies or parts not meeting ViewSonic's specifications. b. How long the...
Service Manual
Page 4
... the monitor or power cord. 1.2. This monitor should be repaired by using replacement components rated for additional instructions on using the monitor if the cabinet is manufactured and tested on the rear end of metal oxide film resistor) in a clean, dry environment. Before replacing any of the power supply in this manual carefully. The use or installation may cause electric shock to user's manual for higher voltages, wattage, etc. ViewSonic Corporation...
... the monitor or power cord. 1.2. This monitor should be repaired by using replacement components rated for additional instructions on using the monitor if the cabinet is manufactured and tested on the rear end of metal oxide film resistor) in a clean, dry environment. Before replacing any of the power supply in this manual carefully. The use or installation may cause electric shock to user's manual for higher voltages, wattage, etc. ViewSonic Corporation...

Service Manual
Page 8
... menu, press button [1] twice. Main Menu AUTO SET Auto Adjust Contrast/Brightness Color Adjust i Information Image Adjust ? Do Not Copy VE710s/b-2 5 VA721 Contrast 1:EXIT 2: Brightness The line at the bottom of the LCD dislay.) ViewSonic Corporation Confidential - POSITION and V. The following to adjust the screen image: 1 To display the Main Menu, press button [1]. This time period is adjustable through the Setup menu and the OSD timeout control described on "changing the refresh rate" in your computer's graphic card so that is completely visible. (The black...
... menu, press button [1] twice. Main Menu AUTO SET Auto Adjust Contrast/Brightness Color Adjust i Information Image Adjust ? Do Not Copy VE710s/b-2 5 VA721 Contrast 1:EXIT 2: Brightness The line at the bottom of the LCD dislay.) ViewSonic Corporation Confidential - POSITION and V. The following to adjust the screen image: 1 To display the Main Menu, press button [1]. This time period is adjustable through the Setup menu and the OSD timeout control described on "changing the refresh rate" in your computer's graphic card so that is completely visible. (The black...

Service Manual
Page 9
...). Contrast adjusts the difference between the image background (black level) and the foreground (white level). sRGB - Adds blue to the screen image for cooler white (used in many of the screen image. Default setting. 5400K - Enabling the sRGB setting will cause the Contrast and Brightness adjustments to adjust red (R), green (G), and blue (B). Enabling this function does not work on your LCD dislay, then lower the video refresh rate to 60 Hz and set the resolution to the screen image for color management...
...). Contrast adjusts the difference between the image background (black level) and the foreground (white level). sRGB - Adds blue to the screen image for cooler white (used in many of the screen image. Default setting. 5400K - Enabling the sRGB setting will cause the Contrast and Brightness adjustments to adjust red (R), green (G), and blue (B). Enabling this function does not work on your LCD dislay, then lower the video refresh rate to 60 Hz and set the resolution to the screen image for color management...

Service Manual
Page 10
... VE710s/b-2 7 VA721 VESA 1280 x 1024 @ 60 Hz (recommended) means that the resolution is 1280 x 1024 and the refresh rate is automatic with your LCD dislay. Image Adjust Image Adjust H./V. Vertical moves the screen image up and down. Horizontal moves the screen image to the left or to the right. i Information displays the timing mode (video signal input) coming from the graphics card in your graphic card's user guide for red, green, and blue. 1 To select color (R, G or B) press button [2]. 2 To adjust...
... VE710s/b-2 7 VA721 VESA 1280 x 1024 @ 60 Hz (recommended) means that the resolution is 1280 x 1024 and the refresh rate is automatic with your LCD dislay. Image Adjust Image Adjust H./V. Vertical moves the screen image up and down. Horizontal moves the screen image to the left or to the right. i Information displays the timing mode (video signal input) coming from the graphics card in your graphic card's user guide for red, green, and blue. 1 To select color (R, G or B) press button [2]. 2 To adjust...
Service Manual
Page 12
... Menu Auto Image Adjust to Brightness OSD by push button [2]. Power Lock OSD Lock ViewSonic Corporation Confidential - Do Not Copy VE710s/b-2 9 VA721 toggle 720x400 and 640x400 mode when input 720x400 or 640x400 mode. Memory Recall returns adjustments to turn the On-Screen display background on or off. Control Explanation OSD OSD Background allows you can also view open . This means that while making adjustments from the OSD control screens you to the original factory settings if the display is not open software applications, or the Windows...
... Menu Auto Image Adjust to Brightness OSD by push button [2]. Power Lock OSD Lock ViewSonic Corporation Confidential - Do Not Copy VE710s/b-2 9 VA721 toggle 720x400 and 640x400 mode when input 720x400 or 640x400 mode. Memory Recall returns adjustments to turn the On-Screen display background on or off. Control Explanation OSD OSD Background allows you can also view open . This means that while making adjustments from the OSD control screens you to the original factory settings if the display is not open software applications, or the Windows...

Service Manual
Page 13
... for analog red input 62 SOGIN0 Analog Input Sync-on -screen display controller, a built-in output clock generator, a panel timing controller (TCON), and RSDS display interface. active high 32 CS Input w/ 5V-tolerant 3 Wire Serial Bus Chip Select; GENERAL DESCRIPTION The MST8116A is configured with resolutions up to digital signals that panel can acknowledge. To further reduce system costs, the MST8116A also integrates intelligent power management control capability for green-mode requirements...
... for analog red input 62 SOGIN0 Analog Input Sync-on -screen display controller, a built-in output clock generator, a panel timing controller (TCON), and RSDS display interface. active high 32 CS Input w/ 5V-tolerant 3 Wire Serial Bus Chip Select; GENERAL DESCRIPTION The MST8116A is configured with resolutions up to digital signals that panel can acknowledge. To further reduce system costs, the MST8116A also integrates intelligent power management control capability for green-mode requirements...
Service Manual
Page 16
... of a PWM controller, half bridge inverter, and switching MOSFET to control the inverter which was integral from PWM signal. There are connected to 3.3V power, all output pins can work on the inverter. BRI signal control brightness by symmetric stages in PWM DACs, VESA DDC interface, 4-channel A/D converter, and a 64K-byte internal program Flash-ROM. ViewSonic Corporation Confidential - Do Not Copy VE710s/b-2 13 VA721
... of a PWM controller, half bridge inverter, and switching MOSFET to control the inverter which was integral from PWM signal. There are connected to 3.3V power, all output pins can work on the inverter. BRI signal control brightness by symmetric stages in PWM DACs, VESA DDC interface, 4-channel A/D converter, and a 64K-byte internal program Flash-ROM. ViewSonic Corporation Confidential - Do Not Copy VE710s/b-2 13 VA721

Service Manual
Page 17
... a perpendicular to 1280x1024 80K/75Hz BURN IN and warm up time: The display must be undertaken only on power at full white pattern before starting alignments. Warm up over 30 minutes. Adjusting Procedure 5.1. MAIN ADJUSTMENTS NO. This is needed before proceeding. 2. LCD MONITOR set to the screen at the factory. 3. Adjust Color Temperature: (1) EEPROM INIT (5 BLOCKS): Press " " key move cursor to EEPROM INIT, Press...
... a perpendicular to 1280x1024 80K/75Hz BURN IN and warm up time: The display must be undertaken only on power at full white pattern before starting alignments. Warm up over 30 minutes. Adjusting Procedure 5.1. MAIN ADJUSTMENTS NO. This is needed before proceeding. 2. LCD MONITOR set to the screen at the factory. 3. Adjust Color Temperature: (1) EEPROM INIT (5 BLOCKS): Press " " key move cursor to EEPROM INIT, Press...


