
User Manual
Page 2
... the date and time, setting up , see section 2 "Getting Started" in this manual to refer to avoid improper operations. Once green indicator light is on, turn system on for the first time. When turning on by pressing the power button (shown below ). 2. QUICK START 1.
... the date and time, setting up , see section 2 "Getting Started" in this manual to refer to avoid improper operations. Once green indicator light is on, turn system on for the first time. When turning on by pressing the power button (shown below ). 2. QUICK START 1.

User Manual
Page 8
Insert the AC end to connect the adapter: 1. Connect the piece with a universal AC-DC adapter. Check the connections above before turning on the gTablet. Plug the DC end of adapter into the power jack of adapter is from the pictures shown. 8 Your gTablet and the accessories may differ from 100V to 240V. Follow the below steps to the wall outlet. 4. 2 GETTING STARTED 2-1 Connecting the Power Adapter The gTablet comes with the plugs to the power cord. 1 2. The allowable input voltage of the gTablet. 3.
Insert the AC end to connect the adapter: 1. Connect the piece with a universal AC-DC adapter. Check the connections above before turning on the gTablet. Plug the DC end of adapter into the power jack of adapter is from the pictures shown. 8 Your gTablet and the accessories may differ from 100V to 240V. Follow the below steps to the wall outlet. 4. 2 GETTING STARTED 2-1 Connecting the Power Adapter The gTablet comes with the plugs to the power cord. 1 2. The allowable input voltage of the gTablet. 3.
User Manual
Page 9
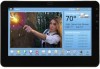
There are 4 easy steps to follow for the first time. 2-2 Setting Up Your gTablet Turning the gTablet ON for the first time You must fully charge your gTablet before using for initial setup. gTablet Key Map section). After tapping on ... When the gTablet powers on, the Welcome Screen below will appear. When fully charged, a green indicator light will appear. Once green indicator light is on, turn system on the "Next" button (2). 9 End User License Agreement 1. Review this and tap the "Accept" button.
There are 4 easy steps to follow for the first time. 2-2 Setting Up Your gTablet Turning the gTablet ON for the first time You must fully charge your gTablet before using for initial setup. gTablet Key Map section). After tapping on ... When the gTablet powers on, the Welcome Screen below will appear. When fully charged, a green indicator light will appear. Once green indicator light is on, turn system on the "Next" button (2). 9 End User License Agreement 1. Review this and tap the "Accept" button.

User Manual
Page 12
...on from the sleep mode, also briefly press the power button. 12 To turn the gTablet on button. To put the system into "Sleep" mode. A menu will appear. This save battery. Turning the gTablet Off In order to turn the gTablet ON from an Off state, you must hold the power button... down for about 2 seconds. 1 2-3 ON, OFF, and Sleep Turning the gTablet On In order to turn the gTablet off completely, you must hold the power button for about 2 seconds. Select "Power Off". Sleep The most common mode for ...
...on from the sleep mode, also briefly press the power button. 12 To turn the gTablet on button. To put the system into "Sleep" mode. A menu will appear. This save battery. Turning the gTablet Off In order to turn the gTablet ON from an Off state, you must hold the power button... down for about 2 seconds. 1 2-3 ON, OFF, and Sleep Turning the gTablet On In order to turn the gTablet off completely, you must hold the power button for about 2 seconds. Select "Power Off". Sleep The most common mode for ...

User Manual
Page 28
Then select your timer (2). If it to scroll the hours, minutes, and seconds up a digital timer. To simply turn off an alarm, tap on the "Timers" tab from the Clock page will bring open the "Set Alarm" window and tap on "Delete". To set , ... will be green. To set the timer, use your finger to the "OFF" position. Timers Tapping on the "ON" button below the alarm clock and turn it is ON, the button will appear. To delete an alarm, touch the face of the alarm clock you wish to cancel to set by...
Then select your timer (2). If it to scroll the hours, minutes, and seconds up a digital timer. To simply turn off an alarm, tap on the "Timers" tab from the Clock page will bring open the "Set Alarm" window and tap on "Delete". To set , ... will be green. To set the timer, use your finger to the "OFF" position. Timers Tapping on the "ON" button below the alarm clock and turn it is ON, the button will appear. To delete an alarm, touch the face of the alarm clock you wish to cancel to set by...
User Manual
Page 43
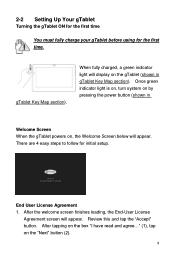
... to start recording video (2). 3 1 2 Camera Mode The camera runs in the top right of the screen containing a snap shot (last photo taken) (3). This will turn red. When recording, the button will bring up the "Photos" application. Note: photos taken with your gTablet are saved to your "Photos" application. 3 1 2 Video...
... to start recording video (2). 3 1 2 Camera Mode The camera runs in the top right of the screen containing a snap shot (last photo taken) (3). This will turn red. When recording, the button will bring up the "Photos" application. Note: photos taken with your gTablet are saved to your "Photos" application. 3 1 2 Video...
User Manual
Page 49
... by category, or by most popular, or by price, or Free Apps, etc. 3. Once "download complete", tap on "Install". 10. You will be prompted to "Turn on USB storage" to your PC, you can drag and drop any music, photos, or videos that the USB is the mini USB cable. Connect... the gTablet to proceed. 3. On the gTablet, tap on "Turn on USB storage". From the download screen, select "download to the clock. 6. The download status will also find the application in Windows Explorer. 49 Tap...
... by category, or by most popular, or by price, or Free Apps, etc. 3. Once "download complete", tap on "Install". 10. You will be prompted to "Turn on USB storage" to your PC, you can drag and drop any music, photos, or videos that the USB is the mini USB cable. Connect... the gTablet to proceed. 3. On the gTablet, tap on "Turn on USB storage". From the download screen, select "download to the clock. 6. The download status will also find the application in Windows Explorer. 49 Tap...

User Manual
Page 50
...). 3. Tap on the "ES file explorer" icon (found on the "usbdisk" file folder. 50 To remove the SD card, you are done transferring files, tap "Turn off USB storage" on the SD card, simply open up the appropriate application. 4. Once you must "unmount" the card by simply opening up the "Music...
...). 3. Tap on the "ES file explorer" icon (found on the "usbdisk" file folder. 50 To remove the SD card, you are done transferring files, tap "Turn off USB storage" on the SD card, simply open up the appropriate application. 4. Once you must "unmount" the card by simply opening up the "Music...

User Manual
Page 54
...settings - Under Bluetooth settings, "Scan for devices". (3) 4. Airplane mode - Bluetooth settings are only enabled when Bluetooth is turned on it and start pairing. (4) 5. Turn the gTablet and your wireless network settings, add a network, and detect a network. Bluetooth - After Scanning, select the... desired device by tapping on . Turns Bluetooth on both the gTablet and the remote device and complete the connection 2 3 4 54 Type the password as indicated on or ...
...settings - Under Bluetooth settings, "Scan for devices". (3) 4. Airplane mode - Bluetooth settings are only enabled when Bluetooth is turned on it and start pairing. (4) 5. Turn the gTablet and your wireless network settings, add a network, and detect a network. Bluetooth - After Scanning, select the... desired device by tapping on . Turns Bluetooth on both the gTablet and the remote device and complete the connection 2 3 4 54 Type the password as indicated on or ...
User Manual
Page 61
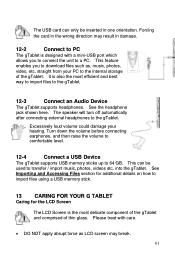
It is also the most delicate component of the gTablet and comprised of the gTablet. Turn down the volume before connecting earphones, and then raise the volume to comfortable level. 12-4 Connect a USB Device The gTablet supports USB memory sticks up ... for the LCD Screen The LCD Screen is designed with care. DO NOT apply abrupt force as , music, photos, video, etc. The speaker will turn off automatically after connecting external headphones to import files using a USB memory stick. 13 CARING FOR YOUR G TABLET Caring for additional details on how to...
It is also the most delicate component of the gTablet and comprised of the gTablet. Turn down the volume before connecting earphones, and then raise the volume to comfortable level. 12-4 Connect a USB Device The gTablet supports USB memory sticks up ... for the LCD Screen The LCD Screen is designed with care. DO NOT apply abrupt force as , music, photos, video, etc. The speaker will turn off automatically after connecting external headphones to import files using a USB memory stick. 13 CARING FOR YOUR G TABLET Caring for additional details on how to...
User Manual
Page 62
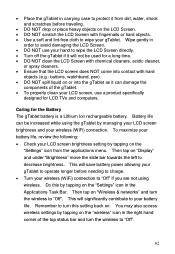
... Check your LCD screen brightness setting by tapping on the "Settings" icon from dirt, water, shock and scratches before needing to charge. Turn your wireless (WiFi) connection to "Off" if you are not using the gTablet by managing your LCD screen brightness and your wireless (WiFi) connection. Then.... Ensure that the LCD screen does NOT come into the gTablet as it can damage the components of the top status bar and turn this by tapping on the "Settings" icon in the Applications Task Bar. Place the gTablet in carrying case to protect it from ...
... Check your LCD screen brightness setting by tapping on the "Settings" icon from dirt, water, shock and scratches before needing to charge. Turn your wireless (WiFi) connection to "Off" if you are not using the gTablet by managing your LCD screen brightness and your wireless (WiFi) connection. Then.... Ensure that the LCD screen does NOT come into the gTablet as it can damage the components of the top status bar and turn this by tapping on the "Settings" icon in the Applications Task Bar. Place the gTablet in carrying case to protect it from ...
User Manual
Page 63
... it maybe become too hot and halt the system. 15 FCC COMPLIANCE This device complies with ambient temperatures between the main unit and attachments before turning on the screen which will not be responsible for any installed batteries. 15. DO NOT insert anything into the gTablet that may not cause harmful...
... it maybe become too hot and halt the system. 15 FCC COMPLIANCE This device complies with ambient temperatures between the main unit and attachments before turning on the screen which will not be responsible for any installed batteries. 15. DO NOT insert anything into the gTablet that may not cause harmful...
User Manual
Page 64
...interference received, including interference that to which can radiate radio frequency energy. A: Press the POWER button and hold 4 or 6 seconds to turn off the gTablet when it may cause harmful interference to radio or reception. Then restart. This equipment has been tested and found to ...Part 15 of the following measures: Reorient or relocate the receiving antenna on . This equipment generates, and can be determined by turning the equipment off the gTablet. CAUTION: This equipment has been tested and found to comply with the limits for a Class B digital device,...
...interference received, including interference that to which can radiate radio frequency energy. A: Press the POWER button and hold 4 or 6 seconds to turn off the gTablet when it may cause harmful interference to radio or reception. Then restart. This equipment has been tested and found to ...Part 15 of the following measures: Reorient or relocate the receiving antenna on . This equipment generates, and can be determined by turning the equipment off the gTablet. CAUTION: This equipment has been tested and found to comply with the limits for a Class B digital device,...
User Manual
Page 65
... Note that all external devices. 3. If not, clean with the soft cloth. Make sure the indicator light indicator of the LCD Screen to turn off wireless if not in Main Menu. Detach the battery pack. Be sure to back up files that the lens is on "Settings"---"Security"---"...Q: What do I do if the camera image is low, connect to the default status in use the power button). For Customer Service, please visit www.viewsonic.com/gtablet. 17 SPECIFICATIONS Display Features Display Technology TFT-LCD Size (inches) 10.1 inch 65 A: 1. DO NOT use a hair dryer on the internal ...
... Note that all external devices. 3. If not, clean with the soft cloth. Make sure the indicator light indicator of the LCD Screen to turn off wireless if not in Main Menu. Detach the battery pack. Be sure to back up files that the lens is on "Settings"---"Security"---"...Q: What do I do if the camera image is low, connect to the default status in use the power button). For Customer Service, please visit www.viewsonic.com/gtablet. 17 SPECIFICATIONS Display Features Display Technology TFT-LCD Size (inches) 10.1 inch 65 A: 1. DO NOT use a hair dryer on the internal ...


