

User Guide
Page 1
Pro8510L/Pro8520WL/Pro8530HDL/ Pro8800WUL DLP Projector User Guide IMPORTANT: Please read this User Guide will describe your limited coverage from ViewSonic Corporation, which is also found on installing and using your product for future service. VS16369/VS16370/ VS16371/VS16372 "Antes de operar su equipo lea cu ...
Pro8510L/Pro8520WL/Pro8530HDL/ Pro8800WUL DLP Projector User Guide IMPORTANT: Please read this User Guide will describe your limited coverage from ViewSonic Corporation, which is also found on installing and using your product for future service. VS16369/VS16370/ VS16371/VS16372 "Antes de operar su equipo lea cu ...

User Guide
Page 5
... part of International Business Machines Corporation. Product Name: Model Number: Document Number: Serial Number: Purchase Date: For Your Records Pro8510L/Pro8520WL/Pro8530HDL/Pro8800WUL ViewSonic DLP Projector VS16369/VS16370/ VS16371/VS16372 Pro8510L/Pro8520WL/Pro8530HDL/Pro8800WUL_UG_ ENG Rev. 1A 04-14-16 Product disposal at end of in the "For Your Records" section. Registering your product...
... part of International Business Machines Corporation. Product Name: Model Number: Document Number: Serial Number: Purchase Date: For Your Records Pro8510L/Pro8520WL/Pro8530HDL/Pro8800WUL ViewSonic DLP Projector VS16369/VS16370/ VS16371/VS16372 Pro8510L/Pro8520WL/Pro8530HDL/Pro8800WUL_UG_ ENG Rev. 1A 04-14-16 Product disposal at end of in the "For Your Records" section. Registering your product...

User Guide
Page 6
...Connecting a computer or monitor .... 19 Connecting Video source devices ...... 20 Playing sound through the projector .. 22 Using the cable management cover ... 23 Operation 24 Starting up the projector 24 Using the menus 25 Utilizing the password function ......... 26 Switching input signal 28 Adjusting the...39 Using the 3D functions 39 Controlling the projector through a LAN environment 40 Using the projector in standby mode. 47 Adjusting the sound 47 Shutting down the projector 49 Menu operation 50 Maintenance 59 Care of the projector 59 Using the dust filter (optional accessory ...
...Connecting a computer or monitor .... 19 Connecting Video source devices ...... 20 Playing sound through the projector .. 22 Using the cable management cover ... 23 Operation 24 Starting up the projector 24 Using the menus 25 Utilizing the password function ......... 26 Switching input signal 28 Adjusting the...39 Using the 3D functions 39 Controlling the projector through a LAN environment 40 Using the projector in standby mode. 47 Adjusting the sound 47 Shutting down the projector 49 Menu operation 50 Maintenance 59 Care of the projector 59 Using the dust filter (optional accessory ...

User Guide
Page 7
...is under operation as the inside which has its own removable cover. Always open the lens shutter or remove the lens cap when the projector lamp is designed and tested to break on rare occasions. 9. Excessive operation of a car with an ambient temperature above 40°C ...176;F - Locations where the altitudes are dangerous high voltages inside of lamps beyond the rated lamp life. Safety Instructions 1. Please read this projector. Locations where temperatures may fluctuate or cut out, it for replacement. 8. Do not look straight at least 50 cm clearance from walls and...
...is under operation as the inside which has its own removable cover. Always open the lens shutter or remove the lens cap when the projector lamp is designed and tested to break on rare occasions. 9. Excessive operation of a car with an ambient temperature above 40°C ...176;F - Locations where the altitudes are dangerous high voltages inside of lamps beyond the rated lamp life. Safety Instructions 1. Please read this projector. Locations where temperatures may fluctuate or cut out, it for replacement. 8. Do not look straight at least 50 cm clearance from walls and...

User Guide
Page 8
...heated air and odor from the power supply's wall socket and call your local service center to have a pleasant experience using your projector. Do not place liquids near the projector. 14. It is securely installed. 19. Warning • THIS APPARATUS MUST BE EARTHED. • When installing the unit,...person and property. Do not step on end vertically. Doing so may cause a malfunction of displaying inverted pictures for mounting the projector and ensure it . Use only qualified ceiling mount kit for ceiling mount installation. If you ensure it is not fully horizontal may ...
...heated air and odor from the power supply's wall socket and call your local service center to have a pleasant experience using your projector. Do not place liquids near the projector. 14. It is securely installed. 19. Warning • THIS APPARATUS MUST BE EARTHED. • When installing the unit,...person and property. Do not step on end vertically. Doing so may cause a malfunction of displaying inverted pictures for mounting the projector and ensure it . Use only qualified ceiling mount kit for ceiling mount installation. If you ensure it is not fully horizontal may ...

User Guide
Page 9
...Component adapter (optional) 11. Shipping contents 1. VGA Cable 7. Soft carry case (optional) 10. Dust filter (optional) 4 Introduction Projector features The projector integrates high-performance optical engine projection and a user-friendly design to deliver high reliability and ease of the lamp by up the ... CEC (Consumer Electronics Control) function allows synchronized power ON/ OFF operation between the projector and a CEC-compatible DVD player device connected to the HDMI input of the projector The apparent brightness of the projected image will decline over time and may vary and...
...Component adapter (optional) 11. Shipping contents 1. VGA Cable 7. Soft carry case (optional) 10. Dust filter (optional) 4 Introduction Projector features The projector integrates high-performance optical engine projection and a user-friendly design to deliver high reliability and ease of the lamp by up the ... CEC (Consumer Electronics Control) function allows synchronized power ON/ OFF operation between the projector and a CEC-compatible DVD player device connected to the HDMI input of the projector The apparent brightness of the projected image will decline over time and may vary and...

User Guide
Page 10
... picture setup mode. • / / / (Keystone keys) Manually corrects distorted images • Source resulting from an angled projection. Controls and functions Projector Lens shift wheel Lamp indicator light Focus and Zoom rings Power indicator light Temperature indicator light • Power Toggles the... projector between standby mode and Power ON. • Enter Enacts the selected On-Screen Display (OSD) menu item. HDMI/MHL port ...
... picture setup mode. • / / / (Keystone keys) Manually corrects distorted images • Source resulting from an angled projection. Controls and functions Projector Lens shift wheel Lamp indicator light Focus and Zoom rings Power indicator light Temperature indicator light • Power Toggles the... projector between standby mode and Power ON. • Enter Enacts the selected On-Screen Display (OSD) menu item. HDMI/MHL port ...

User Guide
Page 11
... HDMI/MHL port Turns on page 8 for display. • Menu • HDMI/MHL Selects source from an angled projection. • Power • Enter Toggles the projector between standby mode and Power ON. port for details. makes adjustments. • Auto Sync Automatically determines the best picture timings for display. for display. •...
... HDMI/MHL port Turns on page 8 for display. • Menu • HDMI/MHL Selects source from an angled projection. • Power • Enter Toggles the projector between standby mode and Power ON. port for details. makes adjustments. • Auto Sync Automatically determines the best picture timings for display. for display. •...

User Guide
Page 12
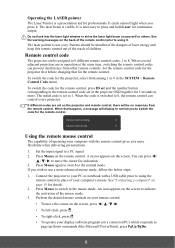
.... • (Aspect Ratio) Displays the aspect ratio selection bar. • Pattern Displays embedded test pattern. • Blank Hides the screen picture. • (Mute) Toggles the projector audio between the normal and mouse Allows user to page up/down commands (like Microsoft PowerPoint) when the mouse mode is selected. • Source Displays...
.... • (Aspect Ratio) Displays the aspect ratio selection bar. • Pattern Displays embedded test pattern. • Blank Hides the screen picture. • (Mute) Toggles the projector audio between the normal and mouse Allows user to page up/down commands (like Microsoft PowerPoint) when the mouse mode is selected. • Source Displays...
User Guide
Page 13
...screen, press To left-click, press . • To right-click, press . • To operate your computer's mouse. When several adjacent projectors are set in place of children. You can prevent interference from the remote control. See the warning messages on the screen to 8. To switch ...response from other remote controls. If you press it . It is set and the number button corresponding to using the remote control in the projector OSD together for the remote control. The initial code is necessary to 1. Press Mouse on yourself or others. See "Connecting a computer" on...
...screen, press To left-click, press . • To right-click, press . • To operate your computer's mouse. When several adjacent projectors are set in place of children. You can prevent interference from the remote control. See the warning messages on the screen to 8. To switch ...response from other remote controls. If you press it . It is set and the number button corresponding to using the remote control in the projector OSD together for the remote control. The initial code is necessary to 1. Press Mouse on yourself or others. See "Connecting a computer" on...
User Guide
Page 14
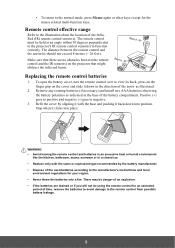
... there are drained or if you will not be held at an angle within 30 degrees perpendicular to the projector's IR remote control sensor(s) to function correctly. The remote control must be using the remote control for your region. • Never throw the batteries into a ...
... there are drained or if you will not be held at an angle within 30 degrees perpendicular to the projector's IR remote control sensor(s) to function correctly. The remote control must be using the remote control for your region. • Never throw the batteries into a ...
User Guide
Page 15
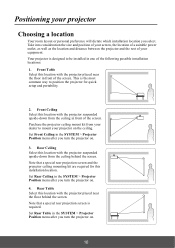
...the ceiling behind the screen. Rear Ceiling Select this location with the projector placed near the floor in front of your equipment. Set Rear Table in one of the screen. Positioning your projector Choosing a location Your room layout or personal preference will dictate which... and portability. 2. Note that a special rear projection screen is the most common way to mount your projector on . 3. Front Ceiling Select this location with the projector suspended upside-down from the ceiling in front of the following possible installation locations: 1. Set Front Ceiling ...
...the ceiling behind the screen. Rear Ceiling Select this location with the projector placed near the floor in front of your equipment. Set Rear Table in one of the screen. Positioning your projector Choosing a location Your room layout or personal preference will dictate which... and portability. 2. Note that a special rear projection screen is the most common way to mount your projector on . 3. Front Ceiling Select this location with the projector suspended upside-down from the ceiling in front of the following possible installation locations: 1. Set Front Ceiling ...

User Guide
Page 16
...(a) Screen Size [inch (cm)] (b) Projection min. Projection dimensions The "screen" mentioned below refers to the projection screen usually consisting of this projector. distance [m (inch)] max. (c) Image height [cm (inch)] (d) Vertical offset [cm (inch)] min. max. 60 (152) ... (c) (d) (e) (f) (b) • 4:3 image on a 16:10 screen (a) (e): Screen (b) (d) (c) (f) (e) (f): Center of lens (a) (e) (f) (c) (d) (b) When the projector's native resolution is XGA (1024 x 768) with a throw ratio of 1.41~2.25 4:3 image on page 81 for the native display resolution of a screen surface and...
...(a) Screen Size [inch (cm)] (b) Projection min. Projection dimensions The "screen" mentioned below refers to the projection screen usually consisting of this projector. distance [m (inch)] max. (c) Image height [cm (inch)] (d) Vertical offset [cm (inch)] min. max. 60 (152) ... (c) (d) (e) (f) (b) • 4:3 image on a 16:10 screen (a) (e): Screen (b) (d) (c) (f) (e) (f): Center of lens (a) (e) (f) (c) (d) (b) When the projector's native resolution is XGA (1024 x 768) with a throw ratio of 1.41~2.25 4:3 image on page 81 for the native display resolution of a screen surface and...

User Guide
Page 18
... (74) 9.4 (3.7) 14.1 (5.6) 150 (381) 3.6 (143) 5.8 (228) 202 (79) 10.1 (4.0) 15.1 (6.0) 16:10 image on a 16:10 Screen (a) Screen Size [inch (cm)] (b) Projection min. When the projector's native resolution is WXGA (1280 x 800) with a throw ratio of 1.12~1.8 16:10 image on a 4:3 Screen (a) Screen Size [inch (cm)] (b) Projection distance [m (inch)] (c) Image height...
... (74) 9.4 (3.7) 14.1 (5.6) 150 (381) 3.6 (143) 5.8 (228) 202 (79) 10.1 (4.0) 15.1 (6.0) 16:10 image on a 16:10 Screen (a) Screen Size [inch (cm)] (b) Projection min. When the projector's native resolution is WXGA (1280 x 800) with a throw ratio of 1.12~1.8 16:10 image on a 4:3 Screen (a) Screen Size [inch (cm)] (b) Projection distance [m (inch)] (c) Image height...

User Guide
Page 19
When the projector's native resolution is WUXGA (1920 x 1200) with a throw ratio of 1.07~1.71 16:10 image on a 4:3 Screen (a) Screen Size [inch (cm)] (b) Projection distance [m (inch)] (c) Image ...
When the projector's native resolution is WUXGA (1920 x 1200) with a throw ratio of 1.07~1.71 16:10 image on a 4:3 Screen (a) Screen Size [inch (cm)] (b) Projection distance [m (inch)] (c) Image ...

User Guide
Page 20
For models with a 16:9 native aspect ratio • 16:9 image on a 16:9 screen (b) (a) (d) (c) (f) (e) (a) (e) (f) (c) (d) (b) • 16:9 image on a 4:3 screen (b) (a) (d) (a) (e) (f) (c) (e): Screen (c) (f) (e) (f): Center of lens (d) (b) When the projector's native resolution is 1080p (1920 x 1080) with a throw ratio of 1.07~1.71 16:9 image on a 16:9 Screen (a) Screen Size [inch (cm)] (b) Projection distance [m (inch)] (c) Image ...
For models with a 16:9 native aspect ratio • 16:9 image on a 16:9 screen (b) (a) (d) (c) (f) (e) (a) (e) (f) (c) (d) (b) • 16:9 image on a 4:3 screen (b) (a) (d) (a) (e) (f) (c) (e): Screen (c) (f) (e) (f): Center of lens (d) (b) When the projector's native resolution is 1080p (1920 x 1080) with a throw ratio of 1.07~1.71 16:9 image on a 16:9 Screen (a) Screen Size [inch (cm)] (b) Projection distance [m (inch)] (c) Image ...

User Guide
Page 21
...(d) Vertical offset [cm (inch)] min. Shifting the projection lens vertically The vertical lens shift control provides flexibility for this projector's optical characteristics. Use the wheel to optical component variations. It is 3% tolerance among these numbers due to shift the ... the projected image position. Lens shift adjustment does not result in situ before you should physically test the projection size and distance using the actual projector in a degraded picture quality. 16 max. 60 (152) 1.3 (51) 2.1 (82) 69 (27) 5.1 (2.0) 10.3 (4.1) 70 (178) 1.5 (60) 2.4 (96) 80 (32) ...
...(d) Vertical offset [cm (inch)] min. Shifting the projection lens vertically The vertical lens shift control provides flexibility for this projector's optical characteristics. Use the wheel to optical component variations. It is 3% tolerance among these numbers due to shift the ... the projected image position. Lens shift adjustment does not result in situ before you should physically test the projection size and distance using the actual projector in a degraded picture quality. 16 max. 60 (152) 1.3 (51) 2.1 (82) 69 (27) 5.1 (2.0) 10.3 (4.1) 70 (178) 1.5 (60) 2.4 (96) 80 (32) ...

User Guide
Page 22
... method for each source. 3. For detailed connection methods, see "Shipping contents" on the projector vary with each projector model. Connection When connecting a signal source to the projector, be included with the projector (see pages 19-21. Use the correct signal cables for each connector that you may not... to VGA (D-Sub) adapter cable Computer A/V device 17 The connection illustrations below , some cables may find on your projector. Turn all equipment off before making any connections. 2. Ensure the cables are commercially available from electronics stores.
... method for each source. 3. For detailed connection methods, see "Shipping contents" on the projector vary with each projector model. Connection When connecting a signal source to the projector, be included with the projector (see pages 19-21. Use the correct signal cables for each connector that you may not... to VGA (D-Sub) adapter cable Computer A/V device 17 The connection illustrations below , some cables may find on your projector. Turn all equipment off before making any connections. 2. Ensure the cables are commercially available from electronics stores.
User Guide
Page 23
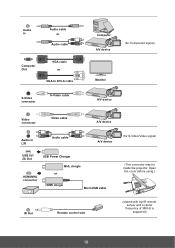
Open the cover before using.) IR Out Remote control wire (shared with top IR remote sensor and a carrier frequency of 38KHz is supported) 18 Audio in Audio cable or Audio cable Computer Out VGA cable or VGA to DVI-A cable S-Video connector S-Video cable Computer A/V device (for Component signal) Monitor A/V device Video connector Video cable A/V device Audio in L/R Audio cable A/V device USB 5V/ 2A Out USB Power Charger MHL dongle HDMI/MHL connector or HDMI dongle MicroUSB cable (for S-Video/Video signal) (This connector may be inside the projector.
Open the cover before using.) IR Out Remote control wire (shared with top IR remote sensor and a carrier frequency of 38KHz is supported) 18 Audio in Audio cable or Audio cable Computer Out VGA cable or VGA to DVI-A cable S-Video connector S-Video cable Computer A/V device (for Component signal) Monitor A/V device Video connector Video cable A/V device Audio in L/R Audio cable A/V device USB 5V/ 2A Out USB Power Charger MHL dongle HDMI/MHL connector or HDMI dongle MicroUSB cable (for S-Video/Video signal) (This connector may be inside the projector.

User Guide
Page 24
... IN 1 or COMPUTER IN 2 signal input socket on the notebook. Connect the other end of the video monitor. 3. Connect the projector to a computer as on the projector. 19 12V Out Powered screen (Trigger only) Microphone MIC Audio Out Speakers Connecting a computer or monitor Connecting a computer 1. Refer to...DVI end of the cable to the D-Sub output socket of the computer, and smaller end to an external monitor with a monitor symbol on the projector. 3. See "Using the remote mouse control" on /off. Usually a key combo like FN + F3 or CRT/LCD key turns the external display...
... IN 1 or COMPUTER IN 2 signal input socket on the notebook. Connect the other end of the video monitor. 3. Connect the projector to a computer as on the projector. 19 12V Out Powered screen (Trigger only) Microphone MIC Audio Out Speakers Connecting a computer or monitor Connecting a computer 1. Refer to...DVI end of the cable to the D-Sub output socket of the computer, and smaller end to an external monitor with a monitor symbol on the projector. 3. See "Using the remote mouse control" on /off. Usually a key combo like FN + F3 or CRT/LCD key turns the external display...


