User Manual
Page 3
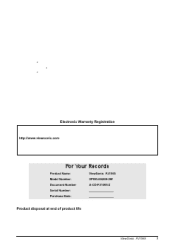
... this material, or the performance or use this product properly at : http://www.viewsonic.com Image Optimization files are trademarks of the U.S. For Your Records Product Name: Model Number: Document Number Serial Number: Purchase Date: ViewSonic PJ1065 VPROJ24268-2W A-CD-PJ1065-2 _____ _____ Product disposal at our web site. Electronic Warranty Registration To meet your projector's warranty on page 24. Information in...
... this material, or the performance or use this product properly at : http://www.viewsonic.com Image Optimization files are trademarks of the U.S. For Your Records Product Name: Model Number: Document Number Serial Number: Purchase Date: ViewSonic PJ1065 VPROJ24268-2W A-CD-PJ1065-2 _____ _____ Product disposal at our web site. Electronic Warranty Registration To meet your projector's warranty on page 24. Information in...
User Manual
Page 5
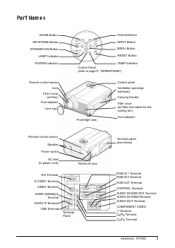
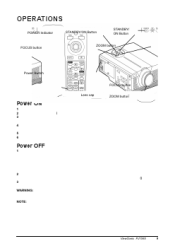
Part Names ZOOM Button KEYSTONE Button STANDBY/ON Button LAMP Indicator POWER Indicator FOCUS Button INPUT Button MENU Button RESET Button TEMP Indicator Control Panel (refer to page 9, "OPERATIONS") Remote control sensor Lens Filter Cover (air filter) Foot adjuster Lens cap Control panel Ventilation openings (exhaust) Carrying Handle Filter cover (air filter and intake for the cooling fan) Front/right view Foot adjuster Remote control sensor Speaker Power switch AC inlet (to power cord) Terminal panel (see below) Rear/Left view RGB IN 1 Terminal RGB IN 2 Terminal RGB OUT Terminal CONTROL...
Part Names ZOOM Button KEYSTONE Button STANDBY/ON Button LAMP Indicator POWER Indicator FOCUS Button INPUT Button MENU Button RESET Button TEMP Indicator Control Panel (refer to page 9, "OPERATIONS") Remote control sensor Lens Filter Cover (air filter) Foot adjuster Lens cap Control panel Ventilation openings (exhaust) Carrying Handle Filter cover (air filter and intake for the cooling fan) Front/right view Foot adjuster Remote control sensor Speaker Power switch AC inlet (to power cord) Terminal panel (see below) Rear/Left view RGB IN 1 Terminal RGB IN 2 Terminal RGB OUT Terminal CONTROL...

User Manual
Page 8
... optional three-core power supply cord. • Always use the liquid crystal projector in the table below . LCD panel, lens, etc.). a:Distance from the lens center to avoid a risk of projection. INSTALLATION Installation of the Projector and Screen To set the screen size and projection distance, see the illustration and table below indicates the full size (1024 × 768 dots). Angle Adjustment Use the foot adjusters located on critical parts (i.e. Table 1: Reference for Installation CAUTION • Install the projector in a suitable...
... optional three-core power supply cord. • Always use the liquid crystal projector in the table below . LCD panel, lens, etc.). a:Distance from the lens center to avoid a risk of projection. INSTALLATION Installation of the Projector and Screen To set the screen size and projection distance, see the illustration and table below indicates the full size (1024 × 768 dots). Angle Adjustment Use the foot adjusters located on critical parts (i.e. Table 1: Reference for Installation CAUTION • Install the projector in a suitable...
User Manual
Page 9
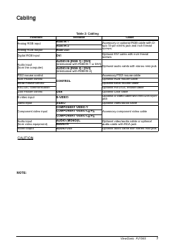
... mouse control Serial mouse control RS/232C communication USB mouse control S-video input Video input Component video input Audio input (from video equipment) Audio output RGB IN 1 RGB IN 2 RGB OUT DVI Table 2: Cabling Terminal Cable Accessory or optional RGB cable with stereo mini-jack CAUTION • An incorrect connection may have to be connected with the projector or those specified. Be sure to read the manual of the USB cable, be sure to turn...
... mouse control Serial mouse control RS/232C communication USB mouse control S-video input Video input Component video input Audio input (from video equipment) Audio output RGB IN 1 RGB IN 2 RGB OUT DVI Table 2: Cabling Terminal Cable Accessory or optional RGB cable with stereo mini-jack CAUTION • An incorrect connection may have to be connected with the projector or those specified. Be sure to read the manual of the USB cable, be sure to turn...
User Manual
Page 11
... POWER indicator is used safely. Remove the lens cap. 5 Adjust picture size with the ZOOM button. 6 Adjust focus with the FOCUS button. Power OFF 1 Press the STANDBY/ON button on the control panel or the remote control device. During this manual and the separate "SAFETY INSTRUCTIONS" thoroughly. The projector lamp is turned off . Always ensure that the equipment is blinking. 2 The system goes into the Standby mode after -image. ViewSonic PJ1065 9 The warm-up starts and the POWER indicator blinks green. 4 The POWER indicator stops blinking and turns green when the power is connected...
... POWER indicator is used safely. Remove the lens cap. 5 Adjust picture size with the ZOOM button. 6 Adjust focus with the FOCUS button. Power OFF 1 Press the STANDBY/ON button on the control panel or the remote control device. During this manual and the separate "SAFETY INSTRUCTIONS" thoroughly. The projector lamp is turned off . Always ensure that the equipment is blinking. 2 The system goes into the Standby mode after -image. ViewSonic PJ1065 9 The warm-up starts and the POWER indicator blinks green. 4 The POWER indicator stops blinking and turns green when the power is connected...
User Manual
Page 12
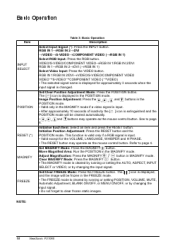
... mode. Set/Clear FREEZE Mode: Press the FREEZE button. Strong light and obstacles will interfere with the supplied remote control device or by changing the input signal. • Do not forget to clear frozen static images. RGB IN 1/RGB IN 2/DVI→VIDEO/S-VIDEO/COMPONENT VIDEO VIDEO→S-VIDEO→COMPONENT VIDEO (→VIDEO) • The selected signal name is displayed for the VOLUME, LANGUAGE, WHISPER and H PHASE. • The RESET button may operate...
... mode. Set/Clear FREEZE Mode: Press the FREEZE button. Strong light and obstacles will interfere with the supplied remote control device or by changing the input signal. • Do not forget to clear frozen static images. RGB IN 1/RGB IN 2/DVI→VIDEO/S-VIDEO/COMPONENT VIDEO VIDEO→S-VIDEO→COMPONENT VIDEO (→VIDEO) • The selected signal name is displayed for the VOLUME, LANGUAGE, WHISPER and H PHASE. • The RESET button may operate...

User Manual
Page 13
... AUTO is heard in the application display. Set/Clear Blank Mode: Press the BLANK button. The screen color is selected automatically. off (→Small) • Valid only at maximum size in the MUTE mode. Vertical Horizontal Adjust KEYSTONE: Press the button. A signal type appropriate for VIDEO on the menu. • This operation requires approximately 10 seconds. No image is displayed on the Image menu. Menu Display Start/Stop: Press the MENU button. • The menu display is used...
... AUTO is heard in the application display. Set/Clear Blank Mode: Press the BLANK button. The screen color is selected automatically. off (→Small) • Valid only at maximum size in the MUTE mode. Vertical Horizontal Adjust KEYSTONE: Press the button. A signal type appropriate for VIDEO on the menu. • This operation requires approximately 10 seconds. No image is displayed on the Image menu. Menu Display Start/Stop: Press the MENU button. • The menu display is used...

User Manual
Page 15
... lacks color) at Video Input), except for the signal of HDTV. Pressing the AUTO button in the application display. Menu for the N-PAL input. • Use this function when the image becomes unstable (eg. The function indicated (**) are effective on RGB input mode. Horizontal position (H.POSIT), vertical position (V.POSIT), clock phase (H.PHASE), and horizontal size (H.SIZE) are automatically adjusted. The selection of the OPT. Use with the window at Video Input...
... lacks color) at Video Input), except for the signal of HDTV. Pressing the AUTO button in the application display. Menu for the N-PAL input. • Use this function when the image becomes unstable (eg. The function indicated (**) are effective on RGB input mode. Horizontal position (H.POSIT), vertical position (V.POSIT), clock phase (H.PHASE), and horizontal size (H.SIZE) are automatically adjusted. The selection of the OPT. Use with the window at Video Input...

User Manual
Page 16
... MyScreen Display Size mode, select the magnification x1, x2 or FULL with the / button. Select Mirror Status: Select mirror status with the and buttons. in P. The selected one (MyScreen, ORIGINAL or one (MyScreen, ORIGINAL or TURN OFF) is displayed when no signal input with the button . ORIGINAL is a mode that the customer-customized screen is selected on the menu. NORM. INPUT GAMMA 14 ViewSonic PJ1065 Image Menu The following adjustments and settings...
... MyScreen Display Size mode, select the magnification x1, x2 or FULL with the / button. Select Mirror Status: Select mirror status with the and buttons. in P. The selected one (MyScreen, ORIGINAL or one (MyScreen, ORIGINAL or TURN OFF) is displayed when no signal input with the button . ORIGINAL is a mode that the customer-customized screen is selected on the menu. NORM. INPUT GAMMA 14 ViewSonic PJ1065 Image Menu The following adjustments and settings...

User Manual
Page 18
... blue screen. • When MyScreen or ORIGINAL is selected, the screen is going to the description of MyScreen below . Operation Start/Stop: Press the button. BLANK START UP MIRROR MENU COLOR Select Menu Background Color: Select the color with the and and and buttons. The audio input can be displayed correctly with the Image and Options menus when the MENU button is pressed during the display of no signal is received, set time...
... blue screen. • When MyScreen or ORIGINAL is selected, the screen is going to the description of MyScreen below . Operation Start/Stop: Press the button. BLANK START UP MIRROR MENU COLOR Select Menu Background Color: Select the color with the and and and buttons. The audio input can be displayed correctly with the Image and Options menus when the MENU button is pressed during the display of no signal is received, set time...
User Manual
Page 19
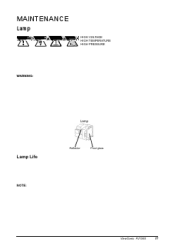
... inside of community authorities. If the LAMP indicator is switched ON. The image will become darker, and hues will become weaker, after a lamp has been used lamp, treat according to the instruction of the projector may explode if handled at high temperatures. ViewSonic PJ1065 17 Replace the lamp if the LAMP indicator is red, or the CHANGE THE LAMP message appears when the projector is still red, replace the lamp. See Table 9 on p. 20 and...
... inside of community authorities. If the LAMP indicator is switched ON. The image will become darker, and hues will become weaker, after a lamp has been used lamp, treat according to the instruction of the projector may explode if handled at high temperatures. ViewSonic PJ1065 17 Replace the lamp if the LAMP indicator is red, or the CHANGE THE LAMP message appears when the projector is still red, replace the lamp. See Table 9 on p. 20 and...
User Manual
Page 20
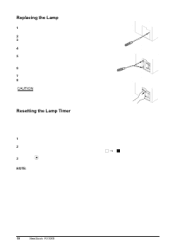
.... • Do not use the projector with the lamp cover removed. The power will not operate properly if the lamp timer is displayed, complete the following operation within ten minutes of the screen. 2 Press the MENU button on the remote control transmitter, or the RESET button on the control panel, while the lamp timer is cleared. 3 Press the NOTE: • Do not reset the lamp timer without replacing the lamp. The 'LAMP xxxx hr' message will then appear. Also...
.... • Do not use the projector with the lamp cover removed. The power will not operate properly if the lamp timer is displayed, complete the following operation within ten minutes of the screen. 2 Press the MENU button on the remote control transmitter, or the RESET button on the control panel, while the lamp timer is cleared. 3 Press the NOTE: • Do not reset the lamp timer without replacing the lamp. The 'LAMP xxxx hr' message will then appear. Also...
User Manual
Page 21
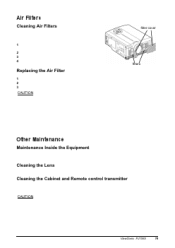
... INSTRUCTIONS" thoroughly to ensure that maintenance is performed correctly. • Do not use cleaning sprays. • Do not rub with a soft, dry cloth. If dirt and stains etc. ViewSonic PJ1065 19 For the optional air filter, see the item "Option Parts" of approximately 100 hours. 1 Switch the projector power supply OFF, and remove the power cord from the power outlet before beginning maintenance work . Cleaning the Lens Gently wipe the lens...
... INSTRUCTIONS" thoroughly to ensure that maintenance is performed correctly. • Do not use cleaning sprays. • Do not rub with a soft, dry cloth. If dirt and stains etc. ViewSonic PJ1065 19 For the optional air filter, see the item "Option Parts" of approximately 100 hours. 1 Switch the projector power supply OFF, and remove the power cord from the power outlet before beginning maintenance work . Cleaning the Lens Gently wipe the lens...
User Manual
Page 22
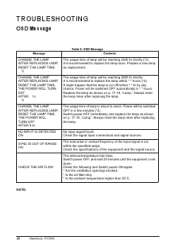
.... Check the specifications of the input signal is switched ON. (*2) The unit has a function to replace the lamp within the specified range. TROUBLESHOOTING OSD Message The messages as described below may appear on p. 17-18, "Lamp." Always reset the lamp timer after replacing the lamp. Power will be active when the usage time reaches 2000 hr. Check the following and Switch power ON again. * Are the ventilation openings blocked. * Is the air filter dirty...
.... Check the specifications of the input signal is switched ON. (*2) The unit has a function to replace the lamp within the specified range. TROUBLESHOOTING OSD Message The messages as described below may appear on p. 17-18, "Lamp." Always reset the lamp timer after replacing the lamp. Power will be active when the usage time reaches 2000 hr. Check the following and Switch power ON again. * Are the ventilation openings blocked. * Is the air filter dirty...
User Manual
Page 23
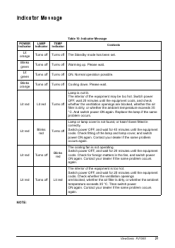
... red Turns off Lit red Blinks red Turns off Lit red Turns off Blinks red Lit red Turns off The Standby mode has been set. Switch power OFF, and wait for 20 minutes until the equipment cools. Contact your dealer if the same problem occurs again. Table 10: Indicator Message POWER indicator LAMP indicator TEMP indicator Contents Lit orange Blinks green Lit green Blinks orange Turns off Turns off Turns off Turns off Turns off Turns off Turns off Turns off Lit red NOTE: • When the internal temperature becomes excessive power is switched...
... red Turns off Lit red Blinks red Turns off Lit red Turns off Blinks red Lit red Turns off The Standby mode has been set. Switch power OFF, and wait for 20 minutes until the equipment cools. Contact your dealer if the same problem occurs again. Table 10: Indicator Message POWER indicator LAMP indicator TEMP indicator Contents Lit orange Blinks green Lit green Blinks orange Turns off Turns off Turns off Turns off Turns off Turns off Turns off Turns off Lit red NOTE: • When the internal temperature becomes excessive power is switched...
User Manual
Page 24
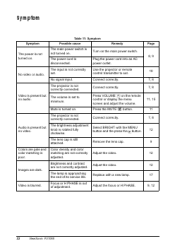
... ViewSonic PJ1065 The lamp is set to set . Adjust the focus or H PHASE. 12 17 9, 12 Images are not correctly adjusted. Plug the power cord into an AC power outlet. Use the projector or remote control transmitter to minimum. Connect correctly. Press VOLUME on . The volume is approaching the end of adjustment. Brightness and contrast are dark. No signal input. Turn on . button. 8, 9 No video or audio. 10 7, 8 7, 8 Video is present but no video. The projector is...
... ViewSonic PJ1065 The lamp is set to set . Adjust the focus or H PHASE. 12 17 9, 12 Images are not correctly adjusted. Plug the power cord into an AC power outlet. Use the projector or remote control transmitter to minimum. Connect correctly. Press VOLUME on . The volume is approaching the end of adjustment. Brightness and contrast are dark. No signal input. Turn on . button. 8, 9 No video or audio. 10 7, 8 7, 8 Video is present but no video. The projector is...
User Manual
Page 25
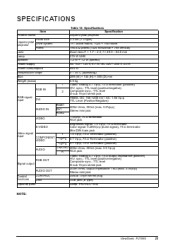
... 0.7 Vp-p, 75 Ω output impedance (positive) H/V. SPECIFICATIONS Table 12: Specifications Item Product name Panel size Liquid crystal Drive system projector Pixels Lens Lamp Speaker Power supply Power consumption Temperature range Size Weight (mass) 1 RGB IN RGB signal input DVI AUDIO IN VIDEO S-VIDEO Video signal input COMPONENT VIDEO AUDIO RGB OUT Signal output AUDIO OUT Control functions Optional parts CONTROL USB Y CB/PB CR/PR RGB1 DVI RGB2 2 Specification Liquid crystal projector 3.3 cm (1.3 type) TFT active matrix, 1024 × 768...
... 0.7 Vp-p, 75 Ω output impedance (positive) H/V. SPECIFICATIONS Table 12: Specifications Item Product name Panel size Liquid crystal Drive system projector Pixels Lens Lamp Speaker Power supply Power consumption Temperature range Size Weight (mass) 1 RGB IN RGB signal input DVI AUDIO IN VIDEO S-VIDEO Video signal input COMPONENT VIDEO AUDIO RGB OUT Signal output AUDIO OUT Control functions Optional parts CONTROL USB Y CB/PB CR/PR RGB1 DVI RGB2 2 Specification Liquid crystal projector 3.3 cm (1.3 type) TFT active matrix, 1024 × 768...

User Manual
Page 29
... interference by the party responsible for help. This equipment generates, uses, and can be used in accordance with the instructions, may cause harmful interference to operate this equipment does cause harmful interference to which can radiate radio frequency energy, and if not installed and used , use grounded power supply cord and the provided shielded video interface cable with bonded ferrite cores. Compliance Information...
... interference by the party responsible for help. This equipment generates, uses, and can be used in accordance with the instructions, may cause harmful interference to operate this equipment does cause harmful interference to which can radiate radio frequency energy, and if not installed and used , use grounded power supply cord and the provided shielded video interface cable with bonded ferrite cores. Compliance Information...

Brochure
Page 1
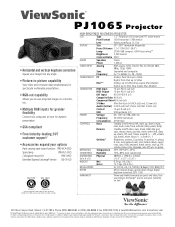
... Extended-life lamp, warranted for enhanced video quality View HD signals and other video signals at maximum performance levels. ViewSonic® P J 1 0 6 5 Projector High Brightness Series • Professional high-brightness 3,500-lumen projector • Native 1024x768 XGA resolution • Easy setup and auto tuning One-touch setup button for fast, easy sync and sharp focus. • Whisper-mode operations Whisper-mode for extended lamp life up to the ViewSonic PJ1065. • Component video for a full year.** 3,500-lumen high-brightness multimedia projector. Multimedia...
... Extended-life lamp, warranted for enhanced video quality View HD signals and other video signals at maximum performance levels. ViewSonic® P J 1 0 6 5 Projector High Brightness Series • Professional high-brightness 3,500-lumen projector • Native 1024x768 XGA resolution • Easy setup and auto tuning One-touch setup button for fast, easy sync and sharp focus. • Whisper-mode operations Whisper-mode for extended lamp life up to the ViewSonic PJ1065. • Component video for a full year.** 3,500-lumen high-brightness multimedia projector. Multimedia...
Brochure
Page 2
..., down ), input, reset, mute, zoom, focus, indicator (lamp, power, temp) Remote Standby on parts and labor, first- position, H. Analog adapter available from VGA up to SXGA Mac®†† Analog: up to SXGA (may require Mac Adapter) Digital: up , down ), mute, focus (+, -), zoom (+, -) OnView® Brightness, contrast, V. All rights reserved. [11761-00B-02/04] PJ1065-2 size, color balance (red), color balance (blue), aspect ratio, auto, RGB, keystone, blank, mirror, start up, PIP, volume, menu color, language, auto off, sync on green OPERATING Temperature 32...
..., down ), input, reset, mute, zoom, focus, indicator (lamp, power, temp) Remote Standby on parts and labor, first- position, H. Analog adapter available from VGA up to SXGA Mac®†† Analog: up to SXGA (may require Mac Adapter) Digital: up , down ), mute, focus (+, -), zoom (+, -) OnView® Brightness, contrast, V. All rights reserved. [11761-00B-02/04] PJ1065-2 size, color balance (red), color balance (blue), aspect ratio, auto, RGB, keystone, blank, mirror, start up, PIP, volume, menu color, language, auto off, sync on green OPERATING Temperature 32...


