English Owner's Manual
Page 1
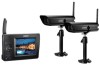
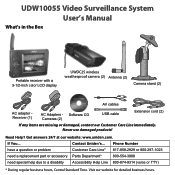
... our website for detailed business hours. Get answers 24/7 at our website: www.uniden.com. Phone Number have a question or problem Customer Care Line* 817-858-2929 or 800-297-1023 need a replacement part or accessory Parts Department* ... to a disability Accessibility Help Line 800-874-9314 (voice or TTY) * During regular business hours, Central Standard Time. Never use damaged products! Software CD Cameras (2) USB cable Extension cord (2) If any items are missing or damaged, contact our Customer Care Line immediately. If You... Need Help? UDW10055 Video Surveillance System...
... our website for detailed business hours. Get answers 24/7 at our website: www.uniden.com. Phone Number have a question or problem Customer Care Line* 817-858-2929 or 800-297-1023 need a replacement part or accessory Parts Department* ... to a disability Accessibility Help Line 800-874-9314 (voice or TTY) * During regular business hours, Central Standard Time. Never use damaged products! Software CD Cameras (2) USB cable Extension cord (2) If any items are missing or damaged, contact our Customer Care Line immediately. If You... Need Help? UDW10055 Video Surveillance System...
English Owner's Manual
Page 2
... use the device if the adapter cords or plugs have been damaged, the unit has been exposed to make sure that both the transmitter and receiver are working properly and are installing this product for use this product near water, e.g., near a bath tub, wash bowl, kitchen sink or ...rub against any sharp edges or lie across any children under the age of each other. ►► STRANGULATION HAZARD. Do not cover the camera or receiver with any electronic devices (except battery powered ones) during an electrical storm. ►► Use only the power cord provided with the end...
... use the device if the adapter cords or plugs have been damaged, the unit has been exposed to make sure that both the transmitter and receiver are working properly and are installing this product for use this product near water, e.g., near a bath tub, wash bowl, kitchen sink or ...rub against any sharp edges or lie across any children under the age of each other. ►► STRANGULATION HAZARD. Do not cover the camera or receiver with any electronic devices (except battery powered ones) during an electrical storm. ►► Use only the power cord provided with the end...
English Owner's Manual
Page 3
... the Video Signal 5 Learning Your System 6 Get to Know the Camera 6 What the lights mean 6 Using the Camera Stand 6 Switch the bracket 7 Mount the stand 7 Attach the camera 8 Adjusting the Sun Shield 8 Get to Know the Receiver 9 What the buttons do 9 What the lights mean 10 What ...cloth. Uniden assumes no user-serviceable parts inside. ►► Do not expose the equipment to high temperatures, and avoid leaving the equipment in zoom mode 12 Understanding Night Vision 12 Connecting to Your TV 13 Reducing pixellation 13 Multiple Camera Features 14 Pairing Cameras 14 Some...
... the Video Signal 5 Learning Your System 6 Get to Know the Camera 6 What the lights mean 6 Using the Camera Stand 6 Switch the bracket 7 Mount the stand 7 Attach the camera 8 Adjusting the Sun Shield 8 Get to Know the Receiver 9 What the buttons do 9 What the lights mean 10 What ...cloth. Uniden assumes no user-serviceable parts inside. ►► Do not expose the equipment to high temperatures, and avoid leaving the equipment in zoom mode 12 Understanding Night Vision 12 Connecting to Your TV 13 Reducing pixellation 13 Multiple Camera Features 14 Pairing Cameras 14 Some...
English Owner's Manual
Page 4
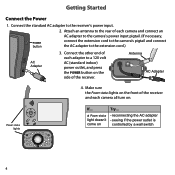
... (standard indoor) power outlet, and press the Power button on . Make sure the Power status lights on the front of the receiver and each camera and connect an AC adapter to the camera's power input pigtail. (If necessary, POWER button connect the extension cord to the... camera's pigtail and connect the AC adapter to the receiver's power input. 2. Connect the other end of each camera all turn on the side of the receiver. Getting Started Connect the Power 1. a Power status light doesn't come on...
... (standard indoor) power outlet, and press the Power button on . Make sure the Power status lights on the front of the receiver and each camera and connect an AC adapter to the camera's power input pigtail. (If necessary, POWER button connect the extension cord to the... camera's pigtail and connect the AC adapter to the receiver's power input. 2. Connect the other end of each camera all turn on the side of the receiver. Getting Started Connect the Power 1. a Power status light doesn't come on...
English Owner's Manual
Page 5
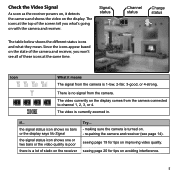
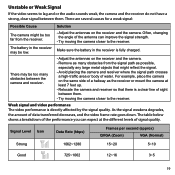
... and what 's going on . --re-pairing the camera and receiver (see all of static on the state of the camera and receiver, you what they mean. The video is turned on with the camera and receiver. the signal status icon shows no signal from the camera. 1 2 3 4 The video currently on the ...display. Check the Video Signal As soon as the receiver powers on, it means...
... and what 's going on . --re-pairing the camera and receiver (see all of static on the state of the camera and receiver, you what they mean. The video is turned on with the camera and receiver. the signal status icon shows no signal from the camera. 1 2 3 4 The video currently on the ...display. Check the Video Signal As soon as the receiver powers on, it means...
English Owner's Manual
Page 6
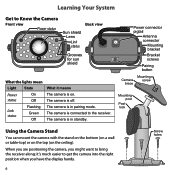
... Light State Power On status Off Link status Flashing Green Off What it 's much easier to get the camera into the right position when you might want to bring the receiver along; The camera is off. The camera is in pairing mode. Power connector pigtail Antenna connector Mounting bracket Bracket screws Pairing button Mounting...
... Light State Power On status Off Link status Flashing Green Off What it 's much easier to get the camera into the right position when you might want to bring the receiver along; The camera is off. The camera is in pairing mode. Power connector pigtail Antenna connector Mounting bracket Bracket screws Pairing button Mounting...
English Owner's Manual
Page 8
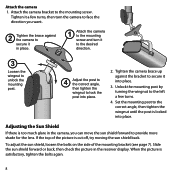
.... Slide the sun shield forward or back, then check the picture in the camera, you want. 2 Tighten the brace against the bracket to the mounting screw. Attach the camera bracket to secure it a few turns. 4. Unlock the mounting post by turning... the wingnut to the left a few turns, then turn the camera to face the direction you can move the sun shield forward to the correct angle, then tighten the wingnut ... is satisfactory, tighten the bolts again. 8 When the picture is too much glare in the receiver display. Attach the camera 1.
.... Slide the sun shield forward or back, then check the picture in the camera, you want. 2 Tighten the brace against the bracket to the mounting screw. Attach the camera bracket to secure it a few turns. 4. Unlock the mounting post by turning... the wingnut to the left a few turns, then turn the camera to face the direction you can move the sun shield forward to the correct angle, then tighten the wingnut ... is satisfactory, tighten the bolts again. 8 When the picture is too much glare in the receiver display. Attach the camera 1.
English Owner's Manual
Page 9
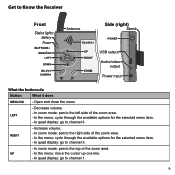
Get to Know the Receiver Front Status lights: Battery Power BUTTONS: MENU/OK LEFT DOWN SELECT CAMERA Antenna Side (right) Stand Speaker POWER OK VOL− VOL+ UP RIGHT ZOOM USB output Audio/video output Power input What the buttons do Button ...
Get to Know the Receiver Front Status lights: Battery Power BUTTONS: MENU/OK LEFT DOWN SELECT CAMERA Antenna Side (right) Stand Speaker POWER OK VOL− VOL+ UP RIGHT ZOOM USB output Audio/video output Power input What the buttons do Button ...

English Owner's Manual
Page 10
...status State On Off Flashing Green Red Off What it off. The battery is on . Button DOWN SELECT CAMERA Zoom POWER What it to Connect the receiver to your computer for use with the Uniden Surveillance System Software. (See the software manual for more information.) Send the signal from the... camera to a standard TV (see page 13). 10 The receiver is low; What the connections do Connector USB output Audio/...
...status State On Off Flashing Green Red Off What it off. The battery is on . Button DOWN SELECT CAMERA Zoom POWER What it to Connect the receiver to your computer for use with the Uniden Surveillance System Software. (See the software manual for more information.) Send the signal from the... camera to a standard TV (see page 13). 10 The receiver is low; What the connections do Connector USB output Audio/...
English Owner's Manual
Page 11
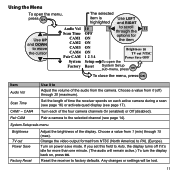
Change the video output format from the camera. Turn on , press OK. Reset the receiver to PAL (Europe). Turn each active camera during a scan (see page 16) or activate quad display (see page 14). Pair a camera to Auto, the display turns off ) through 15 (max). System Setup sub-menu Brightness TV out Power Save Factory...
Change the video output format from the camera. Turn on , press OK. Reset the receiver to PAL (Europe). Turn each active camera during a scan (see page 16) or activate quad display (see page 14). Pair a camera to Auto, the display turns off ) through 15 (max). System Setup sub-menu Brightness TV out Power Save Factory...
English Owner's Manual
Page 12
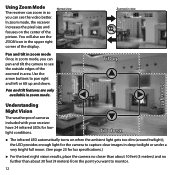
... pixel size and focuses on when the ambient light gets too dim (around twilight); Using Zoom Mode Normal view The receiver can zoom in so you can pan and tilt the camera to see the outside edges of the zoomed in area. Tilt down . Use the arrow buttons to monitor. 12...from the point you want to pan right and left Pan right Understanding Night Vision The weatherproof cameras included with your receiver have 24 infrared LEDs for lowlight conditions. the LED provides enough light for the camera to capture clear images in view 1 Tilt up Pan left or tilt up and down ►...
... pixel size and focuses on when the ambient light gets too dim (around twilight); Using Zoom Mode Normal view The receiver can zoom in so you can pan and tilt the camera to see the outside edges of the zoomed in area. Tilt down . Use the arrow buttons to monitor. 12...from the point you want to pan right and left Pan right Understanding Night Vision The weatherproof cameras included with your receiver have 24 infrared LEDs for lowlight conditions. the LED provides enough light for the camera to capture clear images in view 1 Tilt up Pan left or tilt up and down ►...
English Owner's Manual
Page 14
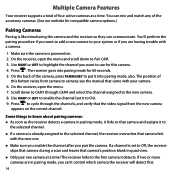
... view. ►► Only pair one . ►► Make sure you enable the channel after you pair the camera. The receiver links to Pair CAM. 3. The position of this camera. 4. Scroll down to the first camera it into pairing mode for 60 seconds. 5. Press to cycle through CAM4 and select the channel assigned to...
... view. ►► Only pair one . ►► Make sure you enable the channel after you pair the camera. The receiver links to Pair CAM. 3. The position of this camera. 4. Scroll down to the first camera it into pairing mode for 60 seconds. 5. Press to cycle through CAM4 and select the channel assigned to...
English Owner's Manual
Page 15
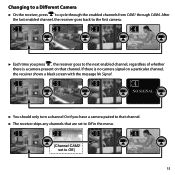
... 1 2 3 4 NO SIGNAL ►► You should only turn a channel On if you press , the receiver goes to the next enabled channel, regardless of whether there is no camera signal on that are set to Off in the menu. 1 2 3 4 (Channel CAM2 set to cycle through the... through CAM4. Changing to a Different Camera ►► On the receiver, press to Off.) 15 After the last enabled channel, the receiver goes back to the first camera. 1 2 3 4 ►► Each time you have a camera paired to that channel. ►► The receiver skips any channels that channel.
... 1 2 3 4 NO SIGNAL ►► You should only turn a channel On if you press , the receiver goes to the next enabled channel, regardless of whether there is no camera signal on that are set to Off in the menu. 1 2 3 4 (Channel CAM2 set to cycle through the... through CAM4. Changing to a Different Camera ►► On the receiver, press to Off.) 15 After the last enabled channel, the receiver goes back to the first camera. 1 2 3 4 ►► Each time you have a camera paired to that channel. ►► The receiver skips any channels that channel.
English Owner's Manual
Page 16
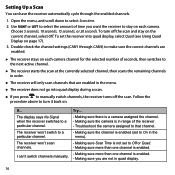
... than one channel is in range of the receiver. --Troubleshoot the camera assigned to that are not in quad display. 16 The receiver won 't switch to stay on each camera channel for the selected number of time you want the receiver to a particular channel. I can have the receiver automatically cycle through CAM4) to make sure the...
... than one channel is in range of the receiver. --Troubleshoot the camera assigned to that are not in quad display. 16 The receiver won 't switch to stay on each camera channel for the selected number of time you want the receiver to a particular channel. I can have the receiver automatically cycle through CAM4) to make sure the...
English Owner's Manual
Page 17
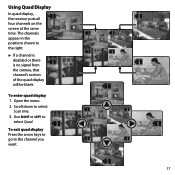
To enter quad display 1. Open the menu. 2. Using Quad Display In quad display, the receiver puts all 1 four channels on the screen at the same time. The channels appear in the positions shown to select Scan time. 3. Scroll down to the right: ►► If a channel is disabled or there is no signal from 3 the camera, that channel's section of the quad display will be blank. Use Right or Left to select Quad. 3 To exit quad display Press the arrow keys to go to the channel you want. 2 1 2 3 4 4 1 1 2 4 3 4 2 17
To enter quad display 1. Open the menu. 2. Using Quad Display In quad display, the receiver puts all 1 four channels on the screen at the same time. The channels appear in the positions shown to select Scan time. 3. Scroll down to the right: ►► If a channel is disabled or there is no signal from 3 the camera, that channel's section of the quad display will be blank. Use Right or Left to select Quad. 3 To exit quad display Press the arrow keys to go to the channel you want. 2 1 2 3 4 4 1 1 2 4 3 4 2 17
English Owner's Manual
Page 18
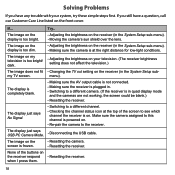
...conditions. The display just says No Signal. --Switching to the receiver. None of the screen to a different camera. (If the receiver is on the receiver respond --Resetting the receiver. my TV screen. The display just says USB PC Camera Mode. --Disconnecting the USB cable. Try.. The image on ...system, try these simple steps first. Make sure the camera assigned to this channel is powered on the receiver (in quad display mode and the cameras are not working, the screen could be blank.) --Resetting the receiver. The display is completely blank. --Making sure the AV...
...conditions. The display just says No Signal. --Switching to the receiver. None of the screen to a different camera. (If the receiver is on the receiver respond --Resetting the receiver. my TV screen. The display just says USB PC Camera Mode. --Disconnecting the USB cable. Try.. The image on ...system, try these simple steps first. Make sure the camera assigned to this channel is powered on the receiver (in quad display mode and the cameras are not working, the screen could be blank.) --Resetting the receiver. The display is completely blank. --Making sure the AV...
English Owner's Manual
Page 19
... not have a strong, clear signal between them . Make sure the battery in the receiver may be too many obstacles between the camera and receiver. --Adjust the antennas on the receiver and the camera. --Remove as many obstacles from the receiver. --Adjust the antennas on the same side of the performance you can improve the signal strength...
... not have a strong, clear signal between them . Make sure the battery in the receiver may be too many obstacles between the camera and receiver. --Adjust the antennas on the receiver and the camera. --Remove as many obstacles from the receiver. --Adjust the antennas on the same side of the performance you can improve the signal strength...
English Owner's Manual
Page 20
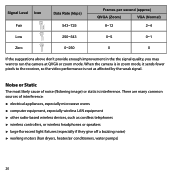
... they give off a buzzing noise) ►► working motors (hair dryers, heater/air conditioners, water pumps) 20 When the camera is in the the signal quality, you may want to the receiver, so the video performance is interference. Noise or Static The most likely cause of interference: ►► electrical appliances, especially... (Normal) 8~12 2~4 Low 250~543 0~5 0~1 Zero 0~250 0 0 If the suggestions above don't provide enough improvement in zoom mode, it sends fewer pixels to run the camera at QVGA or zoom mode.
... they give off a buzzing noise) ►► working motors (hair dryers, heater/air conditioners, water pumps) 20 When the camera is in the the signal quality, you may want to the receiver, so the video performance is interference. Noise or Static The most likely cause of interference: ►► electrical appliances, especially... (Normal) 8~12 2~4 Low 250~543 0~5 0~1 Zero 0~250 0 0 If the suggestions above don't provide enough improvement in zoom mode, it sends fewer pixels to run the camera at QVGA or zoom mode.
English Owner's Manual
Page 22
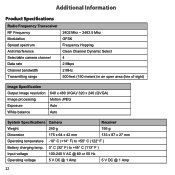
Additional Information Product Specifications Radio Frequency Transceiver RF Frequency Modulation Spread spectrum Anti Interference Selectable camera channel Data rate Channel bandwidth Transmitting range 2402 Mhz ~ 2483.5 Mhz GFSK Frequency Hopping Clean Channel Dynamic Select...(line of sight) Image Specification Output Image resolution Image processing Exposure White balance 640 x 480 (VGA)/ 320 x 240 (QVGA) Motion JPEG Auto Auto System Specifications Camera Receiver Weight 240 g 195 g Dimension 175 x 64 x 42 mm 133 x 87 x 27 mm Operating temperature -10° C (+14° F) to ...
Additional Information Product Specifications Radio Frequency Transceiver RF Frequency Modulation Spread spectrum Anti Interference Selectable camera channel Data rate Channel bandwidth Transmitting range 2402 Mhz ~ 2483.5 Mhz GFSK Frequency Hopping Clean Channel Dynamic Select...(line of sight) Image Specification Output Image resolution Image processing Exposure White balance 640 x 480 (VGA)/ 320 x 240 (QVGA) Motion JPEG Auto Auto System Specifications Camera Receiver Weight 240 g 195 g Dimension 175 x 64 x 42 mm 133 x 87 x 27 mm Operating temperature -10° C (+14° F) to ...

English Owner's Manual
Page 23
System Specifications Camera Receiver Power consumption 650 mA max 650 mA max Low light solution 24 IR LEDs, 1 Low light sensor Low... organization like Earth911.com to find an electronics recycling facility in your area, please return this device must accept any interference received, including interference that may damage the battery or cause the battery to Part 15 of the FCC Rules. Recycling and Disposal... to the following two conditions: (1) this device may not cause harmful interference, and (2) this product to Uniden for a Class B digital device, pursuant to explode.
System Specifications Camera Receiver Power consumption 650 mA max 650 mA max Low light solution 24 IR LEDs, 1 Low light sensor Low... organization like Earth911.com to find an electronics recycling facility in your area, please return this device must accept any interference received, including interference that may damage the battery or cause the battery to Part 15 of the FCC Rules. Recycling and Disposal... to the following two conditions: (1) this device may not cause harmful interference, and (2) this product to Uniden for a Class B digital device, pursuant to explode.

