English Owners Manual
Page 3
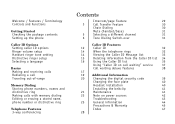
... setup Selecting a language Basics Making and receiving calls Redialing a call Traveling out-of-range Memory Dialing Storing phone numbers, names and distinctive ring Making calls with memory dialing Editing or erasing a stored name, phone number or distinctive ring Telephone Features 3-way conferencing Contents Intercom/page Feature 29 3 Call Transfer Feature 30 Chain...
... setup Selecting a language Basics Making and receiving calls Redialing a call Traveling out-of-range Memory Dialing Storing phone numbers, names and distinctive ring Making calls with memory dialing Editing or erasing a stored name, phone number or distinctive ring Telephone Features 3-way conferencing Contents Intercom/page Feature 29 3 Call Transfer Feature 30 Chain...

English Owners Manual
Page 4
... handset is not in this manual may differ from other equipment. AutoStandbyTM allows you against misbilled calls, which might result from your phone being activated by just removing the handset from the base. a "single narrow band" used in the base. AutoTalk, AutoStandby, ...The handset is in standard digital transmissions. Talk appears on the display. The handset is a registered trademark of the Uniden EXI3965 cordless telephone. Random Code digital security automatically selects one of digital sound, extended range, and minimal interference from the actual...
... handset is not in this manual may differ from other equipment. AutoStandbyTM allows you against misbilled calls, which might result from your phone being activated by just removing the handset from the base. a "single narrow band" used in the base. AutoTalk, AutoStandby, ...The handset is in standard digital transmissions. Talk appears on the display. The handset is a registered trademark of the Uniden EXI3965 cordless telephone. Random Code digital security automatically selects one of digital sound, extended range, and minimal interference from the actual...

English Owners Manual
Page 6
20 21 22 23 ringer off status ringer redial/p memory flash 1 2abc 3def 4ghi 5 jkl 6mno 7pqrs tone int'cm/page 8 tuv 0oper volume 9wxyz # mute mic 24 25 26 27 28 29 30 31 32 33 34 35 36 [ 4 ] CONTROLS AND FUNCTIONS 20.Base Speaker 21.Ringer Key 22.Redial/Pause Key 23.Base Charging Contacts 24.Ringer Off LED 25.Status LED 26. (Talk Key) 27.Flash Key 28.Memory Key 29.Base Antenna 30. /Tone Key 31.Mute Key 32.Base Speaker Volume Keys 33.Intercom/Page Key 34.Base Microphone 35.DC Power Input 36.Phone Jack
20 21 22 23 ringer off status ringer redial/p memory flash 1 2abc 3def 4ghi 5 jkl 6mno 7pqrs tone int'cm/page 8 tuv 0oper volume 9wxyz # mute mic 24 25 26 27 28 29 30 31 32 33 34 35 36 [ 4 ] CONTROLS AND FUNCTIONS 20.Base Speaker 21.Ringer Key 22.Redial/Pause Key 23.Base Charging Contacts 24.Ringer Off LED 25.Status LED 26. (Talk Key) 27.Flash Key 28.Memory Key 29.Base Antenna 30. /Tone Key 31.Mute Key 32.Base Speaker Volume Keys 33.Intercom/Page Key 34.Base Microphone 35.DC Power Input 36.Phone Jack

English Owners Manual
Page 8
Connect the base unit D. Choose the best location Before choosing a location for your new phone, read the INSTALLATION CONSIDERATIONS included in the PRECAUTIONS AND IMPORTANT SAFETY INSTRUCTIONS brochure. Choose the best location B. Choose the dialing mode A. Install ...dust, mechanical vibration, or shock Choose a central location Avoid personal computers Avoid other cordless telephones • The location should be close to both a phone jack and a continuous power outlet that is not switchable. • Keep the base and handset away from sources of electrical noise such as motors,...
Connect the base unit D. Choose the best location Before choosing a location for your new phone, read the INSTALLATION CONSIDERATIONS included in the PRECAUTIONS AND IMPORTANT SAFETY INSTRUCTIONS brochure. Choose the best location B. Choose the dialing mode A. Install ...dust, mechanical vibration, or shock Choose a central location Avoid personal computers Avoid other cordless telephones • The location should be close to both a phone jack and a continuous power outlet that is not switchable. • Keep the base and handset away from sources of electrical noise such as motors,...

English Owners Manual
Page 9
...STARTED [ 7 ] note • Use only the Uniden Battery supplied with your conversation as quickly as possible and return the handset to the base unit for at least 15-20 hours before plugging the phone line into your phone. For optimum performance, be sure to return the handset...B. Replacement batteries are also available through the Uniden Parts Department (See page 44) or www.uniden.com Battery use time (per charge) From fully charged: • 6 hours continuous use , "Low Battery" flashes and the handset beeps. Complete your phone. Install the battery pack Place the handset ...
...STARTED [ 7 ] note • Use only the Uniden Battery supplied with your conversation as quickly as possible and return the handset to the base unit for at least 15-20 hours before plugging the phone line into your phone. For optimum performance, be sure to return the handset...B. Replacement batteries are also available through the Uniden Parts Department (See page 44) or www.uniden.com Battery use time (per charge) From fully charged: • 6 hours continuous use , "Low Battery" flashes and the handset beeps. Complete your phone. Install the battery pack Place the handset ...
English Owners Manual
Page 11
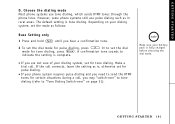
...dial mode for tone dialing, press . Or to "Tone Dialing Switch-over " to tone dialing (refer to set for pulse dialing. • If your phone system requires pulse dialing and you need to send the DTMF tones for certain situations during a call . GETTING STARTED [ 9 ] GETTING STARTED D. If ... as in rural areas. Depending on page 31). note Make sure your dialing system, set for pulse dialing, press # . However, some phone systems still use tone dialing, which sends DTMF tones through the phone lines. A confirmation tone sounds to indicate the setting is tone dialing.
...dial mode for tone dialing, press . Or to "Tone Dialing Switch-over " to tone dialing (refer to set for pulse dialing. • If your phone system requires pulse dialing and you need to send the DTMF tones for certain situations during a call . GETTING STARTED [ 9 ] GETTING STARTED D. If ... as in rural areas. Depending on page 31). note Make sure your dialing system, set for pulse dialing, press # . However, some phone systems still use tone dialing, which sends DTMF tones through the phone lines. A confirmation tone sounds to indicate the setting is tone dialing.

English Owners Manual
Page 12
...mounting slots on the base with the mounting posts on any standard wall plate. The retainer holds the handset in and down until the phone is down. Raise the antenna. 1 Route the AC adapter cord inside the molded wiring channel as shown. Route the cord inside ... seated. [ 10 ] G E T T I N G S T A R T E D Slide it clockwise 180 degrees. 2 Flip the retainer clip from front to a vertical position. Standard wall plate mounting This phone can be mounted on the wall. ! DO NOT use an outlet controlled by a wall switch. Telephone Line Cord Single-Line Telephone Jack (RJ11C) 2 Plug the...
...mounting slots on the base with the mounting posts on any standard wall plate. The retainer holds the handset in and down until the phone is down. Raise the antenna. 1 Route the AC adapter cord inside the molded wiring channel as shown. Route the cord inside ... seated. [ 10 ] G E T T I N G S T A R T E D Slide it clockwise 180 degrees. 2 Flip the retainer clip from front to a vertical position. Standard wall plate mounting This phone can be mounted on the wall. ! DO NOT use an outlet controlled by a wall switch. Telephone Line Cord Single-Line Telephone Jack (RJ11C) 2 Plug the...

English Owners Manual
Page 13
..., pipes, or other items behind the mounting location that could cause a hazard when inserting screws into the wall, (with anchoring devices suitable for mounting the phone. 2 Set the retainer clip if necessary. 3 Refer to steps 1 through 4 on page 10 to the wall. G E T T I N G S T A R T E D [ 11 ] Allow about 1/8 ...15/16 inches apart. GETTING STARTED Direct wall mounting If you don't have a standard wall plate, you can mount your phone within 5 feet of a working phone jack to avoid excessive cord lengths. • Make sure the wall material is capable of supporting the weight of the ...
..., pipes, or other items behind the mounting location that could cause a hazard when inserting screws into the wall, (with anchoring devices suitable for mounting the phone. 2 Set the retainer clip if necessary. 3 Refer to steps 1 through 4 on page 10 to the wall. G E T T I N G S T A R T E D [ 11 ] Allow about 1/8 ...15/16 inches apart. GETTING STARTED Direct wall mounting If you don't have a standard wall plate, you can mount your phone within 5 feet of a working phone jack to avoid excessive cord lengths. • Make sure the wall material is capable of supporting the weight of the ...

English Owners Manual
Page 14
... Then press int'cm/select . 3 Use • or ª to move the pointer to Call Waiting Deluxe from the base and the phone automatically answers the call. AutoTalkTM allows you to handle call waiting calls in seven different ways. (See page 38.) You must subscribe to "Caller... Setup". Setting Caller ID Options There are three Caller ID setup options available; Call waiting options allow you to answer the call. To change your phone company in order to change, then press int'cm/select . [ 12 ] C A L L E R I D O P T I O N S Memory Edit Ringer Volume Ringer Tones Distinct.Ring ...
... Then press int'cm/select . 3 Use • or ª to move the pointer to Call Waiting Deluxe from the base and the phone automatically answers the call. AutoTalkTM allows you to handle call waiting calls in seven different ways. (See page 38.) You must subscribe to "Caller... Setup". Setting Caller ID Options There are three Caller ID setup options available; Call waiting options allow you to answer the call. To change your phone company in order to change, then press int'cm/select . [ 12 ] C A L L E R I D O P T I O N S Memory Edit Ringer Volume Ringer Tones Distinct.Ring ...

English Owners Manual
Page 15
... . 4 Use the number keypad (0 to 9) to the base. Area Code 5 Press int'cm/select ,and a confirmation tone will see a full 10-digit number. 1 When the phone is in Caller ID messages. Then press int'cm/select to the base unit. To change it, use the delete/channel and number keypad to...
... . 4 Use the number keypad (0 to 9) to the base. Area Code 5 Press int'cm/select ,and a confirmation tone will see a full 10-digit number. 1 When the phone is in Caller ID messages. Then press int'cm/select to the base unit. To change it, use the delete/channel and number keypad to...

English Owners Manual
Page 16
... handset returns to "Ringer Tones". [ 14 ] C A L L E R I D O P T I O N S Handset Ringer Tone Setting 1 When the phone is selected the ringer off ) will sound. Ringer Volume Setup Handset ringer volume setting 1 When the phone is in the standby mode, press menu . 2 Press ª to move the pointer to "Ringer Volume" Then...• or ª to move the pointer to the menu screen. note When you will light. Base ringer volume setting 1 When the phone is in standby mode, press ringer . 2 By pressing ringer multiple times, the ringer options (high, low, off LED will hear the confirmation tone....
... handset returns to "Ringer Tones". [ 14 ] C A L L E R I D O P T I O N S Handset Ringer Tone Setting 1 When the phone is selected the ringer off ) will sound. Ringer Volume Setup Handset ringer volume setting 1 When the phone is in the standby mode, press menu . 2 Press ª to move the pointer to "Ringer Volume" Then...• or ª to move the pointer to the menu screen. note When you will light. Base ringer volume setting 1 When the phone is in standby mode, press ringer . 2 By pressing ringer multiple times, the ringer options (high, low, off LED will hear the confirmation tone....

English Owners Manual
Page 18
Selecting a Language 1 When the phone is in the standby mode, press menu . 2 Press ª to move the pointer to the desired selection. Then press int'cm/select to complete setting and a confirmation tone will sound. [ 16 ] C A L L E R I D O P T I O N S Then press int'cm/select to select. The Language setting English screen appears. French Spanish 3 Use • or ª to move the pointer to "Language".
Selecting a Language 1 When the phone is in the standby mode, press menu . 2 Press ª to move the pointer to the desired selection. Then press int'cm/select to complete setting and a confirmation tone will sound. [ 16 ] C A L L E R I D O P T I O N S Then press int'cm/select to select. The Language setting English screen appears. French Spanish 3 Use • or ª to move the pointer to "Language".

English Owners Manual
Page 19
... delete/channel if you have entered, press and hold delete/channel until the display clears. • You must press a key within 20 seconds or the phone will return to the base (Auto Standby). (talk). Handset Off the Base Press talk . BASICS B A S I C S [ 17 ] To make a call Pick up to standby. note •...
... delete/channel if you have entered, press and hold delete/channel until the display clears. • You must press a key within 20 seconds or the phone will return to the base (Auto Standby). (talk). Handset Off the Base Press talk . BASICS B A S I C S [ 17 ] To make a call Pick up to standby. note •...

English Owners Manual
Page 21
The phone number that was Most last dialed appears on the display, then the volume setting is displayed. 4 Then the selected number is dialed. recent 2 Press redial ... retained for about 5 seconds. 8002971023 Redial from Standby Mode 1 Press redial . "Talk" and the volume setting appear on the display. Redialing a Call The last three phone numbers dialed can be accessed after talk has been pressed. Each press of the last three numbers dialed. 3 Press talk . Redialing from Talk Mode 1 Press...
The phone number that was Most last dialed appears on the display, then the volume setting is displayed. 4 Then the selected number is dialed. recent 2 Press redial ... retained for about 5 seconds. 8002971023 Redial from Standby Mode 1 Press redial . "Talk" and the volume setting appear on the display. Redialing a Call The last three phone numbers dialed can be accessed after talk has been pressed. Each press of the last three numbers dialed. 3 Press talk . Redialing from Talk Mode 1 Press...

English Owners Manual
Page 23
Your EXI3965 stores up to select memory location. With the handset 1 Press menu . or Press number keypad...select to enter the name. The following screen appears. Then use the number keypad to select location. MEMORY DIALING Storing Phone Numbers, Names and Distinctive Rings Memory Dialing allows you to standby. Memory Edit 01 02 4 "Store Name" appears...memory delete channel note • In memory dialing operation, you return the handset to the base, the phone will return to dial a number using just a few key strokes. If you must press a key within 20 seconds or the...
Your EXI3965 stores up to select memory location. With the handset 1 Press menu . or Press number keypad...select to enter the name. The following screen appears. Then use the number keypad to select location. MEMORY DIALING Storing Phone Numbers, Names and Distinctive Rings Memory Dialing allows you to standby. Memory Edit 01 02 4 "Store Name" appears...memory delete channel note • In memory dialing operation, you return the handset to the base, the phone will return to dial a number using just a few key strokes. If you must press a key within 20 seconds or the...

English Owners Manual
Page 24
... the Caller ID information matches one of times key is useful for that require a pause between digits. • "Distinctive Ring" allows user to enter the phone number. Then "Store Number" appears on the display. Store number • The pause feature is pressed keys 1 2 3 4 5 6 7 8 9 1 1 2abc A B C a b c 2 3def D E F d e f 3 4ghi G H I g h i 4 5jkl J K L j k l 5 6mno M N O m n o 6 7pqrs P Q R S p q r s 7 8tuv T U V t u v 8 9wxyz...
... the Caller ID information matches one of times key is useful for that require a pause between digits. • "Distinctive Ring" allows user to enter the phone number. Then "Store Number" appears on the display. Store number • The pause feature is pressed keys 1 2 3 4 5 6 7 8 9 1 1 2abc A B C a b c 2 3def D E F d e f 3 4ghi G H I g h i 4 5jkl J K L j k l 5 6mno M N O m n o 6 7pqrs P Q R S p q r s 7 8tuv T U V t u v 8 9wxyz...

English Owners Manual
Page 25
... the same location later, the new number will overwrite the previous one of these locations, then attempt to store. (The phone number cannot exceed 20 digits.) 3 Press . The handset displays 01 UNIDEN CORP your programmed memory locations. 02 JOHN DOE 03 MOM AND DAD 2 Press • and ª or enter a two-digit...
... the same location later, the new number will overwrite the previous one of these locations, then attempt to store. (The phone number cannot exceed 20 digits.) 3 Press . The handset displays 01 UNIDEN CORP your programmed memory locations. 02 JOHN DOE 03 MOM AND DAD 2 Press • and ª or enter a two-digit...

English Owners Manual
Page 26
...status 1 Press (talk key). 2 Press . Talk 2 Press . 3 Enter a two-digit number (01 - 30) to select the memory location of a memory location. Program name list 01 UNIDEN CORP 02 JOHN DOE 03 MOM AND DAD caller id Detail info. 03 MOM AND DAD 817-555-1212 Ringer D note Whenever you are using... a menu screen, you must press a key within 20 seconds or the phone will return to dial the number. Memory dialing from Talk Mode 1 Press talk . Display a Programmed Number while in Memory Location List Press caller id to...
...status 1 Press (talk key). 2 Press . Talk 2 Press . 3 Enter a two-digit number (01 - 30) to select the memory location of a memory location. Program name list 01 UNIDEN CORP 02 JOHN DOE 03 MOM AND DAD caller id Detail info. 03 MOM AND DAD 817-555-1212 Ringer D note Whenever you are using... a menu screen, you must press a key within 20 seconds or the phone will return to dial the number. Memory dialing from Talk Mode 1 Press talk . Display a Programmed Number while in Memory Location List Press caller id to...

English Owners Manual
Page 27
To edit the stored data, select "Edit." MEMORY DIALING Editing or Erasing a Stored Name, Phone Number or Distinctive Ring 1 Press menu . To delete data, go to the previous screen, select "Go Back." Then press int'cm/select to select location ... wxyz 0 # tone oper mute pause menu memory delete channel To edit data, go to select the desired function and press int'cm/select . or 01 Uniden CORP 02 JOHN DOE Press number keypad (0-3) for tens' digit and press number keypad (0-9) for ones' digit to select "Memory Edit". To delete the data...
To edit the stored data, select "Edit." MEMORY DIALING Editing or Erasing a Stored Name, Phone Number or Distinctive Ring 1 Press menu . To delete data, go to the previous screen, select "Go Back." Then press int'cm/select to select location ... wxyz 0 # tone oper mute pause menu memory delete channel To edit data, go to select the desired function and press int'cm/select . or 01 Uniden CORP 02 JOHN DOE Press number keypad (0-3) for tens' digit and press number keypad (0-9) for ones' digit to select "Memory Edit". To delete the data...

English Owners Manual
Page 28
.... Memory01 Stored (2) Press int'cm/select when all editing is deleted. Yes No Memory01 Deleted Memory Edit 01 02 JOHN DOE [ 26 ] M E M O R Y D I A L I N G Editing a stored Name, Phone Number or Distinctive Ring (1) Use the number keypad, delete/channel , redial and caller id to standby. The following screen appears. (3) After a few seconds the display...
.... Memory01 Stored (2) Press int'cm/select when all editing is deleted. Yes No Memory01 Deleted Memory Edit 01 02 JOHN DOE [ 26 ] M E M O R Y D I A L I N G Editing a stored Name, Phone Number or Distinctive Ring (1) Use the number keypad, delete/channel , redial and caller id to standby. The following screen appears. (3) After a few seconds the display...

