English Owners Manual
Page 2
... to Know Your New Phone 16 Features 16 Answering system features 16 Terminology Used in this Manual 17 Manual Conventions 17 Parts of the Handset 18 Parts of the Base 19 Using the Interface 20 Reading the Display 20 Using the Four-way Function Key 21 Using the Menus ...21 Entering Text from Your Phone 22 Basic Setup 23 Selecting a Language 23 Setting the Day & Time 23 Activating Personal Ring (Handset only 24 Activating the Key Touch Tone 24 Setting Up the Phonebook 25 Creating Phonebook Entries 25 Finding a Phonebook Entry 26 Editing an Existing Phonebook...
... to Know Your New Phone 16 Features 16 Answering system features 16 Terminology Used in this Manual 17 Manual Conventions 17 Parts of the Handset 18 Parts of the Base 19 Using the Interface 20 Reading the Display 20 Using the Four-way Function Key 21 Using the Menus ...21 Entering Text from Your Phone 22 Basic Setup 23 Selecting a Language 23 Setting the Day & Time 23 Activating Personal Ring (Handset only 24 Activating the Key Touch Tone 24 Setting Up the Phonebook 25 Creating Phonebook Entries 25 Finding a Phonebook Entry 26 Editing an Existing Phonebook...
English Owners Manual
Page 3
Customizing Your Handsets 29 Changing the Handset Banner 29 Selecting a Ring Tone 29 Activating AutoTalk 30 Activating Any Key Answer 30 Using Your Phone 30 During a Power Failure 30 Making and Receiving ... (One call only 36 Adjusting the Earpiece Volume 36 Adjusting the Speaker Volume 36 Adjusting the Audio Tone 37 Activating T-Coil Mode 37 Finding a Lost Handset 38 Using Hold, Conference and Transfer 38 Placing a Call on Hold 38 Conferencing 38 Transferring a Call 39 Answering a transferred call 39 Using Special Features 40...
Customizing Your Handsets 29 Changing the Handset Banner 29 Selecting a Ring Tone 29 Activating AutoTalk 30 Activating Any Key Answer 30 Using Your Phone 30 During a Power Failure 30 Making and Receiving ... (One call only 36 Adjusting the Earpiece Volume 36 Adjusting the Speaker Volume 36 Adjusting the Audio Tone 37 Activating T-Coil Mode 37 Finding a Lost Handset 38 Using Hold, Conference and Transfer 38 Placing a Call on Hold 38 Conferencing 38 Transferring a Call 39 Answering a transferred call 39 Using Special Features 40...
English Owners Manual
Page 4
While You Are Away from the Handset 47 Reviewing Messages 48 Screening Calls 49 Turning Off the Message Alert Tone 49 Operating the Answering System . Notice 66 Terminal equipment 66 Radio equipment ... or Hard to Hear Audio 58 Noise or Static on the Line 58 Installing a telephone line filter or DSL filter........ 59 Resetting the Handset 59 Resetting the Handset Without the Base 60 Changing the Line Mode for Multiple Extensions.... 61 Traveling Out of Range 61 Liquid Damage 62 Precautions 63 Rechargeable Nickel...
While You Are Away from the Handset 47 Reviewing Messages 48 Screening Calls 49 Turning Off the Message Alert Tone 49 Operating the Answering System . Notice 66 Terminal equipment 66 Radio equipment ... or Hard to Hear Audio 58 Noise or Static on the Line 58 Installing a telephone line filter or DSL filter........ 59 Resetting the Handset 59 Resetting the Handset Without the Base 60 Changing the Line Mode for Multiple Extensions.... 61 Traveling Out of Range 61 Liquid Damage 62 Precautions 63 Rechargeable Nickel...
English Owners Manual
Page 5
..., under one or more of our business hours, you can accommodate persons with disabilities, please call you for purchasing a Uniden Multi-Handset phone. If your call is received outside of the following U.S. Welcome Welcome Thank you back. patents: 5,491,745 5,533,010 5,574,727 5,581,598...,720 6,314,278 6,839,550 7,030,819 5 If you have a disability and need customer service assistance or if you have any questions about how Uniden's products can leave us a message and we will call the accessibility voice/TTY line: 1-800-874-9314. Note: Illustrations in this manual are used ...
..., under one or more of our business hours, you can accommodate persons with disabilities, please call you for purchasing a Uniden Multi-Handset phone. If your call is received outside of the following U.S. Welcome Welcome Thank you back. patents: 5,491,745 5,533,010 5,574,727 5,581,598...,720 6,314,278 6,839,550 7,030,819 5 If you have a disability and need customer service assistance or if you have any questions about how Uniden's products can leave us a message and we will call the accessibility voice/TTY line: 1-800-874-9314. Note: Illustrations in this manual are used ...
English Owners Manual
Page 6
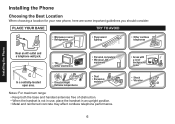
... sunlight • Extreme temperatures • Dust • Excessive moisture Notes: For maximum range: • Keep both the base and handset antennas free of obstruction. • When the handset is not in use, place the handset in an upright position. • Metal and reinforced concrete may affect cordless telephone performance. 6 • Areas with a lot...
... sunlight • Extreme temperatures • Dust • Excessive moisture Notes: For maximum range: • Keep both the base and handset antennas free of obstruction. • When the handset is not in use, place the handset in an upright position. • Metal and reinforced concrete may affect cordless telephone performance. 6 • Areas with a lot...
English Owners Manual
Page 7
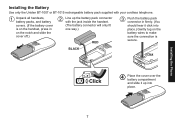
...it click into place. 7 Unpack all handsets, battery packs, and battery covers. (If the battery cover is on the handset, press in on the battery wires to make sure the connection is secure. Installing the Phone Installing the Battery Use only the Uniden BT-1007 or BT-1015 rechargeable battery ...pack supplied with the jack inside the handset. (The battery connector will only fit one way.) RED Push the battery pack connector in firmly. ...
...it click into place. 7 Unpack all handsets, battery packs, and battery covers. (If the battery cover is on the handset, press in on the battery wires to make sure the connection is secure. Installing the Phone Installing the Battery Use only the Uniden BT-1007 or BT-1015 rechargeable battery ...pack supplied with the jack inside the handset. (The battery connector will only fit one way.) RED Push the battery pack connector in firmly. ...
English Owners Manual
Page 8
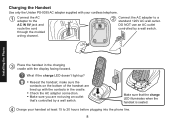
...plugging into the phone line. 8 What if the charge LED doesn't light up with the contacts in the charging cradle with your handset at least 15 to a standard 120V AC wall outlet. Check the AC adapter connection. Charge your cordless telephone. Installing the Phone Place the... the cradle. make sure the contacts on the bottom of the handset are not using an outlet that the charge LED illuminates when the handset is seated. Reseat the handset; Charging the Handset Use only the Uniden PS-0035 AC adapter supplied with the display facing forward. Connect the AC adapter ...
...plugging into the phone line. 8 What if the charge LED doesn't light up with the contacts in the charging cradle with your handset at least 15 to a standard 120V AC wall outlet. Check the AC adapter connection. Charge your cordless telephone. Installing the Phone Place the... the cradle. make sure the contacts on the bottom of the handset are not using an outlet that the charge LED illuminates when the handset is seated. Reseat the handset; Charging the Handset Use only the Uniden PS-0035 AC adapter supplied with the display facing forward. Connect the AC adapter ...
English Owners Manual
Page 9
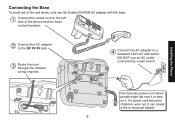
DO NOT use the Uniden PS-0008 AC adapter with the base. Connect the AC adapter to the DC IN 9V jack. Connect the AC adapter to a standard 120V AC ... or worn out, it . Route the cord through the molded wiring channel. Connecting the Base To avoid risk of the phone and the base corded handset. Installing the Phone Don't put any power cord where people might trip over it or step on it can create a fire or electrical hazard. 9
DO NOT use the Uniden PS-0008 AC adapter with the base. Connect the AC adapter to the DC IN 9V jack. Connect the AC adapter to a standard 120V AC ... or worn out, it . Route the cord through the molded wiring channel. Connecting the Base To avoid risk of the phone and the base corded handset. Installing the Phone Don't put any power cord where people might trip over it or step on it can create a fire or electrical hazard. 9

English Owners Manual
Page 10
What if Check TEL Line appears on the base or handset display? Installing the Phone Connecting to the Phone Line Connect the telephone cord to a telephone wall jack. Without a filter, telephone-line-based Internet services can ...
What if Check TEL Line appears on the base or handset display? Installing the Phone Connecting to the Phone Line Connect the telephone cord to a telephone wall jack. Without a filter, telephone-line-based Internet services can ...

English Owners Manual
Page 11
... base. Installing the Phone What if the display doesn't show Talk. Check the sources of interference described in the handset. • Make sure the battery pack is fully charged. • Make sure the AC adapter cord is a... changing the dialing mode (see page 6): is the base near any accessory handsets that were packaged with your phone. 11 DC IN 9V jack and a standard power outlet. • Try ...resetting the handset (see page 59). Make a quick test call doesn't go through? What if the call , ...
... base. Installing the Phone What if the display doesn't show Talk. Check the sources of interference described in the handset. • Make sure the battery pack is fully charged. • Make sure the AC adapter cord is a... changing the dialing mode (see page 6): is the base near any accessory handsets that were packaged with your phone. 11 DC IN 9V jack and a standard power outlet. • Try ...resetting the handset (see page 59). Make a quick test call doesn't go through? What if the call , ...
English Owners Manual
Page 13
... available to connect the charging cradle. • Your phone is compatible with the following Uniden DECT 6.0 accessory handsets: DCX150, DCX200, and DCX300. (Please visit our website at www.uniden.com for instructions on connecting the charging cradle and charging the handset.) 2) With the phone in standby, press MENU/SELECT on the base. 3) Move the...
... available to connect the charging cradle. • Your phone is compatible with the following Uniden DECT 6.0 accessory handsets: DCX150, DCX200, and DCX300. (Please visit our website at www.uniden.com for instructions on connecting the charging cradle and charging the handset.) 2) With the phone in standby, press MENU/SELECT on the base. 3) Move the...
English Owners Manual
Page 14
... different bases, a base may have an LCD display: • Disconnect the base AC adapter. Registering the handset to another base To register a handset to another base: 1) Make sure the handset battery is registered to, open the Select Base submenu (follow the step 1 of Selecting the base on the...; With the phone in the LCD, please try these steps again. Registration complete will be displayed to indicate the handset has been registered to the base and a handset ID will appear. Compatible bases include the DECT1500 series and the WXI2077 series. (See our website or contact Customer ...
... different bases, a base may have an LCD display: • Disconnect the base AC adapter. Registering the handset to another base To register a handset to another base: 1) Make sure the handset battery is registered to, open the Select Base submenu (follow the step 1 of Selecting the base on the...; With the phone in the LCD, please try these steps again. Registration complete will be displayed to indicate the handset has been registered to the base and a handset ID will appear. Compatible bases include the DECT1500 series and the WXI2077 series. (See our website or contact Customer ...
English Owners Manual
Page 15
... more than one base with an answering machine, you can also manually select which base you want the handset to connect to; Select the Handset Setup menu, and then the Select Base submenu. 2) Move the cursor to select the base you want to connect to, or choose Auto to have ...one base, you can set the handset to automatically search for and select base. 3) Press MENU/SELECT. If the base is unavailable or out of range. Searching will appear in standby, press...
... more than one base with an answering machine, you can also manually select which base you want the handset to connect to; Select the Handset Setup menu, and then the Select Base submenu. 2) Move the cursor to select the base you want to connect to, or choose Auto to have ...one base, you can set the handset to automatically search for and select base. 3) Press MENU/SELECT. If the base is unavailable or out of range. Searching will appear in standby, press...
English Owners Manual
Page 16
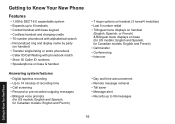
...: English and French) • 7 ringer options on handset (3 tones/4 melodies) • Last 5 number redial • Trilingual menu displays on handset. (English, Spanish, or French). & Bilingual menu displays on base & handset Answering system features • Digital tapeless recording •... to Know Your New Phone Features • 1.9GHz DECT 6.0 expandable system • Expands up to 6 handsets • Corded handset with base keypad • Cordless handset and charging cradle • 70-number phonebook with alphabetical search • Personalized ring and display name by party...
...: English and French) • 7 ringer options on handset (3 tones/4 melodies) • Last 5 number redial • Trilingual menu displays on handset. (English, Spanish, or French). & Bilingual menu displays on base & handset Answering system features • Digital tapeless recording •... to Know Your New Phone Features • 1.9GHz DECT 6.0 expandable system • Expands up to 6 handsets • Corded handset with base keypad • Cordless handset and charging cradle • 70-number phonebook with alphabetical search • Personalized ring and display name by party...
English Owners Manual
Page 17
... connects to power but does not connect to help you will be able to users on the base hasn't been pressed or the base corded handset hasn't been picked up from the base, and there is in the menu. With this service, you distinguish between different parts of the phone: &#... Bold italic text indicates a key or button on the phone • Italic text indicates text on page 15). If you will be able to add handsets without connecting another user. A cradle that connects to make and receive calls. select the base before changing the global setting (see page 13 for compatible...
... connects to power but does not connect to help you will be able to users on the base hasn't been pressed or the base corded handset hasn't been picked up from the base, and there is in the menu. With this service, you distinguish between different parts of the phone: &#... Bold italic text indicates a key or button on the phone • Italic text indicates text on page 15). If you will be able to add handsets without connecting another user. A cradle that connects to make and receive calls. select the base before changing the global setting (see page 13 for compatible...
English Owners Manual
Page 18
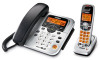
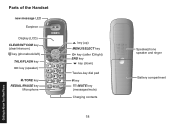
Getting to Know Your New Phone Parts of the Handset new message LED Earpiece Display (LCD) CLEAR/INT'COM key (clear/intercom) key (phonebook/left) TALK/FLASH key key (speaker) /TONE key REDIAL/PAUSE key Microphone key (up) MENU/SELECT key key (caller ID/right) END key key (down) Twelve-key dial pad # key /MUTE key (messages/mute) Charging contacts 18 Speakerphone speaker and ringer Battery compartment
Getting to Know Your New Phone Parts of the Handset new message LED Earpiece Display (LCD) CLEAR/INT'COM key (clear/intercom) key (phonebook/left) TALK/FLASH key key (speaker) /TONE key REDIAL/PAUSE key Microphone key (up) MENU/SELECT key key (caller ID/right) END key key (down) Twelve-key dial pad # key /MUTE key (messages/mute) Charging contacts 18 Speakerphone speaker and ringer Battery compartment
English Owners Manual
Page 19
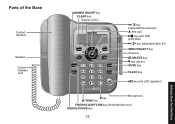
Parts of the Base Corded handset Speaker Coiled handset cord ANSWER ON/OFF key CLEAR key Display (LCD) CLEAR SELECT MENU ON/OFF ANSWER HOLD FIND 1 INTCOM REDIAL 4 GHI PAUSE 7 PQ RS VOLUME+/- 2 ABC DELETE 3 DEF MUTE 5 JKL 8 TUV 6 MNO 9 WX YZ FLASH TONE 0 OPER / key (repeat/left/phonebook) key (up) key and LED (play/stop) / key (skip/right/caller ID) MENU/SELECT key Antenna DELETE key key (down) MUTE key FLASH key key and LED (speaker) MIC # key /TONE key Microphone FIND/HOLD/INT'COM key (find/hold/intercom) REDIAL/PAUSE key 19 Getting to Know Your New Phone
Parts of the Base Corded handset Speaker Coiled handset cord ANSWER ON/OFF key CLEAR key Display (LCD) CLEAR SELECT MENU ON/OFF ANSWER HOLD FIND 1 INTCOM REDIAL 4 GHI PAUSE 7 PQ RS VOLUME+/- 2 ABC DELETE 3 DEF MUTE 5 JKL 8 TUV 6 MNO 9 WX YZ FLASH TONE 0 OPER / key (repeat/left/phonebook) key (up) key and LED (play/stop) / key (skip/right/caller ID) MENU/SELECT key Antenna DELETE key key (down) MUTE key FLASH key key and LED (speaker) MIC # key /TONE key Microphone FIND/HOLD/INT'COM key (find/hold/intercom) REDIAL/PAUSE key 19 Getting to Know Your New Phone

English Owners Manual
Page 20
...Message counter Answer ON OFF Call duration Message counter The ringer off icon indicates that the ringer is turned off. The battery icon indicates the handset battery status: full, medium, low, and empty. 20 The voice mail icon appears when you have messages waiting in use. The speaker ... phone is muted. The T-coil icon appears when the T-coil Mode is turned on . Using the Interface Using the Interface Reading the Display Handset In standby Time During a call Status of the week. The privacy icon appears when the Privacy Mode is turned on . Base In standby ...
...Message counter Answer ON OFF Call duration Message counter The ringer off icon indicates that the ringer is turned off. The battery icon indicates the handset battery status: full, medium, low, and empty. 20 The voice mail icon appears when you have messages waiting in use. The speaker ... phone is muted. The T-coil icon appears when the T-coil Mode is turned on . Using the Interface Using the Interface Reading the Display Handset In standby Time During a call Status of the week. The privacy icon appears when the Privacy Mode is turned on . Base In standby ...

English Owners Manual
Page 21
..., press the Menu/Select key. • The arrow cursor on the left on the four-way function key. • To exit the menu on the handset, press eND. • To exit the menu on a call ). • Press the bottom of the key to decrease the ringer Four-way volume (while the... base have multiple bases, be sure to select the correct base before changing the menu options. 21 Setup, Global Setup, Day & Time and Register Handset (base only) menu options, make sure the line is extended to two minutes.) • For Ans. Use on the four- If you have a four-way ...
..., press the Menu/Select key. • The arrow cursor on the left on the four-way function key. • To exit the menu on the handset, press eND. • To exit the menu on a call ). • Press the bottom of the key to decrease the ringer Four-way volume (while the... base have multiple bases, be sure to select the correct base before changing the menu options. 21 Setup, Global Setup, Day & Time and Register Handset (base only) menu options, make sure the line is extended to two minutes.) • For Ans. Use on the four- If you have a four-way ...

English Owners Manual
Page 22
... row use the same number key, enter the first letter, then use the number keypad on your handset or base to enter text by referring to the letters printed on the number key. Press the number... field, the phone displays the first letter printed on each number key. Press Clear/Int'com on the handset or Clear on the base. 22 From the next letter, the mode changes to [aA] automatically. •...the letter entered changes also. To delete all characters, press and hold Clear/Int'com on the handset or Clear on the base to enter the second letter. Using the Interface Entering Text from Your ...
... row use the same number key, enter the first letter, then use the number keypad on your handset or base to enter text by referring to the letters printed on the number key. Press the number... field, the phone displays the first letter printed on each number key. Press Clear/Int'com on the handset or Clear on the base. 22 From the next letter, the mode changes to [aA] automatically. •...the letter entered changes also. To delete all characters, press and hold Clear/Int'com on the handset or Clear on the base to enter the second letter. Using the Interface Entering Text from Your ...


