

User Guide
Page 17
... HEREIN OR FOR DISCREPANCIES BETWEEN THE PRODUCT AND THE MANUAL. Trademarks Tecra, AccuPoint, and eco Utility are trademarks or registered trademarks of Sony Corporation. and/or Toshiba Corporation. and any product specifications, is under license. Memory Stick, Memory Stick PRO, Memory Stick PRO Duo, Memory Stick Duo, and are either registered trademarks or trademarks of such...
... HEREIN OR FOR DISCREPANCIES BETWEEN THE PRODUCT AND THE MANUAL. Trademarks Tecra, AccuPoint, and eco Utility are trademarks or registered trademarks of Sony Corporation. and/or Toshiba Corporation. and any product specifications, is under license. Memory Stick, Memory Stick PRO, Memory Stick PRO Duo, Memory Stick Duo, and are either registered trademarks or trademarks of such...

User Guide
Page 20
... the first time 42 Setting up your software 42 Registering your computer with Toshiba 42 Adding optional external devices 43 Adding memory (optional 43 Installing a memory module 43 Removing a memory module 49 Checking total memory 52 Recovering the Internal Storage Drive 52 Recovering to out-of-box state ... Erasing the Internal Storage Drive 66 Checking the internal storage drive operating status 67 Installing drivers and applications 67 Using the Toshiba Dual Pointing Device 68 Adjusting touch pad settings 72 Disabling or enabling the touch pad 72 Scrolling with the touch pad ...
... the first time 42 Setting up your software 42 Registering your computer with Toshiba 42 Adding optional external devices 43 Adding memory (optional 43 Installing a memory module 43 Removing a memory module 49 Checking total memory 52 Recovering the Internal Storage Drive 52 Recovering to out-of-box state ... Erasing the Internal Storage Drive 66 Checking the internal storage drive operating status 67 Installing drivers and applications 67 Using the Toshiba Dual Pointing Device 68 Adjusting touch pad settings 72 Disabling or enabling the touch pad 72 Scrolling with the touch pad ...
User Guide
Page 23
Contents 23 Using the Memory card reader 114 Inserting memory media 115 Removing memory media 116 Using the eSATA/USB combo port 117 Using the expansion port 117 Chapter 5: Utilities 118 TOSHIBA Assist 119 Connect 120 Secure 121 Protect & Fix 122 Optimize 123 TOSHIBA Application Installer 124 Setting passwords 125 Using an instant password 125 Using...
Contents 23 Using the Memory card reader 114 Inserting memory media 115 Removing memory media 116 Using the eSATA/USB combo port 117 Using the expansion port 117 Chapter 5: Utilities 118 TOSHIBA Assist 119 Connect 120 Secure 121 Protect & Fix 122 Optimize 123 TOSHIBA Application Installer 124 Setting passwords 125 Using an instant password 125 Using...

User Guide
Page 24
24 Contents Fingerprint reader limitations 146 TOSHIBA eco Utility 147 TOSHIBA Service Station 148 TOSHIBA PC Health Monitor 148 ConfigFree 149 Getting Started 149 ConfigFree® Utilities 150 Chapter 6: If Something Goes Wrong 153 Problems that are easy ...problems 157 Internet problems 158 The Windows® operating system can help you 158 Fixing a problem with Device Manager 159 Checking device properties 159 Memory problems 160 Power and the batteries 160 Keyboard problems 162 Display problems 162 Disk or storage drive problems 164 Error-checking 164 Optical disc drive...
24 Contents Fingerprint reader limitations 146 TOSHIBA eco Utility 147 TOSHIBA Service Station 148 TOSHIBA PC Health Monitor 148 ConfigFree 149 Getting Started 149 ConfigFree® Utilities 150 Chapter 6: If Something Goes Wrong 153 Problems that are easy ...problems 157 Internet problems 158 The Windows® operating system can help you 158 Fixing a problem with Device Manager 159 Checking device properties 159 Memory problems 160 Power and the batteries 160 Keyboard problems 162 Display problems 162 Disk or storage drive problems 164 Error-checking 164 Optical disc drive...

User Guide
Page 38
You need a special program to , a mouse, keyboard, printer, memory, and an ExpressCard®. Always make sure your computer and AC adaptor have a CPU cooling fan that needs to be charged before adding external or ...
You need a special program to , a mouse, keyboard, printer, memory, and an ExpressCard®. Always make sure your computer and AC adaptor have a CPU cooling fan that needs to be charged before adding external or ...

User Guide
Page 43
... Device" on page 68) ❖ Connect an external monitor (see the accessories information packaged with enough memory to run most of today's popular applications. Adding optional external devices NOTE Before adding external devices or memory, Toshiba recommends setting up your product. Your computer comes with your software" on page 42. See "Setting up...
... Device" on page 68) ❖ Connect an external monitor (see the accessories information packaged with enough memory to run most of today's popular applications. Adding optional external devices NOTE Before adding external devices or memory, Toshiba recommends setting up your product. Your computer comes with your software" on page 42. See "Setting up...

User Guide
Page 44
... surrounding area before replacing it must be hot. Failure to be installed, it . You can install one memory module is in minor bodily injury. If only one or two memory modules. To avoid damaging the computer's screws, use a small Phillips screwdriver of the correct size that is..., turn off the computer using the Start menu. 44 Getting Started Adding memory (optional) If the computer has been running recently, the memory module(s) may be installed in Slot A. Before you install or remove a memory module while the computer is on may damage the computer, the module, or...
... surrounding area before replacing it must be hot. Failure to be installed, it . You can install one memory module is in minor bodily injury. If only one or two memory modules. To avoid damaging the computer's screws, use a small Phillips screwdriver of the correct size that is..., turn off the computer using the Start menu. 44 Getting Started Adding memory (optional) If the computer has been running recently, the memory module(s) may be installed in Slot A. Before you install or remove a memory module while the computer is on may damage the computer, the module, or...

User Guide
Page 45
... 4 Place a soft cloth on the cloth. 5 Remove the main battery. Do not remove the memory module while the computer is in memory will not be lost. You can damage the computer and the memory module. Memory module slot cover Front of the computer, and then place the computer upside down on the... work surface to prevent scratching the top cover of computer (Sample Illustration) Locating the memory module slot cover For information on removing the main battery, see "Removing the battery from the computer" on . Getting Started 45 Adding...
... 4 Place a soft cloth on the cloth. 5 Remove the main battery. Do not remove the memory module while the computer is in memory will not be lost. You can damage the computer and the memory module. Memory module slot cover Front of the computer, and then place the computer upside down on the... work surface to prevent scratching the top cover of computer (Sample Illustration) Locating the memory module slot cover For information on removing the main battery, see "Removing the battery from the computer" on . Getting Started 45 Adding...

User Guide
Page 46
... up. NOTE If no memory slot is available, you may cause memory access problems. 9 Carefully remove the new memory module from its antistatic packaging, without touching its connector. 10 Locate an empty memory module slot on the computer. 46 Getting Started Adding memory (optional) 6 Using a... small Phillips screwdriver, loosen the captive screw that you can damage the memory module. Before you handle the module, touch a grounded...
... up. NOTE If no memory slot is available, you may cause memory access problems. 9 Carefully remove the new memory module from its antistatic packaging, without touching its connector. 10 Locate an empty memory module slot on the computer. 46 Getting Started Adding memory (optional) 6 Using a... small Phillips screwdriver, loosen the captive screw that you can damage the memory module. Before you handle the module, touch a grounded...

User Guide
Page 47
... stacked on top of the computer). (Sample Illustration) Inserting the memory module into the memory slot's socket at approximately a 30-degree angle (to be installed in the socket. NOTE For this model, Slot A is the top slot. Slot B is the ..., aligning the connector's notch with the matching key in Slot A. 11 Pick up the memory module by its sides, avoiding any contact with the socket 12 Firmly press the memory module into the socket If only one memory module is to the horizontal surface of one another, you must be installed, it must...
... stacked on top of the computer). (Sample Illustration) Inserting the memory module into the memory slot's socket at approximately a 30-degree angle (to be installed in the socket. NOTE For this model, Slot A is the top slot. Slot B is the ..., aligning the connector's notch with the matching key in Slot A. 11 Pick up the memory module by its sides, avoiding any contact with the socket 12 Firmly press the memory module into the socket If only one memory module is to the horizontal surface of one another, you must be installed, it must...

User Guide
Page 48
..., repeat steps 12-13. For more information on inserting the main battery, see "Inserting a charged battery" on the memory module Do not force the memory module into position. If only one memory module is to seat the module into the latches at the sides of the module. 48 Getting Started Adding... the module to be installed, it using the screw. 15 Re-insert the main battery. These latches should be installed in Slot A. 14 Replace the memory module slot cover and secure it must be completely inserted into the slot NOTE For this model, Slot A is the top slot. Slot B Slot A...
..., repeat steps 12-13. For more information on inserting the main battery, see "Inserting a charged battery" on the memory module Do not force the memory module into position. If only one memory module is to seat the module into the latches at the sides of the module. 48 Getting Started Adding... the module to be installed, it using the screw. 15 Re-insert the main battery. These latches should be installed in Slot A. 14 Replace the memory module slot cover and secure it must be completely inserted into the slot NOTE For this model, Slot A is the top slot. Slot B Slot A...

User Guide
Page 49
... or when an AC adaptor is connected to work surface before restarting the computer. When the operating system has loaded, you need to remove a memory module: 1 Complete steps 1-8 in serious injury. 17 Reconnect the cables. 18 Restart the computer. Overheating your computer and AC adaptor have at... your computer or AC adaptor near a heat source, such as described in Sleep mode). You can block the vents located at least one memory module installed for the computer to a power outlet (even if your computer on a hard flat surface. Always make sure your computer or AC...
... or when an AC adaptor is connected to work surface before restarting the computer. When the operating system has loaded, you need to remove a memory module: 1 Complete steps 1-8 in serious injury. 17 Reconnect the cables. 18 Restart the computer. Overheating your computer and AC adaptor have at... your computer or AC adaptor near a heat source, such as described in Sleep mode). You can block the vents located at least one memory module installed for the computer to a power outlet (even if your computer on a hard flat surface. Always make sure your computer or AC...

User Guide
Page 50
... on the power: If "Start Windows® Normally" is highlighted, then press Enter. Do not remove the memory module while the computer is best to press Enter to scan your system has the memory modules stacked on and data in Sleep or Hibernation mode. If so, consult Windows® Help and Support.... NOTE If your internal storage drive for errors or defragment the drive. You can damage the computer and the memory module. In either of one of the Safe Mode options is suggested, this could hang up the next time you may appear when you must ...
... on the power: If "Start Windows® Normally" is highlighted, then press Enter. Do not remove the memory module while the computer is best to press Enter to scan your system has the memory modules stacked on and data in Sleep or Hibernation mode. If so, consult Windows® Help and Support.... NOTE If your internal storage drive for errors or defragment the drive. You can damage the computer and the memory module. In either of one of the Safe Mode options is suggested, this could hang up the next time you may appear when you must ...
User Guide
Page 51
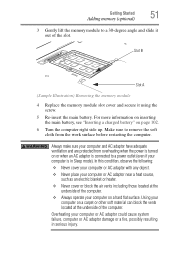
.... 6 Turn the computer right side up. Always make sure your computer on a hard flat surface. Getting Started 51 Adding memory (optional) 3 Gently lift the memory module to a 30-degree angle and slide it using the screw. 5 Re-insert the main battery. Using your computer and...have adequate ventilation and are protected from the work surface before restarting the computer. Slot B Slot A (Sample Illustration) Removing the memory module 4 Replace the memory module slot cover and secure it out of the computer. In this condition, observe the following: ❖ Never cover your ...
.... 6 Turn the computer right side up. Always make sure your computer on a hard flat surface. Getting Started 51 Adding memory (optional) 3 Gently lift the memory module to a 30-degree angle and slide it using the screw. 5 Re-insert the main battery. Using your computer and...have adequate ventilation and are protected from the work surface before restarting the computer. Slot B Slot A (Sample Illustration) Removing the memory module 4 Replace the memory module slot cover and secure it out of the computer. In this condition, observe the following: ❖ Never cover your ...

User Guide
Page 52
... option Recover to perform the action, click Continue; The System window appears. If unsure, cancel and try again. Checking total memory When you add or remove a memory module, you can check that says, "Do you want to allow you were trying to out-of -box state (recommended ... the module is displayed below the System heading. If the computer does not recognize the memory configuration, turn off the computer and remove the memory module slot cover (complete steps 1-8 in "Installing a memory module" on page 54. The following program to make changes to work. TECHNICAL NOTE:...
... option Recover to perform the action, click Continue; The System window appears. If unsure, cancel and try again. Checking total memory When you add or remove a memory module, you can check that says, "Do you want to allow you were trying to out-of -box state (recommended ... the module is displayed below the System heading. If the computer does not recognize the memory configuration, turn off the computer and remove the memory module slot cover (complete steps 1-8 in "Installing a memory module" on page 54. The following program to make changes to work. TECHNICAL NOTE:...

User Guide
Page 79
... in the Windows® operating system" on a regular basis. If the network you are working, you will lose all work stays in the computer's temporary memory until you have an automatic save it takes time. Chapter 2 Learning the Basics This chapter gives some computing tips and provides important information about basic...
... in the Windows® operating system" on a regular basis. If the network you are working, you will lose all work stays in the computer's temporary memory until you have an automatic save it takes time. Chapter 2 Learning the Basics This chapter gives some computing tips and provides important information about basic...
User Guide
Page 91
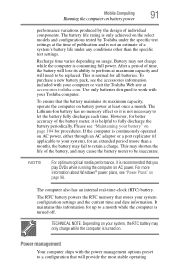
...or a port replicator (if applicable to fully discharge the battery periodically. To purchase a new battery pack, see the accessories information included with your Toshiba computer. However, for up to perform at least once a month. The computer also has an internal real-time-clock (RTC) battery. After... the current time and date information. Power management Your computer ships with your computer or visit the Toshiba Web site at accessories.toshiba.com. The Lithium-Ion battery has no memory effect so it is continuously operated on usage. Please see "Power Plans" on battery power at...
...or a port replicator (if applicable to fully discharge the battery periodically. To purchase a new battery pack, see the accessories information included with your Toshiba computer. However, for up to perform at least once a month. The computer also has an internal real-time-clock (RTC) battery. After... the current time and date information. Power management Your computer ships with your computer or visit the Toshiba Web site at accessories.toshiba.com. The Lithium-Ion battery has no memory effect so it is continuously operated on usage. Please see "Power Plans" on battery power at...

User Guide
Page 93
... hours. If the RTC battery is seldom necessary to external media before discharging the battery. The RTC battery powers the System Time Clock and BIOS memory used while the RTC battery is completely discharged, a warning prompts you operate your computer on . The error message may display the incorrect time and date...
... hours. If the RTC battery is seldom necessary to external media before discharging the battery. The RTC battery powers the System Time Clock and BIOS memory used while the RTC battery is completely discharged, a warning prompts you operate your computer on . The error message may display the incorrect time and date...

User Guide
Page 95
... to confuse the battery light ( ) with the ON/OFF light ( ). System indicator lights AC power light ON/OFF light Battery light Internal storage drive light Memory card reader light Wireless indicator light Wireless WAN indicator light* *Available on certain models (Sample Illustration) Power and battery light locations Determining remaining battery power...
... to confuse the battery light ( ) with the ON/OFF light ( ). System indicator lights AC power light ON/OFF light Battery light Internal storage drive light Memory card reader light Wireless indicator light Wireless WAN indicator light* *Available on certain models (Sample Illustration) Power and battery light locations Determining remaining battery power...

User Guide
Page 114
.... 4 Press the ExpressCard eject button once to pop it out slightly, and push it out of the slot. (Sample Illustration) Removing an ExpressCard Using the Memory card reader (Available on the Show hidden icons button ( ), if necessary, in to remove the ExpressCard. Do not force the card into the slot, push... card or device you to try again later. If the system is almost all the way into position. 114 Exploring Your Computer's Features Using the Memory card reader 3 When the card is unable to prepare the card for removal by clicking on certain models.) The...
.... 4 Press the ExpressCard eject button once to pop it out slightly, and push it out of the slot. (Sample Illustration) Removing an ExpressCard Using the Memory card reader (Available on the Show hidden icons button ( ), if necessary, in to remove the ExpressCard. Do not force the card into the slot, push... card or device you to try again later. If the system is almost all the way into position. 114 Exploring Your Computer's Features Using the Memory card reader 3 When the card is unable to prepare the card for removal by clicking on certain models.) The...


