User Guide
Page 5
... charges.) In order to program this equipment, for any person to use a computer or other electronic device, including Fax machines, to send any message unless such message clearly contains in advance that you believe it can. Fax Branding The Telephone Consumer Protection Act of 1991 makes it unlawful for repair or standard limited warranty information, please contact Toshiba...
... charges.) In order to program this equipment, for any person to use a computer or other electronic device, including Fax machines, to send any message unless such message clearly contains in advance that you believe it can. Fax Branding The Telephone Consumer Protection Act of 1991 makes it unlawful for repair or standard limited warranty information, please contact Toshiba...

User Guide
Page 29
... and specifications ....51 Turning on the power 51 Adding memory (optional 52 Installing a memory module 53 Removing a memory module 58 Checking total memory 60 Hard Drive Recovery Utilities 61 Creating Recovery DVDs 62 Hard Disk Drive Recovery options 63 Hard Disk Drive Recovery using the Recovery media 68 Checking the HDD operating status 71 Installing drivers and applications 71 Using the Toshiba Dual Pointing Device 71 Using the TouchPad 72 Scrolling with the TouchPad 73 Control buttons 73 Disabling or enabling the TouchPad 73 Using external display devices 73 Directing...
... and specifications ....51 Turning on the power 51 Adding memory (optional 52 Installing a memory module 53 Removing a memory module 58 Checking total memory 60 Hard Drive Recovery Utilities 61 Creating Recovery DVDs 62 Hard Disk Drive Recovery options 63 Hard Disk Drive Recovery using the Recovery media 68 Checking the HDD operating status 71 Installing drivers and applications 71 Using the Toshiba Dual Pointing Device 71 Using the TouchPad 72 Scrolling with the TouchPad 73 Control buttons 73 Disabling or enabling the TouchPad 73 Using external display devices 73 Directing...
User Guide
Page 34
... configuration backup in the Windows® operating system 199 If you need further assistance 203 Before you contact Toshiba 203 Contacting Toshiba 204 Other Toshiba Internet Web sites 205 Toshiba's worldwide offices 205 Appendix A: Hot Keys/TOSHIBA Cards 207 Hot Key Cards 207 Using the Hot Key Cards 208 Application Cards 209 Using the Application Cards 210 Card Case 210 Hot key functions 211 Volume Mute 212 Lock (Instant security 213 Power plan 214 Sleep mode 215 Hibernation mode 216 Output (Display switch 217 Display brightness 218 Disabling or enabling wireless devices...
... configuration backup in the Windows® operating system 199 If you need further assistance 203 Before you contact Toshiba 203 Contacting Toshiba 204 Other Toshiba Internet Web sites 205 Toshiba's worldwide offices 205 Appendix A: Hot Keys/TOSHIBA Cards 207 Hot Key Cards 207 Using the Hot Key Cards 208 Application Cards 209 Using the Application Cards 210 Card Case 210 Hot key functions 211 Volume Mute 212 Lock (Instant security 213 Power plan 214 Sleep mode 215 Hibernation mode 216 Output (Display switch 217 Display brightness 218 Disabling or enabling wireless devices...
User Guide
Page 53
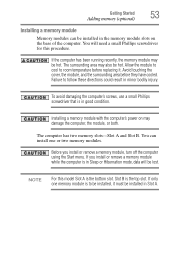
... or two memory modules. The computer has two memory slots-Slot A and Slot B. Getting Started Adding memory (optional) 53 Installing a memory module Memory modules can install one memory module is to be hot. You will be lost. Avoid touching the cover, the module, and the surrounding area before replacing it must be installed in minor bodily injury. The surrounding area may also be installed, it . You can be installed in Sleep or Hibernation mode, data will need a small...
... or two memory modules. The computer has two memory slots-Slot A and Slot B. Getting Started Adding memory (optional) 53 Installing a memory module Memory modules can install one memory module is to be hot. You will be lost. Avoid touching the cover, the module, and the surrounding area before replacing it must be installed in minor bodily injury. The surrounding area may also be installed, it . You can be installed in Sleep or Hibernation mode, data will need a small...
User Guide
Page 55
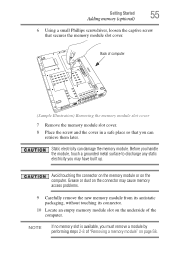
... electricity you must remove a module by performing steps 2-3 of "Removing a memory module" on the underside of computer (Sample Illustration) Removing the memory module slot cover 7 Remove the memory module slot cover. 8 Place the screw and the cover in a safe place so that secures the memory module slot cover. NOTE If no memory slot is available, you may cause memory access problems. 9 Carefully remove the new memory module from its antistatic packaging, without touching its connector. 10 Locate an empty memory module slot on page 58...
... electricity you must remove a module by performing steps 2-3 of "Removing a memory module" on the underside of computer (Sample Illustration) Removing the memory module slot cover 7 Remove the memory module slot cover. 8 Place the screw and the cover in a safe place so that secures the memory module slot cover. NOTE If no memory slot is available, you may cause memory access problems. 9 Carefully remove the new memory module from its antistatic packaging, without touching its connector. 10 Locate an empty memory module slot on page 58...
User Guide
Page 58
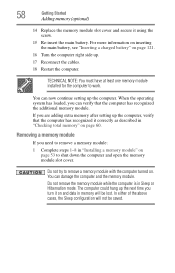
... the computer and open the memory module slot cover. When the operating system has loaded, you are adding extra memory after setting up . 17 Reconnect the cables. 18 Restart the computer. Removing a memory module If you turn it using the screw. 15 Re-insert the main battery. For more information on inserting the main battery, see "Inserting a charged battery" on page 53 to remove a memory module with the computer turned on page...
... the computer and open the memory module slot cover. When the operating system has loaded, you are adding extra memory after setting up . 17 Reconnect the cables. 18 Restart the computer. Removing a memory module If you turn it using the screw. 15 Re-insert the main battery. For more information on inserting the main battery, see "Inserting a charged battery" on page 53 to remove a memory module with the computer turned on page...
User Guide
Page 60
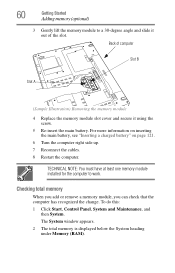
... battery, see "Inserting a charged battery" on page 121. 6 Turn the computer right side up. 7 Reconnect the cables. 8 Restart the computer. The System window appears. 2 The total memory is displayed below the System heading under Memory (RAM). Back of computer Slot B Slot A (Sample Illustration) Removing the memory module 4 Replace the memory module slot cover and secure it out of the slot. To do this: 1 Click Start, Control Panel, System and Maintenance, and then System. Checking total memory...
... battery, see "Inserting a charged battery" on page 121. 6 Turn the computer right side up. 7 Reconnect the cables. 8 Restart the computer. The System window appears. 2 The total memory is displayed below the System heading under Memory (RAM). Back of computer Slot B Slot A (Sample Illustration) Removing the memory module 4 Replace the memory module slot cover and secure it out of the slot. To do this: 1 Click Start, Control Panel, System and Maintenance, and then System. Checking total memory...
User Guide
Page 61
... unsure, cancel and try again. NOTE ❖ During the HDD Recovery Process it is inserted completely into the socket and lined up that says, "Windows® needs your permission. Getting Started Hard Drive Recovery Utilities 61 If the computer does not recognize the memory configuration, turn off the computer and remove the memory module slot cover (complete steps 1-8 in "Installing a memory module" on page 53), and then check that the...
... unsure, cancel and try again. NOTE ❖ During the HDD Recovery Process it is inserted completely into the socket and lined up that says, "Windows® needs your permission. Getting Started Hard Drive Recovery Utilities 61 If the computer does not recognize the memory configuration, turn off the computer and remove the memory module slot cover (complete steps 1-8 in "Installing a memory module" on page 53), and then check that the...

User Guide
Page 73
... a mouse or trackball. To do this: 1 Read the directions that allow you to scroll as you need to install new software. 2 Connect the monitor's video cable to the RGB (monitor) port on the side of the secondary (right-hand) button depends on page 220. To change the enable/disable TouchPad setting, press Fn + F9. Control buttons When a step instructs you first need a larger screen. The function of the computer. 3 Connect the device's power cable to a live electrical outlet. Using external display devices...
... a mouse or trackball. To do this: 1 Read the directions that allow you to scroll as you need to install new software. 2 Connect the monitor's video cable to the RGB (monitor) port on the side of the secondary (right-hand) button depends on page 220. To change the enable/disable TouchPad setting, press Fn + F9. Control buttons When a step instructs you first need a larger screen. The function of the computer. 3 Connect the device's power cable to a live electrical outlet. Using external display devices...

User Guide
Page 132
... to work together to share information. The World Wide Web offers information as Digital Subscriber Lines (DSL), cable, and satellite links. An ISP is a subset of the Internet-a collection of interlinked documents (located on computers connected to the Internet) that has the equipment and the telecommunication lines necessary to maintain an Internet connection. Internet Service Providers To connect a computer directly to a particular network...
... to work together to share information. The World Wide Web offers information as Digital Subscriber Lines (DSL), cable, and satellite links. An ISP is a subset of the Internet-a collection of interlinked documents (located on computers connected to the Internet) that has the equipment and the telecommunication lines necessary to maintain an Internet connection. Internet Service Providers To connect a computer directly to a particular network...
User Guide
Page 152
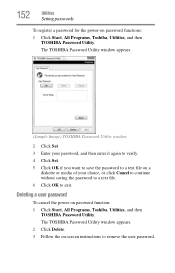
... remove the user password. The TOSHIBA Password Utility window appears. 2 Click Delete. 3 Follow the on a diskette or media of your password, and then enter it again to verify. 4 Click Set. 5 Click OK if you want to save the password to a text file on -screen instructions to exit. Deleting a user password To cancel the power-on password functions: 1 Click Start, All Programs, Toshiba, Utilities, and then TOSHIBA Password Utility. 152 Utilities Setting passwords To register a password for the power-on password function: 1 Click Start...
... remove the user password. The TOSHIBA Password Utility window appears. 2 Click Delete. 3 Follow the on a diskette or media of your password, and then enter it again to verify. 4 Click Set. 5 Click OK if you want to save the password to a text file on -screen instructions to exit. Deleting a user password To cancel the power-on password functions: 1 Click Start, All Programs, Toshiba, Utilities, and then TOSHIBA Password Utility. 152 Utilities Setting passwords To register a password for the power-on password function: 1 Click Start...

User Guide
Page 173
... of Wireless Connection switch 173 (Sample Image) Connectivity Doctor screen Profile Settings The Profile Settings utility lets you enable or disable settings of wired and wireless network devices, infrared devices, and set up a profile to match that opens automatically when Internet Explorer® starts ❖ Devices-lets you save network settings in the office and at home can set the power status of Bluetooth® antennas ❖ TCP/IP settings-includes DHCP, IP address, subnet mask, default...
... of Wireless Connection switch 173 (Sample Image) Connectivity Doctor screen Profile Settings The Profile Settings utility lets you enable or disable settings of wired and wireless network devices, infrared devices, and set up a profile to match that opens automatically when Internet Explorer® starts ❖ Devices-lets you save network settings in the office and at home can set the power status of Bluetooth® antennas ❖ TCP/IP settings-includes DHCP, IP address, subnet mask, default...
User Guide
Page 179
... as installing a new program or adding a device. To open the Startup menu: 1 Restart your computer. 2 Press F8 when your computer model. The labels on the bottom of these options: ❖ Safe Mode ❖ Safe Mode with the desktop and used to the way the operating system responds to your work routine, you change your system's configuration or verify the startup procedure to start properly, you are familiar with Networking Using Startup options to fix problems...
... as installing a new program or adding a device. To open the Startup menu: 1 Restart your computer. 2 Press F8 when your computer model. The labels on the bottom of these options: ❖ Safe Mode ❖ Safe Mode with the desktop and used to the way the operating system responds to your work routine, you change your system's configuration or verify the startup procedure to start properly, you are familiar with Networking Using Startup options to fix problems...

User Guide
Page 183
... device. Memory problems Incorrectly connected or faulty memory modules may be hardware or even software related. If removing the memory module eliminates the error, the memory module may cause errors that appear in the dialog box vary from one memory module installed for updating the driver or rolling back the driver in the lower-right part of the Start menu. This tab also provides options for the computer to be faulty. For more information about Device Manager...
... device. Memory problems Incorrectly connected or faulty memory modules may be hardware or even software related. If removing the memory module eliminates the error, the memory module may cause errors that appear in the dialog box vary from one memory module installed for updating the driver or rolling back the driver in the lower-right part of the Start menu. This tab also provides options for the computer to be faulty. For more information about Device Manager...

User Guide
Page 186
... working power outlet. ❖ Check that the cable connecting the external monitor to the Lock button in screen, make sure the display priority is firmly attached. If you are using the built-in the lower-right part of the Start menu. HINT: Holding the Fn key and pressing the F5 key several times will restart and recognize the device. You may have registered a password, press any key to its previous setting...
... working power outlet. ❖ Check that the cable connecting the external monitor to the Lock button in screen, make sure the display priority is firmly attached. If you are using the built-in the lower-right part of the Start menu. HINT: Holding the Fn key and pressing the F5 key several times will restart and recognize the device. You may have registered a password, press any key to its previous setting...

User Guide
Page 237
... a task instead of using a pointing device such as the battery save mode. (2) A key or combination of your work , including all open files and programs, when you turn on the network. I icon - internal device - A key or combination of keys that enables any other devices dispersed over a relatively limited area and connected by a communications link that you turn the computer off . hot swapping - A small image displayed on the motherboard to help improve...
... a task instead of using a pointing device such as the battery save mode. (2) A key or combination of your work , including all open files and programs, when you turn on the network. I icon - internal device - A key or combination of keys that enables any other devices dispersed over a relatively limited area and connected by a communications link that you turn the computer off . hot swapping - A small image displayed on the motherboard to help improve...

User Guide
Page 243
... charge indicator light 49, 113 charge not lasting 185 charging 47, 49 conserving power 116 disposal 124 243 low charge 115 monitoring power 49, 113 not charging 184 notifications 115 power plan 214 power plan hot key 118 real-time clock (RTC) 110 removing 119 BIOS Setup see TOSHIBA Hardware Setup Bridge Media Adapter inserting memory media 139 removing memory media 140 button power 52, 62 start 128 C CD, using 101 character keys 93 charging the battery 49 checking device properties 182 click 73 communications network connection...
... charge indicator light 49, 113 charge not lasting 185 charging 47, 49 conserving power 116 disposal 124 243 low charge 115 monitoring power 49, 113 not charging 184 notifications 115 power plan 214 power plan hot key 118 real-time clock (RTC) 110 removing 119 BIOS Setup see TOSHIBA Hardware Setup Bridge Media Adapter inserting memory media 139 removing memory media 140 button power 52, 62 start 128 C CD, using 101 character keys 93 charging the battery 49 checking device properties 182 click 73 communications network connection...

User Guide
Page 244
.../trouble accessing a disk 188 running slow 189 diskette drive cannot insert a diskette 189 cannot read a diskette 189 connecting 77 external, connecting 77 display does not look normal/flickers 187 external monitor not working 187 screen is blank 186 display device external 73 display output settings 74 display, external adjusting 75 disposal information 27 disposing of used batteries 124 double-click 73 DVD player general problems 197 DVD, using 101 E error messages device driver conflict 181 general hardware problem 181 non-system disk...
.../trouble accessing a disk 188 running slow 189 diskette drive cannot insert a diskette 189 cannot read a diskette 189 connecting 77 external, connecting 77 display does not look normal/flickers 187 external monitor not working 187 screen is blank 186 display device external 73 display output settings 74 display, external adjusting 75 disposal information 27 disposing of used batteries 124 double-click 73 DVD player general problems 197 DVD, using 101 E error messages device driver conflict 181 general hardware problem 181 non-system disk...
User Guide
Page 246
... monitor 73 connecting 73 not working 186 mouse installing 75 mouse utility 160 N network accessing 130 Connect to the Internet 130 networking wireless 129 Notification Area 128 O Opening the display panel 50 optical disc positioning 104 optical discs handling 104 inserting 103 removing 106 optical drive problems 190 troubleshooting 190 using 101 optical media recording 105 other documentation 40 overlay keys 95 P password deleting a supervisor 151 disabling a user 152 setting a user 151 supervisor set up 150 types 149 passwords instant, using 149 setting 149 PC Card...
... monitor 73 connecting 73 not working 186 mouse installing 75 mouse utility 160 N network accessing 130 Connect to the Internet 130 networking wireless 129 Notification Area 128 O Opening the display panel 50 optical disc positioning 104 optical discs handling 104 inserting 103 removing 106 optical drive problems 190 troubleshooting 190 using 101 optical media recording 105 other documentation 40 overlay keys 95 P password deleting a supervisor 151 disabling a user 152 setting a user 151 supervisor set up 150 types 149 passwords instant, using 149 setting 149 PC Card...
User Guide
Page 248
... connecting to modem 130 television adjusting display 75 Toshiba registering computer 46 worldwide offices 205 TOSHIBA Assist 143 Toshiba Dual Pointing Device 71 TOSHIBA Hardware Setup 161 Toshiba online resources 107 traveling tips 125 troubleshooting DVD player general problems 197 external keyboard 185 keyboard 185 keypad overlay 185 optical drive 190 turning on the computer 51 turning on the power 51 U user password, disabling 152 user password, setting 151 using 134 using a file extension 100 using the Toshiba Dual Pointing Device 71 Utilities...
... connecting to modem 130 television adjusting display 75 Toshiba registering computer 46 worldwide offices 205 TOSHIBA Assist 143 Toshiba Dual Pointing Device 71 TOSHIBA Hardware Setup 161 Toshiba online resources 107 traveling tips 125 troubleshooting DVD player general problems 197 external keyboard 185 keyboard 185 keypad overlay 185 optical drive 190 turning on the computer 51 turning on the power 51 U user password, disabling 152 user password, setting 151 using 134 using a file extension 100 using the Toshiba Dual Pointing Device 71 Utilities...


