User Guide
Page 2
... the user will expose you are not sure of the type of overheating, and these openings power supply to your product dealer or The openings should never be placed in a built-in which does not exceed the voltage provided for a Class USA only A digital device, pursuant to part 15 of the FCC Rules. Operation of this product, read the owner's manual...
... the user will expose you are not sure of the type of overheating, and these openings power supply to your product dealer or The openings should never be placed in a built-in which does not exceed the voltage provided for a Class USA only A digital device, pursuant to part 15 of the FCC Rules. Operation of this product, read the owner's manual...
User Guide
Page 4
... operating condition. 21. If such parts should be sure the service technician has used replacement parts specified by the manufacturer or have fallen into the laser light source of any edible items placed in fire, electric shock, or other controls may result in damage and will often require extensive work by following conditions: a) When the power-supply cord or plug is in a closed installation...
... operating condition. 21. If such parts should be sure the service technician has used replacement parts specified by the manufacturer or have fallen into the laser light source of any edible items placed in fire, electric shock, or other controls may result in damage and will often require extensive work by following conditions: a) When the power-supply cord or plug is in a closed installation...
User Guide
Page 5
... images or audio sound. They will come in the instrument. Wireless LAN PC Card • Do not connect the supplied wireless LAN PC card to devices other problems. • Toshiba Corporation bears no responsibility for incidental damages (lost profit, work interruption, corruption or loss of the memory contents, etc.) arising from the use of cable. In the spaces provided below, record the Model and Serial No. located...
... images or audio sound. They will come in the instrument. Wireless LAN PC Card • Do not connect the supplied wireless LAN PC card to devices other problems. • Toshiba Corporation bears no responsibility for incidental damages (lost profit, work interruption, corruption or loss of the memory contents, etc.) arising from the use of cable. In the spaces provided below, record the Model and Serial No. located...

User Guide
Page 7
... Operations Turning the power on and off 22 Basic operations 24 Using handy features 26 Using auto setting 26 Cutting off the picture and sound temporarily (Mute 28 Freezing the image (Freeze 28 Using the menus 29 How to use the menus 29 The image adjustment menu 30 The display setting menu 31 The default setting menu 32 Displaying Information (Status display 33 Setting up the wireless LAN 34 Functions ...34 Communication mode 34 Caution when using the wireless LAN functions 35 Setup using...
... Operations Turning the power on and off 22 Basic operations 24 Using handy features 26 Using auto setting 26 Cutting off the picture and sound temporarily (Mute 28 Freezing the image (Freeze 28 Using the menus 29 How to use the menus 29 The image adjustment menu 30 The display setting menu 31 The default setting menu 32 Displaying Information (Status display 33 Setting up the wireless LAN 34 Functions ...34 Communication mode 34 Caution when using the wireless LAN functions 35 Setup using...
User Guide
Page 8
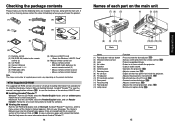
... -screen instructions to replace lamp. p.16 : Adjusts screen size. Follow the on Start.pdf. See the Help menu for its simplified hardcopy, Owner's Manual (Getting Started), Acrobat® Reader™ to view the manual, and application software p.49 to view a reference page with the main unit. p.63 15 Preparations Follow the on a bookmark title to stow the foot adjuster. p.25 : Senses commands from outside the projector. : Outputs audio sound. : Operates the projector. p.18 : Projects expanded image. : Draws...
... -screen instructions to replace lamp. p.16 : Adjusts screen size. Follow the on Start.pdf. See the Help menu for its simplified hardcopy, Owner's Manual (Getting Started), Acrobat® Reader™ to view the manual, and application software p.49 to view a reference page with the main unit. p.63 15 Preparations Follow the on a bookmark title to stow the foot adjuster. p.25 : Senses commands from outside the projector. : Outputs audio sound. : Operates the projector. p.18 : Projects expanded image. : Draws...
User Guide
Page 9
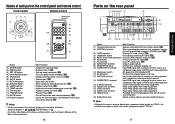
... picture and sound temporarily. p.28 : Use to set up image and mode. p.18 (2) CONTROL terminal : When operating the projector via a computer, connect this manual, buttons are referred to a computer display, etc. (10) COMPUTER 2 terminal : Input RGB signal from a computer or other source, or a component video signal (Y/PB/PR) from video equipment. (11) Main power switch : AC power line ON (standby)/OFF. (12) AC IN socket : Connect the supplied power cord here. (13) AUDIO IN terminal : Input audio signals from a computer or video...
... picture and sound temporarily. p.28 : Use to set up image and mode. p.18 (2) CONTROL terminal : When operating the projector via a computer, connect this manual, buttons are referred to a computer display, etc. (10) COMPUTER 2 terminal : Input RGB signal from a computer or other source, or a component video signal (Y/PB/PR) from video equipment. (11) Main power switch : AC power line ON (standby)/OFF. (12) AC IN socket : Connect the supplied power cord here. (13) AUDIO IN terminal : Input audio signals from a computer or video...

User Guide
Page 10
... impede the operation of the projector know that fact. Attempting to clean/replace the lamp at the main unit again, and repeat the operation. • For further information of the mouse remote control, see the Owner's Manual of the Mouse Remote Control. 18 Placement Placement Styles As shown in the figures below to determine the projection size and projection distance. (Projection sizes are used. Set the Projection mode in the default setting menu p.32 , in...
... impede the operation of the projector know that fact. Attempting to clean/replace the lamp at the main unit again, and repeat the operation. • For further information of the mouse remote control, see the Owner's Manual of the Mouse Remote Control. 18 Placement Placement Styles As shown in the figures below to determine the projection size and projection distance. (Projection sizes are used. Set the Projection mode in the default setting menu p.32 , in...

User Guide
Page 11
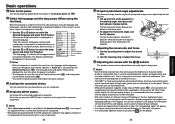
... the owner's manual of the device you to step r. e Wait until it is a sample connection. Doing so could damage the PC card or corrupt your data. r Press the Eject button. Be careful to project JPEG image files using this projector. w Press the UNMOUNT button. CARD indicator RESET switch 21 Preparations Check for an RGB output terminal, supported signal p.69 , etc. • Turn off , proceed to connect the projector wirelessly with...
... the owner's manual of the device you to step r. e Wait until it is a sample connection. Doing so could damage the PC card or corrupt your data. r Press the Eject button. Be careful to project JPEG image files using this projector. w Press the UNMOUNT button. CARD indicator RESET switch 21 Preparations Check for an RGB output terminal, supported signal p.69 , etc. • Turn off , proceed to connect the projector wirelessly with...

User Guide
Page 12
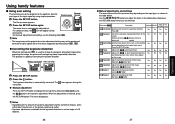
... the LAMP indicator goes off the main power switch in this state. Operations 22 23 The ON indicator will disappear after a moment. Control panel Remote Control Start-up screen will change to operate for a short while, in . Notes • The start -up screen disappears, the Language menu is on . When cooling lamp During internal cooling After cooling complete (Green) Flashing A (Orange) (Green) (Off) B (Orange) (Green) (Off) (Off) C (Orange) A During cooling, the LAMP indicator flashes. C In standby mode Note • The projector...
... the LAMP indicator goes off the main power switch in this state. Operations 22 23 The ON indicator will disappear after a moment. Control panel Remote Control Start-up screen will change to operate for a short while, in . Notes • The start -up screen disappears, the Language menu is on . When cooling lamp During internal cooling After cooling complete (Green) Flashing A (Orange) (Green) (Off) B (Orange) (Green) (Off) (Off) C (Orange) A During cooling, the LAMP indicator flashes. C In standby mode Note • The projector...
User Guide
Page 13
... and Lamp power menus do not light) or bright spots (pixels that English has been selected. 3 Activate the connected device. To view high-quality images, it switches to XGA resolution. • With some models of your computer. • If a signal not supported by this happens, turn off the computer's LCD display. Basic operations 1 Turn on the projector and the monitor's display may prevent the images from displaying properly. Each time you press the INPUT button, it...
... and Lamp power menus do not light) or bright spots (pixels that English has been selected. 3 Activate the connected device. To view high-quality images, it switches to XGA resolution. • With some models of your computer. • If a signal not supported by this happens, turn off the computer's LCD display. Basic operations 1 Turn on the projector and the monitor's display may prevent the images from displaying properly. Each time you press the INPUT button, it...
User Guide
Page 14
... auto adjustment/setting may not be lost, or the picture quality may be performed correctly for each type of the input signal by the projector p.69 , p.70 . ● Correcting the keystone distortion When the foot adjuster p.25 is capable of correcting this ● Manual adjustment Press the SET UP button to display the Set up menu and select [Keystone]. This projector is used to change the projector placement angle while projecting the image...
... auto adjustment/setting may not be lost, or the picture quality may be performed correctly for each type of the input signal by the projector p.69 , p.70 . ● Correcting the keystone distortion When the foot adjuster p.25 is capable of correcting this ● Manual adjustment Press the SET UP button to display the Set up menu and select [Keystone]. This projector is used to change the projector placement angle while projecting the image...

User Guide
Page 15
... the control panel (main unit side) and remote control. ■ How to project the images of options. 5. Default setting menu p.32 Status display menu p.33 3. These marks signify the items can be adjusted/set by using . End Press the MENU button The menu disappears. 4. temporarily, this , or the power goes out, then the data will not be used to pause a video during a presentation, etc. Press the MENU button Display the Setting display menu 2. Item shown with the current input source...
... the control panel (main unit side) and remote control. ■ How to project the images of options. 5. Default setting menu p.32 Status display menu p.33 3. These marks signify the items can be adjusted/set by using . End Press the MENU button The menu disappears. 4. temporarily, this , or the power goes out, then the data will not be used to pause a video during a presentation, etc. Press the MENU button Display the Setting display menu 2. Item shown with the current input source...

User Guide
Page 16
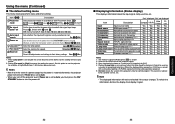
... set screen display-related items. Item Screen size Description (Full): Display with 1024 × 768 dot resolution (Thru): Display with / button. Operations 30 31 Reddish Greenish No No Yes No Sharpness Adjust the sharpness of the image color. Softer Sharper No Yes Yes Yes Noise Set the function to display when there is no input signal (Logo) (Blue) (Black) Icon Display icons as function guides On Off Start-up screen Display start-up screen when power is turned...
... set screen display-related items. Item Screen size Description (Full): Display with 1024 × 768 dot resolution (Thru): Display with / button. Operations 30 31 Reddish Greenish No No Yes No Sharpness Adjust the sharpness of the image color. Softer Sharper No Yes Yes Yes Noise Set the function to display when there is no input signal (Logo) (Blue) (Black) Icon Display icons as function guides On Off Start-up screen Display start-up screen when power is turned...
User Guide
Page 17
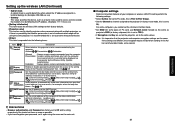
... Yes Lamp reset count The count for customer service, etc. Operations 32 33 Switch with signals is restored afterwards, the projector power will not be used as a measure of a power outage but the cooling fan noise gets quieter. 2: Setting [Fan mode] to for lamp replacement Yes Yes Yes Yes Total time The total time that in accordance with a store about the input signal, lamp use the projector, for [H/V]. 4: Displays [Lamp time] as a counter of the projector's internal control program. Auto input Set...
... Yes Lamp reset count The count for customer service, etc. Operations 32 33 Switch with signals is restored afterwards, the projector power will not be used as a measure of a power outage but the cooling fan noise gets quieter. 2: Setting [Fan mode] to for lamp replacement Yes Yes Yes Yes Total time The total time that in accordance with a store about the input signal, lamp use the projector, for [H/V]. 4: Displays [Lamp time] as a counter of the projector's internal control program. Auto input Set...
User Guide
Page 21
... lamp has blown. Specify a string of arbitrary characters (1 to 8 characters). [ : Enter the setting mode] [ : Move from digit to digit] [ to : Enter the string] [Accept: ] Status Select whether to automatically send error information to be remote-controlled by the IP address. (Example: 111.112.xxx.xxx) • [Setting initialization] This item resets the wireless LAN settings to their factory defaults. • [Projector name] This can be using the menu on the projector, set...
... lamp has blown. Specify a string of arbitrary characters (1 to 8 characters). [ : Enter the setting mode] [ : Move from digit to digit] [ to : Enter the string] [Accept: ] Status Select whether to automatically send error information to be remote-controlled by the IP address. (Example: 111.112.xxx.xxx) • [Setting initialization] This item resets the wireless LAN settings to their factory defaults. • [Projector name] This can be using the menu on the projector, set...
User Guide
Page 22
... the wireless/card input mode with a memory PC card plugged into the PC card slot. Item Description PC card display Manual Auto. (Select whether to automatically switch to Off, a thumbnail list p.45 appears automatically on the screen. Select and view desired JPEG image files. 43 Operations Storage media that can be used as a "memory PC card." Please use as -is Flash ATA card, TOSHIBA Mobile...
... the wireless/card input mode with a memory PC card plugged into the PC card slot. Item Description PC card display Manual Auto. (Select whether to automatically switch to Off, a thumbnail list p.45 appears automatically on the screen. Select and view desired JPEG image files. 43 Operations Storage media that can be used as a "memory PC card." Please use as -is Flash ATA card, TOSHIBA Mobile...
User Guide
Page 25
... is partly covered under the GNU General Public License Version 2 (hereafter GPL2). Contact AXE if you want to uninstall Select [Start Menu] → [Settings] → [Control Panel] → [Add/Remove Programs], and remove Toshiba Data Projector from the computer's screen to TOSHIBA CORPORATION (hereafter TOSHIBA) by 768 pixels recommended ■ Application Types and Major Functions Wireless Utility This application is plugged ➔ "Type/MAC address/DHCP/IP address/ Subnet...
... is partly covered under the GNU General Public License Version 2 (hereafter GPL2). Contact AXE if you want to uninstall Select [Start Menu] → [Settings] → [Control Panel] → [Add/Remove Programs], and remove Toshiba Data Projector from the computer's screen to TOSHIBA CORPORATION (hereafter TOSHIBA) by 768 pixels recommended ■ Application Types and Major Functions Wireless Utility This application is plugged ➔ "Type/MAC address/DHCP/IP address/ Subnet...

User Guide
Page 32
... using the two lamp locking screws. 6 Replace the lamp cover. Loosen the 2 screws holding the lamp in step 3 until the lamp cover is consumable supplies. This display disappears when you breathe it. Maintenance About lamp The product's light source is a mercury lamp that it is not loose. Lamp replacement A lamp is no longer loose. 3 Lamp cover 1 2 1 4 2 2 5 1 7 Reset the lamp timer. This is characteristic of a lamp, and is not malfunction. (The lifetime of the arrow with a new one . WARNING...
... using the two lamp locking screws. 6 Replace the lamp cover. Loosen the 2 screws holding the lamp in step 3 until the lamp cover is consumable supplies. This display disappears when you breathe it. Maintenance About lamp The product's light source is a mercury lamp that it is not loose. Lamp replacement A lamp is no longer loose. 3 Lamp cover 1 2 1 4 2 2 5 1 7 Reset the lamp timer. This is characteristic of a lamp, and is not malfunction. (The lifetime of the arrow with a new one . WARNING...

User Guide
Page 34
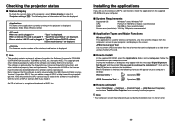
... setting minimized? p.18 • Is the remote control being used within the projector's supported range? Convert them with the supplied software application. Please see "Trouble indications" p.65 as well. p.24 • Is the mute function on ? p.20 • Are all the connected devices functioning properly? p.64 • Is the lens focus adjusted optimally? p.30 • Is the lamp nearing the end of cards other bright lights...
... setting minimized? p.18 • Is the remote control being used within the projector's supported range? Convert them with the supplied software application. Please see "Trouble indications" p.65 as well. p.24 • Is the mute function on ? p.20 • Are all the connected devices functioning properly? p.64 • Is the lens focus adjusted optimally? p.30 • Is the lamp nearing the end of cards other bright lights...
User Guide
Page 35
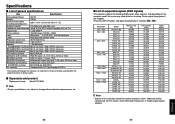
... specifications Item Specification Consumption Power 300 W Weight 2.9 kg External Dimensions (including protruding parts) 298 × 101.4 × 275.4 mm (W × H × D) Cabinet material* PC+ABS resin and ABS resin Conditions for usage environment Temp: 5°C to 70% Display pixels 1 chip DMD™ Picture elements 786,432 pixels (1024H × 768V) Lens Zoom lens F=2.75-3.00 f=22.25-26.69 mm Lamp High-pressure mercury lamp Projection screen size...
... specifications Item Specification Consumption Power 300 W Weight 2.9 kg External Dimensions (including protruding parts) 298 × 101.4 × 275.4 mm (W × H × D) Cabinet material* PC+ABS resin and ABS resin Conditions for usage environment Temp: 5°C to 70% Display pixels 1 chip DMD™ Picture elements 786,432 pixels (1024H × 768V) Lens Zoom lens F=2.75-3.00 f=22.25-26.69 mm Lamp High-pressure mercury lamp Projection screen size...

