
Owners Manual
Page 1
OWNER'S MANUAL DATA PROJECTOR TDP-TW300 Others Maintenance Operations Preparations Before Using
OWNER'S MANUAL DATA PROJECTOR TDP-TW300 Others Maintenance Operations Preparations Before Using
Owners Manual
Page 2
...can radiates radio frequency energy and, if not installed and used in accordance with the instruction manual, may cause harmful interference to part 15 of the FCC Rules. Notice: This Class A...case the user may be regulated due to USA only environmental considerations. MODEL NAME: TDP-TW300 FCC Radio Frequency Interference Statement Note: This equipment has been tested and found to... sold with USA only this equipment, not expressly approved by USA only Toshiba, or parties authorized by Toshiba, could void the user's authority to provide reasonable protection against harmful interference...
...can radiates radio frequency energy and, if not installed and used in accordance with the instruction manual, may cause harmful interference to part 15 of the FCC Rules. Notice: This Class A...case the user may be regulated due to USA only environmental considerations. MODEL NAME: TDP-TW300 FCC Radio Frequency Interference Statement Note: This equipment has been tested and found to... sold with USA only this equipment, not expressly approved by USA only Toshiba, or parties authorized by Toshiba, could void the user's authority to provide reasonable protection against harmful interference...
Owners Manual
Page 3
...Before Using IMPORTANT SAFETY INSTRUCTIONS CAUTION: PLEASE READ AND OBSERVE ALL WARNINGS AND INSTRUCTIONS GIVEN IN THIS OWNER'S MANUAL AND THOSE MARKED ON THE UNIT. Heat 8. Unplug this product, read the owner's manual carefully, and follow all the operating and other similar surface. RETAIN THIS BOOKLET FOR FUTURE REFERENCE. Read ...Owner's Manual After unpacking this product from If you are not sure of the type of overheating, and these openings power supply to...
...Before Using IMPORTANT SAFETY INSTRUCTIONS CAUTION: PLEASE READ AND OBSERVE ALL WARNINGS AND INSTRUCTIONS GIVEN IN THIS OWNER'S MANUAL AND THOSE MARKED ON THE UNIT. Heat 8. Unplug this product, read the owner's manual carefully, and follow all the operating and other similar surface. RETAIN THIS BOOKLET FOR FUTURE REFERENCE. Read ...Owner's Manual After unpacking this product from If you are not sure of the type of overheating, and these openings power supply to...
Owners Manual
Page 6
... operation and other countries. • Adobe is a registered trademark and Acrobat Reader is not related to Toshiba Corporation. • Toshiba bears no liability whatsoever for future reference. 10 OTHER CAUTIONS AND INFORMATIONS Copyrights Showing or transmitting commercial imaging ...damages (lost profit, work interruption, corruption or loss of Adobe Systems Incorporated. Serial No. Please dispose of this Instruction Manual. • Toshiba Corporation accepts no responsibility for a long time, remove the batteries to use of damages arising from leaking into a fire...
... operation and other countries. • Adobe is a registered trademark and Acrobat Reader is not related to Toshiba Corporation. • Toshiba bears no liability whatsoever for future reference. 10 OTHER CAUTIONS AND INFORMATIONS Copyrights Showing or transmitting commercial imaging ...damages (lost profit, work interruption, corruption or loss of Adobe Systems Incorporated. Serial No. Please dispose of this Instruction Manual. • Toshiba Corporation accepts no responsibility for a long time, remove the batteries to use of damages arising from leaking into a fire...
Owners Manual
Page 8
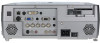
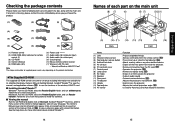
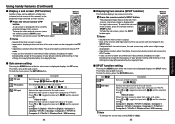
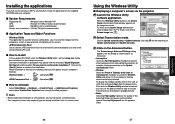
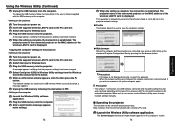
...the projector. p.79 : Draws in the box, along with related information. p.29 : Hold to install the software. ■ Viewing the manual Run the CD-ROM and double-click on a bookmark title to set up or stow the foot adjuster. Preparations Checking the package contents Please ...(7) Audio cable (for computer input) control (2) ■ (8) Audio cable (for video input) ■ (3) CD-ROM ■ (9) Carrying bag ■ (4) Owner's Manual ■ (10) Mouse remote control receiver ■ (5) RGB cable (3m) ■ (11) Wireless LAN PC card • "About the Wireless LAN PC Card" ...
...the projector. p.79 : Draws in the box, along with related information. p.29 : Hold to install the software. ■ Viewing the manual Run the CD-ROM and double-click on a bookmark title to set up or stow the foot adjuster. Preparations Checking the package contents Please ...(7) Audio cable (for computer input) control (2) ■ (8) Audio cable (for video input) ■ (3) CD-ROM ■ (9) Carrying bag ■ (4) Owner's Manual ■ (10) Mouse remote control receiver ■ (5) RGB cable (3m) ■ (11) Wireless LAN PC card • "About the Wireless LAN PC Card" ...
Owners Manual
Page 9
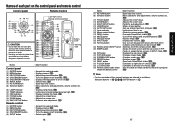
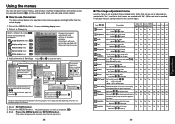
... code switch : Sets the code of remote control to that of the projector. (inside the battery cover) p.45 Note • For the remainder of this manual, buttons are referred to laser. p.50 : Accepts the selected mode. : Displays menus. p.30 : Turns the power on . (18) Mouse control button : Controls a mouse pointer. p.30...
... code switch : Sets the code of remote control to that of the projector. (inside the battery cover) p.45 Note • For the remainder of this manual, buttons are referred to laser. p.50 : Accepts the selected mode. : Displays menus. p.30 : Turns the power on . (18) Mouse control button : Controls a mouse pointer. p.30...

Owners Manual
Page 13
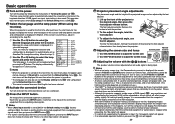
... selected among the COMPUTER 1 IN, COMPUTER 2 IN, and the COMPUTER 3 IN terminals. (Digital RGB signals are sample connections. Connection Before connection • Read the owner's manual of the device you are connecting to this projector, but it is not a malfunction. 24 S-video cable (not supplied) Conversion adapter BNC-pin (not supplied...
... selected among the COMPUTER 1 IN, COMPUTER 2 IN, and the COMPUTER 3 IN terminals. (Digital RGB signals are sample connections. Connection Before connection • Read the owner's manual of the device you are connecting to this projector, but it is not a malfunction. 24 S-video cable (not supplied) Conversion adapter BNC-pin (not supplied...
Owners Manual
Page 15
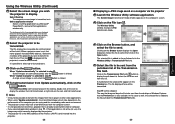
... or shrunk, which will be set via the Display setting menu p.41 and Lamp power via the Default setting menu p.44 . • This owner's manual assumes that is outputting video signals each time you press the INPUT button, it is automatically set to [On] in the Default setting menu is...[Easy setup] in the Default setting menu p.44 (factory setting is [On]), the input is switched to turn off the LCD display, see the owner's manual of the connected eqipment is turned on the power by the foot adjuster. To change the input and "There is [Off] p.26 . 2 Select the language...
... or shrunk, which will be set via the Display setting menu p.41 and Lamp power via the Default setting menu p.44 . • This owner's manual assumes that is outputting video signals each time you press the INPUT button, it is automatically set to [On] in the Default setting menu is...[Easy setup] in the Default setting menu p.44 (factory setting is [On]), the input is switched to turn off the LCD display, see the owner's manual of the connected eqipment is turned on the power by the foot adjuster. To change the input and "There is [Off] p.26 . 2 Select the language...
Owners Manual
Page 16
... keystone distortion. When the adjustment is obstructed or the window gets dirty. When such a case arises, adjust the screen focus manually. • Improper adjustment or correction may not be adjusted by selecting [Auto setting] in the Default setting menu set to ...42 . • With [Easy setup] in the Image adjustment menu p.39 . For computer input, the icon will appear. Adjusting vertical distortion [Manual] 1 Press the KEYSTONE button. 2 Select [V-keystone] by factory setting.) Note • A message appears on the remote control. Screen shrinking at...
... keystone distortion. When the adjustment is obstructed or the window gets dirty. When such a case arises, adjust the screen focus manually. • Improper adjustment or correction may not be adjusted by selecting [Auto setting] in the Default setting menu set to ...42 . • With [Easy setup] in the Image adjustment menu p.39 . For computer input, the icon will appear. Adjusting vertical distortion [Manual] 1 Press the KEYSTONE button. 2 Select [V-keystone] by factory setting.) Note • A message appears on the remote control. Screen shrinking at...

Owners Manual
Page 17
...while mute is in larger zoom ratio. • During resizing or moving the zooming area, the image may suffer. • To manually adjust both vertical and horizontal keystones, adjust the vertical keystone first then the horizontal. You can keep pressing. 4 To reset the zoom... 1 Press the remote control's RESIZE button. Pressing the button switches Full/Thru/Wide in turn . When such a case arises, make correction manually. ■ Resizing image The projected image can be changed. temporarily, this function on the video or other than the original size.) button. Notes...
...while mute is in larger zoom ratio. • During resizing or moving the zooming area, the image may suffer. • To manually adjust both vertical and horizontal keystones, adjust the vertical keystone first then the horizontal. You can keep pressing. 4 To reset the zoom... 1 Press the remote control's RESIZE button. Pressing the button switches Full/Thru/Wide in turn . When such a case arises, make correction manually. ■ Resizing image The projected image can be changed. temporarily, this function on the video or other than the original size.) button. Notes...
Owners Manual
Page 18
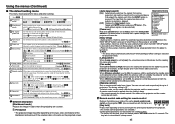
... Press the remote control's SPLIT button. Notes • Sound of the sub screen can be added in smaller size (referred as sub screen in this manual) to the projected image (referred as main screen). Item PIP size PIP position Description Sets the sub screen size. Large Medium Small Sets display position...
... Press the remote control's SPLIT button. Notes • Sound of the sub screen can be added in smaller size (referred as sub screen in this manual) to the projected image (referred as main screen). Item PIP size PIP position Description Sets the sub screen size. Large Medium Small Sets display position...
Owners Manual
Page 20
.... No No No No Phase Adjust with . Press the MENU button Display the Setting display menu. 2. Select a Category Select a category by using . Off Off On Manual Low Standard 1 Key lock Yes These marks signify that can be selected from the actual display. 1. Toggle items with to eliminate periodic patterns No No...
.... No No No No Phase Adjust with . Press the MENU button Display the Setting display menu. 2. Select a Category Select a category by using . Off Off On Manual Low Standard 1 Key lock Yes These marks signify that can be selected from the actual display. 1. Toggle items with to eliminate periodic patterns No No...
Owners Manual
Page 23
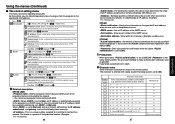
.... Standard High Wireless standby Switch on Easy setup On Off Lamp power Sets the lamp power. p.16 (Use a screwdriver with no signals is in standby. Manual Auto Easy setup Set the items of the Wireless Utility. On Off Remote control When two or more like projecting on the power when the... ON/STANDBY button is pressed (Manual), or when the power cord is pressed. Set this menu sets the code for example, at high altitude (over 1,500 meters above sea level). [...
.... Standard High Wireless standby Switch on Easy setup On Off Lamp power Sets the lamp power. p.16 (Use a screwdriver with no signals is in standby. Manual Auto Easy setup Set the items of the Wireless Utility. On Off Remote control When two or more like projecting on the power when the... ON/STANDBY button is pressed (Manual), or when the power cord is pressed. Set this menu sets the code for example, at high altitude (over 1,500 meters above sea level). [...
Owners Manual
Page 24
... operation status messages from the projector to a network. It is a unique number assigned for IP address, subnet mask, and gateway, then set the following items manually: : This is identified by factory setting. DHCP: Use Not use ], ask your network administrator for a terminal to connect to the specified E-mail address.
... operation status messages from the projector to a network. It is a unique number assigned for IP address, subnet mask, and gateway, then set the following items manually: : This is identified by factory setting. DHCP: Use Not use ], ask your network administrator for a terminal to connect to the specified E-mail address.
Owners Manual
Page 29
...stronger the encryption, and hence the harder it again using the menu on the main unit. ■ Computer settings Refer to instruction manuals of communication range will be used . Make the [Channel] settings identical to access servers outside the network. If you have set...initialization] This item resets the wireless LAN settings to Infrastructure. It is recommended this is NDIS5.1 compliant. If you set the IP address manually. For Config Free support, the computer requires a wireless LAN environment that another person who is set the highest security level, specify a ...
...stronger the encryption, and hence the harder it again using the menu on the main unit. ■ Computer settings Refer to instruction manuals of communication range will be used . Make the [Channel] settings identical to access servers outside the network. If you have set...initialization] This item resets the wireless LAN settings to Infrastructure. It is recommended this is NDIS5.1 compliant. If you set the IP address manually. For Config Free support, the computer requires a wireless LAN environment that another person who is set the highest security level, specify a ...

Owners Manual
Page 30
....0 compliant and can be alleviated by data lost through the use of the projector is TYPE II (PCMCIA Release 2.1)-compliant. This owner's manual refers to give presentations without a computer, create an advertising screen board using the slideshow function, and more. (The projector cannot reproduce animation...LAN PC card) into the projector could damage the PC card or cause malfunctions. ● Memory PC cards whose operation has been verified Toshiba does not guarantee the operation of all USB memories, USB card readers/writers, and digital cameras. ■ Backing up the data saved...
....0 compliant and can be alleviated by data lost through the use of the projector is TYPE II (PCMCIA Release 2.1)-compliant. This owner's manual refers to give presentations without a computer, create an advertising screen board using the slideshow function, and more. (The projector cannot reproduce animation...LAN PC card) into the projector could damage the PC card or cause malfunctions. ● Memory PC cards whose operation has been verified Toshiba does not guarantee the operation of all USB memories, USB card readers/writers, and digital cameras. ■ Backing up the data saved...
Owners Manual
Page 34
...to continue the installation. When the Wireless Utility launches, the Screen Image transmission mode window appears on Update automatically or Update manually. Selecting High speed has the opposite effect. Use it in step 4 and later • Mode Selecting High quality improves...9632; How to uninstall Select [Start Menu] → [Settings] → [Control Panel] → [Add/Remove Programs], and remove Toshiba Data Projector from the computer's screen to convert JPEG and other computers from interrupting the projector, for example, during installation, but lowers communication ...
...to continue the installation. When the Wireless Utility launches, the Screen Image transmission mode window appears on Update automatically or Update manually. Selecting High speed has the opposite effect. Use it in step 4 and later • Mode Selecting High quality improves...9632; How to uninstall Select [Start Menu] → [Settings] → [Control Panel] → [Add/Remove Programs], and remove Toshiba Data Projector from the computer's screen to convert JPEG and other computers from interrupting the projector, for example, during installation, but lowers communication ...
Owners Manual
Page 35
The desktop and a list of the Transmission File field. Note that if too many applications are sent consecutively after the When "Update manually" is selected in step 2 button is added to the file pull-down list in the Wireless Utility's Transmission File field. 4 Select the file to be ...
The desktop and a list of the Transmission File field. Note that if too many applications are sent consecutively after the When "Update manually" is selected in step 2 button is added to the file pull-down list in the Wireless Utility's Transmission File field. 4 Select the file to be ...

Owners Manual
Page 36
... Ad hoc in the message. 4 The projector name of the connected projector or the MAC address of the current PC. • Creates the settings information manually. The IDs of the projector to be listed. (If projector name has been set up the Wireless LAN Utility dialog box. The selected file's image...
... Ad hoc in the message. 4 The projector name of the connected projector or the MAC address of the current PC. • Creates the settings information manually. The IDs of the projector to be listed. (If projector name has been set up the Wireless LAN Utility dialog box. The selected file's image...
Owners Manual
Page 37
...1 Launch the Wireless Utility software application. 2 Plug the USB memory into the computer. 3 After a confirmation message appears, make network settings manually. ■ Operating the projector This function can be used with any projector input. Using the Wireless Utility (Continued) 4 Unplug the USB memory...computer settings. ● Web browser Where the computer and the projector are changed . 5 Select Config free (USB) in the user s manual supplied with a memory PC card. 1 Launch the Wireless Utility software application. To unplug the USB memory, follow the instructions in Wireless ...
...1 Launch the Wireless Utility software application. 2 Plug the USB memory into the computer. 3 After a confirmation message appears, make network settings manually. ■ Operating the projector This function can be used with any projector input. Using the Wireless Utility (Continued) 4 Unplug the USB memory...computer settings. ● Web browser Where the computer and the projector are changed . 5 Select Config free (USB) in the user s manual supplied with a memory PC card. 1 Launch the Wireless Utility software application. To unplug the USB memory, follow the instructions in Wireless ...


