User Manual
Page 6
... • Macintosh is a registered trademark of Microsoft Corporation in accordance with local regulations. Please dispose of this unit. • Toshiba Corporation accepts no liability whatsoever for any damages arising from malfunctions arising from combination with the copyright holder. For example, if making a...• Digital Light Processing, Digital Micromirror Device and DMD are harmful to page 36: p.36 • The illustrations in the remote control. • Do not mix batteries of the imaging software or broadcast program, etc., if done without first consulting with equipment...
... • Macintosh is a registered trademark of Microsoft Corporation in accordance with local regulations. Please dispose of this unit. • Toshiba Corporation accepts no liability whatsoever for any damages arising from malfunctions arising from combination with the copyright holder. For example, if making a...• Digital Light Processing, Digital Micromirror Device and DMD are harmful to page 36: p.36 • The illustrations in the remote control. • Do not mix batteries of the imaging software or broadcast program, etc., if done without first consulting with equipment...
User Manual
Page 7
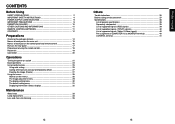
...Before Using SAFETY PRECAUTIONS 2 IMPORTANT SAFETY INSTRUCTIONS 4 POWER SUPPLY CORD SELECTION 9 IMPORTANT PRECAUTIONS 9 EXEMPTION CLAUSES 10 OTHER CAUTIONS AND INFORMATIONS 11 REMOTE CONTROL BATTERIES 11 CONTENTS ...12 Preparations Checking the package contents 14 Names of each part on the main unit 15 Names of each part ...on the control panel and remote control 16 Parts on the rear panel 17 Preparing and using the remote control 18 Placement ...19 Connection ...20 Operations Turning the power on and off 21 Basic operations ...
...Before Using SAFETY PRECAUTIONS 2 IMPORTANT SAFETY INSTRUCTIONS 4 POWER SUPPLY CORD SELECTION 9 IMPORTANT PRECAUTIONS 9 EXEMPTION CLAUSES 10 OTHER CAUTIONS AND INFORMATIONS 11 REMOTE CONTROL BATTERIES 11 CONTENTS ...12 Preparations Checking the package contents 14 Names of each part on the main unit 15 Names of each part ...on the control panel and remote control 16 Parts on the rear panel 17 Preparing and using the remote control 18 Placement ...19 Connection ...20 Operations Turning the power on and off 21 Basic operations ...
User Manual
Page 8
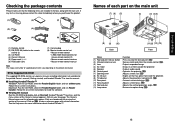
...you purchased the product. (1) (4) (7) (2) (5) (3) (6) (8) LASER PLAY MER-NUC/LIECNKTER INPUT STOP VOL.PJ MODE ■ (1) Remote control ■ (2) R6 (SIZE AA) batteries for remote control (2) ■ (3) CD-ROM ■ (4) Owner's Manual ■ (5) Power cord (See note) ■ (6) RGB cable... (3m) ■ (7) Carrying bag ■ (8) Mouse remote control set • Mouse remote control • LR03 (SIZE AAA) batteries for mouse remote control (2) • Mouse remote control receiver • Mouse remote control manual Note The shape and number of supplied power cords ...
...you purchased the product. (1) (4) (7) (2) (5) (3) (6) (8) LASER PLAY MER-NUC/LIECNKTER INPUT STOP VOL.PJ MODE ■ (1) Remote control ■ (2) R6 (SIZE AA) batteries for remote control (2) ■ (3) CD-ROM ■ (4) Owner's Manual ■ (5) Power cord (See note) ■ (6) RGB cable... (3m) ■ (7) Carrying bag ■ (8) Mouse remote control set • Mouse remote control • LR03 (SIZE AAA) batteries for mouse remote control (2) • Mouse remote control receiver • Mouse remote control manual Note The shape and number of supplied power cords ...
User Manual
Page 9
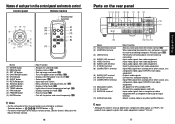
... p.27 Notes • For the remainder of each part on the rear panel (1) (2) (3) (4) (5) (6) (7) (8) (9) (10) (11) (15) Name (1) Infrared remote sensor (2) CONTROL terminal (3) USB terminal (4) AUDIO (L/R) terminal (5) VIDEO terminal (6) AUDIO (L/R) terminal (7) S-VIDEO terminal (8) COMPUTER 1 terminal (9) AUDIO OUT terminal (10) MONITOR ...video equipment. : AC power line ON (standby)/OFF. : Connect the supplied power cord here. : Input audio signals from the remote control. p.36 : Displays cooling fan mode. Note • Although this to a computer display, etc. : Input RGB signal ...
... p.27 Notes • For the remainder of each part on the rear panel (1) (2) (3) (4) (5) (6) (7) (8) (9) (10) (11) (15) Name (1) Infrared remote sensor (2) CONTROL terminal (3) USB terminal (4) AUDIO (L/R) terminal (5) VIDEO terminal (6) AUDIO (L/R) terminal (7) S-VIDEO terminal (8) COMPUTER 1 terminal (9) AUDIO OUT terminal (10) MONITOR ...video equipment. : AC power line ON (standby)/OFF. : Connect the supplied power cord here. : Input audio signals from the remote control. p.36 : Displays cooling fan mode. Note • Although this to a computer display, etc. : Input RGB signal ...
User Manual
Page 10
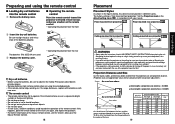
...lighting. • Do not drop or bang. • Do not leave in hot or humid locations. • Do not get wet or place on the remote control. • Operating the projector from the side Lens center H 90° a a is ceiling-mounted, install the breaker for turning off the power ... the projector on the ceiling, be placed in accordance with the use of the batteries properly. Preparing and using for extended periods. • If the remote control stops working, or if its range decreases, replace all the batteries with no keystone adjustment.) Screen As seen from above a (min length) = ...
...lighting. • Do not drop or bang. • Do not leave in hot or humid locations. • Do not get wet or place on the remote control. • Operating the projector from the side Lens center H 90° a a is ceiling-mounted, install the breaker for turning off the power ... the projector on the ceiling, be placed in accordance with the use of the batteries properly. Preparing and using for extended periods. • If the remote control stops working, or if its range decreases, replace all the batteries with no keystone adjustment.) Screen As seen from above a (min length) = ...
User Manual
Page 11
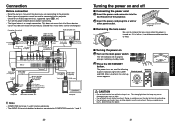
... air exhaust. Power cord connector (Supplied) ■ Removing the lens cover Be sure to orange, indicating standby mode. 2 Press the ON/STANDBY button. Control panel Remote Control (Orange) Start-up screen appears. Connection Before connection • Read the owner's manual of the device you are connecting to the projector. • Some...
... air exhaust. Power cord connector (Supplied) ■ Removing the lens cover Be sure to orange, indicating standby mode. 2 Press the ON/STANDBY button. Control panel Remote Control (Orange) Start-up screen appears. Connection Before connection • Read the owner's manual of the device you are connecting to the projector. • Some...
User Manual
Page 13
... each type of the input signal by the projector is input, the "Unsupported signal" will appear dark, and the lamp could burn out. Control panel Remote Control The Set up menu and select [Keystone]. Before correction After correction 1 Press the SET UP button. 2 Press the button. To stow the foot adjuster...
... each type of the input signal by the projector is input, the "Unsupported signal" will appear dark, and the lamp could burn out. Control panel Remote Control The Set up menu and select [Keystone]. Before correction After correction 1 Press the SET UP button. 2 Press the button. To stow the foot adjuster...
User Manual
Page 14
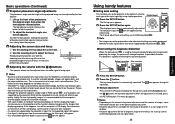
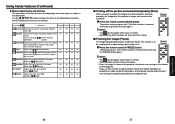
... Item Description Computer Y/PB/PR Video S-video Auto. Yes Lower Higher Clamp 2 Adjusts the clamp pulse width. Press the remote control's MUTE button. Keystone Automatically corrects the keystone distortion. Press the SET UP button. H-position Adjust the horizontal position of...screen. Yes Move down Move up menu vary depending on the screen. Press the remote control's FREEZE button. The picture pauses. (The Freeze function is released when pressing the FREEZE button again.) Remote Control Remote Control Notes • The icon will appear while freeze is in the table ...
... Item Description Computer Y/PB/PR Video S-video Auto. Yes Lower Higher Clamp 2 Adjusts the clamp pulse width. Press the remote control's MUTE button. Keystone Automatically corrects the keystone distortion. Press the SET UP button. H-position Adjust the horizontal position of...screen. Yes Move down Move up menu vary depending on the screen. Press the remote control's FREEZE button. The picture pauses. (The Freeze function is released when pressing the FREEZE button again.) Remote Control Remote Control Notes • The icon will appear while freeze is in the table ...
User Manual
Page 15
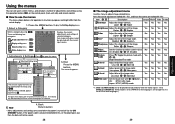
... Yes No US: NTSC (US) mode Japan: NTSC (JAPAN) mode *1: [Tint] and [NTSC mode] can call up on the control panel (main unit side) and remote control. ■ How to use the following four categories: Image adjustment menu p.29 Display setting menu p.30 Displays the current adjustments and settings of selected...
... Yes No US: NTSC (US) mode Japan: NTSC (JAPAN) mode *1: [Tint] and [NTSC mode] can call up on the control panel (main unit side) and remote control. ■ How to use the following four categories: Image adjustment menu p.29 Display setting menu p.30 Displays the current adjustments and settings of selected...
User Manual
Page 19
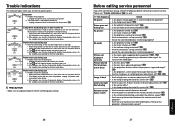
...; The icon will appear before the power goes out. ❈ After approx. p.32 Remote control doesn't work • Are the remote control's batteries drained? • Are the batteries inserted into the remote control correctly? Power went out during use (Red lit or flashing) Or (Orange lit)...tint, R-level, G-level, or B-level adjustments off? p.36 No picture • Is the projector turned on ? p.18 • Is the remote control being used within the projector's supported range? p.34 Power goes out • Is the ambient temperature high? p.29 • Are the connections ...
...; The icon will appear before the power goes out. ❈ After approx. p.32 Remote control doesn't work • Are the remote control's batteries drained? • Are the batteries inserted into the remote control correctly? Power went out during use (Red lit or flashing) Or (Orange lit)...tint, R-level, G-level, or B-level adjustments off? p.36 No picture • Is the projector turned on ? p.18 • Is the remote control being used within the projector's supported range? p.34 Power goes out • Is the ambient temperature high? p.29 • Are the connections ...


