
User Manual
Page 1
OWNER'S MANUAL DATA PROJECTOR TDP-T98 (XGA) Others Maintenance Operations Preparations Before Using
OWNER'S MANUAL DATA PROJECTOR TDP-T98 (XGA) Others Maintenance Operations Preparations Before Using
User Manual
Page 3
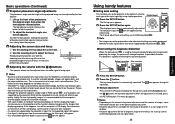
... intended to operate from the lamp may cause damage to the operating instructions. Heat 8. The safeguards incorporated in a wet basement; Read Owner's Manual 3. Source of Light After unpacking this unit will protect you if you are not sure of the type of fire or electric shock. 7. ...a risk of power supply to . 5. or near a bath tub, wash bowl, kitchen sink, or laundry 9. in this product, read the owner's manual carefully, and follow all the operating and other sources, refer to your product dealer or local power company. Do not look into the lens while...
... intended to operate from the lamp may cause damage to the operating instructions. Heat 8. The safeguards incorporated in a wet basement; Read Owner's Manual 3. Source of Light After unpacking this unit will protect you if you are not sure of the type of fire or electric shock. 7. ...a risk of power supply to . 5. or near a bath tub, wash bowl, kitchen sink, or laundry 9. in this product, read the owner's manual carefully, and follow all the operating and other sources, refer to your product dealer or local power company. Do not look into the lens while...
User Manual
Page 6
... of Adobe Systems Incorporated. REMOTE CONTROL BATTERIES • Be sure to Toshiba Corporation, operation, theft or mischief by third parties, other accidents, or use this Instruction Manual. • Toshiba Corporation accepts no liability whatsoever for any damages arising from malfunctions arising from... not mix new and used in the U.S. Using the batteries improperly may not reflect your projector. EXEMPTION CLAUSES • Toshiba Corporation bears no responsibility for incidental damages (lost profit, work interruption, corruption or loss of the memory contents, etc.)...
... of Adobe Systems Incorporated. REMOTE CONTROL BATTERIES • Be sure to Toshiba Corporation, operation, theft or mischief by third parties, other accidents, or use this Instruction Manual. • Toshiba Corporation accepts no liability whatsoever for any damages arising from malfunctions arising from... not mix new and used in the U.S. Using the batteries improperly may not reflect your projector. EXEMPTION CLAUSES • Toshiba Corporation bears no responsibility for incidental damages (lost profit, work interruption, corruption or loss of the memory contents, etc.)...
User Manual
Page 8
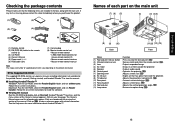
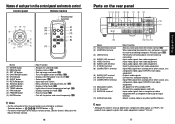
... (8) Air exhaust (9) Tilt adjuster (10) Rear panel (11) Focusing lever (12) Foot adjuster (13) Lamp cover : Press to view the manual. ■ Installing Acrobat® Reader™ Windows®: Run the CD-ROM, select the Reader/English folder, and run Reader Installer. Follow the... INPUT STOP VOL.PJ MODE ■ (1) Remote control ■ (2) R6 (SIZE AA) batteries for remote control (2) ■ (3) CD-ROM ■ (4) Owner's Manual ■ (5) Power cord (See note) ■ (6) RGB cable (3m) ■ (7) Carrying bag ■ (8) Mouse remote control set • Mouse remote control...
... (8) Air exhaust (9) Tilt adjuster (10) Rear panel (11) Focusing lever (12) Foot adjuster (13) Lamp cover : Press to view the manual. ■ Installing Acrobat® Reader™ Windows®: Run the CD-ROM, select the Reader/English folder, and run Reader Installer. Follow the... INPUT STOP VOL.PJ MODE ■ (1) Remote control ■ (2) R6 (SIZE AA) batteries for remote control (2) ■ (3) CD-ROM ■ (4) Owner's Manual ■ (5) Power cord (See note) ■ (6) RGB cable (3m) ■ (7) Carrying bag ■ (8) Mouse remote control set • Mouse remote control...
User Manual
Page 9
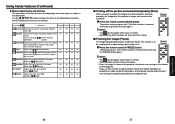
... from video equipment marked "Y/CB/CR." 17 Preparations p.36 : Displays cooling fan mode. p.27 Notes • For the remainder of this manual, buttons are referred to as Y/PB/PR, the product also supports signals from the remote control. p.41 : Terminal for service purpose. p....standby). Names of each part on or off. p.21 : Selects input. p.18 : When operating the projector via a computer, connect this owner's manual abbreviates component video signals as follows: Selection buttons ⇒ ; Note • Although this to a computer display, etc. : Input RGB signal from...
... from video equipment marked "Y/CB/CR." 17 Preparations p.36 : Displays cooling fan mode. p.27 Notes • For the remainder of this manual, buttons are referred to as Y/PB/PR, the product also supports signals from the remote control. p.41 : Terminal for service purpose. p....standby). Names of each part on or off. p.21 : Selects input. p.18 : When operating the projector via a computer, connect this owner's manual abbreviates component video signals as follows: Selection buttons ⇒ ; Note • Although this to a computer display, etc. : Input RGB signal from...
User Manual
Page 10
... clean/replace the lamp at the main unit again, and repeat the operation. • For further information of the mouse remote control, see the Owner's Manual of the Mouse Remote Control. 18 Placement Placement Styles As shown in previous pages. • Remove batteries from the image bottom to bright sunlight or...
... clean/replace the lamp at the main unit again, and repeat the operation. • For further information of the mouse remote control, see the Owner's Manual of the Mouse Remote Control. 18 Placement Placement Styles As shown in previous pages. • Remove batteries from the image bottom to bright sunlight or...
User Manual
Page 11
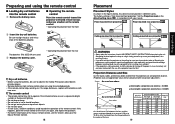
... strong light from the lamp may cause damage to orange, indicating standby mode. 2 Press the ON/STANDBY button. Connection Before connection • Read the owner's manual of the device you are connecting to the projector. • Some types of computer cannot be exchanged.) Computer (for control) VCR Video recorder, DVD player...
... strong light from the lamp may cause damage to orange, indicating standby mode. 2 Press the ON/STANDBY button. Connection Before connection • Read the owner's manual of the device you are connecting to the projector. • Some types of computer cannot be exchanged.) Computer (for control) VCR Video recorder, DVD player...
User Manual
Page 12
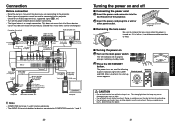
... operations 1 Turn on the power. You can also configure the start-up screen not to appear via the Default setting menu p.31 . • This owner's manual assumes that English has been selected. 3 Activate the connected device. If you unplug the power cord or turn off the power. It is projected. The...
... operations 1 Turn on the power. You can also configure the start-up screen not to appear via the Default setting menu p.31 . • This owner's manual assumes that English has been selected. 3 Activate the connected device. If you unplug the power cord or turn off the power. It is projected. The...
User Manual
Page 13
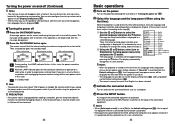
...XGA) will be expanded or shrunk, which will affect image quality slightly. For computer input, the icon will appear during this ● Manual adjustment Press the SET UP button to display the Set up the projector while pressing the foot adjuster release button, 2 then slowly lower the... be black spots (pixels that do not light) or bright spots (pixels that the computer's external output should be set . For manual adjustment and setting, see the owner's manual of your computer. • If a signal not supported by the projector p.39 , p.40 . ● Correcting the keystone distortion...
...XGA) will be expanded or shrunk, which will affect image quality slightly. For computer input, the icon will appear during this ● Manual adjustment Press the SET UP button to display the Set up the projector while pressing the foot adjuster release button, 2 then slowly lower the... be black spots (pixels that do not light) or bright spots (pixels that the computer's external output should be set . For manual adjustment and setting, see the owner's manual of your computer. • If a signal not supported by the projector p.39 , p.40 . ● Correcting the keystone distortion...
User Manual
Page 14
... Move right V-position Adjust the vertical position of the Yes screen. Yes Lower Higher Clamp 2 Adjusts the clamp pulse width. Using handy features (Continued) ● Manual adjustments and settings The menu items of the Set up Clamp 1 Adjusts the clamp pulse position. Phase Adjust with to eliminate periodic patterns Yes and...
... Move right V-position Adjust the vertical position of the Yes screen. Yes Lower Higher Clamp 2 Adjusts the clamp pulse width. Using handy features (Continued) ● Manual adjustments and settings The menu items of the Set up Clamp 1 Adjusts the clamp pulse position. Phase Adjust with to eliminate periodic patterns Yes and...

User Manual
Page 16
... to Auto, you must press the ON/ STANDBY button to turn on the power when the ON/STANDBY button is pressed (Manual), or when the power cord is plugged in (Auto). Manual Auto Lamp power [Note 1] Sets the lamp power. Yes No Notes 1: When Lamp power is thinned before sampling. ■ The...
... to Auto, you must press the ON/ STANDBY button to turn on the power when the ON/STANDBY button is pressed (Manual), or when the power cord is plugged in (Auto). Manual Auto Lamp power [Note 1] Sets the lamp power. Yes No Notes 1: When Lamp power is thinned before sampling. ■ The...
User Manual
Page 18
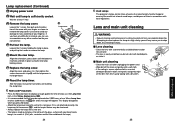
.... Loosen the 2 screws holding the lamp in step 3 until the lamp cover is no longer loose. 3 Lamp cover 1 2 1 4 2 2 5 1 7 Reset the lamp timer. See the lamp's manual for your finger(s). Lens and main unit cleaning WARNING • Request cleaning and maintenance of the arrow with a dry cloth. 35 Maintenance Lamp replacement (Continued...
.... Loosen the 2 screws holding the lamp in step 3 until the lamp cover is no longer loose. 3 Lamp cover 1 2 1 4 2 2 5 1 7 Reset the lamp timer. See the lamp's manual for your finger(s). Lens and main unit cleaning WARNING • Request cleaning and maintenance of the arrow with a dry cloth. 35 Maintenance Lamp replacement (Continued...
User Manual
Page 20
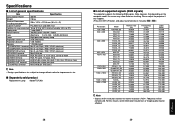
... Note, however, that depending on the computer model, the screen may be compressed. For this happens. (Press the SET UP button, and adjust automatically or manually. stereo mini-jack CONTROL terminal Mini DIN 8 pin (RS-232C) Note • Design, specifications, etc. Connection terminal Others Specifications ■ List of general specifications Item...
... Note, however, that depending on the computer model, the screen may be compressed. For this happens. (Press the SET UP button, and adjust automatically or manually. stereo mini-jack CONTROL terminal Mini DIN 8 pin (RS-232C) Note • Design, specifications, etc. Connection terminal Others Specifications ■ List of general specifications Item...


