User Manual
Page 6
...or mischief by third parties, other accidents, or use under abnormal conditions including erroneous or improper operation and other problems. • Toshiba Corporation bears no responsibility for incidental damages (lost profit, work interruption, corruption or loss of the memory contents, etc.) arising from ...) Avoid Volatile Liquid Do not use the battery beyond the expiration date indicated on the battery or leave a dead battery in the remote control. • Do not mix batteries of different types, such as alkaline and manganese. Using the batteries improperly may not reflect your...
...or mischief by third parties, other accidents, or use under abnormal conditions including erroneous or improper operation and other problems. • Toshiba Corporation bears no responsibility for incidental damages (lost profit, work interruption, corruption or loss of the memory contents, etc.) arising from ...) Avoid Volatile Liquid Do not use the battery beyond the expiration date indicated on the battery or leave a dead battery in the remote control. • Do not mix batteries of different types, such as alkaline and manganese. Using the batteries improperly may not reflect your...
User Manual
Page 7
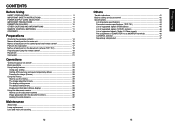
...Using SAFETY PRECAUTIONS 2 IMPORTANT SAFETY INSTRUCTIONS 4 POWER SUPPLY CORD SELECTION 9 IMPORTANT PRECAUTIONS 9 EXEMPTION CLAUSES 10 OTHER CAUTIONS AND INFORMATIONS 11 REMOTE CONTROL BATTERIES 11 CONTENTS ...12 Preparations Checking the package contents 14 Names of each part on the main unit 15 Names of each part... on the control panel and remote control 16 Parts on the rear panel 17 Names of each part on the document camera (TDP-T91 18 Preparing and using the remote control 19 Placement ...20 Connection ...21 Operations Turning the power on and...
...Using SAFETY PRECAUTIONS 2 IMPORTANT SAFETY INSTRUCTIONS 4 POWER SUPPLY CORD SELECTION 9 IMPORTANT PRECAUTIONS 9 EXEMPTION CLAUSES 10 OTHER CAUTIONS AND INFORMATIONS 11 REMOTE CONTROL BATTERIES 11 CONTENTS ...12 Preparations Checking the package contents 14 Names of each part on the main unit 15 Names of each part... on the control panel and remote control 16 Parts on the rear panel 17 Names of each part on the document camera (TDP-T91 18 Preparing and using the remote control 19 Placement ...20 Connection ...21 Operations Turning the power on and...
User Manual
Page 8
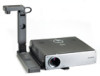
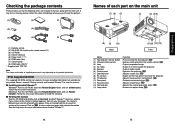
...; (6) RGB cable (3m) ■ (7) Carrying bag ■ (8) RGB cable (25cm)* *: Supplied with TDP-T91 Note The shape and number of each part on the main unit (7) (6) (5) (4) (3) (2)(1) (8) (9) (10) Back (11)(9) (12) (13) Front Name : Function (1) Foot adjuster release button (2) Infrared remote sensor (3) Lens (4) Air intake (5) Speaker (6) Control panel (7) Zooming lever (8) Air exhaust (9) Tilt...
...; (6) RGB cable (3m) ■ (7) Carrying bag ■ (8) RGB cable (25cm)* *: Supplied with TDP-T91 Note The shape and number of each part on the main unit (7) (6) (5) (4) (3) (2)(1) (8) (9) (10) Back (11)(9) (12) (13) Front Name : Function (1) Foot adjuster release button (2) Infrared remote sensor (3) Lens (4) Air intake (5) Speaker (6) Control panel (7) Zooming lever (8) Air exhaust (9) Tilt...
User Manual
Page 9
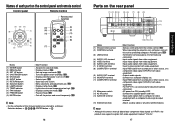
... a computer or other source, or a component video signal (Y/PB/PR) from video equipment. p.22 : Displays whether power is on the control panel and remote control Control panel Remote Control Remote control transmitter (9) (10) (11) (3) (4) (8) (1) (6) (2) (13) (12) (1) (7) (2) (8) (6) (3) (4) (7) (5) Name (1) ENTER button (2) MENU button (3) SET UP button (4) ON/STANDBY button (5) ON indicator...connect this to the controlling computer's RS-232C port. p.29 : Sets up image and mode. p.41 : Displays cooling fan mode. For TDP-T91, use exclusively for service purpose.
... a computer or other source, or a component video signal (Y/PB/PR) from video equipment. p.22 : Displays whether power is on the control panel and remote control Control panel Remote Control Remote control transmitter (9) (10) (11) (3) (4) (8) (1) (6) (2) (13) (12) (1) (7) (2) (8) (6) (3) (4) (7) (5) Name (1) ENTER button (2) MENU button (3) SET UP button (4) ON/STANDBY button (5) ON indicator...connect this to the controlling computer's RS-232C port. p.29 : Sets up image and mode. p.41 : Displays cooling fan mode. For TDP-T91, use exclusively for service purpose.
User Manual
Page 10
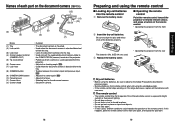
... may fail to operate if the infrared remote sensor is used . If this happens, point the remote control at the main unit again, and repeat the operation. 19 Preparations Names of each part on the document camera (TDP-T91) (12) (1) (11) (6) (8) (9) (10) (2) (3) (5) (4) (7) Name (1) Tray (2) Lock switch (3) Lock lever (4) Camera ...176; Approx. 5m Dry-cell batteries • Before using the batteries, be sure to align the plus and minus ends of the remote control. Be sure to observe the Safety Precautions described in hot or humid locations. • Do not get wet or place on the...
... may fail to operate if the infrared remote sensor is used . If this happens, point the remote control at the main unit again, and repeat the operation. 19 Preparations Names of each part on the document camera (TDP-T91) (12) (1) (11) (6) (8) (9) (10) (2) (3) (5) (4) (7) Name (1) Tray (2) Lock switch (3) Lock lever (4) Camera ...176; Approx. 5m Dry-cell batteries • Before using the batteries, be sure to align the plus and minus ends of the remote control. Be sure to observe the Safety Precautions described in hot or humid locations. • Do not get wet or place on the...
User Manual
Page 12
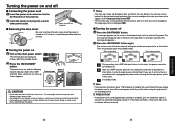
.... Operations 22 23 The power turns on and off the main power switch in order to shut off 1 Press the ON/STANDBY button. Control panel Remote Control (Orange) Start-up screen appears. The strong light from the lamp may fail to heat. ■ Turning the power on 1 Turn on . B After the...
.... Operations 22 23 The power turns on and off the main power switch in order to shut off 1 Press the ON/STANDBY button. Control panel Remote Control (Orange) Start-up screen appears. The strong light from the lamp may fail to heat. ■ Turning the power on 1 Turn on . B After the...

User Manual
Page 14
... input signal. This projector is available for input signals other than those supported by using simple operations. 1 Press the SET UP button. Press . Control panel Remote Control The Set up Yes No No No Clamp 1 Adjusts the clamp pulse position. For computer input, the icon will undergo keystone (trapezoidal) distortion. Before...
... input signal. This projector is available for input signals other than those supported by using simple operations. 1 Press the SET UP button. Press . Control panel Remote Control The Set up Yes No No No Clamp 1 Adjusts the clamp pulse position. For computer input, the icon will undergo keystone (trapezoidal) distortion. Before...

User Manual
Page 15
...effect. • Operating any other equipment. • If you want to project the images of another projector, overhead projector, etc. Remote Control Press the remote control's FREEZE button. Press the MENU button Display the Setting display menu 2. Default setting menu p.32 Status display menu p.33 3. ... you use this function on video software sold on the market, broadcast or broadcast on the control panel (main unit side) and remote control. ■ How to use the following four categories: Image adjustment menu p.30 Display setting menu p.31 Displays the current adjustments...
...effect. • Operating any other equipment. • If you want to project the images of another projector, overhead projector, etc. Remote Control Press the remote control's FREEZE button. Press the MENU button Display the Setting display menu 2. Default setting menu p.32 Status display menu p.33 3. ... you use this function on video software sold on the market, broadcast or broadcast on the control panel (main unit side) and remote control. ■ How to use the following four categories: Image adjustment menu p.30 Display setting menu p.31 Displays the current adjustments...
User Manual
Page 19
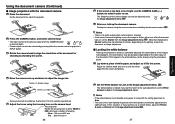
... that the white paper fills the screen completely. 2 Set the White balance to align the orientation of the document for shooting by pressing either the remote control or projector's INPUT button. 3 Rotate the camera head to Lock in the Image adjustment menu.
... that the white paper fills the screen completely. 2 Set the White balance to align the orientation of the document for shooting by pressing either the remote control or projector's INPUT button. 3 Rotate the camera head to Lock in the Image adjustment menu.
User Manual
Page 22
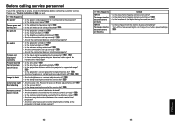
...projector? • Are there any fluorescent or other bright lights shining at the projector's infrared remote sensor? 42 If This Happens TDP-T91 The images from the document camera are blurry TDP-T91 The images from the document camera are flickering Check • Is the document imaging camera... No power • Is the power cord plugged in? p.21 • Are all the connected devices functioning properly? p.19 • Is the remote control being focused too dark? • Is there impact from the room's fluorescent lighting? p.40 • Is the lens focus adjusted optimally? ...
...projector? • Are there any fluorescent or other bright lights shining at the projector's infrared remote sensor? 42 If This Happens TDP-T91 The images from the document camera are blurry TDP-T91 The images from the document camera are flickering Check • Is the document imaging camera... No power • Is the power cord plugged in? p.21 • Are all the connected devices functioning properly? p.19 • Is the remote control being focused too dark? • Is there impact from the room's fluorescent lighting? p.40 • Is the lens focus adjusted optimally? ...


