
User Manual
Page 2
... NOT OPEN THE CABINET. Reorient or relocate the receiving antenna. - WARNING: TO REDUCE THE RISK OF FIRE OR ELECTRIC SHOCK, DO NOT EXPOSE THIS APPLIANCE TO RAIN OR MOISTURE. REFER SERVICING TO QUALIFIED PERSONNEL ONLY. MODEL NAME: TDP-T40 USA only TRADE NAME: DATA PROJECTOR Tested To Comply With FCC Standards FOR HOME OR OFFICE USE MODEL NAME: TDP-T40 FCC...
... NOT OPEN THE CABINET. Reorient or relocate the receiving antenna. - WARNING: TO REDUCE THE RISK OF FIRE OR ELECTRIC SHOCK, DO NOT EXPOSE THIS APPLIANCE TO RAIN OR MOISTURE. REFER SERVICING TO QUALIFIED PERSONNEL ONLY. MODEL NAME: TDP-T40 USA only TRADE NAME: DATA PROJECTOR Tested To Comply With FCC Standards FOR HOME OR OFFICE USE MODEL NAME: TDP-T40 FCC...
User Manual
Page 3
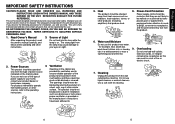
... not use this product, read the owner's manual carefully, and follow all the operating and other sources, refer to operate from overheating, and these openings must not be repaired by the user. Read Owner's Manual 3. Source of Light After unpacking this product near water. - Do not look into the lens while the lamp is fully transistorized and does not contain any parts that can be blocked or covered. Power Sources...
... not use this product, read the owner's manual carefully, and follow all the operating and other sources, refer to operate from overheating, and these openings must not be repaired by the user. Read Owner's Manual 3. Source of Light After unpacking this product near water. - Do not look into the lens while the lamp is fully transistorized and does not contain any parts that can be blocked or covered. Power Sources...
User Manual
Page 4
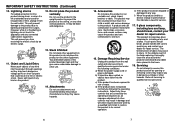
... product manufacturer as opening or removing covers may give some undesirable damage to its normal operation. Refer all servicing to rain or water. c) If the product has been exposed to qualified service personnel. 7 Before Using Adjust only those controls that are covered by following conditions: a) When the power-supply cord or plug is thundering or lightning, do not place this indicates a need for long...
... product manufacturer as opening or removing covers may give some undesirable damage to its normal operation. Refer all servicing to rain or water. c) If the product has been exposed to qualified service personnel. 7 Before Using Adjust only those controls that are covered by following conditions: a) When the power-supply cord or plug is thundering or lightning, do not place this indicates a need for long...
User Manual
Page 5
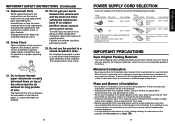
... at least 2 hours when there is reduced so use the unit for long periods of the unit or near the air exhaust for at the factory. For maximum protection, repack the set to [High]. p.33 9 Before Using Unauthorized substitutions may result in a risk of the projector. • Avoid locations with children should be sure the service technician has used replacement parts specified by...
... at least 2 hours when there is reduced so use the unit for long periods of the unit or near the air exhaust for at the factory. For maximum protection, repack the set to [High]. p.33 9 Before Using Unauthorized substitutions may result in a risk of the projector. • Avoid locations with children should be sure the service technician has used replacement parts specified by...
User Manual
Page 6
... may not reflect your projector. IMPORTANT PRECAUTIONS (Continued) Avoid Volatile Liquid Do not use volatile liquids, such as alkaline and manganese. In the spaces provided below, record the Model and Serial No. REMOTE CONTROL BATTERIES • Be sure to Toshiba Corporation. 10 OTHER CAUTIONS AND INFORMATIONS Copyrights Showing or transmitting commercial imaging software or broadcast or cable-broad casting programs...
... may not reflect your projector. IMPORTANT PRECAUTIONS (Continued) Avoid Volatile Liquid Do not use volatile liquids, such as alkaline and manganese. In the spaces provided below, record the Model and Serial No. REMOTE CONTROL BATTERIES • Be sure to Toshiba Corporation. 10 OTHER CAUTIONS AND INFORMATIONS Copyrights Showing or transmitting commercial imaging software or broadcast or cable-broad casting programs...
User Manual
Page 7
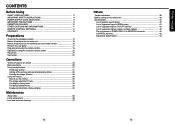
... using the remote control 18 Operating a computer using the remote control 20 Placement ...21 Connection ...22 Operations Turning the power on and off 23 Basic operations 25 Using handy features 27 Using auto setting 27 Cutting off the picture and sound temporarily (Mute 29 Freezing the image (Freeze 29 Using the menus 30 How to use the menus 30 The image adjustment menu 31 The display setting menu 32 The default setting menu 33 Displaying Information (Status display 34 Maintenance About lamp ...35 Lamp replacement 35 Lens...
... using the remote control 18 Operating a computer using the remote control 20 Placement ...21 Connection ...22 Operations Turning the power on and off 23 Basic operations 25 Using handy features 27 Using auto setting 27 Cutting off the picture and sound temporarily (Mute 29 Freezing the image (Freeze 29 Using the menus 30 How to use the menus 30 The image adjustment menu 31 The display setting menu 32 The default setting menu 33 Displaying Information (Status display 34 Maintenance About lamp ...35 Lamp replacement 35 Lens...
User Manual
Page 8
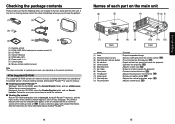
.... Click on the main unit (6) (5) (4) (3) (2) (1) (7) (8) (9) (9) Back (10) (11) (12) Front Name : Function (1) Lens (2) Infrared remote sensor (3) Foot adjuster release button (4) Air exhaust (5) Control panel (6) Zooming lever (7) Air intake (8) Rear panel (9) Tilt adjuster (10) Lamp cover (11) Foot adjuster (12) Focusing lever : Projects expanded image. : Senses commands from outside the projector. : Connects external devices. to install the software. ■ Viewing the manual Run the CD-ROM and double-click on your language. Names of the...
.... Click on the main unit (6) (5) (4) (3) (2) (1) (7) (8) (9) (9) Back (10) (11) (12) Front Name : Function (1) Lens (2) Infrared remote sensor (3) Foot adjuster release button (4) Air exhaust (5) Control panel (6) Zooming lever (7) Air intake (8) Rear panel (9) Tilt adjuster (10) Lamp cover (11) Foot adjuster (12) Focusing lever : Projects expanded image. : Senses commands from outside the projector. : Connects external devices. to install the software. ■ Viewing the manual Run the CD-ROM and double-click on your language. Names of the...

User Manual
Page 9
...also supports signals from video equipment. : When operating the projector via a computer, connect this to the controlling computer's RS-232C port. p.23 : Selects input. p.19 : This control functions as a computer's [↑] button. p.20 : Pauses image. ENTER button ⇒ 16 Parts on the control panel and remote control Control panel (9) (10) (11) TEMP LAMP FAN (1) (8) (2) (7) (3) Remote Control Front Remote control transmitter Rear (5) (8) (18) (6) (5) (4) (11) (13) (14) (6) ENTER R-CLICK RETURN ESC INPUT SET UP MENU (15) (1) (3) (2) (16) (4) Battery cover...
...also supports signals from video equipment. : When operating the projector via a computer, connect this to the controlling computer's RS-232C port. p.23 : Selects input. p.19 : This control functions as a computer's [↑] button. p.20 : Pauses image. ENTER button ⇒ 16 Parts on the control panel and remote control Control panel (9) (10) (11) TEMP LAMP FAN (1) (8) (2) (7) (3) Remote Control Front Remote control transmitter Rear (5) (8) (18) (6) (5) (4) (11) (13) (14) (6) ENTER R-CLICK RETURN ESC INPUT SET UP MENU (15) (1) (3) (2) (16) (4) Battery cover...
User Manual
Page 11
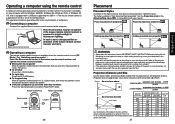
... Mouse remote control at a high site by yourself may fail to operate if the mouse remote control receiver is supported on any computer with your dealer to do so. Set the Projection mode in the default setting menu p.33 , in accordance with the Windows 98/98SE, Windows Me, Windows 2000, or Windows XP OS, that fact. Mounting the projector on the ceiling, be sure to ask your needs. Projection Distance and Size Use the...
... Mouse remote control at a high site by yourself may fail to operate if the mouse remote control receiver is supported on any computer with your dealer to do so. Set the Projection mode in the default setting menu p.33 , in accordance with the Windows 98/98SE, Windows Me, Windows 2000, or Windows XP OS, that fact. Mounting the projector on the ceiling, be sure to ask your needs. Projection Distance and Size Use the...
User Manual
Page 12
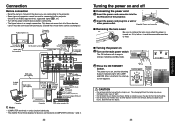
... used or connected to this projector. Computer (for devices connected to COMPUTER terminals 1 and 2. 22 Operations Turning the power on and off the power of the projector. 2 Insert the power cord plug into the lens while the lamp is left on, it is on , and the following 3 green indicators light: ON, LAMP, and FAN. The power turns on . To audio input White (L)/Red (R) Audio cable (not supplied) To RS-232C terminal p.43 To audio output White (L)/Red (R) Control cable Video cable (not supplied) To S-Video output S-Video cable...
... used or connected to this projector. Computer (for devices connected to COMPUTER terminals 1 and 2. 22 Operations Turning the power on and off the power of the projector. 2 Insert the power cord plug into the lens while the lamp is left on, it is on , and the following 3 green indicators light: ON, LAMP, and FAN. The power turns on . To audio input White (L)/Red (R) Audio cable (not supplied) To RS-232C terminal p.43 To audio output White (L)/Red (R) Control cable Video cable (not supplied) To S-Video output S-Video cable...

User Manual
Page 13
... displayed p.25 . ■ Turning the power off 1 Press the ON/STANDBY button. Then, the projector goes into standby mode. We recommend that you use the projector after purchase, after the start-up screen disappears, the Language menu is set via the Display setting menu p.32 and Lamp power via the Display setting menu p.32 . • The first time you wish to shut off the main power switch in order to appear via the Default setting menu p.33 . • This owner's manual...
... displayed p.25 . ■ Turning the power off 1 Press the ON/STANDBY button. Then, the projector goes into standby mode. We recommend that you use the projector after purchase, after the start-up screen disappears, the Language menu is set via the Display setting menu p.32 and Lamp power via the Display setting menu p.32 . • The first time you wish to shut off the main power switch in order to appear via the Default setting menu p.33 . • This owner's manual...
User Manual
Page 14
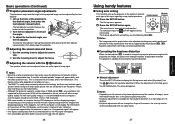
... will undergo keystone (trapezoidal) distortion. Control panel Remote Control The Set up the front of your computer. • If a signal not supported by the foot adjuster. The foot adjuster extends. w Turn the foot adjuster to fluctuate slightly. • A lamp is consumable item. If used to display the Set up the projector while pressing the foot adjuster release button, then slowly lower the projector. 6 Adjusting the screen size and focus q Use the zooming lever to XGA (1024 ×...
... will undergo keystone (trapezoidal) distortion. Control panel Remote Control The Set up the front of your computer. • If a signal not supported by the foot adjuster. The foot adjuster extends. w Turn the foot adjuster to fluctuate slightly. • A lamp is consumable item. If used to display the Set up the projector while pressing the foot adjuster release button, then slowly lower the projector. 6 Adjusting the screen size and focus q Use the zooming lever to XGA (1024 ×...
User Manual
Page 15
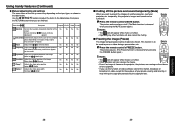
...; Manual adjustments and settings The menu items of the Set up Clamp 1 Adjusts the clamp pulse position. Screen shrinking Screen shrinking downward upward Auto setting Automatically adjusts items such as shown in the table below . Operations 28 29 Use the buttons to project the images of the image. temporarily, this function on video software sold on the market, broadcast or broadcast on cable except for the purpose of your private viewing...
...; Manual adjustments and settings The menu items of the Set up Clamp 1 Adjusts the clamp pulse position. Screen shrinking Screen shrinking downward upward Auto setting Automatically adjusts items such as shown in the table below . Operations 28 29 Use the buttons to project the images of the image. temporarily, this function on video software sold on the market, broadcast or broadcast on cable except for the purpose of your private viewing...
User Manual
Page 16
... ON/ STANDBY button. Less green More green Yes Yes Yes Yes B-level Adjust blue of the image color. If the power cable is disconnected before this, or the power goes out, then the data will not be adjusted are marked with "Yes", and those that there are saved when the power is selected, apply it by using . As the display may differ depending on the control panel (main...
... ON/ STANDBY button. Less green More green Yes Yes Yes Yes B-level Adjust blue of the image color. If the power cable is disconnected before this, or the power goes out, then the data will not be adjusted are marked with "Yes", and those that there are saved when the power is selected, apply it by using . As the display may differ depending on the control panel (main...
User Manual
Page 17
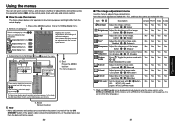
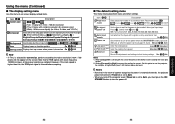
... mounted from ceiling) No signal power off Set the timer to wait for the power to be turned off )/1 min./5 min./10 min./30 min./60 min. Low Standard Fan mode [Note 2] Sets the cooling fan speed. Resets all Press . Using the menu (Continued) ■ The display setting menu Use this menu to set screen display-related items. Item Screen size Description (Full): Display with 1024 × 768 dot resolution (Thru): Display with sampling resolution (for computer input) (Wide): Wide-screen display (for Video, S-video...
... mounted from ceiling) No signal power off Set the timer to wait for the power to be turned off )/1 min./5 min./10 min./30 min./60 min. Low Standard Fan mode [Note 2] Sets the cooling fan speed. Resets all Press . Using the menu (Continued) ■ The display setting menu Use this menu to set screen display-related items. Item Screen size Description (Full): Display with 1024 × 768 dot resolution (Thru): Display with sampling resolution (for computer input) (Wide): Wide-screen display (for Video, S-video...
User Manual
Page 18
.../PR Input Input source name Yes Yes Mode name RGB input mode [Note 1] Yes No H-resolution Horizontal resolution (in dots) Yes No V-resolution Vertical resolution (in dots) Yes No H-frequency Horizontal sync frequency Yes No V-frequency Vertical sync frequency [Note 2] Yes No Sync Sync signal polarity [Note 3] Yes No Signal format Y/PB/PR signal format No Yes Video mode Color method of video signal No No Lamp time Time of lamp use [Note 4] Yes Yes Lamp reset count The count for lamp replacement...
.../PR Input Input source name Yes Yes Mode name RGB input mode [Note 1] Yes No H-resolution Horizontal resolution (in dots) Yes No V-resolution Vertical resolution (in dots) Yes No H-frequency Horizontal sync frequency Yes No V-frequency Vertical sync frequency [Note 2] Yes No Sync Sync signal polarity [Note 3] Yes No Signal format Y/PB/PR signal format No Yes Video mode Color method of video signal No No Lamp time Time of lamp use [Note 4] Yes Yes Lamp reset count The count for lamp replacement...
User Manual
Page 19
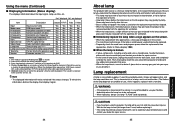
... the button twice to come on resetting the lamp timer. If it is not attached correctly, the lamp may deform or discolor the unit or damage the paint surface. • When using the two lamp locking screws. 6 Replace the lamp cover. Lens and main unit cleaning WARNING • Request cleaning and maintenance of the arrow with your projector dealership. When Lamp time reaches 3,000 hours, the icon and a message will appear...
... the button twice to come on resetting the lamp timer. If it is not attached correctly, the lamp may deform or discolor the unit or damage the paint surface. • When using the two lamp locking screws. 6 Replace the lamp cover. Lens and main unit cleaning WARNING • Request cleaning and maintenance of the arrow with your projector dealership. When Lamp time reaches 3,000 hours, the icon and a message will appear...
User Manual
Page 20
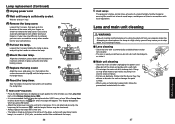
... the lamp cover loose? LAMP (Orange flashing) LAMP (Green lit or Off) TEMP FAN (Red lit) TEMP (Green lit or Off) (Red lit) FAN (Green flashing) Power went out during use ⇒ Internal overheating, or the outside temperature is too high. • Place the projector so that it connected to the standby state waiting for internal cool down . p.31 • Is the screen dirty? • Is the lamp nearing the end of focus • Is the lens dirty? Power...
... the lamp cover loose? LAMP (Orange flashing) LAMP (Green lit or Off) TEMP FAN (Red lit) TEMP (Green lit or Off) (Red lit) FAN (Green flashing) Power went out during use ⇒ Internal overheating, or the outside temperature is too high. • Place the projector so that it connected to the standby state waiting for internal cool down . p.31 • Is the screen dirty? • Is the lamp nearing the end of focus • Is the lens dirty? Power...
User Manual
Page 21
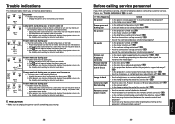
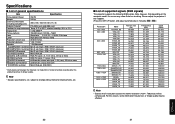
... be lost, or image quality may show flicker or streaking. stereo mini-jack CONTROL terminal Mini DIN 8 pin (RS-232C) * Each plastic part displays the materials it is made from, in order to 70% Display pixels 1 chip DMD™ Picture elements 786,432 pixels (1024H × 768V) Lens Zoom lens F=2.0-2.2 f=18.20-21.84 mm Lamp High-pressure mercury lamp Projection screen size 30-300 inches Projection distance 1.20-11...
... be lost, or image quality may show flicker or streaking. stereo mini-jack CONTROL terminal Mini DIN 8 pin (RS-232C) * Each plastic part displays the materials it is made from, in order to 70% Display pixels 1 chip DMD™ Picture elements 786,432 pixels (1024H × 768V) Lens Zoom lens F=2.0-2.2 f=18.20-21.84 mm Lamp High-pressure mercury lamp Projection screen size 30-300 inches Projection distance 1.20-11...
User Manual
Page 22
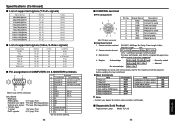
... (1) input select Computer (2) input select Video input select S-video input select Command IN1 IN2 IN3 IN4 Auto setting (RGB input) Status display on PAT DON Status display off DOF Note • Contact your dealer for control cable and other commands. ■ Separately Sold Product Replacement Lamp Model TLPLV5 43 Others For input commands, only ASCII-compliant all-uppercase alphanumeric characters supported. 4 Replies Acknowledge ACK (06h) CR (0Dh) Data ... Specifications (Continued) ■ List of supported signals (Y/PB/PR signals) Signal...
... (1) input select Computer (2) input select Video input select S-video input select Command IN1 IN2 IN3 IN4 Auto setting (RGB input) Status display on PAT DON Status display off DOF Note • Contact your dealer for control cable and other commands. ■ Separately Sold Product Replacement Lamp Model TLPLV5 43 Others For input commands, only ASCII-compliant all-uppercase alphanumeric characters supported. 4 Replies Acknowledge ACK (06h) CR (0Dh) Data ... Specifications (Continued) ■ List of supported signals (Y/PB/PR signals) Signal...

