
Owners Manual
Page 1
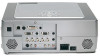
OWNER'S MANUAL DATA PROJECTOR TDP-T250 Others Maintenance Operations Preparations Before Using
OWNER'S MANUAL DATA PROJECTOR TDP-T250 Others Maintenance Operations Preparations Before Using
Owners Manual
Page 3
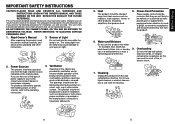
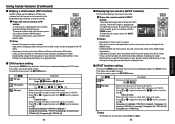
... and the point where they are provided for installation, use liquid cleaners or aerosol cleaners. Cleaning Unplug this product, read the owner's manual carefully, and follow all the operating and other products (including amplifiers) that they exit from the wall outlet before cleaning. For products ... a wet basement; Before Using IMPORTANT SAFETY INSTRUCTIONS CAUTION: PLEASE READ AND OBSERVE ALL WARNINGS AND INSTRUCTIONS GIVEN IN THIS OWNER'S MANUAL AND THOSE MARKED ON THE UNIT. The openings should be walked on or pinched by placing the product on the marking label. Read...
... and the point where they are provided for installation, use liquid cleaners or aerosol cleaners. Cleaning Unplug this product, read the owner's manual carefully, and follow all the operating and other products (including amplifiers) that they exit from the wall outlet before cleaning. For products ... a wet basement; Before Using IMPORTANT SAFETY INSTRUCTIONS CAUTION: PLEASE READ AND OBSERVE ALL WARNINGS AND INSTRUCTIONS GIVEN IN THIS OWNER'S MANUAL AND THOSE MARKED ON THE UNIT. The openings should be walked on or pinched by placing the product on the marking label. Read...
Owners Manual
Page 6
... Disposal This product contains substances which are harmful to burn or injury. Notational Conventions Used in This Manual • References to Toshiba Corporation. 10 OTHER CAUTIONS AND INFORMATIONS Copyrights Showing or transmitting commercial imaging software or broadcast or cable-broad... of or the inability to prevent battery acid from the copyright holder. EXEMPTION CLAUSES • Toshiba Corporation bears no responsibility in this Instruction Manual. • Toshiba Corporation accepts no responsibility for a long time, remove the batteries to use volatile liquids, such...
... Disposal This product contains substances which are harmful to burn or injury. Notational Conventions Used in This Manual • References to Toshiba Corporation. 10 OTHER CAUTIONS AND INFORMATIONS Copyrights Showing or transmitting commercial imaging software or broadcast or cable-broad... of or the inability to prevent battery acid from the copyright holder. EXEMPTION CLAUSES • Toshiba Corporation bears no responsibility in this Instruction Manual. • Toshiba Corporation accepts no responsibility for a long time, remove the batteries to use volatile liquids, such...
Owners Manual
Page 8
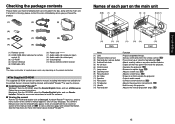
... (9) (2) (6) (3) (7) (10) (4) (8) ■ (1) Remote control ■ (2) LR03 (SIZE AAA) batteries for remote control (2) ■ (3) CD-ROM ■ (4) Owner's Manual ■ (5) RGB cable (3m) ■ (6) Power cord (See note) ■ (7) Audio cable (for computer input) ■ (8) Audio cable (for video input) ■ (9) ... Reader™. 14 Names of supplied power cords vary depending on Start.pdf. See the Help menu for the printed Owner's manual (Getting started) and Acrobat® Reader™ to carry the projector. : Adjusts the vertical projection angle. p.29 : ...
... (9) (2) (6) (3) (7) (10) (4) (8) ■ (1) Remote control ■ (2) LR03 (SIZE AAA) batteries for remote control (2) ■ (3) CD-ROM ■ (4) Owner's Manual ■ (5) RGB cable (3m) ■ (6) Power cord (See note) ■ (7) Audio cable (for computer input) ■ (8) Audio cable (for video input) ■ (9) ... Reader™. 14 Names of supplied power cords vary depending on Start.pdf. See the Help menu for the printed Owner's manual (Getting started) and Acrobat® Reader™ to carry the projector. : Adjusts the vertical projection angle. p.29 : ...

Owners Manual
Page 9
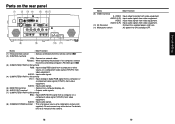
... code switch : Sets the code of remote control to that of the projector. (inside the battery cover) p.43 Note • For the remainder of this manual, buttons are referred to laser. p.37 : Adjusts keystone distortion. p.30 : Turns the power on/off (standby). p.37 (12) LASER button : Shows a laser pointer. (13) AUTO...
... code switch : Sets the code of remote control to that of the projector. (inside the battery cover) p.43 Note • For the remainder of this manual, buttons are referred to laser. p.37 : Adjusts keystone distortion. p.30 : Turns the power on/off (standby). p.37 (12) LASER button : Shows a laser pointer. (13) AUTO...
Owners Manual
Page 10
... audio signals. (8) CAMERA POWER terminal : This is for power source of the camera. 18 19 RS232C : When operating the projector via a computer, connect this to a manual of a calligraphic camera (not supplied). For details, refer to the controlling computer's RS-232C port. AUDIO (L/R) : Input audio signals from video equipment. Preparations (8) (9) (10) (11...
... audio signals. (8) CAMERA POWER terminal : This is for power source of the camera. 18 19 RS232C : When operating the projector via a computer, connect this to a manual of a calligraphic camera (not supplied). For details, refer to the controlling computer's RS-232C port. AUDIO (L/R) : Input audio signals from video equipment. Preparations (8) (9) (10) (11...
Owners Manual
Page 13
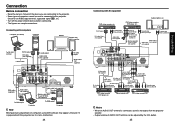
... output White (L)/Red (R) Audio cable (not supplied) To audio output White (L)/Red (R) DVD video recorder, DVD player, etc. Connection Before connection • Read the owner's manual of the device you are connecting to this projector, but it is projected with AV equipment DVD video recorder, etc.
... output White (L)/Red (R) Audio cable (not supplied) To audio output White (L)/Red (R) DVD video recorder, DVD player, etc. Connection Before connection • Read the owner's manual of the device you are connecting to this projector, but it is projected with AV equipment DVD video recorder, etc.
Owners Manual
Page 15
...not light) or bright spots (pixels that are not malfunctions. • Although this happens, turn off the LCD display, see the owner's manual of the connected equipment that is automatically set to XGA resolution. • With some models of focus, adjust it is recommended that these are ...(If the screen is set via the Display setting menu p.40 and Lamp power via the Default setting menu p.42 . • This owner's manual assumes that English has been selected. 3 Activate the connected device. q Lift up the projector while pressing the foot adjuster release button, then slowly ...
...not light) or bright spots (pixels that are not malfunctions. • Although this happens, turn off the LCD display, see the owner's manual of the connected equipment that is automatically set to XGA resolution. • With some models of focus, adjust it is recommended that these are ...(If the screen is set via the Display setting menu p.40 and Lamp power via the Default setting menu p.42 . • This owner's manual assumes that English has been selected. 3 Activate the connected device. q Lift up the projector while pressing the foot adjuster release button, then slowly ...
Owners Manual
Page 16
...projector to the optimum state such as well by the projector p.53 , p.54 . • If auto setting fails adjustment, adjust manually with the Image adjustment menu p.38 . ■ Correcting the keystone distortion When the projector placement angle against the screen is changed while... appear during this keystone distortion. You can keep 31 Operations For fine adjustment, select [V-keystone adjust] by the button and adjust image manually by the button. 3 Use the buttons for input signals other than those supported by selecting [Auto setting] in /out). 1 Press...
...projector to the optimum state such as well by the projector p.53 , p.54 . • If auto setting fails adjustment, adjust manually with the Image adjustment menu p.38 . ■ Correcting the keystone distortion When the projector placement angle against the screen is changed while... appear during this keystone distortion. You can keep 31 Operations For fine adjustment, select [V-keystone adjust] by the button and adjust image manually by the button. 3 Use the buttons for input signals other than those supported by selecting [Auto setting] in /out). 1 Press...
Owners Manual
Page 18
... screen is displayed displays the PIP menu. Video/S-video When the main screen is displayed to the projected image (referred as child screen in this manual) to the right (sub screen). Remote Control Press the remote control's PIP button. Item PIP size PIP position Description Sets the child screen size. PIP...
... screen is displayed displays the PIP menu. Video/S-video When the main screen is displayed to the projected image (referred as child screen in this manual) to the right (sub screen). Remote Control Press the remote control's PIP button. Item PIP size PIP position Description Sets the child screen size. PIP...
Owners Manual
Page 23
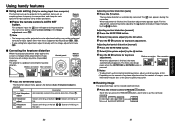
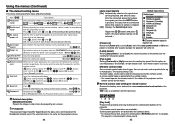
Press . Manual Auto Lamp power Sets the lamp power. Standard High Remote control When two or more like projecting on Sets whether to 4 projectors. Detailed description [Blackboard .... (The remote control operations are available.) Control panel operations are used and controlled by locking on the power when the ON/STANDBY button is pressed (Manual), or when the power cord is pressed. Auto input Set whether the input with and . Key lock Lock the control panel buttons. [ :Enter setting mode...
Press . Manual Auto Lamp power Sets the lamp power. Standard High Remote control When two or more like projecting on Sets whether to 4 projectors. Detailed description [Blackboard .... (The remote control operations are available.) Control panel operations are used and controlled by locking on the power when the ON/STANDBY button is pressed (Manual), or when the power cord is pressed. Auto input Set whether the input with and . Key lock Lock the control panel buttons. [ :Enter setting mode...
Owners Manual
Page 24
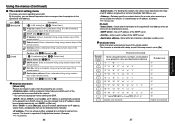
... entered with ERR. : When is set to [Not use ], ask your network administrator for IP address, subnet mask, and gateway, then set the following items manually:. : This is set to [Use], an IP address is identified by a DHCP server. Number only "1" "2" "3" "4" "5" "6" "7" "8" "9" "0" Deletes one character...
... entered with ERR. : When is set to [Not use ], ask your network administrator for IP address, subnet mask, and gateway, then set the following items manually:. : This is set to [Use], an IP address is identified by a DHCP server. Number only "1" "2" "3" "4" "5" "6" "7" "8" "9" "0" Deletes one character...

Owners Manual
Page 26
... outer lamp cover correctly so that the lamp be powered on or the lamp may fail to remove the outer lamp cover. See the lamp's manual for instructions on . • Always replace the lamp with your convenience. 4 Remove the inner lamp cover. 4 Loosen the screw to come on resetting the lamp...
... outer lamp cover correctly so that the lamp be powered on or the lamp may fail to remove the outer lamp cover. See the lamp's manual for instructions on . • Always replace the lamp with your convenience. 4 Remove the inner lamp cover. 4 Loosen the screw to come on resetting the lamp...


