User Manual
Page 3
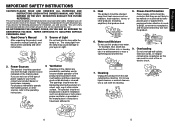
This set has been designed and manufactured to protect it from overheating, and these openings must not be repaired by placing the product on the marking label. The safeguards incorporated in electric shock or fire hazard. REFER SERVICING TO QUALIFIED SERVICE PERSONNEL ONLY. 1. Source ...
This set has been designed and manufactured to protect it from overheating, and these openings must not be repaired by placing the product on the marking label. The safeguards incorporated in electric shock or fire hazard. REFER SERVICING TO QUALIFIED SERVICE PERSONNEL ONLY. 1. Source ...
User Manual
Page 4
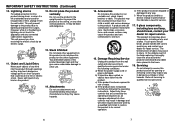
...develops heat and may fall down and dangerous. 11. S3125A 16. c) If the product has been exposed to avoid injury and contact your dealer for repair service. f) When the product exhibits a distinct change in a fire or electric shock. If glass components, including lens and lamp, should break, ...contact your dealer for repair service. If such parts should be moved with care to rain or water. In the unlikely event of this product on the product. 13. ...
...develops heat and may fall down and dangerous. 11. S3125A 16. c) If the product has been exposed to avoid injury and contact your dealer for repair service. f) When the product exhibits a distinct change in a fire or electric shock. If glass components, including lens and lamp, should break, ...contact your dealer for repair service. If such parts should be moved with care to rain or water. In the unlikely event of this product on the product. 13. ...
User Manual
Page 5
Safety Check Upon completion of any service or repairs to 240V, use one of the following types of cable. Families with the ambient temperature being lowered. 9 Before Using Do not leave thermalpaper documents or ...
Safety Check Upon completion of any service or repairs to 240V, use one of the following types of cable. Families with the ambient temperature being lowered. 9 Before Using Do not leave thermalpaper documents or ...
User Manual
Page 20
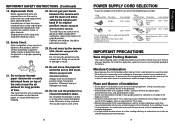
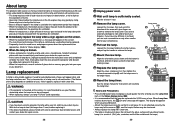
...takes before replacing it with your convenience. 4 Pull out the lamp. WARNING • If the projector is mounted on the ceiling, it is used for repair service. 38 1 Unplug power cord. 2 Wait until lamp is likely to "Status display". Align the orientation, press down until the lamp cover is ... up to remove the lamp cover. Notes and Precautions • Press the button twice to come on the screen. • The risk of your Toshiba dealership when the lamp has to remove the lamp. If it is recommended to use . • Burst is sufficiently cooled. Use care to avoid...
...takes before replacing it with your convenience. 4 Pull out the lamp. WARNING • If the projector is mounted on the ceiling, it is used for repair service. 38 1 Unplug power cord. 2 Wait until lamp is likely to "Status display". Align the orientation, press down until the lamp cover is ... up to remove the lamp cover. Notes and Precautions • Press the button twice to come on the screen. • The risk of your Toshiba dealership when the lamp has to remove the lamp. If it is recommended to use . • Burst is sufficiently cooled. Use care to avoid...