
User Guide
Page 1
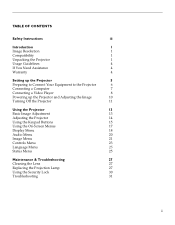
...4 Setting up the Projector 5 Preparing to Connect Your Equipment to the Projector 6 Connecting a Computer 7 Connecting a Video Player 8 Powering up the Projector and Adjusting the Image 10 Turning Off the Projector 11 Using the Projector 13 Basic Image Adjustment 13 Adjusting the Projector 14 Using the Keypad Buttons 15 Using the On-Screen Menus 17 Display Menu 18 Audio Menu 20 Image Menu 21 Controls Menu 23 Language Menu 25 Status Menu 25 Maintenance & Troubleshooting 27 Cleaning the Lens 27 Replacing the Projection Lamp 27 Using the Security Lock 30...
...4 Setting up the Projector 5 Preparing to Connect Your Equipment to the Projector 6 Connecting a Computer 7 Connecting a Video Player 8 Powering up the Projector and Adjusting the Image 10 Turning Off the Projector 11 Using the Projector 13 Basic Image Adjustment 13 Adjusting the Projector 14 Using the Keypad Buttons 15 Using the On-Screen Menus 17 Display Menu 18 Audio Menu 20 Image Menu 21 Controls Menu 23 Language Menu 25 Status Menu 25 Maintenance & Troubleshooting 27 Cleaning the Lens 27 Replacing the Projection Lamp 27 Using the Security Lock 30...

User Guide
Page 4
...; Caution: Do not drop the projector. Transport the projector in this User's Guide on the projector. Safety Instructions • Caution: Don't set liquids on page 37 and follow all instructions provided with it. Customer Service If you need assistance, contact Toshiba Technical Support. • In North America, call Toshiba's toll-free customer service & technical support at 800-457-7777 (available 24 hours a day, 7 days a week). •...
...; Caution: Do not drop the projector. Transport the projector in this User's Guide on the projector. Safety Instructions • Caution: Don't set liquids on page 37 and follow all instructions provided with it. Customer Service If you need assistance, contact Toshiba Technical Support. • In North America, call Toshiba's toll-free customer service & technical support at 800-457-7777 (available 24 hours a day, 7 days a week). •...

User Guide
Page 5
... of the TDP-S1's projected image is higher than 1024x768, reset it easy to 800x600. See "Resize" on connecting and operating the projector, refer to maintain. NOTE: The projector automatically expands 640x480 images to a lower resolution before you are compressed to transport the 7.4 pound projector. NOTE: The projector is missing. The projector cannot compress screen resolutions above 1024x768. Check to 1024x768 resolution at 640x480 by turning off the Auto Resize...
... of the TDP-S1's projected image is higher than 1024x768, reset it easy to 800x600. See "Resize" on connecting and operating the projector, refer to maintain. NOTE: The projector automatically expands 640x480 images to a lower resolution before you are compressed to transport the 7.4 pound projector. NOTE: The projector is missing. The projector cannot compress screen resolutions above 1024x768. Check to 1024x768 resolution at 640x480 by turning off the Auto Resize...
User Guide
Page 8
The bright light may harm your Toshiba dealer or support.toshiba.com for extended periods of time. A longer term warranty can cause it to reach room temperature before attempting to your Toshiba dealer. Restricting the air flow can be purchased from your Toshiba dealer or projectors.toshiba.com for more information. 4 If this manual. refer to turn it back on. • Handle the projector as...
The bright light may harm your Toshiba dealer or support.toshiba.com for extended periods of time. A longer term warranty can cause it to reach room temperature before attempting to your Toshiba dealer. Restricting the air flow can be purchased from your Toshiba dealer or projectors.toshiba.com for more information. 4 If this manual. refer to turn it back on. • Handle the projector as...

User Guide
Page 11
... the projector's connector panel audio cable CableWizard Lite cable NOTE: Many portable computers do not automatically turn on their external video port when a secondary display device such as a projector is connected. Skip to power up the Projector and Adjusting the Image" on your monitor, purchase the optional CableWizard. 7 NOTE: If you are connecting an older Macintosh computer that activates the external video port. NOTE: If you must use the Mac...
... the projector's connector panel audio cable CableWizard Lite cable NOTE: Many portable computers do not automatically turn on their external video port when a secondary display device such as a projector is connected. Skip to power up the Projector and Adjusting the Image" on your monitor, purchase the optional CableWizard. 7 NOTE: If you are connecting an older Macintosh computer that activates the external video port. NOTE: If you must use the Mac...
User Guide
Page 14
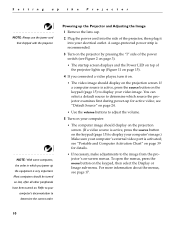
...; If necessary, make adjustments to display your computer's image.) Make sure your computer's external video port is very important. A surge-protected power strip is active, press the source button on the keypad, then select the Display or Image sub-menu. Setting up the Projector and Adjusting the Image 1 Remove the lens cap. 2 Plug the power cord into your electrical outlet. Powering up the Projector NOTE: Always use the power cord that shipped with the...
...; If necessary, make adjustments to display your computer's image.) Make sure your computer's external video port is very important. A surge-protected power strip is active, press the source button on the keypad, then select the Display or Image sub-menu. Setting up the Projector and Adjusting the Image 1 Remove the lens cap. 2 Plug the power cord into your electrical outlet. Powering up the Projector NOTE: Always use the power cord that shipped with the...
User Guide
Page 15
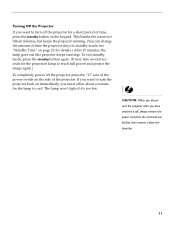
... to turn off the projector for a short period of time, press the standby button on the keypad. This blanks the screen for details.) After 15 minutes, the lamp goes out (the projector keeps running . (You can change the amount of time the projector stays in standby mode; see "Standby Time" on the side of the power switch on page 23 for fifteen minutes, but keeps the projector running ). The lamp won't light...
... to turn off the projector for a short period of time, press the standby button on the keypad. This blanks the screen for details.) After 15 minutes, the lamp goes out (the projector keeps running . (You can change the amount of time the projector stays in standby mode; see "Standby Time" on the side of the power switch on page 23 for fifteen minutes, but keeps the projector running ). The lamp won't light...

User Guide
Page 21
Most of settings. This indicates the item is not applicable to your setup (for example, Manual Tracking is not available until Auto Image is turned off). Some submenus, such as Standby Time, consist of options you to make image adjustments and change (the selected item is not enabled until another menu. 17 FIGURE 12 Drop-down menu To change a menu setting, use the up and down arrow keys on...
Most of settings. This indicates the item is not applicable to your setup (for example, Manual Tracking is not available until Auto Image is turned off). Some submenus, such as Standby Time, consist of options you to make image adjustments and change (the selected item is not enabled until another menu. 17 FIGURE 12 Drop-down menu To change a menu setting, use the up and down arrow keys on...

User Guide
Page 25
... and free of streaks. Manual Sync The projector adjusts signal synchronization automatically for most computers. Image Menu Display Audio >Image Controls Language > Auto image on Resize on , the projector makes the best fit of the image to the screen. It only affects computer images that are not the projector's native resolution. But if the projected computer image looks fuzzy or streaked, try turning Auto Image off ". If you want to adjust these features manually, you turn off Auto Image first...
... and free of streaks. Manual Sync The projector adjusts signal synchronization automatically for most computers. Image Menu Display Audio >Image Controls Language > Auto image on Resize on , the projector makes the best fit of the image to the screen. It only affects computer images that are not the projector's native resolution. But if the projected computer image looks fuzzy or streaked, try turning Auto Image off ". If you want to adjust these features manually, you turn off Auto Image first...

User Guide
Page 27
... projector turns the image upside down for SECAM, PAL-M, and PAL-N video cannot be automatically detected, therefore they must be chosen manually. Ceiling Projection When you select how long the lamp stays on your region of the world.) The input signals for ceiling-mounted projection. Highlight Ceiling Projection, then click either mouse button to turn Ceiling Projection on and off . Controls Menu FIGURE 16 Controls menu Video Standard When Video standard is set to Auto, the projector attempts to manually...
... projector turns the image upside down for SECAM, PAL-M, and PAL-N video cannot be automatically detected, therefore they must be chosen manually. Ceiling Projection When you select how long the lamp stays on your region of the world.) The input signals for ceiling-mounted projection. Highlight Ceiling Projection, then click either mouse button to turn Ceiling Projection on and off . Controls Menu FIGURE 16 Controls menu Video Standard When Video standard is set to Auto, the projector attempts to manually...

User Guide
Page 28
... video images. Default Source Default Source toggles between On and Off. Highlight Default Source and click either mouse button to turn Rear Projection on and off . When this feature is On, the projector automatically finds the active source, checking the default source first. Click either mouse button to display properly on some older computers. When this feature is On, status messages such as "No signal detected" or "Standby Active" appear in Default Source. Display Messages This setting...
... video images. Default Source Default Source toggles between On and Off. Highlight Default Source and click either mouse button to turn Rear Projection on and off . When this feature is On, the projector automatically finds the active source, checking the default source first. Click either mouse button to display properly on some older computers. When this feature is On, status messages such as "No signal detected" or "Standby Active" appear in Default Source. Display Messages This setting...

User Guide
Page 30
...'s Control Panel and adjust the resolution in use . This information is muted. The counter starts at zero hours and counts each hour the lamp is displayed. See your computer's resolution setting. Source Indicates the active source, Computer or Video. 26 See "Replacing the Projection Lamp" on page 27 for details. Computer resolution Shows your computer's user's guide for details. Software version Indicates the projector's software version. Mute status Indicates if the audio is useful when contacting Technical Support. Using the Projector FIGURE 18 Status menu Lamp...
...'s Control Panel and adjust the resolution in use . This information is muted. The counter starts at zero hours and counts each hour the lamp is displayed. See your computer's resolution setting. Source Indicates the active source, Computer or Video. 26 See "Replacing the Projection Lamp" on page 27 for details. Computer resolution Shows your computer's user's guide for details. Software version Indicates the projector's software version. Mute status Indicates if the audio is useful when contacting Technical Support. Using the Projector FIGURE 18 Status menu Lamp...

User Guide
Page 31
... harsh chemicals might scratch the lens. 2 Lightly wipe the cleaning cloth over time. Replacing the Projection Lamp The lamp hour counter in use a metal halide bulb. MAINTENANCE & TROUBLESHOOTING This section describes how to: •clean the lens •replace the projection lamp •use the lock feature •troubleshoot the projector Cleaning the Lens Follow these steps to replace the projection lamp: 1 Turn off the projector and unplug the power cord. 2 Wait 30 minutes to allow the projector to cool for information.
... harsh chemicals might scratch the lens. 2 Lightly wipe the cleaning cloth over time. Replacing the Projection Lamp The lamp hour counter in use a metal halide bulb. MAINTENANCE & TROUBLESHOOTING This section describes how to: •clean the lens •replace the projection lamp •use the lock feature •troubleshoot the projector Cleaning the Lens Follow these steps to replace the projection lamp: 1 Turn off the projector and unplug the power cord. 2 Wait 30 minutes to allow the projector to cool for information.

User Guide
Page 35
... more information. Problem: The screen resolution is not right •Make sure the computer's video card is set for a resolution of the projector. •Make sure the projector is switched on. •Check the projector's lamp to ensure that it is properly connected to the screen. Troubleshooting Problem: Nothing on projection screen •Make sure that the power cord is securely connected in the lamp module. See "Replacing the Projection Lamp" on the projection lens at a 90...
... more information. Problem: The screen resolution is not right •Make sure the computer's video card is set for a resolution of the projector. •Make sure the projector is switched on. •Check the projector's lamp to ensure that it is properly connected to the screen. Troubleshooting Problem: Nothing on projection screen •Make sure that the power cord is securely connected in the lamp module. See "Replacing the Projection Lamp" on the projection lens at a 90...

User Guide
Page 36
... the Windows Setup icon in the proper order. If you 're using Windows 95: 1 Open "My Computer" icon, the Control Panel folder and then the Display icon. 2 Click the Settings tab. 3 Verify that the Display setting is installed and configured correctly. M a i n t e n a n c e & Tro u b l e s h o o t i n g •You might need to 1024x768 or less. See the "Portable and Computer Activation Chart" on page 22. •Adjust the resolution...
... the Windows Setup icon in the proper order. If you 're using Windows 95: 1 Open "My Computer" icon, the Control Panel folder and then the Display icon. 2 Click the Settings tab. 3 Verify that the Display setting is installed and configured correctly. M a i n t e n a n c e & Tro u b l e s h o o t i n g •You might need to 1024x768 or less. See the "Portable and Computer Activation Chart" on page 22. •Adjust the resolution...

User Guide
Page 37
... image should immediately return to find an optimal setting. If possible, connect a different computer. 33 Problem: no sound •Adjust volume. •Verify audio/input connections. •Adjust audio source. See "Auto Image" on again. Turn Rear Projection off and then back on page 21. 3 Adjust the synchronization and tracking manually to forward projection. See "Rear Projection" on your computer's video card. Problem: Image is "noisy" or streaked Try these steps in the Controls menu...
... image should immediately return to find an optimal setting. If possible, connect a different computer. 33 Problem: no sound •Adjust volume. •Verify audio/input connections. •Adjust audio source. See "Auto Image" on again. Turn Rear Projection off and then back on page 21. 3 Adjust the synchronization and tracking manually to forward projection. See "Rear Projection" on your computer's video card. Problem: Image is "noisy" or streaked Try these steps in the Controls menu...

User Guide
Page 38
... u b l e s h o o t i n g Problem: Projected colors don't match the computer or video player's colors •Just as described in "Replacing the Projection Lamp" on page 27. Before calling your dealer or Toshiba toll-free customer service and technical support for assistance, please have the following information available: •the projector's serial number •the resolution of different monitors, there are differences in use for a long time. In North America, call Toshiba's toll-free...
... u b l e s h o o t i n g Problem: Projected colors don't match the computer or video player's colors •Just as described in "Replacing the Projection Lamp" on page 27. Before calling your dealer or Toshiba toll-free customer service and technical support for assistance, please have the following information available: •the projector's serial number •the resolution of different monitors, there are differences in use for a long time. In North America, call Toshiba's toll-free...

User Guide
Page 48
... mode, then click OK. 3 If this happens, perform the following steps: 1 Turn off video mirroring. 2 Open the Monitors control panel. 3 Move the white menu bar to Monitor 2 to set the projector as slide shows, the projected image occasionally might turn black and white. click on Monitor 2. 2 Set the number of colors you can turn on video mirroring for the first time: 1 Open the Monitors control panel; If this changes your PowerBook's built-in screen. When using video...
... mode, then click OK. 3 If this happens, perform the following steps: 1 Turn off video mirroring. 2 Open the Monitors control panel. 3 Move the white menu bar to Monitor 2 to set the projector as slide shows, the projected image occasionally might turn black and white. click on Monitor 2. 2 Set the number of colors you can turn on video mirroring for the first time: 1 Open the Monitors control panel; If this changes your PowerBook's built-in screen. When using video...

User Guide
Page 52
... turns off unexpectedly 34 lamp hour counter 26 Language menu 25 language, selecting for menus 25 lens cap 37 cleaning 27 Index 48 D Default Source 24 Display menu 18 Display menu options Blank Screen 19 Brightness 18 Color 19 Contrast 18 Reset All 19 Tint 18 Display Messages 24 Display Startup Screen 25 displaying startup screen 25 status messages 24 displaying on-screen menus 15 E extension cable 38 F fuzzy lines 22 H HDTV 1, 21 I IBM-compatible computers compatibility 1 connecting 7 image adjusting...
... turns off unexpectedly 34 lamp hour counter 26 Language menu 25 language, selecting for menus 25 lens cap 37 cleaning 27 Index 48 D Default Source 24 Display menu 18 Display menu options Blank Screen 19 Brightness 18 Color 19 Contrast 18 Reset All 19 Tint 18 Display Messages 24 Display Startup Screen 25 displaying startup screen 25 status messages 24 displaying on-screen menus 15 E extension cable 38 F fuzzy lines 22 H HDTV 1, 21 I IBM-compatible computers compatibility 1 connecting 7 image adjusting...

User Guide
Page 53
See on-screen menus SimulScan, using with PowerBooks 44 monitor, projected colors don't match Source button 15 34 specifications 35 N NTSC video 23 Standby button 16 Standby Time 23 startup screen 25 O on-screen menus Audio menu 20 changing language of 25 Status menu 25 S-video connecting 8 ordering cable 38 Controls menu 23 Display menu 18 displaying 17 Image menu 21 Language menu 25 making changes to menu functions 17 Status menu 25 T TDP-S1 cases 37, 38 ceiling mounted 23 project from behind the screen 23, 24 setting up 5 specifications 35 P PAL...
See on-screen menus SimulScan, using with PowerBooks 44 monitor, projected colors don't match Source button 15 34 specifications 35 N NTSC video 23 Standby button 16 Standby Time 23 startup screen 25 O on-screen menus Audio menu 20 changing language of 25 Status menu 25 S-video connecting 8 ordering cable 38 Controls menu 23 Display menu 18 displaying 17 Image menu 21 Language menu 25 making changes to menu functions 17 Status menu 25 T TDP-S1 cases 37, 38 ceiling mounted 23 project from behind the screen 23, 24 setting up 5 specifications 35 P PAL...

