
User Manual
Page 12
... reflect your package exactly. If the fluid is spilt on an instrument, avoid contact and wipe it off immediately with water.) 12 REMOTE CONTROL BATTERIES REMOTE CONTROL BATTERIES Caution • Never throw batteries into the battery compartment. Note • Be sure to use AAA batteries. •... designated disposal area. • Attention should be drawn to the environmental aspects of the used batteries with new ones. • If the remote control does not operate correctly, or if the operating range becomes reduced, replace both batteries with new ones. • If the batteries are...
... reflect your package exactly. If the fluid is spilt on an instrument, avoid contact and wipe it off immediately with water.) 12 REMOTE CONTROL BATTERIES REMOTE CONTROL BATTERIES Caution • Never throw batteries into the battery compartment. Note • Be sure to use AAA batteries. •... designated disposal area. • Attention should be drawn to the environmental aspects of the used batteries with new ones. • If the remote control does not operate correctly, or if the operating range becomes reduced, replace both batteries with new ones. • If the batteries are...
User Manual
Page 13
... BATTERIES 12 Overview 15 Shipping contents 15 Projector exterior view 16 Controls and functions 17 Remote control 18 Preparing and using the remote control 19 Operating a computer using the remote control ......... 21 Positioning your projector 22 Choosing a location 22 Projection distance and size 23 Connection 23 Connecting to a computer 24 Connecting to a Component...
... BATTERIES 12 Overview 15 Shipping contents 15 Projector exterior view 16 Controls and functions 17 Remote control 18 Preparing and using the remote control 19 Operating a computer using the remote control ......... 21 Positioning your projector 22 Choosing a location 22 Projection distance and size 23 Connection 23 Connecting to a computer 24 Connecting to a Component...
User Manual
Page 15
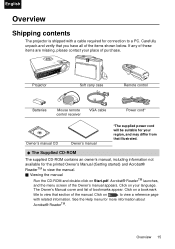
... of purchase. If any of these items are missing, please contact your place of the Owner's manual appears. INPUT PLAY Projector Soft carry case Remote control Batteries Mouse remote control receiver VGA cable Power cord* Owner's manual CD Owner's manual *The supplied power cord will be suitable for more information about Acrobat...
... of purchase. If any of these items are missing, please contact your place of the Owner's manual appears. INPUT PLAY Projector Soft carry case Remote control Batteries Mouse remote control receiver VGA cable Power cord* Owner's manual CD Owner's manual *The supplied power cord will be suitable for more information about Acrobat...
User Manual
Page 16
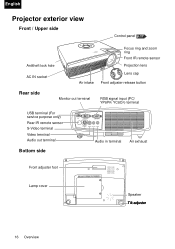
English Projector exterior view Front / Upper side Control panel p.17 Antitheft lock hole AC IN socket Focus ring and zoom ring Front IR remote sensor Projection lens Lens cap Air intake Front adjuster release button Rear side Monitor out terminal RGB signal input (PC/ YPBPR/ YCBCR) terminal USB terminal (For service purpose only) Rear IR remote sensor S-Video terminal Video terminal Audio out terminal Bottom side Audio in terminal Air exhaust Front adjuster foot Lamp cover Speaker Tilt adjuster 16 Overview
English Projector exterior view Front / Upper side Control panel p.17 Antitheft lock hole AC IN socket Focus ring and zoom ring Front IR remote sensor Projection lens Lens cap Air intake Front adjuster release button Rear side Monitor out terminal RGB signal input (PC/ YPBPR/ YCBCR) terminal USB terminal (For service purpose only) Rear IR remote sensor S-Video terminal Video terminal Audio out terminal Bottom side Audio in terminal Air exhaust Front adjuster foot Lamp cover Speaker Tilt adjuster 16 Overview
User Manual
Page 18
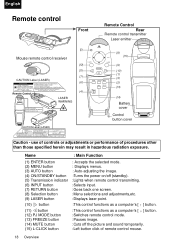
... Accepts the selected mode. : Displays menus. : Auto-adjusting the image. :Turns the power on/off (standby). :Lights when remote control transmitting. :Selects input. :Goes back one screen. :Menu selections and adjustments,etc. :Displays laser point. :This control functions... those specified herein may result in hazardous radiation exposure. English ENTER Remote control Front Remote Control Rear Remote control transmitter Laser emitter (5) Mouse remote control receiver (12) (11) (7) CAUTION Label (LASER) (6) Remote Control INPUT PLAY (4) LASER WARNING CAUTION Label (LASER) R-CLICK ESC...
... Accepts the selected mode. : Displays menus. : Auto-adjusting the image. :Turns the power on/off (standby). :Lights when remote control transmitting. :Selects input. :Goes back one screen. :Menu selections and adjustments,etc. :Displays laser point. :This control functions... those specified herein may result in hazardous radiation exposure. English ENTER Remote control Front Remote Control Rear Remote control transmitter Laser emitter (5) Mouse remote control receiver (12) (11) (7) CAUTION Label (LASER) (6) Remote Control INPUT PLAY (4) LASER WARNING CAUTION Label (LASER) R-CLICK ESC...
User Manual
Page 19
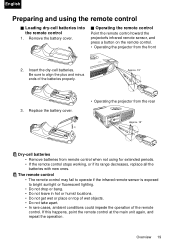
... not leave in hot or humid locations. • Do not get wet or place on the remote control. • Operating the projector from remote control when not using the remote control Q Loading dry-cell batteries into the remote control 1. Replace the battery cover. (1) (2) • Operating the projector from the rear Approx. 15° Approx...
... not leave in hot or humid locations. • Do not get wet or place on the remote control. • Operating the projector from remote control when not using the remote control Q Loading dry-cell batteries into the remote control 1. Replace the battery cover. (1) (2) • Operating the projector from the rear Approx. 15° Approx...
User Manual
Page 20
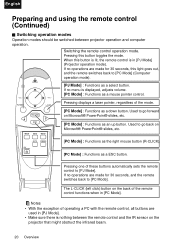
... Functions as an up button. PJ MODE R-CLICK ESC INPUT AUTO MENU Pressing displays a laser pointer, regardless of operating a PC with the remote control, all buttons are made for 30 seconds, this button toggles the mode. The L-CLICK (left click) button on the back of these... of the mode. [PC Mode] : Functions as a ESC button. English Preparing and using the remote control (Continued) Q Switching operation modes Operation modes should be switched between the remote control and the IR sensor on the projector that might obstruct the infrared beam. 20 Overview Used to...
... Functions as an up button. PJ MODE R-CLICK ESC INPUT AUTO MENU Pressing displays a laser pointer, regardless of operating a PC with the remote control, all buttons are made for 30 seconds, this button toggles the mode. The L-CLICK (left click) button on the back of these... of the mode. [PC Mode] : Functions as a ESC button. English Preparing and using the remote control (Continued) Q Switching operation modes Operation modes should be switched between the remote control and the IR sensor on the projector that might obstruct the infrared beam. 20 Overview Used to...
User Manual
Page 21
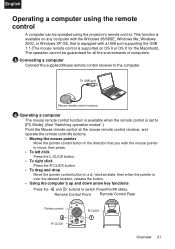
... 21 To USB port Mouse remote control receiver 2 Operating a computer The mouse remote control function is available when the remote control is set to [PC Mode]. (See "Switching operation modes".) Point the Mouse remote control at the mouse remote control receiver, and operate the remote controlfs buttons. • Moving... the mouse pointer Move the pointer control button in the direction that is equipped with a USB port supporting the USB 1.1 (The mouse remote control is over the desired location, release the button. • Using the computer's up and down arrow key functions Press the and ...
... 21 To USB port Mouse remote control receiver 2 Operating a computer The mouse remote control function is available when the remote control is set to [PC Mode]. (See "Switching operation modes".) Point the Mouse remote control at the mouse remote control receiver, and operate the remote controlfs buttons. • Moving... the mouse pointer Move the pointer control button in the direction that is equipped with a USB port supporting the USB 1.1 (The mouse remote control is over the desired location, release the button. • Using the computer's up and down arrow key functions Press the and ...

User Manual
Page 26
...the ON/STANDBY button. If no input source signal is detected, the search will continue until an input source signal is on the projector or remote control to select an input signal to your hands, face, or other objects near the air exhaust. CAUTION • Do not look into ...source being scanned at the upper left on . 5. If the frequency/ resolution of start up 1. Remove the lens cap. The start up, a default Toshiba logo is left corner of the connected equipment on a blank screen. Doing so could cause a fire due to p.28 . English Operation Start up procedure ...
...the ON/STANDBY button. If no input source signal is detected, the search will continue until an input source signal is on the projector or remote control to select an input signal to your hands, face, or other objects near the air exhaust. CAUTION • Do not look into ...source being scanned at the upper left on . 5. If the frequency/ resolution of start up 1. Remove the lens cap. The start up, a default Toshiba logo is left corner of the connected equipment on a blank screen. Doing so could cause a fire due to p.28 . English Operation Start up procedure ...
User Manual
Page 27
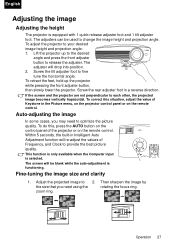
...adjuster button, then slowly lower the projector. Screw the rear adjuster foot in the Picture menu, on the projector control panel or on the remote control. Within 5 seconds, the built-in Intelligent Auto Adjustment function will re-adjust the values of Frequency, and Clock to release the adjuster... input is equipped with 1 quick-release adjuster foot and 1 tilt adjuster foot. To correct this , press the AUTO button on the remote control. Auto-adjusting the image In some cases, you need to change the image height and projection angle. Operation 27 The adjusters can ...
...adjuster button, then slowly lower the projector. Screw the rear adjuster foot in the Picture menu, on the projector control panel or on the remote control. Within 5 seconds, the built-in Intelligent Auto Adjustment function will re-adjust the values of Frequency, and Clock to release the adjuster... input is equipped with 1 quick-release adjuster foot and 1 tilt adjuster foot. To correct this , press the AUTO button on the remote control. Auto-adjusting the image In some cases, you need to change the image height and projection angle. Operation 27 The adjusters can ...
User Manual
Page 28
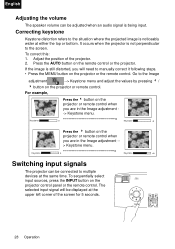
...the screen. Adjust the position of the screen for 5 seconds. 28 Operation To sequentially select input sources, press the INPUT button on the remote control or the projector. The selected input signal will need to the Image adjustment --> Keystone menu and adjust the values by pressing 3 .../ 4 button on the projector or the remote control. Press the AUTO button on the projector control panel or the remote control. Go to manually correct it following steps. • Press the MEMU button on the projector ...
...the screen. Adjust the position of the screen for 5 seconds. 28 Operation To sequentially select input sources, press the INPUT button on the remote control or the projector. The selected input signal will need to the Image adjustment --> Keystone menu and adjust the values by pressing 3 .../ 4 button on the projector or the remote control. Press the AUTO button on the projector control panel or the remote control. Go to manually correct it following steps. • Press the MEMU button on the projector ...
User Manual
Page 31
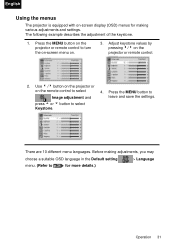
The following example describes the adjustment of the keystone. 1. Press the MENU button on the projector or remote control to turn the on-screen menu on the projector or remote control. 2. Adjust keystone values by pressing 3/4 on . 3. Use 3 /4 button on the projector or on -screen display (OSD) menus for making adjustments, you may... Image adjustment and leave and save the settings. Before making various adjustments and settings. English Using the menus The projector is equipped with on the remote control to select 4.
The following example describes the adjustment of the keystone. 1. Press the MENU button on the projector or remote control to turn the on-screen menu on the projector or remote control. 2. Adjust keystone values by pressing 3/4 on . 3. Use 3 /4 button on the projector or on -screen display (OSD) menus for making adjustments, you may... Image adjustment and leave and save the settings. Before making various adjustments and settings. English Using the menus The projector is equipped with on the remote control to select 4.
User Manual
Page 34
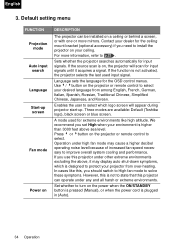
...are available: Default (Toshiba logo), black screen or blue screen. We recommend you use this projector under other extreme environments excluding the above sea level. If you set High when your environment is designed to protect your ceiling. Press 3 or 4button on the projector or remote control to install ... to state that this projector can be installed on , the projector will appear during projector start-up. Use 3/ 4button on the projector or remote control to turn on the power when the ON/STANDBY button is pressed (Manual), or when the power cord is on a ceiling or behind...
...are available: Default (Toshiba logo), black screen or blue screen. We recommend you use this projector under other extreme environments excluding the above sea level. If you set High when your environment is designed to protect your ceiling. Press 3 or 4button on the projector or remote control to install ... to state that this projector can be installed on , the projector will appear during projector start-up. Use 3/ 4button on the projector or remote control to turn on the power when the ON/STANDBY button is pressed (Manual), or when the power cord is on a ceiling or behind...
User Manual
Page 37
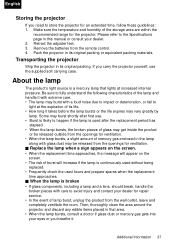
... store the projector for the projector. Transporting the projector Ship the projector in the lamp along with glass dust may be released outside from the remote control. 4. Be sure to fully understand the following characteristics of the lamp and handle it with extreme care. • The lamp may burst with care...
... store the projector for the projector. Transporting the projector Ship the projector in the lamp along with glass dust may be released outside from the remote control. 4. Be sure to fully understand the following characteristics of the lamp and handle it with extreme care. • The lamp may burst with care...
User Manual
Page 41
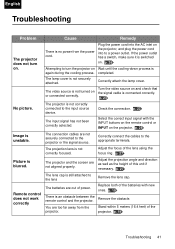
... Attempting to the lens Remove the lens cap. Check the connection. Adjust the focus of the batteries with the INPUT buttons on the remote control or INPUT on . Remote control does not work correctly Cause Remedy There is not correctly focused. Plug the power cord into the AC inlet on the signal... projection angle and direction as well as the height of the projector. The batteries are not aligned properly. p. 19 There is an obstacle between the remote control and the projector.
... Attempting to the lens Remove the lens cap. Check the connection. Adjust the focus of the batteries with the INPUT buttons on the remote control or INPUT on . Remote control does not work correctly Cause Remedy There is not correctly focused. Plug the power cord into the AC inlet on the signal... projection angle and direction as well as the height of the projector. The batteries are not aligned properly. p. 19 There is an obstacle between the remote control and the projector.
Brochure
Page 2
... 15), 2 x video (RCA, S-video), audio (stereo mini jack), USB (for remote mouse) Outputs RGB (D-sub 15), audio (stereo mini jack) Monitor Computer 1 IN Serial interface - p75 the world of Texas Instruments August 2005 • Subject to modifications and errors www.toshiba.ch/projectors Toshiba Europe GmbH Projection & Display Technology Tel: 044 908 56 30...
... 15), 2 x video (RCA, S-video), audio (stereo mini jack), USB (for remote mouse) Outputs RGB (D-sub 15), audio (stereo mini jack) Monitor Computer 1 IN Serial interface - p75 the world of Texas Instruments August 2005 • Subject to modifications and errors www.toshiba.ch/projectors Toshiba Europe GmbH Projection & Display Technology Tel: 044 908 56 30...


