

User Manual
Page 2
..., pursuant to part 15 of the FCC Rules. However, there is no guarantee that may not cause harmful interference, and (2) this projector contains mercury. These limits are designed to provide reasonable protection against harmful interference in a residential installation. If this equipment does cause harmful ...harmful interference to radio communications. DO NOT OPEN THE CABINET. MODEL NAME: TDP-P75 USA only TRADE NAME: DATA PROJECTOR Tested To Comply With FCC Standards FOR HOME OR OFFICE USE MODEL NAME: TDP-P75 FCC NOTICE: This device complies with part 15 of the FCC Rules. ...
..., pursuant to part 15 of the FCC Rules. However, there is no guarantee that may not cause harmful interference, and (2) this projector contains mercury. These limits are designed to provide reasonable protection against harmful interference in a residential installation. If this equipment does cause harmful ...harmful interference to radio communications. DO NOT OPEN THE CABINET. MODEL NAME: TDP-P75 USA only TRADE NAME: DATA PROJECTOR Tested To Comply With FCC Standards FOR HOME OR OFFICE USE MODEL NAME: TDP-P75 FCC NOTICE: This device complies with part 15 of the FCC Rules. ...
User Manual
Page 7
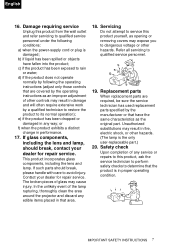
... of glass may result in that have fallen into the product; Safety check Upon completion of the lamp rupturing, thoroughly clean the area around the projector and discard any service or repairs to this product, ask the service technician to perform safety checks to determine that are required, be sure the...
... of glass may result in that have fallen into the product; Safety check Upon completion of the lamp rupturing, thoroughly clean the area around the projector and discard any service or repairs to this product, ask the service technician to perform safety checks to determine that are required, be sure the...
User Manual
Page 9
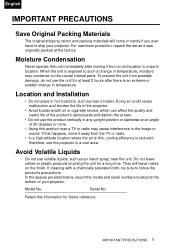
...For maximum protection, repack the set as it was originally packed at least 2 hours after moving it away from possible damage, do not use the projector in any upright position or slantwise at the bottom of 20 degrees or more. • Using this information for a long time. Doing so could... cause malfunction and shorten the life of the projector. • Avoid locations with a chemically saturated cloth, be sure to such a change in handy if you ever have to a warm location. Do not...
...For maximum protection, repack the set as it was originally packed at least 2 hours after moving it away from possible damage, do not use the projector in any upright position or slantwise at the bottom of 20 degrees or more. • Using this information for a long time. Doing so could... cause malfunction and shorten the life of the projector. • Avoid locations with a chemically saturated cloth, be sure to such a change in handy if you ever have to a warm location. Do not...
User Manual
Page 13
... SELECTION 8 IMPORTANT PRECAUTIONS 9 EXEMPTION CLAUSES 10 OTHER NOTES AND INFORMATION 11 REMOTE CONTROL BATTERIES 12 Overview 15 Shipping contents 15 Projector exterior view 16 Controls and functions 17 Remote control 18 Preparing and using the remote control 19 Operating a computer using the ...remote control ......... 21 Positioning your projector 22 Choosing a location 22 Projection distance and size 23 Connection 23 Connecting to a computer 24 Connecting to a Component Video ...
... SELECTION 8 IMPORTANT PRECAUTIONS 9 EXEMPTION CLAUSES 10 OTHER NOTES AND INFORMATION 11 REMOTE CONTROL BATTERIES 12 Overview 15 Shipping contents 15 Projector exterior view 16 Controls and functions 17 Remote control 18 Preparing and using the remote control 19 Operating a computer using the ...remote control ......... 21 Positioning your projector 22 Choosing a location 22 Projection distance and size 23 Connection 23 Connecting to a computer 24 Connecting to a Component Video ...
User Manual
Page 14
... About the lamp 37 Lamp warning message 38 Replacing the lamp 38 Indicator lights 40 Troubleshooting 41 Specifications 42 Projector specifications 42 Dimensions 43 Signal timing 43 Regulation statements 45 FCC statement 45 EEC statement 45 MIC statement 45 14 Contents English Correcting keystone 28 ...
... About the lamp 37 Lamp warning message 38 Replacing the lamp 38 Indicator lights 40 Troubleshooting 41 Specifications 42 Projector specifications 42 Dimensions 43 Signal timing 43 Regulation statements 45 FCC statement 45 EEC statement 45 MIC statement 45 14 Contents English Correcting keystone 28 ...
User Manual
Page 15
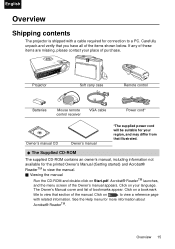
...® ReaderTM launches, and the menu screen of the items shown below. Click on p. Carefully unpack and verify that section of the manual. INPUT PLAY Projector Soft carry case Remote control Batteries Mouse remote control receiver VGA cable Power cord* Owner's manual CD Owner's manual *The supplied power cord will be... the manual Run the CD-ROM and double-click on your region, and may differ from that illustrated. to a PC. English Overview Shipping contents The projector is shipped with related information. Overview 15
...® ReaderTM launches, and the menu screen of the items shown below. Click on p. Carefully unpack and verify that section of the manual. INPUT PLAY Projector Soft carry case Remote control Batteries Mouse remote control receiver VGA cable Power cord* Owner's manual CD Owner's manual *The supplied power cord will be... the manual Run the CD-ROM and double-click on your region, and may differ from that illustrated. to a PC. English Overview Shipping contents The projector is shipped with related information. Overview 15
User Manual
Page 16
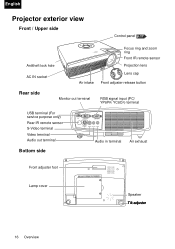
English Projector exterior view Front / Upper side Control panel p.17 Antitheft lock hole AC IN socket Focus ring and zoom ring Front IR remote sensor Projection lens Lens cap Air intake Front adjuster release button Rear side Monitor out terminal RGB signal input (PC/ YPBPR/ YCBCR) terminal USB terminal (For service purpose only) Rear IR remote sensor S-Video terminal Video terminal Audio out terminal Bottom side Audio in terminal Air exhaust Front adjuster foot Lamp cover Speaker Tilt adjuster 16 Overview
English Projector exterior view Front / Upper side Control panel p.17 Antitheft lock hole AC IN socket Focus ring and zoom ring Front IR remote sensor Projection lens Lens cap Air intake Front adjuster release button Rear side Monitor out terminal RGB signal input (PC/ YPBPR/ YCBCR) terminal USB terminal (For service purpose only) Rear IR remote sensor S-Video terminal Video terminal Audio out terminal Bottom side Audio in terminal Air exhaust Front adjuster foot Lamp cover Speaker Tilt adjuster 16 Overview
User Manual
Page 17
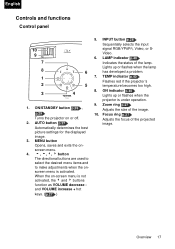
.... 6. ON indicator p.40 Lights up or flashes when the lamp has developed a problem. 7. TEMP indicator p.40 Flashes red if the projector's temperature becomes too high. 8. ON/STANDBY button p.26 , p.29 Turns the projector on -screen menu is activated. English Controls and functions Control panel 10 9 7 8 1 2 3 6 5 4 1. When the on or off. 2. Lights up...
.... 6. ON indicator p.40 Lights up or flashes when the lamp has developed a problem. 7. TEMP indicator p.40 Flashes red if the projector's temperature becomes too high. 8. ON/STANDBY button p.26 , p.29 Turns the projector on -screen menu is activated. English Controls and functions Control panel 10 9 7 8 1 2 3 6 5 4 1. When the on or off. 2. Lights up...
User Manual
Page 19
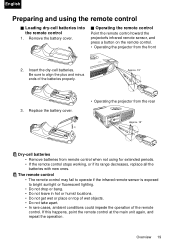
Replace the battery cover. (1) (2) • Operating the projector from the rear Approx. 15° Approx. 5 m INPUT Dry-cell batteries • Remove batteries from the front 2. Approx. 15° Approx. 5 m INPUT 3. The remote control &#... or bang. • Do not leave in hot or humid locations. • Do not get wet or place on the remote control. • Operating the projector from remote control when not using the remote control Q Loading dry-cell batteries into the remote control 1.
Replace the battery cover. (1) (2) • Operating the projector from the rear Approx. 15° Approx. 5 m INPUT Dry-cell batteries • Remove batteries from the front 2. Approx. 15° Approx. 5 m INPUT 3. The remote control &#... or bang. • Do not leave in hot or humid locations. • Do not get wet or place on the remote control. • Operating the projector from remote control when not using the remote control Q Loading dry-cell batteries into the remote control 1.
User Manual
Page 20
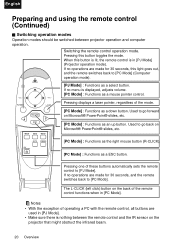
... remote control (Continued) Q Switching operation modes Operation modes should be switched between the remote control and the IR sensor on the projector that might obstruct the infrared beam. 20 Overview If no operations are used in [PJ Mode]. • Make sure there is nothing between... With the exception of the mode. [PC Mode] : Functions as a ESC button. Pressing one of the remote control functions when in [PJ Mode] (Projector operation mode). The L-CLICK (left click) button on the back of these buttons automatically sets the remote control to [PC Mode]. Used to go back...
... remote control (Continued) Q Switching operation modes Operation modes should be switched between the remote control and the IR sensor on the projector that might obstruct the infrared beam. 20 Overview If no operations are used in [PJ Mode]. • Make sure there is nothing between... With the exception of the mode. [PC Mode] : Functions as a ESC button. Pressing one of the remote control functions when in [PJ Mode] (Projector operation mode). The L-CLICK (left click) button on the back of these buttons automatically sets the remote control to [PC Mode]. Used to go back...
User Manual
Page 21
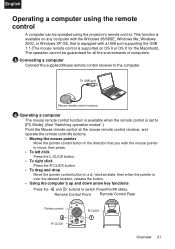
The operation cannot be operated using the projector's remote control. Remote Control Front Remote Control Rear Pointer control R-CLICK ENTER R-CLICK RETURN ESC R-CLICK Overview 21 To USB port Mouse remote control receiver 2 ...
The operation cannot be operated using the projector's remote control. Remote Control Front Remote Control Rear Pointer control R-CLICK ENTER R-CLICK RETURN ESC R-CLICK Overview 21 To USB port Mouse remote control receiver 2 ...
User Manual
Page 22
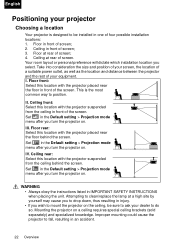
... drop down, thus resulting in injury. • If you wish to mount the projector on the ceiling, be installed in the Default setting > Projection mode menu after you turn the projector on . I. Mounting the projector on . Take into consideration the size and position of your equipment. Floor rear: ... brackets (sold separately) and specialized knowledge. Attempting to do so. II. Set in front of the screen. Improper mounting could cause the projector to be sure to ask your dealer to clean/replace the lamp at rear of your screen, the location of a suitable power outlet, ...
... drop down, thus resulting in injury. • If you wish to mount the projector on the ceiling, be installed in the Default setting > Projection mode menu after you turn the projector on . I. Mounting the projector on . Take into consideration the size and position of your equipment. Floor rear: ... brackets (sold separately) and specialized knowledge. Attempting to do so. II. Set in front of the screen. Improper mounting could cause the projector to be sure to ask your dealer to clean/replace the lamp at rear of your screen, the location of a suitable power outlet, ...
User Manual
Page 23
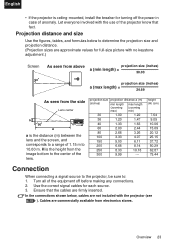
...) 7.54 9.05 10.06 15.09 20.12 25.15 37.72 50.29 62.87 75.44 Connection When connecting a signal source to the projector, be sure to 10.00 m. Let everyone involved with no keystone adjustment.) Screen 90° As seen from above projection size (inches) a (min length) = ...80 2.66 3.26 100 3.33 4.07 150 5.00 6.11 200 6.66 8.14 250 8.33 10.18 300 9.99 --- Ensure that fact. English • If the projector is the distance (m) between the lens and the screen, and corresponds to a range of anomaly. In the connections shown below to determine the projection size...
...) 7.54 9.05 10.06 15.09 20.12 25.15 37.72 50.29 62.87 75.44 Connection When connecting a signal source to the projector, be sure to 10.00 m. Let everyone involved with no keystone adjustment.) Screen 90° As seen from above projection size (inches) a (min length) = ...80 2.66 3.26 100 3.33 4.07 150 5.00 6.11 200 6.66 8.14 250 8.33 10.18 300 9.99 --- Ensure that fact. English • If the projector is the distance (m) between the lens and the screen, and corresponds to a range of anomaly. In the connections shown below to determine the projection size...
User Manual
Page 24
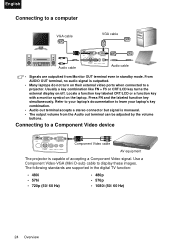
English Connecting to a Component Video device Component Video cable AV equipment The projector is capable of accepting a Component Video signal. Connecting to a computer VGA cable VGA cable Audio cable Audio cable • Signals are supported in standby ...mode. Locate a function key labeled CRT/LCD or a function key with a monitor symbol on their external video ports when connected to a projector. Refer to your laptop's key combination. • Audio out terminal accepts a stereo connector but signal is outputted. • Many laptops do not turn on ...
English Connecting to a Component Video device Component Video cable AV equipment The projector is capable of accepting a Component Video signal. Connecting to a computer VGA cable VGA cable Audio cable Audio cable • Signals are supported in standby ...mode. Locate a function key labeled CRT/LCD or a function key with a monitor symbol on their external video ports when connected to a projector. Refer to your laptop's key combination. • Audio out terminal accepts a stereo connector but signal is outputted. • Many laptops do not turn on ...
User Manual
Page 25
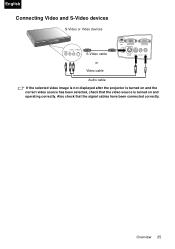
Overview 25 Also check that the video source is turned on and operating correctly. English Connecting Video and S-Video devices S-Video or Video devices S-Video cable or Video cable Audio cable If the selected video image is not displayed after the projector is turned on and the correct video source has been selected, check that the signal cables have been connected correctly.
Overview 25 Also check that the video source is turned on and operating correctly. English Connecting Video and S-Video devices S-Video or Video devices S-Video cable or Video cable Audio cable If the selected video image is not displayed after the projector is turned on and the correct video source has been selected, check that the signal cables have been connected correctly.

User Manual
Page 26
... upper left on . 2. English Operation Start up procedure takes about 20 seconds after power has been applied. 3. Plug the power cord into the projector and into the lens while the lamp is projected. 6. Remove the lens cap. The ON indicator flashes green and stays green when the unit is... detected. 7. The start up, a default Toshiba logo is on the remote control or projector to start to display. The strong light from the lamp may cause damage to p.28 . If it could become deformed due to...
... upper left on . 2. English Operation Start up procedure takes about 20 seconds after power has been applied. 3. Plug the power cord into the projector and into the lens while the lamp is projected. 6. Remove the lens cap. The ON indicator flashes green and stays green when the unit is... detected. 7. The start up, a default Toshiba logo is on the remote control or projector to start to display. The strong light from the lamp may cause damage to p.28 . If it could become deformed due to...
User Manual
Page 27
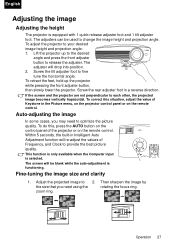
...to optimize the picture quality. Then sharpen the image by the size that you may need using the rotating the focus ring. To adjust the projector to each other, the projected image becomes vertically trapezoidal. To retract the feet, hold up to the desired angle and press the front adjuster button... values of Frequency, and Clock to release the adjuster. The screen will drop into position. 2 2. To do this situation, adjust the value of the projector or on the remote control. To correct this , press the AUTO button on the control panel of Keystone in the Picture menu, on the...
...to optimize the picture quality. Then sharpen the image by the size that you may need using the rotating the focus ring. To adjust the projector to each other, the projected image becomes vertically trapezoidal. To retract the feet, hold up to the desired angle and press the front adjuster button... values of Frequency, and Clock to release the adjuster. The screen will drop into position. 2 2. To do this situation, adjust the value of the projector or on the remote control. To correct this , press the AUTO button on the control panel of Keystone in the Picture menu, on the...
User Manual
Page 28
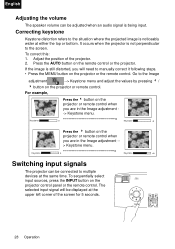
... time. Go to manually correct it following steps. • Press the MEMU button on the projector or remote control. Keystone 0 Keystone +6 Switching input signals The projector can be connected to the situation where the projected image is noticeably wider at either the top ...Correcting keystone Keystone distortion refers to multiple devices at the upper left corner of the projector. 2. It occurs when the projector is being input. For example, Press the 3 button on the projector or remote control when you are in the Image adjustment -> Keystone menu. Press the...
... time. Go to manually correct it following steps. • Press the MEMU button on the projector or remote control. Keystone 0 Keystone +6 Switching input signals The projector can be connected to the situation where the projected image is noticeably wider at either the top ...Correcting keystone Keystone distortion refers to multiple devices at the upper left corner of the projector. 2. It occurs when the projector is being input. For example, Press the 3 button on the projector or remote control when you are in the Image adjustment -> Keystone menu. Press the...
User Manual
Page 29
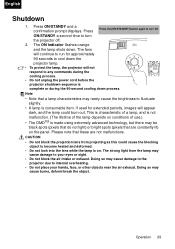
...not look into the lens while the lamp is complete or during the cooling process. • Do not unplug the power cord before the projector shutdown sequence is on the panel. This is characteristic of a lamp, and is not malfunction. (The lifetime of the lamp depends on conditions...consumable item. Press ON/STANDY and a confirmation prompt displays. Operation 29 Please note that are not malfunctions. Doing so may cause damage to the projector due to fluctuate slightly. • A lamp is made using extremely advanced technology, but there may cause burns, deform/break the object. If ...
...not look into the lens while the lamp is complete or during the cooling process. • Do not unplug the power cord before the projector shutdown sequence is on the panel. This is characteristic of a lamp, and is not malfunction. (The lifetime of the lamp depends on conditions...consumable item. Press ON/STANDY and a confirmation prompt displays. Operation 29 Please note that are not malfunctions. Doing so may cause damage to the projector due to fluctuate slightly. • A lamp is made using extremely advanced technology, but there may cause burns, deform/break the object. If ...
User Manual
Page 31
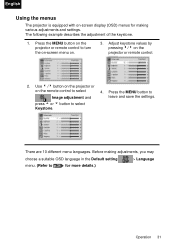
... remote control. 2. Press the MENU button to select Keystone. Adjust keystone values by pressing 3/4 on . 3. Use 3 /4 button on the projector or on -screen display (OSD) menus for more details.) > Language Operation 31 Before making adjustments, you may choose a suitable OSD language in the Default setting ... the keystone. 1. There are 10 different menu languages. press 5 or 6 button to Image adjustment and leave and save the settings. English Using the menus The projector is equipped with on the remote control to select 4.
... remote control. 2. Press the MENU button to select Keystone. Adjust keystone values by pressing 3/4 on . 3. Use 3 /4 button on the projector or on -screen display (OSD) menus for more details.) > Language Operation 31 Before making adjustments, you may choose a suitable OSD language in the Default setting ... the keystone. 1. There are 10 different menu languages. press 5 or 6 button to Image adjustment and leave and save the settings. English Using the menus The projector is equipped with on the remote control to select 4.


