
User Guide
Page 38
... your computer, the Setup Wizard guides you must complete all setup steps up to and including "Setting up your software. 1 From the Welcome screen click Next to enter the Setup Wizard. 2 Confirm acceptance of windows displayed, and the order in which windows appear, may vary according to ...click Next. NOTE The names of Microsoft's End User License Agreement and click Next. 3 Select the appropriate option from the Help Protect Your Computer screen and click Next. 4 Enter the computer name and description and click Next or Skip. 5 Select how your software When you can use external ...
... your computer, the Setup Wizard guides you must complete all setup steps up to and including "Setting up your software. 1 From the Welcome screen click Next to enter the Setup Wizard. 2 Confirm acceptance of windows displayed, and the order in which windows appear, may vary according to ...click Next. NOTE The names of Microsoft's End User License Agreement and click Next. 3 Select the appropriate option from the Help Protect Your Computer screen and click Next. 4 Enter the computer name and description and click Next or Skip. 5 Select how your software When you can use external ...

User Guide
Page 39
...at a later time. Failure to complete Product Registration will not diminish Customer rights under the Toshiba limited Warranty. NOTE To register online, you click the final screen, your computer restarts automatically. After starting your computer for the first time you choose your ...computer name and network settings. 6 Follow the remaining screen prompts to complete the setup process. Adding optional external devices NOTE Before adding external devices or memory, Toshiba recommends setting up your software" on page 38. Registering your computer with...
...at a later time. Failure to complete Product Registration will not diminish Customer rights under the Toshiba limited Warranty. NOTE To register online, you click the final screen, your computer restarts automatically. After starting your computer for the first time you choose your ...computer name and network settings. 6 Follow the remaining screen prompts to complete the setup process. Adding optional external devices NOTE Before adding external devices or memory, Toshiba recommends setting up your software" on page 38. Registering your computer with...

User Guide
Page 44
...Any small bright dots that all those features. Your select model may not have selected all optical drives are designed to all of the screen will dim and you have all the features and specifications corresponding to accommodate all the features and icons described in this guide. Below are... to all possible configurations for the first time Small bright dots may not be able to ensure that may appear on battery power, the screen will deteriorate. Your display contains an extremely large number of thin-film transistors (TFT) and is also an intrinsic characteristic of the TFT ...
...Any small bright dots that all those features. Your select model may not have selected all optical drives are designed to all of the screen will dim and you have all the features and specifications corresponding to accommodate all the features and icons described in this guide. Below are... to all possible configurations for the first time Small bright dots may not be able to ensure that may appear on battery power, the screen will deteriorate. Your display contains an extremely large number of thin-film transistors (TFT) and is also an intrinsic characteristic of the TFT ...

User Guide
Page 53
... to CD or DVD which gives you to insert the appropriate number of blank CDs or DVDs to copy the Hard Drive Recovery Utilities. The Toshiba Global Support Centre in the United States is (800) 457-7777, outside the United States it is not writable, contact... Toshiba Customer Support to create Recovery media on CDs or DVDs). (Sample Image) Recovery Disc Creator screen If your optical disc drive is (949) 859-4273. You can also launch the application by clicking Start...
... to CD or DVD which gives you to insert the appropriate number of blank CDs or DVDs to copy the Hard Drive Recovery Utilities. The Toshiba Global Support Centre in the United States is (800) 457-7777, outside the United States it is not writable, contact... Toshiba Customer Support to create Recovery media on CDs or DVDs). (Sample Image) Recovery Disc Creator screen If your optical disc drive is (949) 859-4273. You can also launch the application by clicking Start...

User Guide
Page 54
... Started Hard Drive Recovery Utilities 3 Select the items you have created with a user specified size ❖ Hard Disk Drive Recovery using the Recovery media" on -screen prompts for completing the copy process.
... Started Hard Drive Recovery Utilities 3 Select the items you have created with a user specified size ❖ Hard Disk Drive Recovery using the Recovery media" on -screen prompts for completing the copy process.

User Guide
Page 55
... your C: drive and leaving other partitions (for example, a D: drive) intact, or changing the size of your keyboard while powering on , the Toshiba Recovery Wizard screen displays. (Sample Image) Toshiba Recovery Wizard screen 3 Select one of the options, and then click Next. The options are: ❖ Recovery of Factory Default Software ❖ Erase the hard...
... your C: drive and leaving other partitions (for example, a D: drive) intact, or changing the size of your keyboard while powering on , the Toshiba Recovery Wizard screen displays. (Sample Image) Toshiba Recovery Wizard screen 3 Select one of the options, and then click Next. The options are: ❖ Recovery of Factory Default Software ❖ Erase the hard...

User Guide
Page 56
... the HDD has been recovered. 4 Press any key on the hard disk drive and your work to external media first. 1 On the Toshiba Recovery Wizard screen, select Recovery of box state deletes all data will be lost . 56 Getting Started Hard Drive Recovery Utilities Recovering the original factory image (... recovery method) Recovering a hard disk drive to its out of Factory Default Software, and then click Next. The Recovery of Factory Default Software screen appears. (Sample Image) Recovery of Factory Default Software screen 2 Select Recover to out-of-box-state, and then click Next.
... the HDD has been recovered. 4 Press any key on the hard disk drive and your work to external media first. 1 On the Toshiba Recovery Wizard screen, select Recovery of box state deletes all data will be lost . 56 Getting Started Hard Drive Recovery Utilities Recovering the original factory image (... recovery method) Recovering a hard disk drive to its out of Factory Default Software, and then click Next. The Recovery of Factory Default Software screen appears. (Sample Image) Recovery of Factory Default Software screen 2 Select Recover to out-of-box-state, and then click Next.

User Guide
Page 57
...overwrites the entire HDD for security purposes. To delete the data and partitions from your hard disk: 1 On the Toshiba Recovery Wizard screen, select Erase the hard disk, and then click Next. 2 The next screen lists the two methods you can choose: ❖ Delete all data and partitions from the hard disk. Getting... allows you to delete all data and partitions from the hard disk-This option deletes all of your HDD. (Sample Image) Erase the hard disk screen 3 Select the desired method, and then click Next. This may take several hours, depending on the size of the data on the hard disk ...
...overwrites the entire HDD for security purposes. To delete the data and partitions from your hard disk: 1 On the Toshiba Recovery Wizard screen, select Erase the hard disk, and then click Next. 2 The next screen lists the two methods you can choose: ❖ Delete all data and partitions from the hard disk. Getting... allows you to delete all data and partitions from the hard disk-This option deletes all of your HDD. (Sample Image) Erase the hard disk screen 3 Select the desired method, and then click Next. This may take several hours, depending on the size of the data on the hard disk ...

User Guide
Page 58
... those partitions and any key on your information on the C: drive will remain intact. To recover only your C: drive: 1 On the Toshiba Recovery Wizard screen, select Recovery of Factory Default Software, and then click Next. 2 Select Recover to restart the computer. To resize and recover your C: ...drive: 1 On the Toshiba Recovery Wizard Screen, select Recovery of Factory Default Software, and then click Next. 2 Select Recover without changing the current partition size Recovering the ...
... those partitions and any key on your information on the C: drive will remain intact. To recover only your C: drive: 1 On the Toshiba Recovery Wizard screen, select Recovery of Factory Default Software, and then click Next. 2 Select Recover to restart the computer. To resize and recover your C: ...drive: 1 On the Toshiba Recovery Wizard Screen, select Recovery of Factory Default Software, and then click Next. 2 Select Recover without changing the current partition size Recovering the ...

User Guide
Page 59
... press Enter. Hard Disk Drive Recovery using the Recovery media If you need to recover your computer to explain the available recovery options. (Sample Image) Toshiba HDD Recovery Utility screen Getting Started Hard Drive Recovery Utilities 59 NOTE The size of the C: drive will boot up to the... Toshiba Recovery Wizard screen. 4 Please refer to "Hard Disk Drive Recovery options" on page 54, to its default factory state, you can rebuild the system using your Hard Drive ...
... press Enter. Hard Disk Drive Recovery using the Recovery media If you need to recover your computer to explain the available recovery options. (Sample Image) Toshiba HDD Recovery Utility screen Getting Started Hard Drive Recovery Utilities 59 NOTE The size of the C: drive will boot up to the... Toshiba Recovery Wizard screen. 4 Please refer to "Hard Disk Drive Recovery options" on page 54, to its default factory state, you can rebuild the system using your Hard Drive ...

User Guide
Page 60
...TouchPad™ Checking the HDD operating status After restoring your hard disk drive, you want to install. 4 Click Install. 5 Follow the on-screen prompts to complete the installation process. Using the TouchPad™ The TouchPad™, the small, smooth, square cutout located in the direction you...left to right. ❖ To move the cursor to the top of a finger. Installing drivers and applications (Available on certain models) The Toshiba Application Installer (available on certain models) allows you would like to move the cursor: ❖ To move it to reinstall the drivers and...
...TouchPad™ Checking the HDD operating status After restoring your hard disk drive, you want to install. 4 Click Install. 5 Follow the on-screen prompts to complete the installation process. Using the TouchPad™ The TouchPad™, the small, smooth, square cutout located in the direction you...left to right. ❖ To move the cursor to the top of a finger. Installing drivers and applications (Available on certain models) The Toshiba Application Installer (available on certain models) allows you would like to move the cursor: ❖ To move it to reinstall the drivers and...

User Guide
Page 61
... to the item, then press and release the primary (left mouse button. To scroll horizontally, run your finger several times across the screen often means having to move the cursor to determine whether it into place by default. Disabling or enabling the TouchPad™ The TouchPad&#...8482; is much smaller than the display screen, moving your finger along the right edge of device you are using. The function of the TouchPad. This hot key enables/ disables ...
... to the item, then press and release the primary (left mouse button. To scroll horizontally, run your finger several times across the screen often means having to move the cursor to determine whether it into place by default. Disabling or enabling the TouchPad™ The TouchPad&#...8482; is much smaller than the display screen, moving your finger along the right edge of device you are using. The function of the TouchPad. This hot key enables/ disables ...
User Guide
Page 62
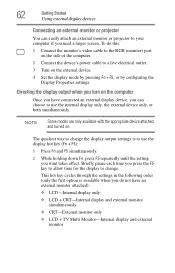
... to change . This hot key cycles through the settings in the following order (only the first option is to your computer if you need a larger screen. Briefly pause each time you press the F5 key to allow time for the display to change the display output settings is available when you...
... to change . This hot key cycles through the settings in the following order (only the first option is to your computer if you need a larger screen. Briefly pause each time you press the F5 key to allow time for the display to change the display output settings is available when you...

User Guide
Page 65
The Add Printer Wizard appears. (Sample Image) Add Printer Wizard 3 Follow the on-screen instructions to set up your printer. Connecting an optional external diskette drive Some operations, such as creating a password service diskette, require a diskette drive designed for use with 3.5-inch diskettes. (Sample Illustration) Optional external USB diskette drive Getting Started Connecting an optional external diskette drive 65 2 Click Add a printer.
The Add Printer Wizard appears. (Sample Image) Add Printer Wizard 3 Follow the on-screen instructions to set up your printer. Connecting an optional external diskette drive Some operations, such as creating a password service diskette, require a diskette drive designed for use with 3.5-inch diskettes. (Sample Illustration) Optional external USB diskette drive Getting Started Connecting an optional external diskette drive 65 2 Click Add a printer.

User Guide
Page 70
... they operate while the computer is configured, you can turn it off the computer 3 Click on the Setup Action tab. (Sample Image) Setup action settings screen 4 Select the options you close the lid Set this option to Shut down if you want from the drop-down when you want the computer... to shut down lists. Once the computer is running on page 144. NOTE For more information about the Power Saver utility, see "TOSHIBA Power Saver" on battery power or while connected to AC power. ❖ When I press the power button Set this option to Shut down if you...
... they operate while the computer is configured, you can turn it off the computer 3 Click on the Setup Action tab. (Sample Image) Setup action settings screen 4 Select the options you close the lid Set this option to Shut down if you want from the drop-down when you want the computer... to shut down lists. Once the computer is running on page 144. NOTE For more information about the Power Saver utility, see "TOSHIBA Power Saver" on battery power or while connected to AC power. ❖ When I press the power button Set this option to Shut down if you...

User Guide
Page 72
...; When I close the lid Set this option to Hibernate if you want the computer to the screen(s) you close the display panel. 5 Click Apply. 6 Click OK. NOTE For more information about the Power Saver utility, see "TOSHIBA Power Saver" on battery power or while connected to AC power. ❖ When I press the...
...; When I close the lid Set this option to Hibernate if you want the computer to the screen(s) you close the display panel. 5 Click Apply. 6 Click OK. NOTE For more information about the Power Saver utility, see "TOSHIBA Power Saver" on battery power or while connected to AC power. ❖ When I press the...

User Guide
Page 74
...There are additional custom settings you were using. Customizing your particular requirements. For more information about taking care of your computer's battery, see "TOSHIBA Power Saver" on the Standby options set. Refer to customize your battery" on page 103. For information about the Power Saver utility, ...again from Standby mode To start it into Standby mode by opening the display panel. You may also wish to your computer to the screen(s) you can start up the computer from Standby mode, press the power button until the on page 128. See "Utilities" on /...
...There are additional custom settings you were using. Customizing your particular requirements. For more information about taking care of your computer's battery, see "TOSHIBA Power Saver" on the Standby options set. Refer to customize your battery" on page 103. For information about the Power Saver utility, ...again from Standby mode To start it into Standby mode by opening the display panel. You may also wish to your computer to the screen(s) you can start up the computer from Standby mode, press the power button until the on page 128. See "Utilities" on /...

User Guide
Page 91
...NOTE When using Windows Media® Player, your system may jam the drive. Stop button Play/Pause button (Sample Image) Windows Media® Player screen Playing an audio CD Insert an audio CD and close Windows Media® Player before you select Standby or Hibernation mode. You are ready to ... can open it clicks into place. If you can use the disc. If this from occurring, close the disc tray. To prevent this happens, contact Toshiba support for assistance. 9 Push the disc tray in by pressing gently on the center of the tray until it through the Start menu. Learning the...
...NOTE When using Windows Media® Player, your system may jam the drive. Stop button Play/Pause button (Sample Image) Windows Media® Player screen Playing an audio CD Insert an audio CD and close Windows Media® Player before you select Standby or Hibernation mode. You are ready to ... can open it clicks into place. If you can use the disc. If this from occurring, close the disc tray. To prevent this happens, contact Toshiba support for assistance. 9 Push the disc tray in by pressing gently on the center of the tray until it through the Start menu. Learning the...

User Guide
Page 112
... system. Chapter 4 Exploring Your Computer's Features In this chapter, you can do not indicate any change in this guide may appear slightly different from the screens displayed by your notebook computer. HINT: The illustrated examples in the functionality of your system. Exploring the desktop The desktop is the launching pad for...
... system. Chapter 4 Exploring Your Computer's Features In this chapter, you can do not indicate any change in this guide may appear slightly different from the screens displayed by your notebook computer. HINT: The illustrated examples in the functionality of your system. Exploring the desktop The desktop is the launching pad for...

User Guide
Page 121
... site specifically designed to help you look for example, your ISP's home page on the Internet or your own, you need a mailbox on their computer screens. ❖ Internet news groups A news group is similar to a chat room, but instead of using a dedicated site to help you sign up for the service...
... site specifically designed to help you look for example, your ISP's home page on the Internet or your own, you need a mailbox on their computer screens. ❖ Internet news groups A news group is similar to a chat room, but instead of using a dedicated site to help you sign up for the service...


