

User Guide
Page 2
... user guides and/or manuals enclosed or provided electronically. Wash hands after handling. TOSHIBA DISCLAIMS ANY LIABILITY FOR THE FAILURE TO COPY OR TRANSFER THE DATA CORRECTLY. TOSHIBA AMERICA INFORMATION SYSTEMS, INC. ("TOSHIBA"), ITS AFFILIATES AND SUPPLIERS DO NOT WARRANT THAT OPERATION OF THE PRODUCT WILL BE UNINTERRUPTED OR ERROR FREE. Model: Satellite Pro® A210/A215 Series Recordable and/or ReWritable Drive(s) and Associated Software...
... user guides and/or manuals enclosed or provided electronically. Wash hands after handling. TOSHIBA DISCLAIMS ANY LIABILITY FOR THE FAILURE TO COPY OR TRANSFER THE DATA CORRECTLY. TOSHIBA AMERICA INFORMATION SYSTEMS, INC. ("TOSHIBA"), ITS AFFILIATES AND SUPPLIERS DO NOT WARRANT THAT OPERATION OF THE PRODUCT WILL BE UNINTERRUPTED OR ERROR FREE. Model: Satellite Pro® A210/A215 Series Recordable and/or ReWritable Drive(s) and Associated Software...

User Guide
Page 5
... them to the fax software instructions installed on this information into your right to the telephone network, the telephone company will notify the customer as soon as possible. 5 Connection to party line service is subject to allow you disconnect the equipment until the problem is resolved. If these changes might affect your service or the operation of the sending machine...
... them to the fax software instructions installed on this information into your right to the telephone network, the telephone company will notify the customer as soon as possible. 5 Connection to party line service is subject to allow you disconnect the equipment until the problem is resolved. If these changes might affect your service or the operation of the sending machine...
User Guide
Page 25
... Removing a memory module 50 Checking total memory 52 Hard Drive Recovery Utilities 52 Creating Recovery CDs/DVDs 53 Hard Disk Drive Recovery options 54 Hard Disk Drive Recovery using the Recovery media 59 Installing drivers and applications 60 Using the TouchPad 60 Scrolling with the TouchPad 61 Control buttons 61 Disabling or enabling the TouchPad 61 Using external display devices 61 Directing the display output when you turn on the computer 62 Adjusting the quality of the external display......63 Using an external keyboard 63 Using a mouse 63 Connecting a printer 64 Setting...
... Removing a memory module 50 Checking total memory 52 Hard Drive Recovery Utilities 52 Creating Recovery CDs/DVDs 53 Hard Disk Drive Recovery options 54 Hard Disk Drive Recovery using the Recovery media 59 Installing drivers and applications 60 Using the TouchPad 60 Scrolling with the TouchPad 61 Control buttons 61 Disabling or enabling the TouchPad 61 Using external display devices 61 Directing the display output when you turn on the computer 62 Adjusting the quality of the external display......63 Using an external keyboard 63 Using a mouse 63 Connecting a printer 64 Setting...

User Guide
Page 46
... hot. Avoid touching the cover, the module, and the surrounding area before replacing it. Failure to the computer, including the AC adaptor. 4 Remove the main battery. The operating system turns off computer or Shut Down window appears. 2 Click Turn Off or Shut Down. To avoid damaging the computer's screws, use a small Phillips screwdriver that is in minor bodily injury. Installing a memory module with the computer's power...
... hot. Avoid touching the cover, the module, and the surrounding area before replacing it. Failure to the computer, including the AC adaptor. 4 Remove the main battery. The operating system turns off computer or Shut Down window appears. 2 Click Turn Off or Shut Down. To avoid damaging the computer's screws, use a small Phillips screwdriver that is in minor bodily injury. Installing a memory module with the computer's power...
User Guide
Page 50
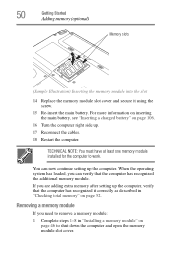
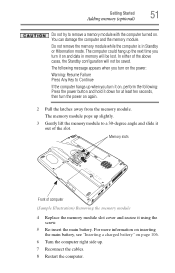
... the additional memory module. 50 Getting Started Adding memory (optional) Memory slots (Sample Illustration) Inserting the memory module into the slot 14 Replace the memory module slot cover and secure it correctly as described in "Installing a memory module" on page 52. Removing a memory module If you can now continue setting up . 17 Reconnect the cables. 18 Restart the computer. For more information on inserting the main battery, see "Inserting a charged battery" on page 106. 16 Turn the...
... the additional memory module. 50 Getting Started Adding memory (optional) Memory slots (Sample Illustration) Inserting the memory module into the slot 14 Replace the memory module slot cover and secure it correctly as described in "Installing a memory module" on page 52. Removing a memory module If you can now continue setting up . 17 Reconnect the cables. 18 Restart the computer. For more information on inserting the main battery, see "Inserting a charged battery" on page 106. 16 Turn the...
User Guide
Page 51
... of computer (Sample Illustration) Removing the memory module 4 Replace the memory module slot cover and secure it using the screw. 5 Re-insert the main battery. The following : Press the power button and hold it down for at least ten seconds, then turn it on, perform the following message appears when you turn on the power: Warning: Resume Failure Press Any Key to Continue If the computer...
... of computer (Sample Illustration) Removing the memory module 4 Replace the memory module slot cover and secure it using the screw. 5 Re-insert the main battery. The following : Press the power button and hold it down for at least ten seconds, then turn it on, perform the following message appears when you turn on the power: Warning: Resume Failure Press Any Key to Continue If the computer...

User Guide
Page 52
...and software features or utilities. Checking total memory When you add or remove a memory module, you can : ❖ Create Hard Drive Recovery CDs or DVDs using a writable drive. ❖ Recover your hard disk drive to the factory-set default without the HDD Recovery partition. ❖ Reinstall drivers and applications which were bundled with a hard disk partition to allow you to the factory-set default. ❖ Recover just your C: drive, leaving any other partitions you create recovery CDs/DVDs before using your system. To do this: 1 Click Start, Control Panel, Performance...
...and software features or utilities. Checking total memory When you add or remove a memory module, you can : ❖ Create Hard Drive Recovery CDs or DVDs using a writable drive. ❖ Recover your hard disk drive to the factory-set default without the HDD Recovery partition. ❖ Reinstall drivers and applications which were bundled with a hard disk partition to allow you to the factory-set default. ❖ Recover just your C: drive, leaving any other partitions you create recovery CDs/DVDs before using your system. To do this: 1 Click Start, Control Panel, Performance...

User Guide
Page 61
... mouse button. Control buttons When a step instructs you can also connect an external monitor or projector via the RGB (monitor) port. Disabling or enabling the TouchPad™ The TouchPad™ is much smaller than the display screen, moving your cursor across the TouchPad in display, but you to click or choose an item, move the cursor to move your cursor, you can click it uses the right mouse button. Scrolling with the TouchPad...
... mouse button. Control buttons When a step instructs you can also connect an external monitor or projector via the RGB (monitor) port. Disabling or enabling the TouchPad™ The TouchPad™ is much smaller than the display screen, moving your cursor across the TouchPad in display, but you to click or choose an item, move the cursor to move your cursor, you can click it uses the right mouse button. Scrolling with the TouchPad...
User Guide
Page 62
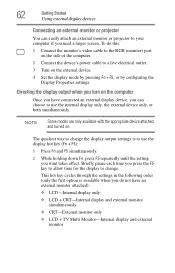
...-External monitor only ❖ LCD + TV Multi Monitor-Internal display and external monitor NOTE Some modes are only available with the appropriate device attached and turned on. The quickest way to change . This hot key cycles through the settings in the following order (only the first option is to use the internal display only, the external device only, or both simultaneously. Briefly pause each time you want takes effect. 62 Getting Started Using external display devices Connecting an external monitor...
...-External monitor only ❖ LCD + TV Multi Monitor-Internal display and external monitor NOTE Some modes are only available with the appropriate device attached and turned on. The quickest way to change . This hot key cycles through the settings in the following order (only the first option is to use the internal display only, the external device only, or both simultaneously. Briefly pause each time you want takes effect. 62 Getting Started Using external display devices Connecting an external monitor...

User Guide
Page 139
... or media of your password in a location where you can later access it should you not remember it. Using a user password A user password provides instant password and power-on password functions: 1 Click Start, All Programs, Toshiba, Utilities, and then TOSHIBA Assist. Deleting a user password To cancel the power-on password function: 1 Click Start, All Programs, Toshiba, Utilities, and then TOSHIBA Assist. The TOSHIBA Assist window appears. 2 On the left side, click the Optimize tab. 3 Click the Hardware Settings icon. Utilities Setting passwords 139...
... or media of your password in a location where you can later access it should you not remember it. Using a user password A user password provides instant password and power-on password functions: 1 Click Start, All Programs, Toshiba, Utilities, and then TOSHIBA Assist. Deleting a user password To cancel the power-on password function: 1 Click Start, All Programs, Toshiba, Utilities, and then TOSHIBA Assist. The TOSHIBA Assist window appears. 2 On the left side, click the Optimize tab. 3 Click the Hardware Settings icon. Utilities Setting passwords 139...

User Guide
Page 140
Deleting a user password To cancel the power-on password function: 1 Click Start, All Programs, Toshiba, Utilities, and then TOSHIBA Assist. The TOSHIBA Assist window appears. 2 On the left side, click the Optimize tab. 3 Click the Hardware Settings icon. 4 Select Not Registered. 5 Follow the on-screen instructions to exit. 140 Utilities Setting passwords 4 Click on the Password tab. (Sample Image) Toshiba Password Utility window 5 Click on Register. 6 Enter your password, and click OK. 7 Re-enter your password and click...
Deleting a user password To cancel the power-on password function: 1 Click Start, All Programs, Toshiba, Utilities, and then TOSHIBA Assist. The TOSHIBA Assist window appears. 2 On the left side, click the Optimize tab. 3 Click the Hardware Settings icon. 4 Select Not Registered. 5 Follow the on-screen instructions to exit. 140 Utilities Setting passwords 4 Click on the Password tab. (Sample Image) Toshiba Password Utility window 5 Click on Register. 6 Enter your password, and click OK. 7 Re-enter your password and click...

User Guide
Page 156
... each device. Using Startup options to fix problems If the operating system fails to change the system in a different room. The amperage rating of the computer and the AC adaptor show the specifications for voltage ("V") and current ("A") for your system's configuration or verify the startup procedure to a different power outlet, preferably in some way such as installing a new program or adding a device. If the computer starts...
... each device. Using Startup options to fix problems If the operating system fails to change the system in a different room. The amperage rating of the computer and the AC adaptor show the specifications for voltage ("V") and current ("A") for your system's configuration or verify the startup procedure to a different power outlet, preferably in some way such as installing a new program or adding a device. If the computer starts...
User Guide
Page 164
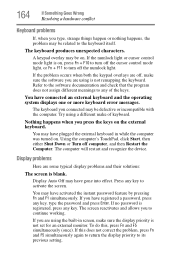
... are using is not set for an external monitor. Using the computer's TouchPad, click Start, then either Shut Down or Turn off the numlock light. The computer will restart and recognize the device. To do this does not correct the problem, press Fn and F5 simultaneously again to return the display priority to continue working. If the numlock light or cursor control mode light is on the external keyboard...
... are using is not set for an external monitor. Using the computer's TouchPad, click Start, then either Shut Down or Turn off the numlock light. The computer will restart and recognize the device. To do this does not correct the problem, press Fn and F5 simultaneously again to return the display priority to continue working. If the numlock light or cursor control mode light is on the external keyboard...

User Guide
Page 173
... with an internal Wi-Fi® adapter, verify that the Wi-Fi® antenna switch is on how to the same COM port. If Something Goes Wrong Resolving a hardware conflict 173 Modem problems (Available on page 115. Check the port settings to make sure the hardware and software are not familiar with the terminology, please see Windows® Help and Support or contact...
... with an internal Wi-Fi® adapter, verify that the Wi-Fi® antenna switch is on how to the same COM port. If Something Goes Wrong Resolving a hardware conflict 173 Modem problems (Available on page 115. Check the port settings to make sure the hardware and software are not familiar with the terminology, please see Windows® Help and Support or contact...
User Guide
Page 175
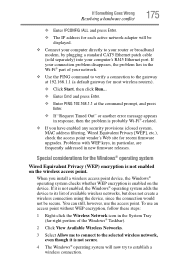
... network. ❖ Use the PING command to verify a connection to establish a wireless connection. If it is enabled on the wireless access point. Problems with WEP keys, in particular, are frequently addressed in new firmware releases. If Something Goes Wrong Resolving a hardware conflict 175 ❖ Enter IPCONFIG /ALL and press Enter. ❖ The IP address for each active network adapter will now try to the gateway at 192.168.1.1 (a default...
... network. ❖ Use the PING command to verify a connection to establish a wireless connection. If it is enabled on the wireless access point. Problems with WEP keys, in particular, are frequently addressed in new firmware releases. If Something Goes Wrong Resolving a hardware conflict 175 ❖ Enter IPCONFIG /ALL and press Enter. ❖ The IP address for each active network adapter will now try to the gateway at 192.168.1.1 (a default...

User Guide
Page 223
... the operating system automatically recognize the change. See device. See also World Wide Web. K keyboard shortcut - Memory cache installed on the screen that polarizes the light passing through the electrodes, the molecules in the liquid form a crystalline pattern that represents a function, file, or program. A type of display that activates a memory resident program. 223 Glossary hot key - (1) A feature in which only every other on the network. internal device - L2...
... the operating system automatically recognize the change. See device. See also World Wide Web. K keyboard shortcut - Memory cache installed on the screen that polarizes the light passing through the electrodes, the molecules in the liquid form a crystalline pattern that represents a function, file, or program. A type of display that activates a memory resident program. 223 Glossary hot key - (1) A feature in which only every other on the network. internal device - L2...
User Guide
Page 230
... a power source 40 connection set up 118 control buttons 61 Ctrl keys 80 D desktop creating new icon 113 major features 113 desktop exploration 112 desktop icons 113 Device Manager 160 checking properties 161 disabling a device 160 devices keyboard 63 mouse 63 Disk Defragmenter 167 disk drive corrupted/damaged data files 167 missing files/trouble accessing a disk 166 running slow 167 diskette drive cannot insert a diskette 167 cannot read a diskette 168 connecting 65 external, connecting 65 display...
... a power source 40 connection set up 118 control buttons 61 Ctrl keys 80 D desktop creating new icon 113 major features 113 desktop exploration 112 desktop icons 113 Device Manager 160 checking properties 161 disabling a device 160 devices keyboard 63 mouse 63 Disk Defragmenter 167 disk drive corrupted/damaged data files 167 missing files/trouble accessing a disk 166 running slow 167 diskette drive cannot insert a diskette 167 cannot read a diskette 168 connecting 65 external, connecting 65 display...

User Guide
Page 232
... J jack RJ-11 117 K keyboard character keys 79 function keys 80 hot keys 193 not working 154 overlay keys 81 troubleshooting 164 using 79 Windows® special keys 80 keyboard, external 63 keyboard, full-size 79 L lock computer, using 75 M main battery removing 105 memory adding 45 problem solving 161 removing memory module slot cover 47 memory module inserting 48 installation 46 removing 51 memory module slot 47 microphone 122 modem connecting to telephone line 116 determining COM port 115 problem solving 173 resetting port to default settings 115 upgrading 115 monitor 61 connecting 62...
... J jack RJ-11 117 K keyboard character keys 79 function keys 80 hot keys 193 not working 154 overlay keys 81 troubleshooting 164 using 79 Windows® special keys 80 keyboard, external 63 keyboard, full-size 79 L lock computer, using 75 M main battery removing 105 memory adding 45 problem solving 161 removing memory module slot cover 47 memory module inserting 48 installation 46 removing 51 memory module slot 47 microphone 122 modem connecting to telephone line 116 determining COM port 115 problem solving 173 resetting port to default settings 115 upgrading 115 monitor 61 connecting 62...

User Guide
Page 233
... disabling a device 160 disk drive is slow 167 display is blank 164 ExpressCard™ 169 checklist 170 error occurs 172 hot swapping fails 171 not recognized 171 slot appears dead 170 external display not working 166 external monitor 165 faulty memory 161 hardware conflict 158, 159 high-pitched noise 169 illegal operation 153 Internet bookmarked site not found 158 Internet connection is slow 157 keyboard not responding 154 missing files/trouble accessing a disk...
... disabling a device 160 disk drive is slow 167 display is blank 164 ExpressCard™ 169 checklist 170 error occurs 172 hot swapping fails 171 not recognized 171 slot appears dead 170 external display not working 166 external monitor 165 faulty memory 161 hardware conflict 158, 159 high-pitched noise 169 illegal operation 153 Internet bookmarked site not found 158 Internet connection is slow 157 keyboard not responding 154 missing files/trouble accessing a disk...

User Guide
Page 234
... 114 T Taskbar 114 telephone line connecting to modem 116 television adjusting display 63 Toshiba registering computer 39 worldwide offices 185 TOSHIBA Assist 129 TOSHIBA Hardware Setup 147 Toshiba online resources 94 traveling tips 111 troubleshooting DVD player general problems 176 external keyboard 164 keyboard 164 keypad overlay 164 optical drive 168 turning on the computer 44 turning on the power 44 U user password, disabling 139, 140 user password, setting 138, 139 using a file extension 86 Utilities 128 utilities
... 114 T Taskbar 114 telephone line connecting to modem 116 television adjusting display 63 Toshiba registering computer 39 worldwide offices 185 TOSHIBA Assist 129 TOSHIBA Hardware Setup 147 Toshiba online resources 94 traveling tips 111 troubleshooting DVD player general problems 176 external keyboard 164 keyboard 164 keypad overlay 164 optical drive 168 turning on the computer 44 turning on the power 44 U user password, disabling 139, 140 user password, setting 138, 139 using a file extension 86 Utilities 128 utilities


