User Guide
Page 7
...adoption of waste management strategies that focus on recycling and reuse. EU Declaration of Conformity TOSHIBA declares that operate with the related European Directives. Industry Canada requires this device. Pb, ... requires producers of lead (Pb), mercury (Hg), and/or cadmium (Cd) defined in the Battery Directive (2006/66/EC), then the chemical symbols for CE-Marking is carrying the CE-Mark in...the market in European Union (EU) member countries after August 2005 to co-channel Mobile Satellite systems. High power radars are allocated as primary users of the Low Voltage Directive 73/...
...adoption of waste management strategies that focus on recycling and reuse. EU Declaration of Conformity TOSHIBA declares that operate with the related European Directives. Industry Canada requires this device. Pb, ... requires producers of lead (Pb), mercury (Hg), and/or cadmium (Cd) defined in the Battery Directive (2006/66/EC), then the chemical symbols for CE-Marking is carrying the CE-Mark in...the market in European Union (EU) member countries after August 2005 to co-channel Mobile Satellite systems. High power radars are allocated as primary users of the Low Voltage Directive 73/...
User Guide
Page 23
... 40 Setting up your computer 41 Connecting to a power source 41 Charging the main battery 44 Using the computer for the first time 44 Initial setup 45 Setting up your software 45 Registering your computer with Toshiba 45 To Shut down your computer 46 To Restart your computer 46 To place your...
... 40 Setting up your computer 41 Connecting to a power source 41 Charging the main battery 44 Using the computer for the first time 44 Initial setup 45 Setting up your software 45 Registering your computer with Toshiba 45 To Shut down your computer 46 To Restart your computer 46 To place your...
User Guide
Page 24
... Removing a disc with the computer off 86 Toshiba's online resources 87 Chapter 3: Mobile Computing 88 Toshiba's energy-saver design 88 Running the computer on battery power 88 Battery Notice 89 Power management 90 Charging the main battery 90 Charging the RTC battery 91 Monitoring battery power 92 Determining remaining battery power 93 What to do when the main...
... Removing a disc with the computer off 86 Toshiba's online resources 87 Chapter 3: Mobile Computing 88 Toshiba's energy-saver design 88 Running the computer on battery power 88 Battery Notice 89 Power management 90 Charging the main battery 90 Charging the RTC battery 91 Monitoring battery power 92 Determining remaining battery power 93 What to do when the main...
User Guide
Page 25
... 95 Power Plans 95 Using the eco power plan 97 Changing the main battery 97 Removing the battery from the computer .........97 Inserting a charged battery 99 Taking care of your battery 100 Safety precautions 100 Maintaining your battery 101 Disposing of used batteries 101 Traveling tips 102 Chapter 4: Exploring Your Computer's Features 103 Exploring the Start...
... 95 Power Plans 95 Using the eco power plan 97 Changing the main battery 97 Removing the battery from the computer .........97 Inserting a charged battery 99 Taking care of your battery 100 Safety precautions 100 Maintaining your battery 101 Disposing of used batteries 101 Traveling tips 102 Chapter 4: Exploring Your Computer's Features 103 Exploring the Start...
User Guide
Page 26
... HDD Protection Utility 127 Function Key 128 PC Diagnostic Tool Utility 129 PC Health Monitor 130 Recovery Media Creator 131 Service Station 131 TOSHIBA Application Installer 132 Chapter 6: If Something Goes Wrong 133 Problems that are easy to fix 133 Problems when you turn on the... operating system can help you 140 Fixing a problem with Device Manager 140 Checking device properties 140 Memory problems 141 Power and the batteries 142 Keyboard problems 143 Display problems 144 Disk or storage drive problems 146 Error-checking 146 Optical disc drive problems 148 Sound system ...
... HDD Protection Utility 127 Function Key 128 PC Diagnostic Tool Utility 129 PC Health Monitor 130 Recovery Media Creator 131 Service Station 131 TOSHIBA Application Installer 132 Chapter 6: If Something Goes Wrong 133 Problems that are easy to fix 133 Problems when you turn on the... operating system can help you 140 Fixing a problem with Device Manager 140 Checking device properties 140 Memory problems 141 Power and the batteries 142 Keyboard problems 143 Display problems 144 Disk or storage drive problems 146 Error-checking 146 Optical disc drive problems 148 Sound system ...
User Guide
Page 28
...down the system after 15 minutes of powerful, portable, multimedia computing. See the "Mobile Computing" section of the Toshiba User's Guide for both AC power and battery modes. Toshiba is a partner in AC power mode. You can accompany you wherever you leave this computer to meet the ...stable operating environment and optimum system performance for more information on using power management settings to conserve computer energy. 28 With your Toshiba computer, your work and entertainment can wake the computer from Sleep mode by pressing the power button. Your computer ships with the...
...down the system after 15 minutes of powerful, portable, multimedia computing. See the "Mobile Computing" section of the Toshiba User's Guide for both AC power and battery modes. Toshiba is a partner in AC power mode. You can accompany you wherever you leave this computer to meet the ...stable operating environment and optimum system performance for more information on using power management settings to conserve computer energy. 28 With your Toshiba computer, your work and entertainment can wake the computer from Sleep mode by pressing the power button. Your computer ships with the...
User Guide
Page 39
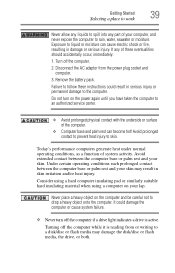
... the AC adaptor from or writing to a disk/disc or flash media may result in serious injury or permanent damage to the computer. Remove the battery pack. Never place a heavy object on the computer and be careful not to skin. Avoid prolonged contact to prevent heat injury to drop a heavy object...
... the AC adaptor from or writing to a disk/disc or flash media may result in serious injury or permanent damage to the computer. Remove the battery pack. Never place a heavy object on the computer and be careful not to skin. Avoid prolonged contact to prevent heat injury to drop a heavy object...
User Guide
Page 41
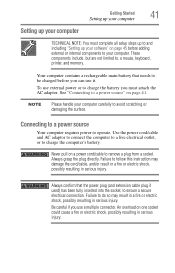
... Started 41 Setting up your computer Setting up your computer TECHNICAL NOTE: You must attach the AC adaptor. Your computer contains a rechargeable main battery that the power plug (and extension cable plug if used) has been fully inserted into the socket, to do so may damage the cord... or damaging the surface. Use the power cord/cable and AC adaptor to connect the computer to a live electrical outlet, or to charge the battery you must complete all setup steps up to and including "Setting up your software" on page 41. NOTE Please handle your computer. Be careful...
... Started 41 Setting up your computer Setting up your computer TECHNICAL NOTE: You must attach the AC adaptor. Your computer contains a rechargeable main battery that the power plug (and extension cable plug if used) has been fully inserted into the socket, to do so may damage the cord... or damaging the surface. Use the power cord/cable and AC adaptor to connect the computer to a live electrical outlet, or to charge the battery you must complete all setup steps up to and including "Setting up your software" on page 41. NOTE Please handle your computer. Be careful...

User Guide
Page 43
...it is not receiving correct input from the AC power supply. Disconnect the AC power cord/cable and remove the main battery pack. The computer's main battery light gives you an indication of the computer. (Sample Illustration) Connecting the AC adaptor cord to the computer 3 Connect... the power cord/cable to connect or disconnect a power plug with wet hands. See "Changing the main battery" on page 97 for information on the indicator panel glows white. Never attempt to a live electrical outlet. Getting Started 43 Connecting to a power...
...it is not receiving correct input from the AC power supply. Disconnect the AC power cord/cable and remove the main battery pack. The computer's main battery light gives you an indication of the computer. (Sample Illustration) Connecting the AC adaptor cord to the computer 3 Connect... the power cord/cable to connect or disconnect a power plug with wet hands. See "Changing the main battery" on page 97 for information on the indicator panel glows white. Never attempt to a live electrical outlet. Getting Started 43 Connecting to a power...

User Guide
Page 44
... display panel, do not force it beyond the point where it , see "Exploring Your Computer's Features" on page 103. This is operated on battery power, the screen will dim and you to turn on your computer. After that may vary depending on your screen display when you must charge... is manufactured using it moves easily and never lift the computer by the display panel. 44 Getting Started Charging the main battery Charging the main battery Before using the battery to power the computer, you turn it on and begin using high-precision technology. Do not press or push on the...
... display panel, do not force it beyond the point where it , see "Exploring Your Computer's Features" on page 103. This is operated on battery power, the screen will dim and you to turn on your computer. After that may vary depending on your screen display when you must charge... is manufactured using it moves easily and never lift the computer by the display panel. 44 Getting Started Charging the main battery Charging the main battery Before using the battery to power the computer, you turn it on and begin using high-precision technology. Do not press or push on the...
User Guide
Page 47
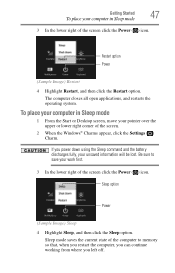
... sure to memory so that, when you restart the computer, you can continue working from where you power down using the Sleep command and the battery discharges fully, your unsaved information will be lost. Sleep option Power (Sample Image) Sleep 4 Highlight Sleep, and then click the Sleep option. Getting Started 47...
... sure to memory so that, when you restart the computer, you can continue working from where you power down using the Sleep command and the battery discharges fully, your unsaved information will be lost. Sleep option Power (Sample Image) Sleep 4 Highlight Sleep, and then click the Sleep option. Getting Started 47...
User Guide
Page 50
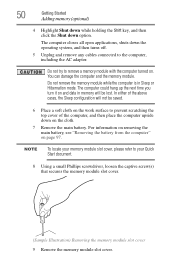
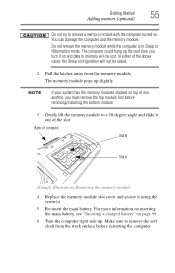
...cases, the Sleep configuration will be lost. The computer closes all open applications, shuts down option. For information on removing the main battery, see "Removing the battery from the computer" on . NOTE To locate your memory module slot cover, please refer to remove a memory module with the ... and data in Sleep or Hibernation mode. The computer could hang up the next time you turn it on the cloth. 7 Remove the main battery. Do not try to your Quick Start document. 8 Using a small Phillips screwdriver, loosen the captive screw(s) that secures the memory module slot...
...cases, the Sleep configuration will be lost. The computer closes all open applications, shuts down option. For information on removing the main battery, see "Removing the battery from the computer" on . NOTE To locate your memory module slot cover, please refer to remove a memory module with the ... and data in Sleep or Hibernation mode. The computer could hang up the next time you turn it on the cloth. 7 Remove the main battery. Do not try to your Quick Start document. 8 Using a small Phillips screwdriver, loosen the captive screw(s) that secures the memory module slot...
User Guide
Page 53
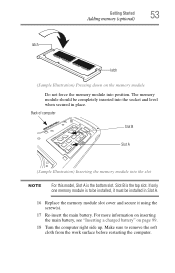
... and level when secured in Slot A. 16 Replace the memory module slot cover and secure it using the screw(s). 17 Re-insert the main battery. Slot B is to remove the soft cloth from the work surface before restarting the computer. Getting Started 53 Adding memory (optional) latch latch... (Sample Illustration) Pressing down on page 99. 18 Turn the computer right side up. For more information on inserting the main battery, see "Inserting a charged battery" on the memory module Do not force the memory module into the slot NOTE For this model, Slot A is the bottom slot....
... and level when secured in Slot A. 16 Replace the memory module slot cover and secure it using the screw(s). 17 Re-insert the main battery. Slot B is to remove the soft cloth from the work surface before restarting the computer. Getting Started 53 Adding memory (optional) latch latch... (Sample Illustration) Pressing down on page 99. 18 Turn the computer right side up. For more information on inserting the main battery, see "Inserting a charged battery" on the memory module Do not force the memory module into the slot NOTE For this model, Slot A is the bottom slot....
User Guide
Page 55
.... The memory module pops up . Make sure to remove the soft cloth from the memory module. For more information on inserting the main battery, see "Inserting a charged battery" on and data in Sleep or Hibernation mode. The computer could hang up the next time you must remove the top module first before... computer Slot B Slot A (Sample Illustration) Removing the memory module 4 Replace the memory module slot cover and secure it using the screw(s). 5 Re-insert the main battery. Getting Started 55 Adding memory (optional) Do not try to a 30-degree angle and slide it out of the slot.
.... The memory module pops up . Make sure to remove the soft cloth from the memory module. For more information on inserting the main battery, see "Inserting a charged battery" on and data in Sleep or Hibernation mode. The computer could hang up the next time you must remove the top module first before... computer Slot B Slot A (Sample Illustration) Removing the memory module 4 Replace the memory module slot cover and secure it using the screw(s). 5 Re-insert the main battery. Getting Started 55 Adding memory (optional) Do not try to a 30-degree angle and slide it out of the slot.

User Guide
Page 74
Customizing your computer's settings There are additional custom settings you can choose. You may also wish to suit your battery" on page 95. 74 Getting Started Customizing your pointer over the upper or lower right corner of the screen. When the Windows Charms appear.... Then choose a category you may also use the F4 key, and then press ENTER to activate a selection. Adjusting the quality of your computer's battery, see "Power Plans" on page 100. There are several ways in which you can go into your computer settings to make adjustments to your television...
Customizing your computer's settings There are additional custom settings you can choose. You may also wish to suit your battery" on page 95. 74 Getting Started Customizing your pointer over the upper or lower right corner of the screen. When the Windows Charms appear.... Then choose a category you may also use the F4 key, and then press ENTER to activate a selection. Adjusting the quality of your computer's battery, see "Power Plans" on page 100. There are several ways in which you can go into your computer settings to make adjustments to your television...
User Guide
Page 77
HINT: Some programs have an automatic save it to the internal storage drive. This feature saves your file to reconnect, or your battery runs out of charge while you are using goes down and you save feature that can be activated. See "Saving your software documentation for further ...
HINT: Some programs have an automatic save it to the internal storage drive. This feature saves your file to reconnect, or your battery runs out of charge while you are using goes down and you save feature that can be activated. See "Saving your software documentation for further ...

User Guide
Page 88
... you leave these energy-saving features have been preset by Toshiba. Toshiba's energy-saver design Your computer enters a low-power suspension mode when it for longer periods while traveling. Running the computer on battery power The computer contains a removable Lithium-Ion (Li-Ion) battery that you can recharge it many times. 88 You can...
... you leave these energy-saving features have been preset by Toshiba. Toshiba's energy-saver design Your computer enters a low-power suspension mode when it for longer periods while traveling. Running the computer on battery power The computer contains a removable Lithium-Ion (Li-Ion) battery that you can recharge it many times. 88 You can...
User Guide
Page 89
..., applications, power management settings and features utilized, as well as the natural performance variations produced by Toshiba under any individual user. The Lithium-Ion battery has no memory effect so it is consuming full power. The computer also has an internal real-... does not indicate the battery life that stores your Toshiba computer. Mobile Computing 89 Running the computer on battery power Battery Notice Battery life rating is for better accuracy of the battery meter, it is helpful to fully discharge the battery periodically. Use only batteries designed to work with...
..., applications, power management settings and features utilized, as well as the natural performance variations produced by Toshiba under any individual user. The Lithium-Ion battery has no memory effect so it is consuming full power. The computer also has an internal real-... does not indicate the battery life that stores your Toshiba computer. Mobile Computing 89 Running the computer on battery power Battery Notice Battery life rating is for better accuracy of the battery meter, it is helpful to fully discharge the battery periodically. Use only batteries designed to work with...
User Guide
Page 90
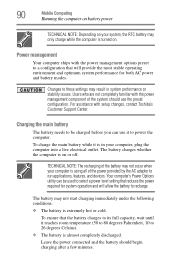
...Users who are not completely familiar with setup changes, contact Toshiba's Customer Support Center. For assistance with the power management component of the power provided by the AC adaptor to power the computer. Charging the main battery The battery needs to be used to select a power level setting ... or stability issues. Your computer's Power Options utility can be charged before you can use the preset configuration. To ensure that the battery charges to its full capacity, wait until it is using all of the system should begin charging after a few minutes. 90 Mobile...
...Users who are not completely familiar with setup changes, contact Toshiba's Customer Support Center. For assistance with the power management component of the power provided by the AC adaptor to power the computer. Charging the main battery The battery needs to be used to select a power level setting ... or stability issues. Your computer's Power Options utility can be charged before you can use the preset configuration. To ensure that the battery charges to its full capacity, wait until it is using all of the system should begin charging after a few minutes. 90 Mobile...
User Guide
Page 91
...charge while the computer is turned on. NOTE Depending on your computer was shipped, resulting in a CMOS error message during startup. To recharge the RTC battery, plug the computer into a live electrical outlet and leave the computer powered on for up to a month when the computer is powered off. When ...fully charged, it charges while the computer is on. If the RTC battery is low, the real-time clock and calendar may vary by computer model. The computer can be used to store your computer on...
...charge while the computer is turned on. NOTE Depending on your computer was shipped, resulting in a CMOS error message during startup. To recharge the RTC battery, plug the computer into a live electrical outlet and leave the computer powered on for up to a month when the computer is powered off. When ...fully charged, it charges while the computer is on. If the RTC battery is low, the real-time clock and calendar may vary by computer model. The computer can be used to store your computer on...


