User Manual
Page 30
... a PC Card 143 Removing a PC Card 143 Setting up a PC Card for your computer .........144 Using the Bridge Media Adapter Slot 144 Inserting memory media 145 Removing memory media 145 Chapter 5: Toshiba Utilities 147 TOSHIBA Assist 148 Connect 149 Secure 149 Protect & Fix 149 Optimize 149 Setting passwords 150 Using an instant password 150 Using...
... a PC Card 143 Removing a PC Card 143 Setting up a PC Card for your computer .........144 Using the Bridge Media Adapter Slot 144 Inserting memory media 145 Removing memory media 145 Chapter 5: Toshiba Utilities 147 TOSHIBA Assist 148 Connect 149 Secure 149 Protect & Fix 149 Optimize 149 Setting passwords 150 Using an instant password 150 Using...
User Manual
Page 46
See "Setting up your software. After starting your computer for the first time you may want to: ❖ Add more memory (see "Adding memory (optional)" on page 53) ❖ Connect a mouse (see "Using a mouse" on page 66) ❖ Connect a full-size keyboard (see "Using an ...external diskette drive" on page 69) ❖ Install PC Cards (see "Using PC Cards" on page 142) ❖ Install flash memory cards (see "Using the Bridge Media Adapter Slot" on page 44. 46 Getting Started Adding optional external devices Adding optional external devices NOTE Before adding external devices or...
See "Setting up your software. After starting your computer for the first time you may want to: ❖ Add more memory (see "Adding memory (optional)" on page 53) ❖ Connect a mouse (see "Using a mouse" on page 66) ❖ Connect a full-size keyboard (see "Using an ...external diskette drive" on page 69) ❖ Install PC Cards (see "Using PC Cards" on page 142) ❖ Install flash memory cards (see "Using the Bridge Media Adapter Slot" on page 44. 46 Getting Started Adding optional external devices Adding optional external devices NOTE Before adding external devices or...

User Manual
Page 54
...) For more information on may damage the computer, the module, or both. NOTE Before adding external devices or memory, Toshiba recommends setting up your software. You will become hot. If this procedure. Installing a memory module The computer has two memory module slots. To avoid damaging the computer's screws, use the computer for a long time, the...
...) For more information on may damage the computer, the module, or both. NOTE Before adding external devices or memory, Toshiba recommends setting up your software. You will become hot. If this procedure. Installing a memory module The computer has two memory module slots. To avoid damaging the computer's screws, use the computer for a long time, the...
User Manual
Page 55
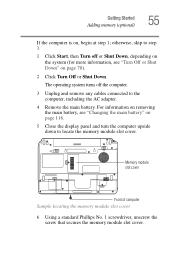
... "Turn Off or Shut Down" on , begin at step 1; Memory module slot cover Front of computer Sample locating the memory module slot cover 6 Using a standard Phillips No. 1 screwdriver, unscrew the screw that secures the memory module slot cover. The operating system turns off or Shut Down, depending on ... the main battery. Getting Started Adding memory (optional) 55 If the computer is on page 70). 2 Click Turn Off or Shut Down. otherwise, skip to step 3. 1 Click Start, then Turn off the computer. 3 Unplug and remove any cables connected to locate the memory module slot cover.
... "Turn Off or Shut Down" on , begin at step 1; Memory module slot cover Front of computer Sample locating the memory module slot cover 6 Using a standard Phillips No. 1 screwdriver, unscrew the screw that secures the memory module slot cover. The operating system turns off or Shut Down, depending on ... the main battery. Getting Started Adding memory (optional) 55 If the computer is on page 70). 2 Click Turn Off or Shut Down. otherwise, skip to step 3. 1 Click Start, then Turn off the computer. 3 Unplug and remove any cables connected to locate the memory module slot cover.
User Manual
Page 56
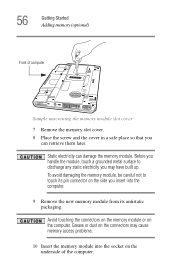
... static electricity you may cause memory access problems. 10 Insert the memory module into the computer. 9 Remove the new memory module from its pin connector on the side you can damage the memory module. 56 Getting Started Adding memory (optional) Front of computer Sample unscrewing the memory module slot cover 7 Remove the memory slot cover. 8 Place the screw and...
... static electricity you may cause memory access problems. 10 Insert the memory module into the computer. 9 Remove the new memory module from its pin connector on the side you can damage the memory module. 56 Getting Started Adding memory (optional) Front of computer Sample unscrewing the memory module slot cover 7 Remove the memory slot cover. 8 Place the screw and...
User Manual
Page 57
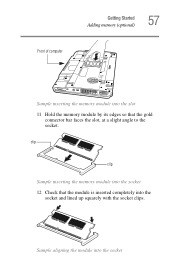
clip clip Sample inserting the memory module into the socket 12 Check that the gold connector bar faces the slot, at a slight angle to the socket. Front of computer Getting Started Adding memory (optional) 57 Sample inserting the memory module into the slot 11 Hold the memory module by its edges so that the module is inserted completely into the socket and lined up squarely with the socket clips. Sample aligning the module into the socket
clip clip Sample inserting the memory module into the socket 12 Check that the gold connector bar faces the slot, at a slight angle to the socket. Front of computer Getting Started Adding memory (optional) 57 Sample inserting the memory module into the slot 11 Hold the memory module by its edges so that the module is inserted completely into the socket and lined up squarely with the socket clips. Sample aligning the module into the socket
User Manual
Page 58
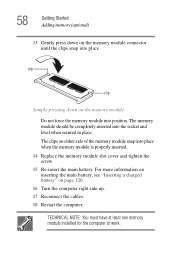
... into position. clip clip Sample pressing down on the memory module connector until the clips snap into place. The memory module should be completely inserted into place when the memory module is properly inserted. 14 Replace the memory module slot cover and tighten the screw. 15 Re-insert the ...main battery. TECHNICAL NOTE: You must have at least one memory module installed for the...
... into position. clip clip Sample pressing down on the memory module connector until the clips snap into place. The memory module should be completely inserted into place when the memory module is properly inserted. 14 Replace the memory module slot cover and tighten the screw. 15 Re-insert the ...main battery. TECHNICAL NOTE: You must have at least one memory module installed for the...
User Manual
Page 59
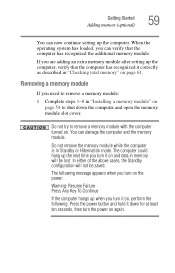
... has recognized it correctly as described in Standby or Hibernation mode. Removing a memory module If you are adding an extra memory module after setting up the next time you turn it down the computer and open the memory module slot cover. When the operating system has loaded, you turn it on, perform ...Key To Continue If the computer hangs up the computer. The following : Press the power button and hold it on and data in "Installing a memory module" on page 54 to shut down for at least ten seconds, then turn on again. In either of the above cases, the Standby ...
... has recognized it correctly as described in Standby or Hibernation mode. Removing a memory module If you are adding an extra memory module after setting up the next time you turn it down the computer and open the memory module slot cover. When the operating system has loaded, you turn it on, perform ...Key To Continue If the computer hangs up the computer. The following : Press the power button and hold it on and data in "Installing a memory module" on page 54 to shut down for at least ten seconds, then turn on again. In either of the above cases, the Standby ...

User Manual
Page 60
... up slightly. 3 Gently lift the memory module to work. TECHNICAL NOTE: You must have at least one memory module installed for the computer to a 45 degree angle and slide it out of computer Sample removing the memory module 4 Replace the memory module slot cover and tighten the screw. 5 ...Re-insert the main battery. The memory module pops up . 7 Reconnect the cables...
... up slightly. 3 Gently lift the memory module to work. TECHNICAL NOTE: You must have at least one memory module installed for the computer to a 45 degree angle and slide it out of computer Sample removing the memory module 4 Replace the memory module slot cover and tighten the screw. 5 ...Re-insert the main battery. The memory module pops up . 7 Reconnect the cables...
User Manual
Page 61
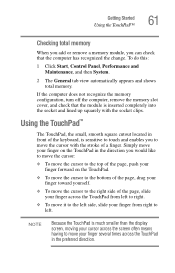
... do this: 1 Click Start, Control Panel, Performance and Maintenance, and then System. 2 The General tab view automatically appears and shows total memory. NOTE Because the TouchPad is sensitive to touch and enables you to left side, slide your finger several times across the TouchPad from left to... right. ❖ To move the cursor with the socket clips. If the computer does not recognize the memory configuration, turn off the computer, remove the memory slot cover, and check that the computer has recognized the change. Using the TouchPad™ The TouchPad, the small, smooth...
... do this: 1 Click Start, Control Panel, Performance and Maintenance, and then System. 2 The General tab view automatically appears and shows total memory. NOTE Because the TouchPad is sensitive to touch and enables you to left side, slide your finger several times across the TouchPad from left to... right. ❖ To move the cursor with the socket clips. If the computer does not recognize the memory configuration, turn off the computer, remove the memory slot cover, and check that the computer has recognized the change. Using the TouchPad™ The TouchPad, the small, smooth...

User Manual
Page 144
... digital music players, cellular phones, PDAs, digital cameras, digital video camcorders, etc. 144 Exploring Your Computer's Features Using the Bridge Media Adapter Slot Sample removing a PC Card Setting up a PC Card for your computer Some PC Cards are ready to use the Copy Disk function for this... type of media. Others, such as you install them. Using the Bridge Media Adapter Slot The Bridge Media Adapter Slot supports the use the drag-and-drop feature of Memory StickTM or Memory StickTM PRO media, Secure DigitalTM (SDTM) Cards, MMC (MultiMedia Card), or xD-Picture Cards. ...
... digital music players, cellular phones, PDAs, digital cameras, digital video camcorders, etc. 144 Exploring Your Computer's Features Using the Bridge Media Adapter Slot Sample removing a PC Card Setting up a PC Card for your computer Some PC Cards are ready to use the Copy Disk function for this... type of media. Others, such as you install them. Using the Bridge Media Adapter Slot The Bridge Media Adapter Slot supports the use the drag-and-drop feature of Memory StickTM or Memory StickTM PRO media, Secure DigitalTM (SDTM) Cards, MMC (MultiMedia Card), or xD-Picture Cards. ...

User Manual
Page 145
...the media for safe removal, a message will tell you want to release it. 145 Exploring Your Computer's Features Using the Bridge Media Adapter Slot Inserting memory media The following instructions apply to all media devices. 1 Turn the media so that the contacts (metal areas) are face down. 2 Push... the media into the adapter slot until it straight out. Sample inserting memory media When inserting memory media, do not touch the metal contacts. You could expose the storage area to static electricity, which can be ...
...the media for safe removal, a message will tell you want to release it. 145 Exploring Your Computer's Features Using the Bridge Media Adapter Slot Inserting memory media The following instructions apply to all media devices. 1 Turn the media so that the contacts (metal areas) are face down. 2 Push... the media into the adapter slot until it straight out. Sample inserting memory media When inserting memory media, do not touch the metal contacts. You could expose the storage area to static electricity, which can be ...

User Manual
Page 146
146 Exploring Your Computer's Features Using the Bridge Media Adapter Slot Do not remove memory media while data is being written or read. Wait for the indicator light to the media might still be in progress and your data could be destroyed. disappears, writing to go out. Even when the Windows message "copying..."
146 Exploring Your Computer's Features Using the Bridge Media Adapter Slot Do not remove memory media while data is being written or read. Wait for the indicator light to the media might still be in progress and your data could be destroyed. disappears, writing to go out. Even when the Windows message "copying..."
User Manual
Page 160
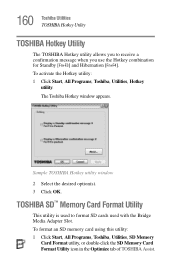
TOSHIBA SD™ Memory Card Format Utility This utility is used with the Bridge Media Adapter Slot. 160 Toshiba Utilities TOSHIBA Hotkey Utility TOSHIBA Hotkey Utility The TOSHIBA Hotkey utility allows you to format SD cards used to receive a confirmation message when you use the Hotkey combination for Standby [Fn+F3] and Hibernation [...
TOSHIBA SD™ Memory Card Format Utility This utility is used with the Bridge Media Adapter Slot. 160 Toshiba Utilities TOSHIBA Hotkey Utility TOSHIBA Hotkey Utility The TOSHIBA Hotkey utility allows you to format SD cards used to receive a confirmation message when you use the Hotkey combination for Standby [Fn+F3] and Hibernation [...
User Manual
Page 174
... Windows® logon password. You must support Power-on security matches a fingerprint in " by default. The fingerprint device memory can be accessible.) Fingerprint Management Fingerprints are stored in the enrollment wizard. If a fingerprint used hardware, and installed applications.... security to use the single logon feature. The number of slots remaining is displayed with the fingerprint logon feature. After a finger is enrolled, it is displayed in memory during enrollment. 174 Toshiba Utilities Fingerprint Authentication Utility 2 Check the option Replace the power...
... Windows® logon password. You must support Power-on security matches a fingerprint in " by default. The fingerprint device memory can be accessible.) Fingerprint Management Fingerprints are stored in the enrollment wizard. If a fingerprint used hardware, and installed applications.... security to use the single logon feature. The number of slots remaining is displayed with the fingerprint logon feature. After a finger is enrolled, it is displayed in memory during enrollment. 174 Toshiba Utilities Fingerprint Authentication Utility 2 Check the option Replace the power...
User Manual
Page 276
Index Numerics 101-key keyboard 84 A AC adapter 47 AC power connecting adapter 48 AC power cord/cable connectors 236 accessories memory 53 adding memory 53 adjusting recording quality 140 Alt keys 84 audio .wav files 139 audio features 139 Auto-Run 101 B backing up files 82 battery changing 118 ... monitoring power 49, 110 not charging 195 power profile hot key 117 power usage mode 230 real-time clock (RTC) 107 removing 119 BIOS see Toshiba Hardware Setup Bridge Media slot 144 button power 53 start 128 C CD creating 101 playing an audio 99 playing using Auto-Run 101
Index Numerics 101-key keyboard 84 A AC adapter 47 AC power connecting adapter 48 AC power cord/cable connectors 236 accessories memory 53 adding memory 53 adjusting recording quality 140 Alt keys 84 audio .wav files 139 audio features 139 Auto-Run 101 B backing up files 82 battery changing 118 ... monitoring power 49, 110 not charging 195 power profile hot key 117 power usage mode 230 real-time clock (RTC) 107 removing 119 BIOS see Toshiba Hardware Setup Bridge Media slot 144 button power 53 start 128 C CD creating 101 playing an audio 99 playing using Auto-Run 101
User Manual
Page 278
... settings not working with hardware 199 program has performed an illegal operation 184 warning resume failure 186 Error-checking 201 Ethernet LAN port 134 expansion memory slot 56 exploring the desktop 126 external monitor not working 200 mouse 66 external diskette drive connecting 69 external display, adjusting 66 F FAT (File Allocation Table...
... settings not working with hardware 199 program has performed an illegal operation 184 warning resume failure 186 Error-checking 201 Ethernet LAN port 134 expansion memory slot 56 exploring the desktop 126 external monitor not working 200 mouse 66 external diskette drive connecting 69 external display, adjusting 66 F FAT (File Allocation Table...
User Manual
Page 279
...Index desktop 128 Internet Explorer 128 moving to desktop 127 recycle bin 128 safety 36 Industry Canada requirement 4 installation memory module 54 installing memory modules 53 mouse 66 instant passwords, using 150 Internet bookmarked site not found 189 connecting to 137 features 138 slow...85 keyboard, external 66 keyboard, full-size 84 keyboard, PS/2-compatible 66 M main battery removing 119 memory adding 53 problem solving 194 removing expansion slot cover 56 memory module inserting 57 installation 54 removing 60 microphone 139 modem determining COM port 130 problem solving 209 resetting port...
...Index desktop 128 Internet Explorer 128 moving to desktop 127 recycle bin 128 safety 36 Industry Canada requirement 4 installation memory module 54 installing memory modules 53 mouse 66 instant passwords, using 150 Internet bookmarked site not found 189 connecting to 137 features 138 slow...85 keyboard, external 66 keyboard, full-size 84 keyboard, PS/2-compatible 66 M main battery removing 119 memory adding 53 problem solving 194 removing expansion slot cover 56 memory module inserting 57 installation 54 removing 60 microphone 139 modem determining COM port 130 problem solving 209 resetting port...

User Manual
Page 281
... Device Manager 192 disabling a device 193 disk drive is slow 201 display is blank 198 external display not working 200 external monitor 198 faulty memory 194 hardware conflict 190, 191 high-pitched noise 204 illegal operation 184 Internet bookmarked site not found 189 Internet connection is slow 189 keyboard not... 204 non-system disk or disk error 187, 202 PC Card 204 checklist 205 error occurs 207 hot swapping fails 207 not recognized 207 slot appears dead 206 power and batteries 195 printer 208 program not responding 183 program not working properly 202 screen does not look right/ flickers ...
... Device Manager 192 disabling a device 193 disk drive is slow 201 display is blank 198 external display not working 200 external monitor 198 faulty memory 194 hardware conflict 190, 191 high-pitched noise 204 illegal operation 184 Internet bookmarked site not found 189 Internet connection is slow 189 keyboard not... 204 non-system disk or disk error 187, 202 PC Card 204 checklist 205 error occurs 207 hot swapping fails 207 not recognized 207 slot appears dead 206 power and batteries 195 printer 208 program not responding 183 program not working properly 202 screen does not look right/ flickers ...


