
User Guide
Page 19
Contents Introduction 25 This guide 27 Safety icons 28 Other icons used 28 Your computer's features and specifications ....29 Other documentation 29 Service options 29 Chapter 1: Getting Started 30 Selecting a place to work 30 Setting up a work environment 30 Keeping yourself comfortable 31 Computer user comfort recommendations .......31 Good Working Posture 31 Using the notebook with an external keyboard, mouse or monitor 32 Typing style 33 Taking breaks and varying tasks 33 Mobile computing tips 34 Transporting the notebook 34 Seeking additional help 34 19
Contents Introduction 25 This guide 27 Safety icons 28 Other icons used 28 Your computer's features and specifications ....29 Other documentation 29 Service options 29 Chapter 1: Getting Started 30 Selecting a place to work 30 Setting up a work environment 30 Keeping yourself comfortable 31 Computer user comfort recommendations .......31 Good Working Posture 31 Using the notebook with an external keyboard, mouse or monitor 32 Typing style 33 Taking breaks and varying tasks 33 Mobile computing tips 34 Transporting the notebook 34 Seeking additional help 34 19
User Guide
Page 21
...Cleaning the computer 71 Moving the computer 71 Using a computer lock 71 Chapter 2: Learning the Basics 73 Computing tips 73 Using the keyboard 74 Function keys 75 Special Windows® keys 76 Mouse properties 76 Starting an app 77 Starting an app from the Start screen 77... the computer on 81 Playing optical media 81 Recording optical media 82 Removing a disc with the computer off 82 Toshiba's online resources 83 Chapter 3: Mobile Computing 84 Toshiba's energy-saver design 84 Running the computer on battery power 84 Battery Notice 85 Power management 86 Charging the main...
...Cleaning the computer 71 Moving the computer 71 Using a computer lock 71 Chapter 2: Learning the Basics 73 Computing tips 73 Using the keyboard 74 Function keys 75 Special Windows® keys 76 Mouse properties 76 Starting an app 77 Starting an app from the Start screen 77... the computer on 81 Playing optical media 81 Recording optical media 82 Removing a disc with the computer off 82 Toshiba's online resources 83 Chapter 3: Mobile Computing 84 Toshiba's energy-saver design 84 Running the computer on battery power 84 Battery Notice 85 Power management 86 Charging the main...
User Guide
Page 23
... supply mode settings 122 Function Key 123 PC Diagnostic Tool Utility 124 PC Health Monitor 125 Recovery Media Creator 126 Service Station 126 TOSHIBA Application Installer 127 Chapter 6: If Something Goes Wrong 128 Problems that are easy to fix 128 Problems when you turn on the ... can help you 135 Fixing a problem with Device Manager 135 Checking device properties 135 Memory problems 136 Power and the batteries 137 Keyboard problems 138 Display problems 139 Disk or storage drive problems 141 Error-checking 141 Optical disc drive problems 143 Sound system problems 144 Printer...
... supply mode settings 122 Function Key 123 PC Diagnostic Tool Utility 124 PC Health Monitor 125 Recovery Media Creator 126 Service Station 126 TOSHIBA Application Installer 127 Chapter 6: If Something Goes Wrong 128 Problems that are easy to fix 128 Problems when you turn on the ... can help you 135 Fixing a problem with Device Manager 135 Checking device properties 135 Memory problems 136 Power and the batteries 137 Keyboard problems 138 Display problems 139 Disk or storage drive problems 141 Error-checking 141 Optical disc drive problems 143 Sound system problems 144 Printer...
User Guide
Page 24
... in the Windows® operating system 149 If you need further assistance 154 Contacting Toshiba 154 Other Toshiba Internet Web sites 154 Toshiba's worldwide offices 155 Appendix A: TOSHIBA Function Keys 156 Functions 156 Help file 157 Display brightness 157 Output (Display switch ...158 Disabling or enabling the touch pad 159 Media buttons 159 Volume Mute 160 Disabling or enabling wireless devices............160 Keyboard Function ...
... in the Windows® operating system 149 If you need further assistance 154 Contacting Toshiba 154 Other Toshiba Internet Web sites 154 Toshiba's worldwide offices 155 Appendix A: TOSHIBA Function Keys 156 Functions 156 Help file 157 Display brightness 157 Output (Display switch ...158 Disabling or enabling the touch pad 159 Media buttons 159 Volume Mute 160 Disabling or enabling wireless devices............160 Keyboard Function ...

User Guide
Page 31
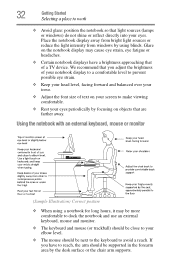
...Avoid pressure points behind the knee or under the thigh. ❖ The space under your desk should be free of you. ❖ The keyboard and pointing device should be flat so that your wrists are not restricted, and you can be supported by the seat. However, if the notebook... stereo speakers (other items that you use a foot rest. Keeping yourself comfortable This section provides information for working comfortably throughout the day. The keyboard should be evenly supported by the chair arm supports or the desk surface. ❖ The notebook display should be flat on the floor and ...
...Avoid pressure points behind the knee or under the thigh. ❖ The space under your desk should be free of you. ❖ The keyboard and pointing device should be flat so that your wrists are not restricted, and you can be supported by the seat. However, if the notebook... stereo speakers (other items that you use a foot rest. Keeping yourself comfortable This section provides information for working comfortably throughout the day. The keyboard should be evenly supported by the chair arm supports or the desk surface. ❖ The notebook display should be flat on the floor and ...
User Guide
Page 32
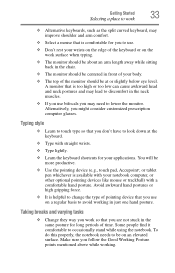
... on objects that of a TV device. We recommend that you have a brightness approaching that are farther away. Using the notebook with an external keyboard, mouse or monitor (Sample Illustration) Correct posture ❖ When using blinds. If you adjust the brightness of your notebook display to a comfortable ...of text on your screen to make viewing comfortable. ❖ Rest your elbow level. ❖ The mouse should be next to the keyboard to your eyes periodically by focusing on the notebook display may be more comfortable to work ❖ Avoid glare: position the notebook so ...
... on objects that of a TV device. We recommend that you have a brightness approaching that are farther away. Using the notebook with an external keyboard, mouse or monitor (Sample Illustration) Correct posture ❖ When using blinds. If you adjust the brightness of your notebook display to a comfortable ...of text on your screen to make viewing comfortable. ❖ Rest your elbow level. ❖ The mouse should be next to the keyboard to your eyes periodically by focusing on the notebook display may be more comfortable to work ❖ Avoid glare: position the notebook so ...
User Guide
Page 33
... typing. ❖ The monitor should be about an arm length away while sitting back in the chair. ❖ The monitor should be at the keyboard. ❖ Type with a comfortable hand posture. Make sure you don't have to look down at or slightly below eye level. Getting Started 33 ...Selecting a place to work ❖ Alternative keyboards, such as the split curved keyboard, may improve shoulder and arm comfort. ❖ Select a mouse that is comfortable for you to use on an elevated surface. Typing...
... typing. ❖ The monitor should be about an arm length away while sitting back in the chair. ❖ The monitor should be at the keyboard. ❖ Type with a comfortable hand posture. Make sure you don't have to look down at or slightly below eye level. Getting Started 33 ...Selecting a place to work ❖ Alternative keyboards, such as the split curved keyboard, may improve shoulder and arm comfort. ❖ Select a mouse that is comfortable for you to use on an elevated surface. Typing...
User Guide
Page 35
... feet flat on the ground? ❏ Is there adequate space under your desk for your legs? ❏ Are the keyboard and mouse at elbow level? ❏ Are your shoulders relaxed when using the keyboard? ❏ Are your shoulders relaxed when using a mouse or other optional pointing device? ❏ Are your hands and...
... feet flat on the ground? ❏ Is there adequate space under your desk for your legs? ❏ Are the keyboard and mouse at elbow level? ❏ Are your shoulders relaxed when using the keyboard? ❏ Are your shoulders relaxed when using a mouse or other optional pointing device? ❏ Are your hands and...
User Guide
Page 38
See "Connecting to a power source" on a power cord/cable to remove a plug from a socket. Connecting to a power source Your computer requires power to , a mouse, keyboard, printer, and memory. An overload on page 42 before you use external power or to charge the battery you must complete all setup steps up ...
See "Connecting to a power source" on a power cord/cable to remove a plug from a socket. Connecting to a power source Your computer requires power to , a mouse, keyboard, printer, and memory. An overload on page 42 before you use external power or to charge the battery you must complete all setup steps up ...
User Guide
Page 41
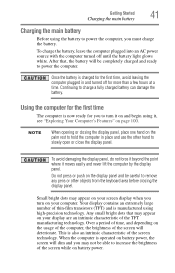
... hours at a time. Once the battery is operated on battery power, the screen will be careful to remove any pens or other objects from the keyboard area before closing the display panel, place one hand on the palm rest to hold the computer in and turned off until the battery light...
... hours at a time. Once the battery is operated on battery power, the screen will be careful to remove any pens or other objects from the keyboard area before closing the display panel, place one hand on the palm rest to hold the computer in and turned off until the battery light...
User Guide
Page 64
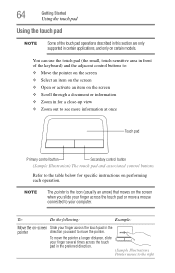
... touch pad and associated control buttons Refer to your computer. 64 Getting Started Using the touch pad Using the touch pad NOTE Some of the keyboard) and the adjacent control buttons to: ❖ Move the pointer on the screen ❖ Select an item on the screen ❖ Open or activate an...
... touch pad and associated control buttons Refer to your computer. 64 Getting Started Using the touch pad Using the touch pad NOTE Some of the keyboard) and the adjacent control buttons to: ❖ Move the pointer on the screen ❖ Select an item on the screen ❖ Open or activate an...
User Guide
Page 71
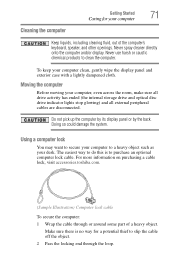
... a heavy object. Do not pick up the computer by its display panel or by the back. For more information on purchasing a cable lock, visit accessories.toshiba.com. (Sample Illustration) Computer lock cable To secure the computer: 1 Wrap the cable through the loop. Never spray cleaner directly onto the computer and/or... use harsh or caustic chemical products to slip the cable off the object. 2 Pass the locking end through or around some part of the computer's keyboard, speaker, and other openings.
... a heavy object. Do not pick up the computer by its display panel or by the back. For more information on purchasing a cable lock, visit accessories.toshiba.com. (Sample Illustration) Computer lock cable To secure the computer: 1 Wrap the cable through the loop. Never spray cleaner directly onto the computer and/or... use harsh or caustic chemical products to slip the cable off the object. 2 Pass the locking end through or around some part of the computer's keyboard, speaker, and other openings.
User Guide
Page 74
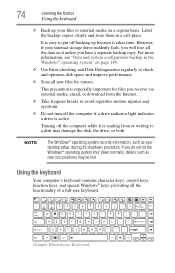
...records information, such as new icon positions may damage the disk, the drive, or both. 74 Learning the Basics Using the keyboard ❖ Back up because it takes time. This precaution is especially important for viruses. For more information, see "Data and ... Defragmenter regularly to external media on it unless you will lose all the functionality of a full-size keyboard. (Sample Illustration) Keyboard It is active. Using the keyboard Your computer's keyboard contains character keys, control keys, function keys, and special Windows® keys, providing all the data...
...records information, such as new icon positions may damage the disk, the drive, or both. 74 Learning the Basics Using the keyboard ❖ Back up because it takes time. This precaution is especially important for viruses. For more information, see "Data and ... Defragmenter regularly to external media on it unless you will lose all the functionality of a full-size keyboard. (Sample Illustration) Keyboard It is active. Using the keyboard Your computer's keyboard contains character keys, control keys, function keys, and special Windows® keys, providing all the data...
User Guide
Page 75
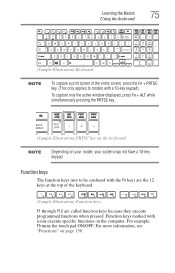
..." on the computer. To capture only the active window displayed, press Fn + ALT while simultaneously pressing the PRTSC key. (Sample Illustration) PRTSC key on the keyboard NOTE Depending on your model, your system may not have a 10-key keypad. Learning the Basics 75 Using the... keyboard (Sample Illustration) Keyboard NOTE To capture a print screen of the entire screen, press the Fn + PRTSC key. (This only applies to be confused with the Fn key) are ...
..." on the computer. To capture only the active window displayed, press Fn + ALT while simultaneously pressing the PRTSC key. (Sample Illustration) PRTSC key on the keyboard NOTE Depending on your model, your system may not have a 10-key keypad. Learning the Basics 75 Using the... keyboard (Sample Illustration) Keyboard NOTE To capture a print screen of the entire screen, press the Fn + PRTSC key. (This only applies to be confused with the Fn key) are ...
User Guide
Page 76
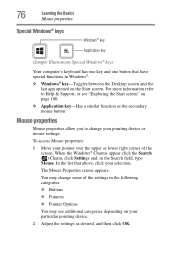
... click OK. 76 Learning the Basics Mouse properties Special Windows® keys Windows® key Application key (Sample Illustration) Special Windows® keys Your computer's keyboard has one key and one button that above, click your selection.
... click OK. 76 Learning the Basics Mouse properties Special Windows® keys Windows® key Application key (Sample Illustration) Special Windows® keys Your computer's keyboard has one key and one button that above, click your selection.

User Guide
Page 80
... touch the surface of the disc. 80 Learning the Basics Using the optical disc drive Media control buttons The media control buttons located above the keyboard allow you mute the sound and play audio CDs or DVD movies when the computer is free of dust. The Volume decrease button allows you...
... touch the surface of the disc. 80 Learning the Basics Using the optical disc drive Media control buttons The media control buttons located above the keyboard allow you mute the sound and play audio CDs or DVD movies when the computer is free of dust. The Volume decrease button allows you...
User Guide
Page 89
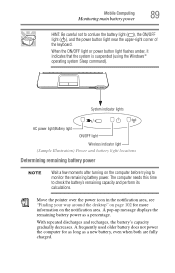
... computer needs this time to confuse the battery light ( ), the ON/OFF light ( ), and the power button light near the upper-right corner of the keyboard. Move the pointer over the power icon in the notification area, see "Finding your way around the desktop" on page 102 for as long as...
... computer needs this time to confuse the battery light ( ), the ON/OFF light ( ), and the power button light near the upper-right corner of the keyboard. Move the pointer over the power icon in the notification area, see "Finding your way around the desktop" on page 102 for as long as...
User Guide
Page 100
... tasks like turning off the power and advanced PC settings. By clicking on page 101. You can also use the Windows® key ( ) on your keyboard or on the LCD screen to go to Start screen. You can do in the Windows® operating system, providing new and easy ways to...
... tasks like turning off the power and advanced PC settings. By clicking on page 101. You can also use the Windows® key ( ) on your keyboard or on the LCD screen to go to Start screen. You can do in the Windows® operating system, providing new and easy ways to...
User Guide
Page 120
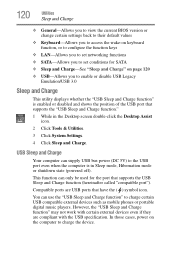
... and Charge ❖ General-Allows you to view the current BIOS version or change certain settings back to their default values ❖ Keyboard-Allows you to access the wake-on keyboard function, or to configure the function keys ❖ LAN-Allows you to set networking functions ❖ SATA-Allows you to set...
... and Charge ❖ General-Allows you to view the current BIOS version or change certain settings back to their default values ❖ Keyboard-Allows you to access the wake-on keyboard function, or to configure the function keys ❖ LAN-Allows you to set networking functions ❖ SATA-Allows you to set...
User Guide
Page 121
... 5V) supply may always be disabled. It is recommended that does not have the USB Sleep and Charge function-compatible icon ( ), attach the mouse or keyboard to it. Metal paper clips or hair pins/clips will generate heat if they come into contact with metal products, for example when carrying the...
... 5V) supply may always be disabled. It is recommended that does not have the USB Sleep and Charge function-compatible icon ( ), attach the mouse or keyboard to it. Metal paper clips or hair pins/clips will generate heat if they come into contact with metal products, for example when carrying the...

