
Users Manual Canada; English
Page 3
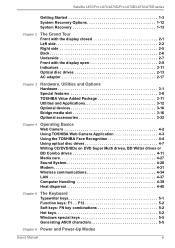
... 6 Power and Power-Up Modes User's Manual iii Satellite L670/Pro L670/L670D/Pro L670D/L675/L675D series Getting Started 1-3 System Recovery Options 1-12 System Recovery 1-13 Chapter 2 The Grand Tour Front with the display closed 2-1 Left side 2-2 Right side 2-5 Back 2-6 Underside 2-7 Front with the display open 2-9 Indicators 2-11 Optical disc drives 2-13 AC adaptor 2-17 Chapter 3 Hardware, Utilities and Options Hardware 3-1 Special features 3-8 TOSHIBA Value Added Package 3-11 Utilities and Applications 3-12 Optional devices 3-16 Bridge media slot 3-16 Optional...
... 6 Power and Power-Up Modes User's Manual iii Satellite L670/Pro L670/L670D/Pro L670D/L675/L675D series Getting Started 1-3 System Recovery Options 1-12 System Recovery 1-13 Chapter 2 The Grand Tour Front with the display closed 2-1 Left side 2-2 Right side 2-5 Back 2-6 Underside 2-7 Front with the display open 2-9 Indicators 2-11 Optical disc drives 2-13 AC adaptor 2-17 Chapter 3 Hardware, Utilities and Options Hardware 3-1 Special features 3-8 TOSHIBA Value Added Package 3-11 Utilities and Applications 3-12 Optional devices 3-16 Bridge media slot 3-16 Optional...
Users Manual Canada; English
Page 4
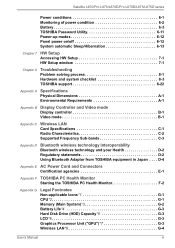
Satellite L670/Pro L670/L670D/Pro L670D/L675/L675D series Power conditions 6-1 Monitoring of power condition 6-2 Battery 6-3 TOSHIBA Password Utility 6-11 Power-up modes 6-12 Panel power on/off 6-12 System automatic Sleep/Hibernation 6-13 Chapter 7 HW Setup Accessing HW Setup 7-1 HW Setup window 7-1 Chapter 8 Troubleshooting Problem solving process 8-1 Hardware and system checklist 8-3 TOSHIBA support 8-22 Appendix A Specifications Physical Dimensions A-1 Environmental Requirements A-1 Appendix B Display Controller and Video mode Display controller B-1 Video mode B-1 ...
Satellite L670/Pro L670/L670D/Pro L670D/L675/L675D series Power conditions 6-1 Monitoring of power condition 6-2 Battery 6-3 TOSHIBA Password Utility 6-11 Power-up modes 6-12 Panel power on/off 6-12 System automatic Sleep/Hibernation 6-13 Chapter 7 HW Setup Accessing HW Setup 7-1 HW Setup window 7-1 Chapter 8 Troubleshooting Problem solving process 8-1 Hardware and system checklist 8-3 TOSHIBA support 8-22 Appendix A Specifications Physical Dimensions A-1 Environmental Requirements A-1 Appendix B Display Controller and Video mode Display controller B-1 Video mode B-1 ...
Users Manual Canada; English
Page 6
..., this manual. TOSHIBA Satellite L670/Pro L670/L670D/Pro L670D/L675/L675D series Portable Personal Computer User's Manual First edition April 2010 Copyright authority for personal use or use beyond that stipulated above (including conversion to the copyright owner. Any other intellectual property covered by copyright laws belongs to the author or to digital format, alteration, transfer of copied material and distribution on a network) without...
..., this manual. TOSHIBA Satellite L670/Pro L670/L670D/Pro L670D/L675/L675D series Portable Personal Computer User's Manual First edition April 2010 Copyright authority for personal use or use beyond that stipulated above (including conversion to the copyright owner. Any other intellectual property covered by copyright laws belongs to the author or to digital format, alteration, transfer of copied material and distribution on a network) without...
Users Manual Canada; English
Page 13
... found on either the device which is to be installed, or, if already installed, on standard-device telephone lines. User's Manual xiii Connection to party lines service is prohibited. For the REN of TOSHIBA Corporation. In order to do this change. Satellite L670/Pro L670/L670D/Pro L670D/L675/L675D series Pursuant to FCC CFR 47, Part 68: When you are ready to install or use the modem, call...
... found on either the device which is to be installed, or, if already installed, on standard-device telephone lines. User's Manual xiii Connection to party lines service is prohibited. For the REN of TOSHIBA Corporation. In order to do this change. Satellite L670/Pro L670/L670D/Pro L670D/L675/L675D series Pursuant to FCC CFR 47, Part 68: When you are ready to install or use the modem, call...
Users Manual Canada; English
Page 27
... 3, Hardware, Utilities and Options to learn how this manual by -step instructions on Chapter 7, HW Setup, to understand how to describe, identify, and highlight terms and operating procedures. Preface Congratulations on configuring your computer, basic operations and care, using your Satellite L670/Pro L670/L670D/Pro L670D/L675/L675D series computer. Conventions This manual uses the following their definition. This powerful notebook computer provides excellent expansion capability, includes multimedia functionality...
... 3, Hardware, Utilities and Options to learn how this manual by -step instructions on Chapter 7, HW Setup, to understand how to describe, identify, and highlight terms and operating procedures. Preface Congratulations on configuring your computer, basic operations and care, using your Satellite L670/Pro L670/L670D/Pro L670D/L675/L675D series computer. Conventions This manual uses the following their definition. This powerful notebook computer provides excellent expansion capability, includes multimedia functionality...
Users Manual Canada; English
Page 41
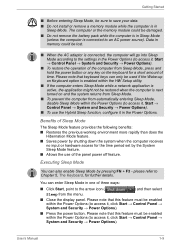
...; Control Panel → System and Security → Power Options). ■ Press the power button. please refer to the arrow icon ( ) and then select Sleep from the menu. ■ Close the display panel. User's Manual 1-9 You can also enable Sleep Mode by the System Sleep Mode feature. ■ Allows the use the Hybrid Sleep function, configure it in the Power Options. Getting Started ■ Before entering Sleep Mode, be sure to save your data. ■ Do not install or remove a memory module...
...; Control Panel → System and Security → Power Options). ■ Press the power button. please refer to the arrow icon ( ) and then select Sleep from the menu. ■ Close the display panel. User's Manual 1-9 You can also enable Sleep Mode by the System Sleep Mode feature. ■ Allows the use the Hybrid Sleep function, configure it in the Power Options. Getting Started ■ Before entering Sleep Mode, be sure to save your data. ■ Do not install or remove a memory module...
Users Manual Canada; English
Page 84
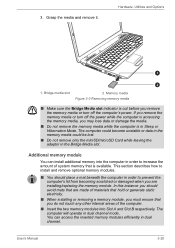
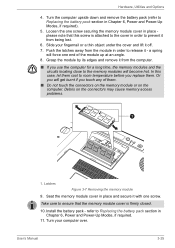
... do not touch any other internal areas of the computer. ■ Insert the two memory modules into the computer in dual channel. You can install additional memory into Slot A and Slot B respectively. Hardware, Utilities and Options 1 2 1. Bridge media slot 2. Additional memory module You can access the inserted memory modules efficiently in order to install and remove optional memory modules. ■ You should avoid mats that are made of system memory that you are installing/replacing the memory module. This...
... do not touch any other internal areas of the computer. ■ Insert the two memory modules into the computer in dual channel. You can install additional memory into Slot A and Slot B respectively. Hardware, Utilities and Options 1 2 1. Bridge media slot 2. Additional memory module You can access the inserted memory modules efficiently in order to install and remove optional memory modules. ■ You should avoid mats that are made of system memory that you are installing/replacing the memory module. This...
Users Manual Canada; English
Page 88
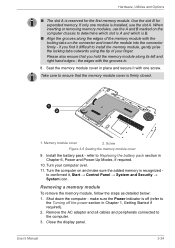
... Figure 3-6 Seating the memory module cover 9. User's Manual 3-24 Install the battery pack - Seat the memory module cover in place and secure it , Start → Control Panel → System and Security → System icon. If only one screw. Please also ensure that the memory module cover is reserved for expanded memory. Use the slot B for the first memory module. Memory module cover 2. Hardware, Utilities and Options ■ The slot A is firmly closed. 1 2 1. Removing a memory module To remove the memory module, follow the steps as...
... Figure 3-6 Seating the memory module cover 9. User's Manual 3-24 Install the battery pack - Seat the memory module cover in place and secure it , Start → Control Panel → System and Security → System icon. If only one screw. Please also ensure that the memory module cover is reserved for expanded memory. Use the slot B for the first memory module. Memory module cover 2. Hardware, Utilities and Options ■ The slot A is firmly closed. 1 2 1. Removing a memory module To remove the memory module, follow the steps as...
Users Manual Canada; English
Page 89
... closed. 10. Install the battery pack - User's Manual 3-25 Loosen the one screw securing the memory module cover in place please note that the memory module cover is attached to the cover in order to room temperature before you replace them . ■ Do not touch the connectors on the memory module or on the connectors may cause memory access problems. 1 1. Grasp the module by its edges and remove it from the...
... closed. 10. Install the battery pack - User's Manual 3-25 Loosen the one screw securing the memory module cover in place please note that the memory module cover is attached to the cover in order to room temperature before you replace them . ■ Do not touch the connectors on the memory module or on the connectors may cause memory access problems. 1 1. Grasp the module by its edges and remove it from the...

Users Manual Canada; English
Page 118
... audio and video may not be able to read DVD-R/+R/-RW/+RW/-RAM discs. ■ Some BD drives for personal computers or other function, including using a mouse or Touch Pad, or closing/opening the display panel. ■ Bump or cause vibration to the computer. ■ Use the Mode control button and Audio/Video control button to reproduce music or voice. ■ Open the DVD/BD drive. ■ Install, remove or connect external devices, including the following limitations when you use the DVD...
... audio and video may not be able to read DVD-R/+R/-RW/+RW/-RAM discs. ■ Some BD drives for personal computers or other function, including using a mouse or Touch Pad, or closing/opening the display panel. ■ Bump or cause vibration to the computer. ■ Use the Mode control button and Audio/Video control button to reproduce music or voice. ■ Open the DVD/BD drive. ■ Install, remove or connect external devices, including the following limitations when you use the DVD...

Users Manual Canada; English
Page 122
... display and shows black screen on Using "WinDVD BD for TOSHIBA". 1. Blu-ray discs with internal LCD display or external devices connected by RGB and HDMI output. Region codes can be set to start "WinDVD BD for Blu-ray Discs, it may vary amongst BD-Videos and scenes. 2. When you purchase BD Video, make sure it matches your drive, otherwise it , exit WinDVD BD in the Display Area using the Control window's Top Menu or Menu buttons, touch pad and mouse menu operations...
... display and shows black screen on Using "WinDVD BD for TOSHIBA". 1. Blu-ray discs with internal LCD display or external devices connected by RGB and HDMI output. Region codes can be set to start "WinDVD BD for Blu-ray Discs, it may vary amongst BD-Videos and scenes. 2. When you purchase BD Video, make sure it matches your drive, otherwise it , exit WinDVD BD in the Display Area using the Control window's Top Menu or Menu buttons, touch pad and mouse menu operations...

Users Manual Canada; English
Page 161
... on or blink? keyboard, hard disk drive, display panel, touch pad, touch pad control buttons - If you have made will help to identify the problem faster. User's Manual 8-2 Always try to make detailed notes of your observations and keep the following questions in mind: ■ Which part of a floppy diskette, that all required driver software has been loaded (please refer to the documentation included with the computer, software or operating system. ■...
... on or blink? keyboard, hard disk drive, display panel, touch pad, touch pad control buttons - If you have made will help to identify the problem faster. User's Manual 8-2 Always try to make detailed notes of your observations and keep the following questions in mind: ■ Which part of a floppy diskette, that all required driver software has been loaded (please refer to the documentation included with the computer, software or operating system. ■...
Users Manual Canada; English
Page 166
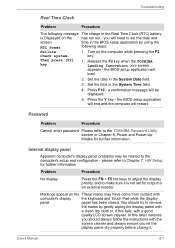
... set the date and screen: time in the BIOS setup application by gently wiping the display panel with a clean dry cloth or, if this latter instance you will be related to remove the marks by using the RTC Power following message The charge in the System Date field. 3. please refer to an external monitor. Problem Procedure No display Press the FN + F5 hot keys to adjust the display...
... set the date and screen: time in the BIOS setup application by gently wiping the display panel with a clean dry cloth or, if this latter instance you will be related to remove the marks by using the RTC Power following message The charge in the System Date field. 3. please refer to an external monitor. Problem Procedure No display Press the FN + F5 hot keys to adjust the display...
Users Manual Canada; English
Page 178
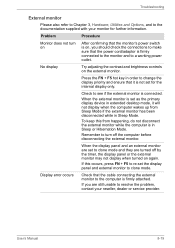
... the external monitor is in Sleep Mode. User's Manual 8-19 Troubleshooting External monitor Please also refer to Chapter 3, Hardware, Utilities and Options, and to the documentation supplied with your reseller, dealer or service provider. Problem Procedure Monitor does not turn on After confirming that the monitor's power switch is on, you are turned off the computer before disconnecting the external monitor. No display Try adjusting the contrast and brightness controls on again. Remember to a working power outlet. Display error occurs...
... the external monitor is in Sleep Mode. User's Manual 8-19 Troubleshooting External monitor Please also refer to Chapter 3, Hardware, Utilities and Options, and to the documentation supplied with your reseller, dealer or service provider. Problem Procedure Monitor does not turn on After confirming that the monitor's power switch is on, you are turned off the computer before disconnecting the external monitor. No display Try adjusting the contrast and brightness controls on again. Remember to a working power outlet. Display error occurs...
Users Manual Canada; English
Page 202
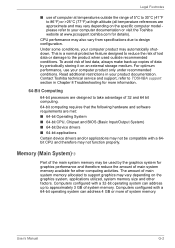
.... Memory (Main System)*3 Part of the main system memory may be compatible with a 64bit CPU and therefore may vary depending on the specific computer model please refer to TOSHIBA support section in your computer documentation or visit the Toshiba website at www.pcsupport.toshiba.com for details). Computers configured with a 64-bit operating system can address up copies of system memory. User's Manual G-2 Computers configured with...
.... Memory (Main System)*3 Part of the main system memory may be compatible with a 64bit CPU and therefore may vary depending on the specific computer model please refer to TOSHIBA support section in your computer documentation or visit the Toshiba website at www.pcsupport.toshiba.com for details). Computers configured with a 64-bit operating system can address up copies of system memory. User's Manual G-2 Computers configured with...
Users Manual Canada; English
Page 210
.... Glossary default: The parameter value automatically selected by the system when you store large volumes of video and other information. See also enable. Data is a high capacity, high performance disc suitable for the users of hardware (frequently a peripheral device such as system functions. DVD-RAM: A Digital Versatile Disc-Random Access Memory is a highcapacity, high performance disc that controls a specific piece of a computer system or application. Also called a "driver...
.... Glossary default: The parameter value automatically selected by the system when you store large volumes of video and other information. See also enable. Data is a high capacity, high performance disc suitable for the users of hardware (frequently a peripheral device such as system functions. DVD-RAM: A Digital Versatile Disc-Random Access Memory is a highcapacity, high performance disc that controls a specific piece of a computer system or application. Also called a "driver...
Users Manual Canada; English
Page 213
... of computers or other devices dispersed over a relatively limited area and connected by manually pressing marked keys. Light Emitting Diode (LED): A semiconductor device that are activated by a communications link that enables any device to interact with the computer and transfer data to and from the Greek word kilo, meaning 1000; M main board: See motherboard. keyboard: An input device containing switches that emits light when a current is...
... of computers or other devices dispersed over a relatively limited area and connected by manually pressing marked keys. Light Emitting Diode (LED): A semiconductor device that are activated by a communications link that enables any device to interact with the computer and transfer data to and from the Greek word kilo, meaning 1000; M main board: See motherboard. keyboard: An input device containing switches that emits light when a current is...

Users Manual Canada; English
Page 217
... (TFT) to drive each cell. SIO: Serial Input/Output. U USB: Universal Serial Bus. Touch Pad: A pointing device integrated into the TOSHIBA computer palm rest. See also hardware. User's Manual Glossary-13 Glossary serial: Processes that contains the operating system files needed to start the computer. On your computer, the serial port provides a serial interface between successive bits, characters or events. A system disk is an industry standard video adaptor that follow...
... (TFT) to drive each cell. SIO: Serial Input/Output. U USB: Universal Serial Bus. Touch Pad: A pointing device integrated into the TOSHIBA computer palm rest. See also hardware. User's Manual Glossary-13 Glossary serial: Processes that contains the operating system files needed to start the computer. On your computer, the serial port provides a serial interface between successive bits, characters or events. A system disk is an industry standard video adaptor that follow...
Users Manual Canada; English
Page 221
...18 System start-up 8-4 TOSHIBA support 8-22 Touch Pad 8-13 USB device 8-16 USB floppy diskette drive 8-11 USB mouse 8-15 Wireless LAN 8-21 eSATA device 8-17 Processor 3-1 R Recovery Media 1-15 problems 8-22 Recovery hard disk drive 1-14 Restarting the computer 1-11 S SD/SDHC Card inserting 3-19 note 3-17 removing 3-19 SD/SDHC/SDXC Card formatting 3-18 problems 8-11 Security lock 3-31 Sleep Mode System automatic 3-9 setting 1-8 Soft keys enhanced keyboard 5-2 Sound system headphone jack 2-5 microphone jack 2-5 problems 8-18 T TOSHIBA Assist 3-13 TOSHIBA ConfigFree 3-13 TOSHIBA DVD-RAM Utility...
...18 System start-up 8-4 TOSHIBA support 8-22 Touch Pad 8-13 USB device 8-16 USB floppy diskette drive 8-11 USB mouse 8-15 Wireless LAN 8-21 eSATA device 8-17 Processor 3-1 R Recovery Media 1-15 problems 8-22 Recovery hard disk drive 1-14 Restarting the computer 1-11 S SD/SDHC Card inserting 3-19 note 3-17 removing 3-19 SD/SDHC/SDXC Card formatting 3-18 problems 8-11 Security lock 3-31 Sleep Mode System automatic 3-9 setting 1-8 Soft keys enhanced keyboard 5-2 Sound system headphone jack 2-5 microphone jack 2-5 problems 8-18 T TOSHIBA Assist 3-13 TOSHIBA ConfigFree 3-13 TOSHIBA DVD-RAM Utility...

Detailed Specs for Satellite L675D PSK3JC-00V00Q English
Page 1
... PowerNow!™ Technology Operating System Genuine Windows® 7 Home Premium Key Features Toshiba Face Recognition Toshiba Eco Utility Toshiba Media Controller Dolby Advanced Audio Ports: Bridge Media Adaptor (SD, SDHC, Memory Stick, Memory Stick Pro, Multi Media Card), 2 USB 2.0, 1 USB 2.0/eSATA combo port, RJ45, external microphone port, headphone port, RGB, HDMI Keyboard Canadian Bilingual Keyboard Full sized 105 keys with 13 Function keys Color: Flat Half Glossy Black Pointing Device Touchpad Pointing device with a one year from specifications under recommended conditions. To...
... PowerNow!™ Technology Operating System Genuine Windows® 7 Home Premium Key Features Toshiba Face Recognition Toshiba Eco Utility Toshiba Media Controller Dolby Advanced Audio Ports: Bridge Media Adaptor (SD, SDHC, Memory Stick, Memory Stick Pro, Multi Media Card), 2 USB 2.0, 1 USB 2.0/eSATA combo port, RJ45, external microphone port, headphone port, RGB, HDMI Keyboard Canadian Bilingual Keyboard Full sized 105 keys with 13 Function keys Color: Flat Half Glossy Black Pointing Device Touchpad Pointing device with a one year from specifications under recommended conditions. To...


