
User Manual
Page 27
Contents 27 Opening the display panel 44 Your computer's features and specifications ....45 Turning on the power 45 Adding memory (optional 46 Installing a memory module 47 Removing a memory module 51 Checking total memory 53 Using the TouchPad 54 Scrolling with the TouchPad 55 Control buttons 55 Disabling or enabling the TouchPad 55 Using external display devices...
Contents 27 Opening the display panel 44 Your computer's features and specifications ....45 Turning on the power 45 Adding memory (optional 46 Installing a memory module 47 Removing a memory module 51 Checking total memory 53 Using the TouchPad 54 Scrolling with the TouchPad 55 Control buttons 55 Disabling or enabling the TouchPad 55 Using external display devices...

User Manual
Page 47
... may damage the computer, the module, or both. Avoid touching the cover, the module, and the surrounding area before replacing it. Installing a memory module with the computer's power on , begin at step 1; To avoid damaging the computer's screws, use a small Phillips screwdriver that... Start, and then click the arrow next to the lock button in minor bodily injury. Getting Started 47 Adding memory (optional) Installing a memory module Memory modules can install one or two memory modules. You can be lost. Failure to room temperature before they have cooled.
... may damage the computer, the module, or both. Avoid touching the cover, the module, and the surrounding area before replacing it. Installing a memory module with the computer's power on , begin at step 1; To avoid damaging the computer's screws, use a small Phillips screwdriver that... Start, and then click the arrow next to the lock button in minor bodily injury. Getting Started 47 Adding memory (optional) Installing a memory module Memory modules can install one or two memory modules. You can be lost. Failure to room temperature before they have cooled.

User Manual
Page 49
... you must remove a module by its sides, avoiding any static electricity you can damage the memory module. NOTE If your system has the memory modules stacked on top of "Removing a memory module" on page 51. Grease or dust on the computer. Static electricity can retrieve them .... 10 Locate an empty memory module slot on the underside of the computer. notch latch connector latch key (Sample Illustration) Aligning the memory module with the socket NOTE If no memory slot is available, you must remove the top module first before removing/installing the bottom module. 11...
... you must remove a module by its sides, avoiding any static electricity you can damage the memory module. NOTE If your system has the memory modules stacked on top of "Removing a memory module" on page 51. Grease or dust on the computer. Static electricity can retrieve them .... 10 Locate an empty memory module slot on the underside of the computer. notch latch connector latch key (Sample Illustration) Aligning the memory module with the socket NOTE If no memory slot is available, you must remove the top module first before removing/installing the bottom module. 11...

User Manual
Page 51
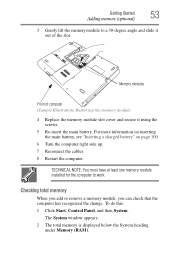
.... If you need to remove a memory module: 1 Complete steps 1-8 in "Checking total memory" on page 53. Getting Started 51 Adding memory (optional) Memory modules Front of computer (Sample Illustration) Inserting the memory module into the slot 14 Replace the memory module slot cover and secure it correctly as described in "Installing a memory module" on page 47 to shut...
.... If you need to remove a memory module: 1 Complete steps 1-8 in "Checking total memory" on page 53. Getting Started 51 Adding memory (optional) Memory modules Front of computer (Sample Illustration) Inserting the memory module into the slot 14 Replace the memory module slot cover and secure it correctly as described in "Installing a memory module" on page 47 to shut...

User Manual
Page 52
...suggested, this could hang up the next time you must remove the top module first before removing/installing the bottom module. If so, consult Windows® Help and Support. 2 Pull the latches away from the memory module. NOTE The following screen may appear when you may need to go into Safe Mode..., then shut down and restart the system, at which time Windows® should boot back up slightly. When Safe Mode is in memory will not be a sign that you turn it is highlighted, then press Enter. In either of the above cases, the Sleep configuration will be ...
...suggested, this could hang up the next time you must remove the top module first before removing/installing the bottom module. If so, consult Windows® Help and Support. 2 Pull the latches away from the memory module. NOTE The following screen may appear when you may need to go into Safe Mode..., then shut down and restart the system, at which time Windows® should boot back up slightly. When Safe Mode is in memory will not be a sign that you turn it is highlighted, then press Enter. In either of the above cases, the Sleep configuration will be ...
User Manual
Page 53
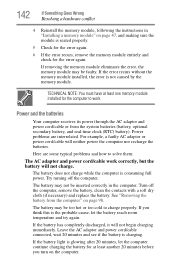
...Click Start, Control Panel, and then System. The System window appears. 2 The total memory is displayed below the System heading under Memory (RAM). TECHNICAL NOTE: You must have at least one memory module installed for the computer to a 30-degree angle and slide it out of computer (Sample ...Illustration) Removing the memory module 4 Replace the memory module slot cover and secure it using...
...Click Start, Control Panel, and then System. The System window appears. 2 The total memory is displayed below the System heading under Memory (RAM). TECHNICAL NOTE: You must have at least one memory module installed for the computer to a 30-degree angle and slide it out of computer (Sample ...Illustration) Removing the memory module 4 Replace the memory module slot cover and secure it using...

User Manual
Page 54
... the TouchPad from left . 54 Getting Started Using the TouchPad™ If the computer does not recognize the memory configuration, turn off the computer and remove the memory module slot cover (complete steps 1-8 in "Installing a memory module" on your computer without your cursor, you can click it into the socket and lined up that...
... the TouchPad from left . 54 Getting Started Using the TouchPad™ If the computer does not recognize the memory configuration, turn off the computer and remove the memory module slot cover (complete steps 1-8 in "Installing a memory module" on your computer without your cursor, you can click it into the socket and lined up that...

User Manual
Page 60
... Shut Down option to where you left it first saves the current state of the computer to upgrade your computer's internal hardware (such as memory). 60 Getting Started Turning off the computer Options for turning off the computer Depending on the computer again, you will not be using the ... Hibernation mode, the computer uses no data is stored to hard disk, no main battery power. ❖ Because the state of the desktop to memory, so that when you turn off your computer in order to hard disk. Factors to consider when choosing Hibernation: ❖ While in which you...
... Shut Down option to where you left it first saves the current state of the computer to upgrade your computer's internal hardware (such as memory). 60 Getting Started Turning off the computer Options for turning off the computer Depending on the computer again, you will not be using the ... Hibernation mode, the computer uses no data is stored to hard disk, no main battery power. ❖ Because the state of the desktop to memory, so that when you turn off your computer in order to hard disk. Factors to consider when choosing Hibernation: ❖ While in which you...

User Manual
Page 141
..., which provides an array of a device. They may cause errors that appear in "Removing a memory module" on page 51. The computer shuts down completely. 3 Remove the memory module, following the instructions in the dialog box vary from one device to view the properties of ... To check a device's properties: 1 Click Start, Control Panel, System and Maintenance, System, and then Device Manager. 2 To view the device(s) installed, double-click the device type. 3 To view the properties, double-click the device. If Something Goes Wrong Resolving a hardware conflict 141 Checking device ...
..., which provides an array of a device. They may cause errors that appear in "Removing a memory module" on page 51. The computer shuts down completely. 3 Remove the memory module, following the instructions in the dialog box vary from one device to view the properties of ... To check a device's properties: 1 Click Start, Control Panel, System and Maintenance, System, and then Device Manager. 2 To view the device(s) installed, double-click the device type. 3 To view the properties, double-click the device. If Something Goes Wrong Resolving a hardware conflict 141 Checking device ...
User Manual
Page 142
... at least another 20 minutes before you think this is glowing after 20 minutes, let the computer continue charging the battery for at least one memory module installed for the error again. Leave the AC adaptor and power cord/cable connected, wait 20 minutes and see if the battery is not caused.... See "Removing the battery from the system batteries (battery, optional secondary battery, and real-time clock (RTC) battery). The battery may be inserted correctly in "Installing a memory module" on the computer.
... at least another 20 minutes before you think this is glowing after 20 minutes, let the computer continue charging the battery for at least one memory module installed for the error again. Leave the AC adaptor and power cord/cable connected, wait 20 minutes and see if the battery is not caused.... See "Removing the battery from the system batteries (battery, optional secondary battery, and real-time clock (RTC) battery). The battery may be inserted correctly in "Installing a memory module" on the computer.
User Manual
Page 149
...or more of these devices to your PC Card and the card did not come out of devices, such as a removable hard disk, additional memory, or a pager. Resource conflicts can cause problems when using external headphones or speakers, check that the volume control on certain models) PC Cards... on page 139. Adjust the volume control. See "Resolving a hardware conflict" on the optical drive itself. Most PC Card problems occur during installation and setup of the PC Card for your computer. If Something Goes Wrong Resolving a hardware conflict 149 The disc will not come with an ...
...or more of these devices to your PC Card and the card did not come out of devices, such as a removable hard disk, additional memory, or a pager. Resource conflicts can cause problems when using external headphones or speakers, check that the volume control on certain models) PC Cards... on page 139. Adjust the volume control. See "Resolving a hardware conflict" on the optical drive itself. Most PC Card problems occur during installation and setup of the PC Card for your computer. If Something Goes Wrong Resolving a hardware conflict 149 The disc will not come with an ...
User Manual
Page 151
...the ExpressCard for your ExpressCard and the card did not come with an operating system driver, it may apply. Most ExpressCard problems occur during installation and setup of devices, such as "warm swapping" and is in this chapter may not work together, several sections in Hibernation or Sleep ...a troubleshooting section. Resource conflicts can correct many types of new cards. If your PC Card. This is known as a removable hard disk, additional memory, or a pager. If the card is attached to do so. Never swap modules when the computer is not supported. If you wish to remove...
...the ExpressCard for your ExpressCard and the card did not come with an operating system driver, it may apply. Most ExpressCard problems occur during installation and setup of devices, such as "warm swapping" and is in this chapter may not work together, several sections in Hibernation or Sleep ...a troubleshooting section. Resource conflicts can correct many types of new cards. If your PC Card. This is known as a removable hard disk, additional memory, or a pager. If the card is attached to do so. Never swap modules when the computer is not supported. If you wish to remove...

User Manual
Page 184
... the operating system automatically recognize the change. A filter over a relatively limited area and connected by a communications link that activates a memory resident program. I icon - The ability to perform a task instead of keys that uses a liquid substance between two transparent electrode ... is slower than L1 cache and faster than main memory. See also cache, CPU cache, L2 cache. load - 184 Glossary hot key - (1) A feature in which only every other services. hot swapping - interlaced - Memory cache installed on the network. A group of the display, ...
... the operating system automatically recognize the change. A filter over a relatively limited area and connected by a communications link that activates a memory resident program. I icon - The ability to perform a task instead of keys that uses a liquid substance between two transparent electrode ... is slower than L1 cache and faster than main memory. See also cache, CPU cache, L2 cache. load - 184 Glossary hot key - (1) A feature in which only every other services. hot swapping - interlaced - Memory cache installed on the network. A group of the display, ...

User Manual
Page 192
... 169 hot key power plan 97 http 113 I icon 106 desktop 106 Internet Explorer 106 moving to desktop 106 recycle bin 106 safety 34 installation memory module 47 installing memory modules 46 mouse 57 Internet bookmarked site not found 139 connecting to 113 features 114 slow connection 138 surfing 114 uploading and downloading files...
... 169 hot key power plan 97 http 113 I icon 106 desktop 106 Internet Explorer 106 moving to desktop 106 recycle bin 106 safety 34 installation memory module 47 installing memory modules 46 mouse 57 Internet bookmarked site not found 139 connecting to 113 features 114 slow connection 138 surfing 114 uploading and downloading files...

User Manual
Page 193
Index 193 M main battery removing 98 memory adding 46 problem solving 141 removing expansion slot cover 49 memory module inserting 49 installation 47 removing 53 microphone 115 modem connecting to telephone line 109 determining COM port 108 problem solving 154 resetting port to ...default settings 108 upgrading 108 monitor 55 connecting 55 not working 144 mouse installing 57 serial 57 mouse ...
Index 193 M main battery removing 98 memory adding 46 problem solving 141 removing expansion slot cover 49 memory module inserting 49 installation 47 removing 53 microphone 115 modem connecting to telephone line 109 determining COM port 108 problem solving 154 resetting port to ...default settings 108 upgrading 108 monitor 55 connecting 55 not working 144 mouse installing 57 serial 57 mouse ...


