User Guide
Page 9
...the 5.15 GHz to 5.85 GHz bands. Equipment (or its operation in excess of Health Canada limits for harmful interference to co-channel Mobile Satellite systems. High power radars are allocated as primary users of the 5.25 GHz to 5.35 GHz and 5.65 GHz to 5.25 GHz frequency range... www.hc-sc.gc.ca/rpb. This device is subject to provide maximum shielding. Industry Canada requires this device. consult Safety Code 6, obtainable from windows to licensing. Operation is intended to be used indoors for frequency range 5.15 GHz to 5.25 GHz to the following two conditions: (1) this device...
...the 5.15 GHz to 5.85 GHz bands. Equipment (or its operation in excess of Health Canada limits for harmful interference to co-channel Mobile Satellite systems. High power radars are allocated as primary users of the 5.25 GHz to 5.35 GHz and 5.65 GHz to 5.25 GHz frequency range... www.hc-sc.gc.ca/rpb. This device is subject to provide maximum shielding. Industry Canada requires this device. consult Safety Code 6, obtainable from windows to licensing. Operation is intended to be used indoors for frequency range 5.15 GHz to 5.25 GHz to the following two conditions: (1) this device...
User Guide
Page 19
Microsoft, Outlook, Windows, and Windows Media are trademarks or registered trademarks of whether such product is...Corporation or its subsidiaries in the United States and/or other countries. Energy Star is a registered trademark of Toshiba. Additional information may be implied for the personal and non-commercial use of a consumer to any other ... trademarks of their respective companies. See www.mpegla.com. government. and any use of such marks by Toshiba is licensed under license. Bluetooth word mark and logos are registered trademarks of the Wi-Fi Alliance. Wi...
Microsoft, Outlook, Windows, and Windows Media are trademarks or registered trademarks of whether such product is...Corporation or its subsidiaries in the United States and/or other countries. Energy Star is a registered trademark of Toshiba. Additional information may be implied for the personal and non-commercial use of a consumer to any other ... trademarks of their respective companies. See www.mpegla.com. government. and any use of such marks by Toshiba is licensed under license. Bluetooth word mark and logos are registered trademarks of the Wi-Fi Alliance. Wi...
User Guide
Page 23
... computer 79 Using a computer lock 79 Chapter 2: Learning the Basics 81 Computing tips 81 Using the keyboard 82 Character keys 83 Function keys 83 Special Windows® keys 83 Starting a program 84 Starting a program using the Search programs and files field 84 Starting a program from the Start menu...........85 Saving your... optical disc 88 Removing a disc with the computer on 89 Playing optical media 89 Recording optical media 90 Removing a disc with the computer off 91 Toshiba's online resources 91
... computer 79 Using a computer lock 79 Chapter 2: Learning the Basics 81 Computing tips 81 Using the keyboard 82 Character keys 83 Function keys 83 Special Windows® keys 83 Starting a program 84 Starting a program using the Search programs and files field 84 Starting a program from the Start menu...........85 Saving your... optical disc 88 Removing a disc with the computer on 89 Playing optical media 89 Recording optical media 90 Removing a disc with the computer off 91 Toshiba's online resources 91

User Guide
Page 25
... Enabling/Disabling USB Sleep and Charge......132 Power supply mode settings 132 TOSHIBA Accessibility 133 TOSHIBA Service Station 134 Chapter 6: If Something Goes Wrong 135 Problems that are easy to fix 135 Problems when you turn on the computer............136 The Windows® operating system is not working 138 Using Startup options to...
... Enabling/Disabling USB Sleep and Charge......132 Power supply mode settings 132 TOSHIBA Accessibility 133 TOSHIBA Service Station 134 Chapter 6: If Something Goes Wrong 135 Problems that are easy to fix 135 Problems when you turn on the computer............136 The Windows® operating system is not working 138 Using Startup options to...
User Guide
Page 26
... problems 151 Develop good computing habits 152 Data and system configuration backup in the Windows® operating system 153 If you need further assistance 157 Contacting Toshiba 158 Other Toshiba Internet Web sites 158 Toshiba's worldwide offices 158 Appendix A: Hot Keys/TOSHIBA Cards 160 Hot Key Cards 160 Using the Hot Key Cards 161 Hot...
... problems 151 Develop good computing habits 152 Data and system configuration backup in the Windows® operating system 153 If you need further assistance 157 Contacting Toshiba 158 Other Toshiba Internet Web sites 158 Toshiba's worldwide offices 158 Appendix A: Hot Keys/TOSHIBA Cards 160 Hot Key Cards 160 Using the Hot Key Cards 161 Hot...
User Guide
Page 29
... subject to change without notice. For more detailed information about your particular model, please visit Toshiba's Web site at the time of publication to ensure the accuracy of contents and the index to perform tasks in Windows® 7. This guide This guide introduces the computer's features as well as some basic procedures...
... subject to change without notice. For more detailed information about your particular model, please visit Toshiba's Web site at the time of publication to ensure the accuracy of contents and the index to perform tasks in Windows® 7. This guide This guide introduces the computer's features as well as some basic procedures...
User Guide
Page 34
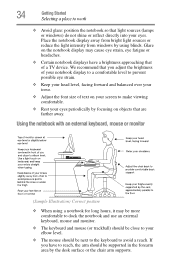
Place the notebook display away from bright light sources or reduce the light intensity from windows by using a notebook for long hours, it may cause eye strain, eye fatigue or headaches. ❖ Certain notebook displays have to reach, the arm should ... make viewing comfortable. ❖ Rest your eyes periodically by the desk surface or the chair arm supports. Glare on objects that light sources (lamps or windows) do not shine or reflect directly into your elbow level. ❖ The mouse should be next to the keyboard to avoid a reach. Using the notebook...
Place the notebook display away from bright light sources or reduce the light intensity from windows by using a notebook for long hours, it may cause eye strain, eye fatigue or headaches. ❖ Certain notebook displays have to reach, the arm should ... make viewing comfortable. ❖ Rest your eyes periodically by the desk surface or the chair arm supports. Glare on objects that light sources (lamps or windows) do not shine or reflect directly into your elbow level. ❖ The mouse should be next to the keyboard to avoid a reach. Using the notebook...
User Guide
Page 44
... power again until the operating system has loaded completely. Product registration can be completed by either visiting the Toshiba Web site at register.toshiba.com, or by clicking the Start button and, in which windows appear, may want to: ❖ Add more memory (see "Adding memory (optional)" on page 45) ❖ Connecting external...
... power again until the operating system has loaded completely. Product registration can be completed by either visiting the Toshiba Web site at register.toshiba.com, or by clicking the Start button and, in which windows appear, may want to: ❖ Add more memory (see "Adding memory (optional)" on page 45) ❖ Connecting external...
User Guide
Page 51
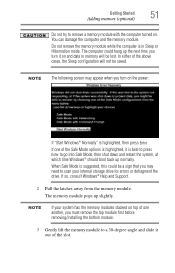
... into Safe Mode, then shut down and restart the system, at which time Windows® should boot back up normally. NOTE If your internal storage drive for errors or defragment the drive.... If so, consult Windows® Help and Support. 2 Pull the latches away from the memory module. The computer could... following screen may need to scan your system has the memory modules stacked on the power: If "Start Windows® Normally" is suggested, this could hang up slightly. The memory module pops up the next time...
... into Safe Mode, then shut down and restart the system, at which time Windows® should boot back up normally. NOTE If your internal storage drive for errors or defragment the drive.... If so, consult Windows® Help and Support. 2 Pull the latches away from the memory module. The computer could... following screen may need to scan your system has the memory modules stacked on the power: If "Start Windows® Normally" is suggested, this could hang up slightly. The memory module pops up the next time...
User Guide
Page 53
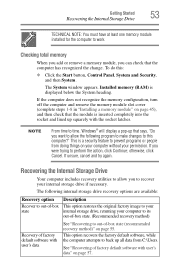
... you want to allow you were trying to work. otherwise, click Cancel. This option recovers the factory default software, while the computer attempts to time, Windows® will display a pop-up squarely with user's data See "Recovering to prevent programs or people from C:\Users. This is displayed below the System heading... Internal Storage Drive TECHNICAL NOTE: You must have at least one memory module installed for the computer to perform the action, click Continue; The System window appears.
... you want to allow you were trying to work. otherwise, click Cancel. This option recovers the factory default software, while the computer attempts to time, Windows® will display a pop-up squarely with user's data See "Recovering to prevent programs or people from C:\Users. This is displayed below the System heading... Internal Storage Drive TECHNICAL NOTE: You must have at least one memory module installed for the computer to perform the action, click Continue; The System window appears.
User Guide
Page 54
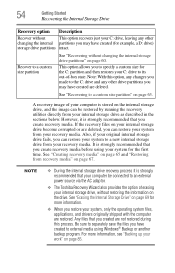
... stored on page 69 for example, a D: drive) storage drive partitions intact. It is strongly recommended that you create recovery media before using Windows® Backup or another backup program. See "Erasing the Internal Storage Drive" on the internal storage drive, and the image can be connected ...drive recovery process it is strongly recommended that you have created to an external power source via the AC adaptor. ❖ The Toshiba Recovery Wizard also provides the option of erasing your recovery media. Any files that your computer be restored by running the recovery ...
... stored on page 69 for example, a D: drive) storage drive partitions intact. It is strongly recommended that you create recovery media before using Windows® Backup or another backup program. See "Erasing the Internal Storage Drive" on the internal storage drive, and the image can be connected ...drive recovery process it is strongly recommended that you have created to an external power source via the AC adaptor. ❖ The Toshiba Recovery Wizard also provides the option of erasing your recovery media. Any files that your computer be restored by running the recovery ...
User Guide
Page 55
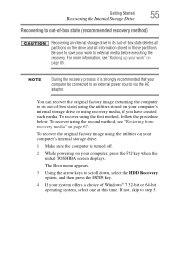
...If not, skip to scroll down, select the HDD Recovery option, and then press the ENTER key. 4 If your system offers a choice of Windows® 7 32-bit or 64-bit operating system, select one at this time. Getting Started 55 Recovering the Internal Storage Drive Recovering to out...executing the recovery. You can recover the original factory image (returning the computer to save your computer, press the F12 key when the initial TOSHIBA screen displays. To recover the original factory image using the utilities on your computer's internal storage drive: 1 Make sure the computer is strongly...
...If not, skip to scroll down, select the HDD Recovery option, and then press the ENTER key. 4 If your system offers a choice of Windows® 7 32-bit or 64-bit operating system, select one at this time. Getting Started 55 Recovering the Internal Storage Drive Recovering to out...executing the recovery. You can recover the original factory image (returning the computer to save your computer, press the F12 key when the initial TOSHIBA screen displays. To recover the original factory image using the utilities on your computer's internal storage drive: 1 Make sure the computer is strongly...
User Guide
Page 58
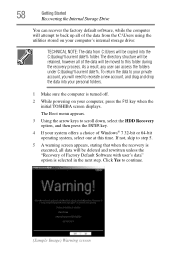
... attempt to scroll down, select the HDD Recovery option, and then press the ENTER key. 4 If your computer, press the F12 key when the initial TOSHIBA screen displays. Click Yes to recreate a new account, and drag and drop the data into the C:\backup%current date% folder. The Boot menu appears.... choice of the data will be retained, however all data will be copied into your personal folders. 1 Make sure the computer is executed, all of Windows® 7 32-bit or 64-bit operating system, select one at this folder during the recovery process. If not, skip to this time. To...
... attempt to scroll down, select the HDD Recovery option, and then press the ENTER key. 4 If your computer, press the F12 key when the initial TOSHIBA screen displays. Click Yes to recreate a new account, and drag and drop the data into the C:\backup%current date% folder. The Boot menu appears.... choice of the data will be retained, however all data will be copied into your personal folders. 1 Make sure the computer is executed, all of Windows® 7 32-bit or 64-bit operating system, select one at this folder during the recovery process. If not, skip to this time. To...
User Guide
Page 61
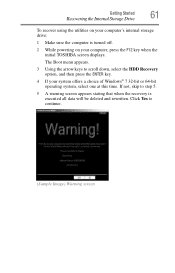
... skip to step 5. 5 A warning screen appears stating that when the recovery is turned off. 2 While powering on your system offers a choice of Windows® 7 32-bit or 64-bit operating system, select one at this time. Click Yes to scroll down, select the HDD Recovery option, and then... press the ENTER key. 4 If your computer, press the F12 key when the initial TOSHIBA screen displays. Getting Started 61 Recovering the Internal Storage Drive To recover using the utilities on your computer's internal storage drive: 1 Make sure the ...
... skip to step 5. 5 A warning screen appears stating that when the recovery is turned off. 2 While powering on your system offers a choice of Windows® 7 32-bit or 64-bit operating system, select one at this time. Click Yes to scroll down, select the HDD Recovery option, and then... press the ENTER key. 4 If your computer, press the F12 key when the initial TOSHIBA screen displays. Getting Started 61 Recovering the Internal Storage Drive To recover using the utilities on your computer's internal storage drive: 1 Make sure the ...
User Guide
Page 63
... to external media before executing the recovery. To recover using the second method, see "Backing up your computer, press the F12 key when the initial TOSHIBA screen displays. The Boot menu appears. 3 Using the arrow keys to restart the computer. You can resize and recover the C: drive using recovery media, if... partition" option restores your C: drive to a custom size partition deletes all partitions on page 85. Recovering to a custom size partition Recovering to its out-of Windows® 7 32-bit or 64-bit operating system, select one at this time.
... to external media before executing the recovery. To recover using the second method, see "Backing up your computer, press the F12 key when the initial TOSHIBA screen displays. The Boot menu appears. 3 Using the arrow keys to restart the computer. You can resize and recover the C: drive using recovery media, if... partition" option restores your C: drive to a custom size partition deletes all partitions on page 85. Recovering to a custom size partition Recovering to its out-of Windows® 7 32-bit or 64-bit operating system, select one at this time.
User Guide
Page 68
...computer. For more information on these options, see "Backing up your work" on page 85. When the initial TOSHIBA screen displays, press the F12 key on your computer is executed all data on your internal storage drive will ...be deleted and rewritten. Click Yes to continue. 6 When the Toshiba Recovery Wizard opens and the Selecting a Process screen displays, select Recovery of Factory Default Software and then click Next... DVD into your optical disc drive. ❖ If your recovery files are using Windows® Backup or another backup program.
...computer. For more information on these options, see "Backing up your work" on page 85. When the initial TOSHIBA screen displays, press the F12 key on your computer is executed all data on your internal storage drive will ...be deleted and rewritten. Click Yes to continue. 6 When the Toshiba Recovery Wizard opens and the Selecting a Process screen displays, select Recovery of Factory Default Software and then click Next... DVD into your optical disc drive. ❖ If your recovery files are using Windows® Backup or another backup program.
User Guide
Page 75
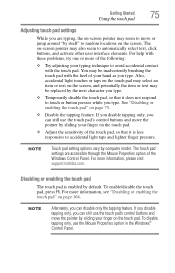
... the tapping feature. Getting Started 75 Using the touch pad Adjusting touch pad settings While you are accessible through the Mouse Properties option of the Windows Control Panel. The on page 164. For help with the heel of the touch pad, so that it is enabled by sliding your finger on... the touch pad, so that it does not respond to touch or button presses while you can still use the Mouse Properties option in the Windows® Control Panel. You may be inadvertently brushing the touch pad with these problems, try one or more information, please visit support...
... the tapping feature. Getting Started 75 Using the touch pad Adjusting touch pad settings While you are accessible through the Mouse Properties option of the Windows Control Panel. The on page 164. For help with the heel of the touch pad, so that it is enabled by sliding your finger on... the touch pad, so that it does not respond to touch or button presses while you can still use the Mouse Properties option in the Windows® Control Panel. You may be inadvertently brushing the touch pad with these problems, try one or more information, please visit support...
User Guide
Page 78
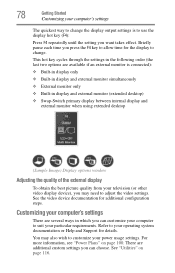
... display and external monitor (extended desktop) ❖ Swap-Switch primary display between internal display and external monitor when using extended desktop (Sample Image) Display options window Adjusting the quality of the external display To obtain the best picture quality from your television (or other video display device), you can customize your...
... display and external monitor (extended desktop) ❖ Swap-Switch primary display between internal display and external monitor when using extended desktop (Sample Image) Display options window Adjusting the quality of the external display To obtain the best picture quality from your television (or other video display device), you can customize your...
User Guide
Page 82
... This precaution is especially important for viruses. Using the keyboard Your computer's keyboard contains character keys, control keys, function keys, and special Windows® keys, providing all new files for files you will lose all the data on page 153. ❖ Use Error-checking and ... from or writing to external media on a regular basis. Turning off backing up your desktop setup, during its shutdown procedure. NOTE The Windows® operating system records information, such as new icon positions may damage the disk, the drive, or both. If you have a separate...
... This precaution is especially important for viruses. Using the keyboard Your computer's keyboard contains character keys, control keys, function keys, and special Windows® keys, providing all new files for files you will lose all the data on page 153. ❖ Use Error-checking and ... from or writing to external media on a regular basis. Turning off backing up your desktop setup, during its shutdown procedure. NOTE The Windows® operating system records information, such as new icon positions may damage the disk, the drive, or both. If you have a separate...

User Guide
Page 83
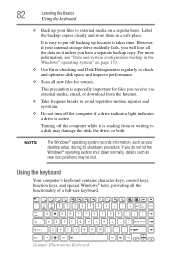
For example, F5 turns the touch pad ON/OFF. Special Windows® keys Windows® key Application key (Sample Illustration) Special Windows® keys Your computer's keyboard has one key and one button that : ❖ The space bar creates a space character instead of ...Using the keyboard Character keys Typing with the character keys is very much like typing on a typewriter, except that have special functions in Windows®: ❖ Windows® key-Opens the Start menu ❖ Application key-Has a similar function as the secondary mouse button Function keys marked with the...
For example, F5 turns the touch pad ON/OFF. Special Windows® keys Windows® key Application key (Sample Illustration) Special Windows® keys Your computer's keyboard has one key and one button that : ❖ The space bar creates a space character instead of ...Using the keyboard Character keys Typing with the character keys is very much like typing on a typewriter, except that have special functions in Windows®: ❖ Windows® key-Opens the Start menu ❖ Application key-Has a similar function as the secondary mouse button Function keys marked with the...


